Roof trims. Do-it-yourself selection, manufacture and installation of platbands on windows
Making your home memorable and beautiful is the dream of any owner. If the house is no longer new, it is not so easy. One of the possibilities is carved platbands. They even turn an ordinary “box” into a masterpiece.
Trim material
Carved platbands are made mainly from coniferous wood. The best option is pine, it is normally cut, inexpensive, and durable due to the high resin content. In principle, you can use any other coniferous board, but it is better not to try with a spruce board: it is too fibrous, it cannot be cut even with the sharpest tool.
You can also make carved architraves from hardwoods - linden (the softest), poplar, maple, oak, cherry, etc. But with each breed you need to be able to work, fill your hand and there is no guarantee that something digestible will turn out, and hardwood is expensive. Therefore, platbands are made on windows more often all the same from pine. You just need to pay attention to the quality characteristics.
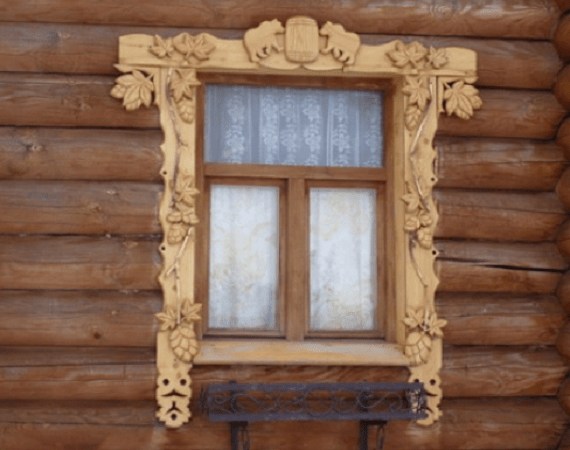
Carved platbands on the windows - a way to make your home unique
If there is wood or a board that has lain for 3 years or more, you can use it: it is already dry for sure, only processing and calibration will be required. If there is no woodworking equipment at home (thickness gauge and circular saw), a cutting board will be needed. Under carved platbands, wood of the first or highest grade is suitable. This means that there should be no knots, chips, resin pockets on the board. Take wood chamber drying, with a moisture content of not more than 8-12%. This is not for sale in the markets; you need to look for it at sawmills and hardware stores.
Why chamber drying? Because it is dried in a special chamber, quickly removing moisture. At the same time, part of the boards cracks, bends - these go to rejection, the rest are sold. If you make carved architraves from chamber-dried wood, they will definitely not be warped and they will not crack.
Instruments
To make carved platbands with your own hands, you will need the following minimum set:
- drill with a set of drills;
- electric jigsaw with a soft start and a bunch of different saws for wood;
- chisels;
- sandpaper with grains of different sizes;
- petal disk from sandpaper for wood on a drill.

To reduce the time it takes to create carved patterns and polishing, it is better to have a router and grinder.
One by one or in bulk?
Carved platbands usually consist of repeating elements. At least two vertical slats on each window are made the same. And since several windows are usually designed, a lot of identical elements are required. If you are going to make platbands slotted, naturally there is a desire to cut several pieces at the same time, folding the boards in a pile and somehow fixing them.

The desire is understandable, but difficult to implement, and the benefits over time are not as great as it seems. The first difficulty is that home craftsmen usually have jigsaws of not too much power. To cut through several boards, you have to move the file more slowly along the intended pattern. On straight lines, the speed is still tolerable, on curves - low. And, the smaller the bending radius, the slower you have to move the file. If you work with one board, there are no such problems. So in terms of time, the gain, if any, is quite small.
One more moment. Even thick, good, expensive files are rejected with a large thickness of the workpiece. So, when cutting several boards at the same time, the quality of the cut on the bottom (or two) remains a big question.
The procedure for manufacturing a platband with a slotted thread
We transfer the desired drawing using a template to the board (where to get it, how to enlarge it, how to make a template, read below). If necessary, we correct, draw the details well. Next, we describe the procedure step by step.

We remove wood in the slots of the pattern

Since the carving will be looked at from afar, some inaccuracies are not fatal, but it is still worth striving for the ideal.
Making a curved edge
Some platbands have a smooth edge. Then we skip this step. If the edge is curly, you will still have to work with a jigsaw.

If the cut is difficult, not very attractive places may remain. It's not scary, then we will process them where necessary - with chisels, the same jigsaw, emery. When you are satisfied with the result, you can move on.
Finalization
Owners of wooden houses probably know everything about how to process wood. But, just in case, we repeat once again the general rules.

The choice of paints and varnishes is very wide. Suitable for any outdoor use. But keep in mind that opaque paints will have to be updated periodically - once a year for sure. And that means - to remove the old paint, primer, paint again. The situation is simpler with oils for wood - they do not leave a film on the surface of the wood, but are absorbed into the fibers. It is also necessary to update the coating, but just clean it of dust and cover with a new layer. And the processing frequency is less. Cons of oil for wood - higher price, fewer colors.

How to enlarge a template
Simple carved platbands can be made without templates. A few examples will be in the video - it shows how to draw, how to cut. But not everyone can draw more or less complex patterns on their own. It takes skill and talent. The easiest way is to find a diagram, print it in the right size, transfer it to cardboard and cut it out. You will get a template that you can circle.
The second way: draw from a photograph. Not all schemes can be found. Some, especially antique window frames, you will not find anywhere else. If there is at least some drawing ability, they can be copied.

Even such an ornament can be copied ... if you have the skill
You may have questions about how to increase the size of the found scheme or template. There are three options:
- With the help of any graphic editor. The simplest - Paint - is available on any computer running Windows (the "Image" tab, the "Resize image" line, select "centimeters" and put the desired length (height) in the box. The resulting file can be printed. If the printer is small, it may be necessary to split into several pages.They should then be glued together and, according to the resulting drawing, make a template.
- With a photocopy. Copiers have a zoom function.
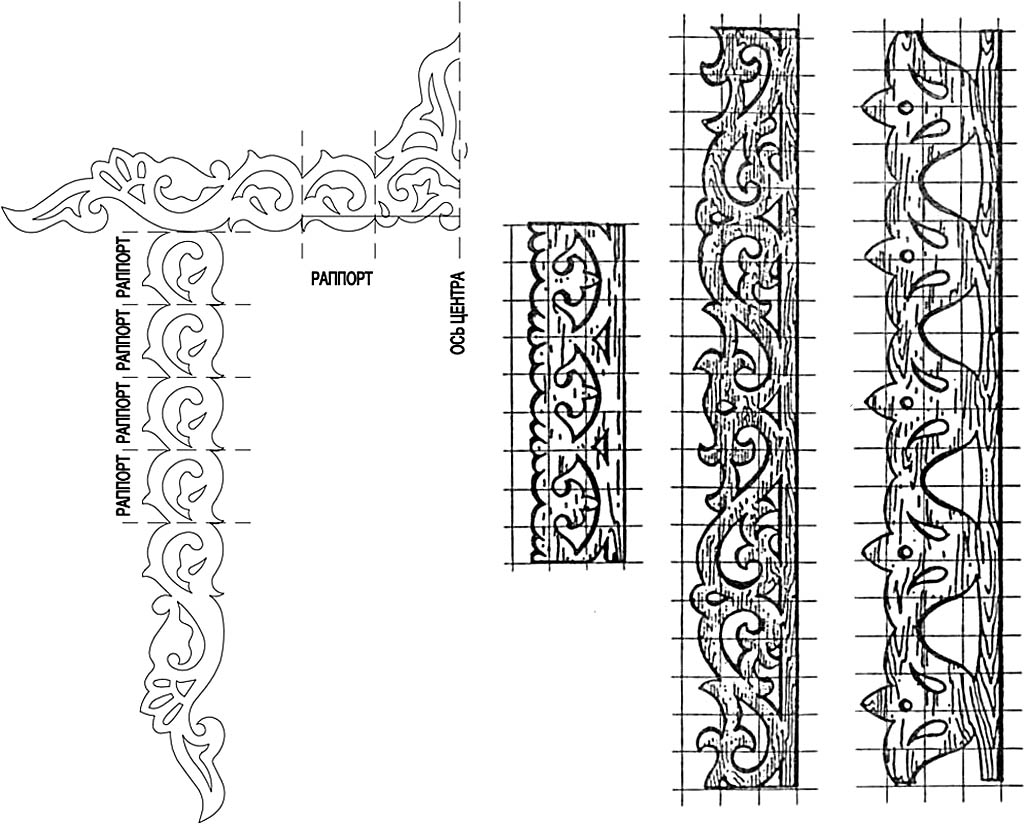
- Taking graph paper, transfer the drawing to the desired scale. To do this, we divide the original image into squares with a side of 0.5 or 1 cm (you can print it on a sheet in a cage). Then we transfer the lines to graph paper, increasing them in the desired proportion.
The first two methods are faster. But when scaling, the picture may turn out to be fuzzy and blurry. It can be corrected by hand, it can be drawn in some editor, for example, CorelDRAW. See the video for how to do this. Just an example of drawing a diagram for a thread.
Related videos
Schemes, patterns, patterns


The style is completely different...
Platbands are called overhead strips framing the window. They have an important function - they hide the gap between the window frame and the wall of the house, thereby protecting the home from drafts, heat loss and moisture ingress. They often serve as an unusual decoration of the house, and in ancient times they were even a talisman against unclean forces.
Carved platbands for windows were popular in our country before the arrival of the Bolsheviks, who considered home decorations to be superfluous. Now the popularity of decorated platbands on the windows has begun to increase again.

Types of platbands
There are many types of platbands that differ in design, material and installation method. By type of installation, they are divided into overhead and telescopic platbands.


Overheads are fastened directly to the window frame with synthetic glue, special spikes, using nails, and telescopic ones are fixed in the space between the window frame and the wall.

materials
For the manufacture of platbands, materials such as wood, plastic and MDF are used.

Wooden platbands on the windows are very practical and will easily fit into any interior. Natural wood lends itself well to processing and a carved pattern will look great on it.

Plastic architraves are practical, convenient and can repeat the texture of wood. They are very budgetary, do not require such careful maintenance as wooden trim, but they also do not look as impressive. Their advantage is resistance to changes in temperature and humidity, which saves them from deformation and increases their service life. The downside will be the scarcity of the choice of color, shape and texture of the platbands.

MDF (medium density fibreboard) trims combine the environmental friendliness of wood and the strength of plastic thanks to a special water-repellent impregnation. Unfortunately, the disadvantage of MDF is the low strength of the material compared to plastic and wood.

There are also metal platbands for sale, but they have a purely functional value and have no artistic value.

Wooden platbands will look harmoniously on the windows of wooden houses, metal ones go well with plastic and metal-plastic front panels, plastic ones will fit under plastic siding, and MDF products are more often used inside the house.


The advantage of using platbands on the windows in the house is the ability to visually expand the window openings and increase the height of the building. When choosing the same ornament of platbands, you can create an integral architectural ensemble on your site.

Making platbands with your own hands
To get a high-quality result of work, it is necessary to choose the right wood from which the platband will be made. For this purpose, a bar made of pine, oak, birch, linden, walnut or alder is used. The wood of fruit trees is also used.

For the first experience in making a trim with a carved pattern, linden, aspen and alder are best suited - they belong to soft-leaved tree species, so even inexperienced people can easily carve a pattern on them. Proper processing of the casing is important - this wood is very hygroscopic and is subject to rapid decay.

A more suitable choice would be hardwood or softwood. Birch and pine have a sufficient margin of safety, while they lend themselves well to processing.

Architraves made of oak and ash (hardwoods) are very difficult for beginners to process due to their increased hardness. They are very reliable and durable, but it is better to entrust the manufacture of platbands from these types of wood to professionals.

Fruit species are well suited for making small details of the casing.


bar
To choose the right timber, you will be helped by a few tips:
- Do not buy a bar with a blue or black tint - this indicates the presence of a fungus in the wood
- Do not buy a third grade tree, the savings will be insignificant, but the quality will be noticeably lower, which will affect the durability of the final product
- Do not take a curved beam - it is very difficult to straighten it.


Usually the thickness of the casing is 20-35 mm. Try to pick up the timber immediately you need the thickness, so as not to waste a lot of time on cutting and processing

The standard timber length is 220 cm, so buy a tree with a margin - you will have a lot of trimmings that are better not to use - the components of the casing will only spoil its appearance and functionality.

Dimensions
The width of the platbands on the windows ranges from 100 to 250 mm. To cut a workpiece of the desired width, nail a bar of different thickness around the perimeter of the window and see from afar which thickness will look more harmonious.

Please note that the trim should go on the frame by 5-10 mm and its upper part can significantly exceed the width of the side and lower parts.

So that your product does not interfere with opening windows, during installation, an indent from the hinges of about 10-20 cm is required, take this into account when measuring.


Thread
To make a pattern on the workpiece yourself, you will need a set of chisels for woodcarving, saws and many other tools. Their set depends on the complexity and type of pattern you choose. At the moment, the appearance of modern power tools greatly facilitates the work.

The most commonly used threading techniques are:
- Through type of processing. In this case, the pattern is sawn through or cut through the tree. These patterns are made using a file and a jigsaw. This technique helps to create an openwork, lace-like product.
- The flat-bladed type is characterized by the creation of a pattern that will be lower than the main background in its level. When choosing such a technique, you will need a knife, semicircular chisels and cutters.
- Relief type. The elements in it are somewhat raised above the rest of the background. To create it, you need the presence of chisels of various shapes.


patterns
To create an interesting design of platbands, you should look for photos of platbands on windows on the Internet. This will allow you to decide on the color, texture and pattern of the intended product.

Now it is easy to find window trim stencils in the public domain. You should not choose complex patterns for the first woodcarving experience. It is important that the same pattern should be depicted on all products.

After you find the wood and stencil that suits you, print the desired pattern in full size and place it on the workpiece, attaching it with buttons.


When placing the stencil, make sure that the thread will go along the grain of the wood, not across. Transfer the pattern to the workpiece and you can start carving. Do not rush, this can ruin the workpiece.

Be sure to carefully sand the resulting pattern, and then remove wood chips and dust from hard-to-reach places with a vacuum cleaner.


Installation
You can attach decorative trim to a wooden frame with self-tapping screws, nails without hats and special spikes. For plastic frames, only liquid nails are used.

Care

As for plastic, metal and MDF platbands, they are unpretentious in their care. Just occasionally repaint them and protect them from corrosion.

Photo of platbands on windows


Specialization: master in the construction of plasterboard structures, finishing work and laying flooring. Installation of door and window blocks, facade finishing, installation of electrics, plumbing and heating - I can give detailed advice on all types of work.
Carved architraves on the windows in a wooden house have been a traditional option for decorating houses for several centuries; earlier, one could even judge the wealth of the owners by them. Nowadays, many modern materials have appeared, but wood products have not lost their relevance and are still popular.
And if you have a wooden house, then the facade should definitely be decorated with a beautiful frame, I will tell you what types it is, and you need to choose the option that suits best.
Types of platbands
I will only talk about wooden products, since it is not serious to put plastic platbands on a house made of wood, it's like clinging cheap stickers to an expensive car: although they are beautiful, they will spoil the impression anyway.
There are several product options, I will not say that one of them is worse or better, each type fits a certain style of the structure and it is important to choose the best solution in each case.
Option 1 - finished products
The industry produces standard platbands, the surface of which can be of different configurations:

| The form | Description |
| straight slats | The simplest option, which is high-quality processed planks with perfectly even corners. Such products are well suited for wooden houses in a modern style, the clarity of the lines allows you to well emphasize the beauty of the tree, and at the same time the frame does not look out of date. |
| Elements with rounded edges | Such products are often used inside houses and apartments when decorating doorways, but they can also be used outside if they are suitable for decoration. In this case, you just need to determine the optimal width of the elements so that the trim looks the best. |
| Semicircular products | This option differs in that it is a convex surface, which is well suited in cases where you need to imitate a log or beam. Products should be chosen carefully, since on oval elements all flaws are very visible. Again, this design is more suitable for modern buildings. |
| Figured platbands | The most interesting of the standard options, the surface in this case is not straight, but figured, and the profile can be very different, as well as the width. This is a kind of compromise for those who do not like other products, but the simplicity of even elements is also not very pleasant. Another plus is the ability to manufacture original products to order, their price will be higher, but you will get a non-standard frame. |

As for the workflow, it is simple, because you buy finished products and can immediately put them to work. The advantage of this option is that the platband can be used both as an external and as an internal one, while the rest are intended only for use on facades.
The instruction for the work looks like this:
- First of all, you need to take measurements to determine how many elements and how long you need. It is better to write down all the data, especially if there are a lot of windows, since you can confuse something and in the end it turns out that you do not have enough material or, on the contrary, there is too much of it;
- When buying, keep in mind that the products come in a standard length (usually 2.2 meters), so you need to calculate how many elements you need, because waste is inevitably generated during work and sometimes there can be a lot of them. Most often, pine products are sold, but if finances allow, look for a larch trim, it is much more durable;

When choosing, pay attention to the surface: it should not be damaged, blue and other defects. Also, the material must be dry, if it is wet, then the casing will deform subsequently.
- The work begins with the preparation of the elements, the dimensions of each are once again precisely measured, after which, using a special device called a miter box, the casing is cut at an angle of 45 degrees. So you get perfectly matching joints, which will significantly improve the appearance of the frame;

- Further, I recommend applying a protective coating to the casing, it is better to do this before installation, as you will be able to process the elements from all sides. In addition, you will not be afraid to stain the walls and the window, which is also important. You can use both paint and special compounds that will not hide the structure of the wood, as long as they are weatherproof;

- The prepared platband can be attached at the place of its installation, this is best done with the help of finishing nails, they are almost invisible and can have different colors to match your coloring. Products are simply exposed and nailed to the end to drive a nail and not damage the tree, use a hammer.

Option 2 - the simplest home-made platbands
If you are looking for an inexpensive and authentic frame for your country window or you love simplicity and natural lines, then this type of product will come in handy. Such products are made by hand and can be of the following types:
- The simplest option is an unedged board with one uneven side, the material is cleaned of bark, polished, and unique elements of an unusual shape are obtained. It is possible in this way to make a platband from an edged board, cutting out irregularities on one side in random order, as a result you will get a very authentic and original design for the window;

- The second option is even simpler: a board is taken and a frame is made with curly ends, they are simply cut as shown in the photo below, and you get a stylish frame. To enhance the effect, you can artificially age the material with sandpaper or burn it with a burner, so the products will look more impressive;

- Another interesting solution is to create a stencil and cut one side in a certain way. You can create any profile and transfer it to the material, and then cut it out with a jigsaw, everything is very simple, but you will get the original frame for the windows.
As for the workflow, it consists of the following steps:

- First you need to find a board of a suitable size and configuration for you, the thickness of the elements can be small, there will be no load on them. Of course, it is best to have processed elements on hand, but a simple board will do, you will have to grind it yourself;
- Manufacturing will not take much effort, you either need to decorate one side, or even cut curly ends. Then the surface is carefully processed with sandpaper, as a result, perfectly smooth elements should be obtained;
- As for the decorative coating, it can be paints and varnishes, the surface can be pre-aged with a plastic or wire brush, which is placed on a drill, it removes soft layers, leaving a textured surface. It is better to apply the protective composition in two layers to ensure maximum reliability;

- Fastening is carried out using finishing nails, their length and number depend on the thickness and weight of the elements. The main thing is to choose the right color so that the fixation points are not visible at all after the work is completed.

Option 3 - slotted platbands
This solution is very different from the two above, both in appearance and in the complexity of manufacturing. This option looks many times more interesting and original, this is a traditional solution in a folk style, which is not suitable for any window.

As for such a casing, I cannot help but note the huge variety of options that you can implement, because you can use ready-made templates, or you can draw your own, your imagination is limited only by the complexity of the work. Too fanciful ornaments are much more difficult to realize, remember this.
Let's figure out how to make such skillful products with your own hands. Do not be afraid, for all the seeming pretentiousness, you will cope with the work without much difficulty. The main thing is to have everything you need at hand and be patient, the manufacturing process may not be complicated, but it takes a lot of time.
We need the following:
- A board of the required length and width, it is better to take already processed options to simplify your work;
- Electric jigsaw - this will be our main working tool, in addition to it, stock up on fine-toothed cutting blades so that the quality of the thread is as high as possible;

- We need a drill with a drill in order to drill holes into which a jigsaw will be inserted and figured cutting is carried out. There are no special requirements, the main thing is that the drill should be wider than the jigsaw blade;
- To make patterns, we will need either ready-made patterns or home-made options, they must be of the required scale so that you simply transfer them to the material without unnecessary troubles.
The workflow looks like this:
- First of all, you need to prepare the workplace, the board should be stably located at a convenient height so that you do not have to work with a jigsaw with one hand and hold the workpiece with the other. You can use clamps or just press the element with something heavy, decide for yourself which is better, based on the working conditions;
- Then you need to pick up a pattern, you can find ready-made options on the Internet, you can draw them on a computer, enlarge them to the desired scale and print them. They can be drawn on paper, or they can be cut out of cardboard - if you will be making a lot of elements, then this option is preferable;

- An important point of the work is the transfer of the pattern to the tree, if you have a cut pattern, then there is nothing complicated, but if on paper, then you need to decide how it is more convenient to markup. You can put ordinary carbon paper under the sheet and simply circle the drawing - you will get an accurate markup, and if you don’t have carbon paper at hand, you can pierce the paper so that you can then draw a pattern on the tree point by point;
- When the markup is over, you can get to work, all the elements that are located along the edge can be cut out like this, but the patterns inside require a different approach. In the place where it is more convenient for you to start cutting, holes are drilled, after which a jigsaw blade is inserted there and the pattern is cut out, the main thing is to be careful, monitor the accuracy of the lines and, if necessary, correct them;

- When the element is completely cut out, it is the turn of bringing the casing to perfection. Sandpaper is taken, and all cutouts are polished, the edges are rounded and the surface is leveled. As a result, you should get a finished element on which there are no protruding wood fibers;

- Then I recommend applying a protective coating to the casing, it is better to do this before installing it, and not after. Coloring can be either monophonic or multi-colored in order to highlight individual parts of the pattern more clearly;
- Fastening can be carried out both with the help of finishing nails and on dowels. This option is done like this: chopsticks are taken, a hole is drilled under them in the casing and in the window frame. After that, the dowel is well lubricated with PVA glue, inserted into the frame, and then placed on the window frame, as a result, the structure is securely fixed and there are no fasteners on the outside at all.

Option 4 - platbands with laid on thread
Another traditional solution that has been very popular for more than one century. This type of product has a number of differences from the previous one:
- The product consists of two parts: a base in the form of a flat or figured board and carved elements that can be located both on the base and on the side of it. This design looks more expressive and voluminous, which is important for those who want to achieve the maximum decorative effect;

- In the manufacture, many small elements can be used, which simplifies the manufacture. You do not need to cut out the entire casing, you can make a composition from several small parts, and in the end you will get just an excellent result;
- You can use different types of wood, if pine or a more reliable option is taken for the base, then it is recommended to use apple or cherry for overhead elements. They are easy to process and with normal processing last a long time. The modern solution is to use plywood for the overlays, this option is good because you can save money, and at the same time cutting will be much easier;
- Another solution is the arrangement of various carved elements in one product, resulting in luxurious openwork frames. The only negative is the complexity of the manufacturing process.

Window carvings of this type are made in much the same way as the above option, so I will only touch on the differences in the workflow:
- First you need to choose the option that you will do, if the base is even, then just cut the board, if it is carved, do it as usual. The top decor can be cut from a board or plywood of small thickness, this will greatly simplify the workflow and speed it up;
If you decide to use plywood, then be sure to choose a moisture-resistant option. Ordinary sheets, even with a good coating, will begin to swell and warp after a couple of years.
- All elements are carefully processed with sandpaper, after which they need to be painted. To achieve the greatest decorative effect, it is recommended to paint the base in a contrasting color to make the pattern even more expressive. Paint the parts before assembling, so as not to burn out later and not to paste over the surfaces, in such elaborate designs it is very difficult;

- Installing platbands in a wooden house on the windows is done in any way convenient for you. You can use traditional dowels, you can use finishing nails, or you can go the easy way and use modern adhesive materials. At one time, I had to glue the casing in the summer cottage due to the lack of other fasteners, about 10 years have passed, everything is holding up just fine.
Option 5 - carved platbands
Without a doubt, this is the most difficult to implement, but also the most luxurious type of window frames. Currently, there are two main types of products:
- Made by hand with cutters, these options are the most expensive, because they are made by hand from start to finish. You can make such a casing on your own only if you have some practice, you will have to master wood carving to cope with the work;

- Platbands made on special milling machines look just great. After all, you can create any pattern or composition on a product, you just need to enter the drawing into a computer program, and it will bring the idea to life. Naturally, units have such equipment at home, but you can order a casing and get it in a matter of days.

As for the workflow, there is no point in talking about manufacturing, carving is the topic of a separate review or even a whole book. Therefore, we will deal with the installation, as this is an important part of the work and any mistakes will lead to damage to the expensive decor:
- Most often, you get finished items without any coating. Often, the wood structure is not closed, and high-strength protective compounds are used. The so-called yacht varnish is well suited, it is resistant to weathering and retains strength and reliability for a long time. It is better to carry out the processing in two layers in order to accurately cover all areas of the surface, pay special attention to the recesses and bends, the composition should get everywhere;
- When the elements dry, you need to try them on and determine the position of each part. If the structure is assembled, then you can immediately drill holes and insert dowels into them, then grease the ends of the fasteners with chalk or something else and gently attach to the surface, there will be points on it where you need to drill holes. This markup option eliminates miscalculations and errors;
- Lastly, the dowels and holes are smeared with carpentry glue, after which the platband is installed in its place and pressed well. This is the end of the job.

Conclusion
The video in this article will help you understand some of the important nuances of the topic even better, because it is worth seeing once than reading a sheet of text. Choose the best solution and implement it, of course, few people can do wood carving, but other options can be implemented without special skills. If you have any questions, write them in the comments below the review.
October 14, 2016If you want to express gratitude, add a clarification or objection, ask the author something - add a comment or say thanks!
When installing plastic windows, many do not even suspect that there are special, simple and concise in appearance, platbands for them. And it’s completely in vain - when placing an order for the installation of such window systems, it is quite possible to immediately coordinate the installation of these elements.
However, this is by no means the only possible solution to the problem. Platbands for plastic windows can also be made of wood and decorated with artistic carvings. If this option is used to decorate the facade of the house, then the window openings will be framed in the same way as Russian masters of wooden architecture have done for centuries.
No need to think that the platbands perform an exclusively decorative role. In fact, they are very functional, and are designed to close the gaps between the window frame and the wall, which in our time are most often sealed with mounting foam. The platbands protect this filling from negative external influences, such as ultraviolet rays that destroy the polyurethane foam, direct moisture, etc.
Platbands and their functions
Briefly, the process of installing a plastic window is as follows:
- If old windows are installed in the openings, they are dismantled, and the vacant opening is cleaned of insulating materials and dirt.
- Then, a plastic frame is inserted into the opening, which is aligned with the building level and fixed on the walls in several places with special metal elements - anchors or plates (underframes). Double-glazed windows are installed and fixed with special glazing beads.
- Further, all the gaps left between the frame and the wall are sealed - filled with mounting foam, closed with special sealing and hydrophobic tapes, etc.
- After the foam hardens, its excess is cut off. Then puttying and installation of slopes is carried out from above.
- And, finally, platbands are installed, which close the gaps filled with foam from the outside or from the inside.

Self-installation of a plastic window is not an easy task.
When installing such a system, it is necessary to provide for many nuances. The process is described in detail in a special publication of our portal.
The standard equipment of a metal-plastic window with double-glazed windows, as a rule, does not include platbands, especially since these finishing elements are not suitable in all cases. For example, if the windows are very recessed into the wall, then you need to choose very narrow platbands, or install them around the window opening. Moreover, in the second version, they will serve exclusively as a decorative element, therefore, they are installed only at will.
However, it should be noted that platbands have their own advantages, which attract many owners of private houses:
- Accuracy and aesthetic appearance of windows.
- In its own way - a certain exclusivity of the design of plastic standard windows, since, nevertheless, most owners do not use these elements of facade decoration.
- And the functionality already mentioned is the protection of the sealed gap from the influence of the external environment.
It should be noted that there are platbands designed for finishing windows and from the inside. Such products are usually intended only for decorative design, therefore, they are purchased mainly in cases where the interior of the room needs to be kept in a certain style. For example, such a design is suitable for a "rustic Russian" style or "country" - both of these trends have been actively coming into fashion lately.

Varieties of platbands in shape and material of manufacture
Platbands for plastic windows can be of various types and profiles, made using a variety of materials:
- Flat slats made of plastic, aluminium, polyurethane and wood.
 The simplest - platbands in the form of flat plastic strips
 Most often, platbands that are flat in shape are used to frame plastic windows, since they are simply mounted, create a neat look, are easy to maintain and have the most affordable price of all existing configurations.
- Carved platbands, which are made of plastic or natural wood.

This version of the parts are made, mainly, by individual order from wood, and therefore are very expensive. Plastic options for carved window frames are not easy to find in hardware stores, since their mass production is far from being organized everywhere and not on a large enough scale.
- Shaped platbands can have a smooth semicircular shape or almost flat, but with a relief pattern in the form of stripes of different depths. This type is produced from almost all of the listed materials.

- Profile architraves are made of plastic, wood, polyurethane or aluminium. They have a certain shape in cross section, sometimes made in a rather intricate configuration.
 The peculiarity of profile architraves is a complex shape in cross section
 The choice of platband according to the material of manufacture
It is important to choose the right platband, which would fit in its appearance not only to the window frame, but also to the material of the walls of the facade or its external decoration.
- Plastic options have the most affordable price and a very aesthetic appearance, however, they do not differ in too long service life.

Usually, all manufacturers have in their product range and platbands of the same color as the profile for the frames. Therefore, when placing an order, you can immediately ask what types of decorative platbands can be offered.
As a rule, plastic platbands are made in different colors, but the most popular option is white. After it, “on the ladder of popularity” is brown-chocolate, and other colors follow, which are used much less frequently. Therefore, not all window manufacturers can find a profile of the desired rare shade.

The color of the frames is usually matched to the shades of the walls or the roof of the house, and sometimes the design of the facade is carried out on contrasting principles.
Plastic framing options are produced in sets that are assembled into a single casing on site, or in a finished, solid form, in the likeness of a frame, which remains only to be fixed around the perimeter of the window opening.
There are special plastic profiles for platbands, which are mounted on the wall and snap into place with a special locking joint on the slopes installed around the window. This option allows not only to create a neat frame, but also to securely connect the slopes with the decorative frame of the opening, without any gaps.
- Platbands made of polyurethane also deserve attention, as they are often used to decorate windows.
Profiles made of this material can have a different relief shape, they are light in weight and quite simply adjusted in size and mounted on a window opening or even directly on a window.
Polyurethane framing options are resistant to moisture and sunlight, so they will last a very long time.

This material can be coated with paint, so if you decide to change the facade design, there will be no problems with changing the color of these elements. When painted, polyurethane becomes even more resistant to external influences, acquires an aesthetic appearance and is very easy to clean from dust deposits.
Platbands are also made from expanded polystyrene, which usually have additional internal reinforcement. They are somewhat inferior in quality to polyurethane foam, but they can also be used for both external and internal decoration of window openings with plastic windows.
- Platbands made of natural wood are very durable and beautiful, provided they are well treated with protective compounds. Such parts, with high-quality performance, have a fairly high cost.
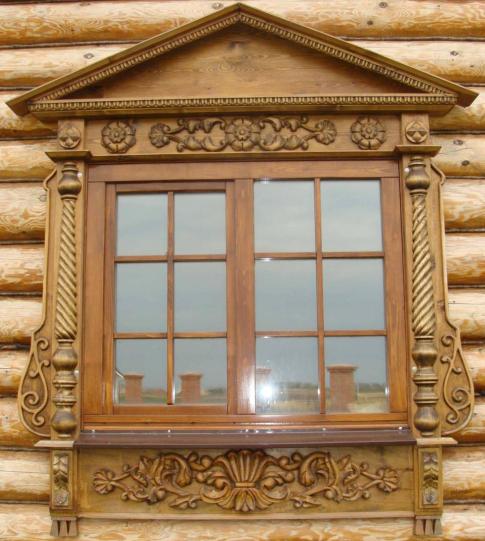
 Wooden platbands are, of course, a "classic" facade decoration.
 Wooden frames for plastic windows are perfect for a house that has wooden walls or finished with a material that authentically imitates wood. As mentioned above, wooden architraves with figured carvings are most often made by hand and ordered individually for each style of the chosen facade design.
Wooden options can be painted in various colors, which are selected depending on other shades present in the overall ensemble, so as to achieve harmony with the facade decoration and the color background of the roof of the house.
The disadvantage of wooden platbands is that they need to be painted much more often than polyurethane - on wood, the paint is more prone to fading.
Installing trim on windows
Platbands are installed in different ways. It depends both on the material of manufacture and on the place of installation, since the window can be recessed into the wall or be in the same external plane with it.
- If the window is deepened into the wall, then they are first mounted around it, which will close the unsightly sections of the wall around the frame that can spoil the overall aesthetic appearance.

To do this, a special plastic starting profile is fixed to the window frame, into which the slope panel will be inserted.
The figure clearly shows the principle of installing a slope in the starting profile, and then a plastic casing.

To join the platbands at the corners, their edges are cut at an angle of 45 degrees. The cuts will be neat and accurate if you follow some recommendations:
- sawing off should be carried out using a special template - a miter box;
 Smooth joints of platbands in the corners are ensured by using a special device for cutting them - a miter box
 - if the miter box is not used, and the casing is sawn off in a horizontal position, then washed down should be carried out from the outside;
- If the platbands have special grooves for fastening them with slopes, then they are simply installed with spikes in them and snap into place.
Video: an example of installing plastic trim - flashings on a PVC window
- In the case of fixing the platbands to the wall surface separately from the slopes, the prepared parts are tried on the window opening, and their location is marked on the wall plane. After that, “liquid nails” or “Moment” glue is applied to the back of the trim panels, and the frame is glued according to the markings. The joints at the corners are also glued together with glue.
 Application of "liquid nails" on the back of the casing
 Wooden platbands are fixed to the walls with dowels or self-tapping screws. To do this, through holes are first drilled in wooden parts, which then expand somewhat from the front side so that the head of the fastener is hidden in the thickness of the wood. According to the markings on the wall, a hole is made where the dowel is installed, and then a self-tapping screw is screwed into it through the casing. The remaining hole in the platband, in which the head of the self-tapping screw “hid”, is sealed with epoxy resin mixed with fine sawdust. Such a putty will make the installation sites of fasteners almost invisible.
Manufacture of platbands
Some craftsmen prefer to make carved platbands on their own. They are cut according to a pre-made template, through which the pattern is transferred to a perfectly processed high-quality board.

You can also make platbands in the form of even panels, which will be very simple to make, but in this case, the board should be flat and smooth. It is treated, and then with water-repellent compounds. Sometimes the wood is darkened with a stain, and covered with yacht moisture-resistant varnish on top.

The choice of wood for platbands
Properly selected wood will greatly facilitate and speed up the work on platbands, so the choice of material must be taken seriously.

It is best to choose wood that is easy to process. So, linden, alder and aspen are well suited for cutting out complex lacy elements of the casing. Do not choose coniferous trees:
- for example, spruce has a large number of knots, which can significantly spoil the pattern;
- pine is an excessively fragile material on which chips may appear during operation;
- cedar and larch, in principle, are well suited for long-term operation of platbands in outdoor conditions, however, they have a very high structural density, so they are difficult to process.
The wood should be moderately dried so that when it dries, the finished parts, on which a lot of effort will be spent, do not deform or crack.
The thickness of the boards for platbands is selected depending on the height of the relief pattern, and can vary from 10 to 40 mm. Therefore, before buying material, you need to decide on the choice of ornament.
If there are small protruding elements in the relief, then it is recommended to make and process them separately, and then paste them in the place provided for them.

If the platbands are not supposed to be painted, then you need to choose boards with a beautiful textured pattern, without a large number of knots, having an even “healthy” structure of one shade, which will be in perfect harmony with the design of the entire facade.
Casing dimensions

Calculations are made as follows:
- The height and width of the window opening are measured - these will be the parameters of the inner perimeter of the casing.
- Then, from the line of the opening, the width of the platband is measured to determine how much it will cover the wall. This is especially important when the window frame is in the same plane as the wall.
- The height of the platband should be equal to the height of the window opening plus two widths of the platband panel. Thus, the calculation is carried out if the horizontal upper and lower bars of the created frame will have the same width as the vertical ones. If the horizontal panels are planned to be made wider, then the vertical ones should have a height equal to the height of the window opening plus the width of the upper and lower sides of the casing.
- The size of the sides of the platband will also depend on which corner joint will be chosen, so before you start cutting the board, you need to carefully consider all the nuances.
Production and processing of wooden platband
The selected pattern is applied to the prepared boards. As already mentioned, it is best to carry out this process using a pre-cut stencil.

If there is no experience in cutting out drawings, then it is better to choose not the most difficult drawing.

When the drawing is completely transferred to the board, you can start cutting it out. For work, an electric jigsaw is used. In each closed section of the drawing, a through hole is drilled with a drill, into which a vertical jigsaw file will be inserted, and from this place this fragment of the board will be carefully, slowly, cut out.
 When cutting out a curly pattern, special care and discretion will be required - any awkward movement can ruin all the work.
 In addition to a jigsaw, you can use a milling cutter for work. It will help smooth out sharp corners in a through drawing, and it is more convenient to cut out some relief elements with this tool.
In order for the pattern on the casing to look aesthetically pleasing and professional, it must be processed with sandpaper, first with medium grain (140 ÷ 180), and then with fine grain (220 ÷ 400). Processing is carried out manually, and to make it less laborious, you must first work well with a milling cutter.
If individual parts of the relief were made separately, then they are fixed with wood glue after all surfaces have been processed. When the glue dries, the entire casing, including all relief elements, is impregnated with antiseptic compounds and also left to dry.
The final stage of work is the coating of all surfaces with a waterproof protective composition for wood. The best option for external details would be to use yacht varnish. Naturally, if desired, or if the facade color scheme is observed, the platbands can be coated with paint of the desired color.
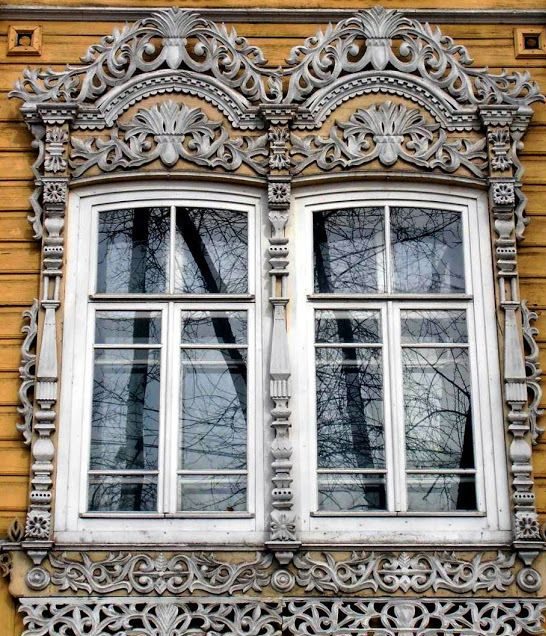
Figured platbands will help to "revive" the look of standard plastic windows
If there is a desire to try your hand at making this facade decorative detail, then it is best to start practicing on pieces of the board, to “fill your hand”. Then, when it starts to work, you can go directly to . Detailed instructions can be found in a dedicated portal publication.
In conclusion, we can summarize that no matter what type of platbands is chosen, they will make the appearance of the facade of the house more aesthetic and neat. In addition, these details will create additional protection for the gaps hermetically sealed with insulation between the window frame and the wall.
The ancient tradition of making and installing carved architraves on windows in a wooden house was remembered relatively recently, when the first boom in the construction of log cabins from logs and timber passed. After living in a new wooden house for several years, the owners almost always begin to treat it as a living creature, so it is not surprising that surprisingly beautiful carved patterns began to appear on the windows and front doors made of wood, serving both as decoration and protection.
Functions and purpose of carved platbands
Most of the experts involved in the culture and history of wooden architectural monuments note that carved architraves on windows, photos, are almost a status thing. A house without carved patterns looks like a wooden hut, even if it is very large and beautifully decorated, with platbands - it turns into a tower.
Traditionally, carved platbands on windows are installed for two purposes:
- Protection of cracks along the perimeter of the window frame from the penetration of rain, snow and wind blowing;
- Additions and decorations of the window opening, the facade of a wooden house as a whole.
For a wooden house, builders traditionally offer wooden window frames or metal-plastic window profiles complete with double-glazed windows. Ordinary PVC plastic architraves can also be ordered in a carved version. It’s just that you most likely won’t be able to choose a pattern or pattern, carved plastic window trims are made according to traditional stamping patterns and only give a handmade look.

Advice! Today, many restoration workshops and firms have at their disposal three-axis milling machines that can automatically cut out a pattern of any complexity from polycarbonate, foam and epoxy plastics.
Such work will be expensive, but the quality of carved platbands for plastic windows will be even higher than manual cutting. It remains to choose a pattern and a pattern.

Rarely any of the owners of the house can tell more or less clearly and reliably about the third task of the window trim. We are talking about protective functions that protect a wooden house from the "evil eye", diseases and uninvited guests. You can relate to beliefs and traditions in different ways, but taking into account the specifics of choosing a pattern for platbands in your home will obviously not be superfluous.
Patterns and figures on carved wooden architraves
It is clear that any self-respecting owner will not hang the first platbands on the windows of a wooden house, the process of selecting a theme and pattern can be delayed, so do not abuse the use of symbols whose meaning is incomprehensible or unknown. If the mystical and culturological part of the carved architraves creates psychological discomfort, carving can be regarded as a way of decorating the window openings of a wooden house.
It was no coincidence that they were invented to decorate carved architraves, and they were carefully stored and transferred almost unchanged. Most master wood carvers cut just like copiers, so you will have to plan and decipher the drawing on your own.
Advice! In any case, before using carved wooden architraves on windows with patterns and pictures of incomprehensible content, it makes sense to try to understand the meanings of carving elements, patterns and figures.
For example, figurines and images of animals have always symbolized positive wishes for the house of prosperity and well-being:
- The serpent or dragon has always signified wisdom and strength to protect the home;
- Birds in flight mean cordiality and friendliness, sitting in the corners - attention to guests and news;
- Fish, deer, bunches of wheat and grapes mean a wish for prosperity.
It was not customary to depict pets and figures of people, especially in the same canvas with climbing plants and flowers.
More modern designs on carved wooden architraves usually have a traditional regular ornament.
It can be intertwined flowers, vine leaves arranged in a regular pattern. In the carved compositions of the 18th-19th centuries, more modern images of columns, porticos and drops, used in the wooden architecture of that era, already appeared.

Most of the carved architraves are ordered from master carvers. If desired, it is not difficult to make carved platbands for windows with your own hands according to templates or ready-made schemes. The simplest lines and drawings can be transferred to a blank and cut out with an engraving nozzle, with more complex patterns you will have to tinker and remember drawing lessons at school.
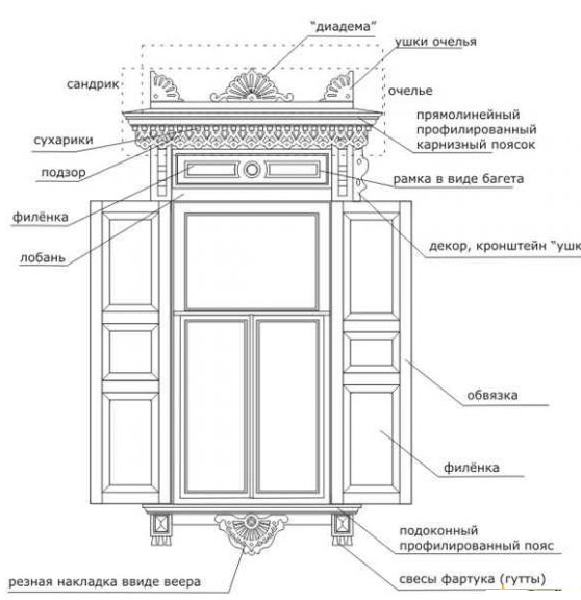
The upper part of the architraves was called an ochelie, this is the most complex and beautiful part of the decor, on the one hand, the ochelie set the general tone of the carved composition, on the other hand, it served as a visor over the window opening. At the top of the composition was a diadem, symbolizing the rising sun, and in the center a medallion or a crown of plants was always depicted. The lower part of the window was covered with a carved apron, usually in the form of an open fan.
If the mystical and culturological part of the carved architraves creates psychological discomfort, carving can be treated simply as a way of decorating the window openings of a wooden house.
The usual intertwined pattern of vines or flowers will be far from any mystical content, while the beauty of the platbands and carvings of the window frame of a wooden house will only intensify. Carved architraves with a regular pattern have a serious advantage over a complex multi-tiered composition:
- Firstly, the patterns of carved platbands for windows are transferred to a wooden or plastic blank much easier and faster than a pattern with a complex multi-tiered composition;
- Secondly, even if you cut out an intertwining vine or edging with your own hands and make small flaws, it will be almost impossible to see them in a patterned field, this is how human psychology works.
Therefore, before making carved platbands on the windows, choose a simple pattern for yourself, with a minimum number of individual details. Even the most uncomplicated pattern on the cladding planks can transform the appearance of a window of a wooden house beyond recognition.

Do-it-yourself options for making carved platbands
Woodcarving has always been and remains a rather expensive undertaking, so instead of buying ready-made platbands cut or stamped on furniture equipment, you can try to make decorative strips with simple patterns with your own hands. At home or in a carpentry shop, you can use one of three methods:
- Transfer the template to the prepared board and cut out the patterns using the engraving kit;
- Cast patterns under a carved platband made of polyester or epoxy resin, followed by painting or finishing with a wood-like laminate film;
- Cut out the overlay pattern of the casing with a jigsaw.
Before you try your hand at making carved platbands, you need to choose the right material. For carving and engraving, hardwoods will be required, beech or oak is good, pine or spruce is a little worse, poplar and aspen are not suitable. To cut an overlay pattern, you can use an ordinary floorboard, but the material should not have knots, defects or complex interlacing of fibers.
Templates for cut-out overlay pattern
To make the simplest patterns, you can use the simplest patterns of intertwining plants, flowers, grapes. In fact, this is a flat tracing paper from more complex carved reliefs. This pattern can be used to decorate the vertical side trims of the casing.

To decorate the window frame, you need to look not for regular, but for single patterns, for example, a composition of symmetrically arranged figures or weaves of plant stems.

The same pattern can be translated into a contour line and turned into a flat ornament, which is quite simply cut out of plywood, boards or even MDF boards.
The most complex relief or three-dimensional patterns are made in typesetting. Initially, ordinary wooden architraves are made from planks, individual elements of the cladding are carefully adjusted to the size of the window and assembled into a finished frame.

All other decorative elements are sequentially cut out of wood, cast from a casting polymer or sawn out of an MDF board, after which they are sanded, primed and glued onto the prepared frame.

Making carved platbands with your own hands
Most often, patterns for window decoration are cut out of waterproof OSB boards in the form of overhead decorative elements. Initially, on tracing paper, a piece of graph paper and with the help of the program, the necessary template for the drawing is developed.


Next, you need to make a working template with which you can transfer the pattern to a wooden substrate an unlimited number of times, photo. To do this, the pattern printed on the printer is glued onto a sheet of fiberboard and cut out with a perforated nozzle for a drill or with ordinary metal scissors.
After marking the wooden blank, you can start cutting the casing. The easiest way is to make cuts with an electric jigsaw on a carpentry workbench.

Along the line of the cuts made, it is necessary to carefully chamfer with sandpaper so that during further processing the front surface of the carved pattern does not chip off. If a sufficiently thin plank was chosen as a blank, then the cut-out carved part of the decor can be glued onto a fabric base.
In the same way, small overhead elements are cut out in the form of rhombuses, squares, rings, braids. After sanding, the cut out elements are turned on an electric grinder with a stone for grinding wood. With the help of a circle, you can simply give a rhombus or any other geometric figure the necessary shape, form faces or transitional curvilinear planes.
After gluing the decor, carved platbands are primed with hydrophobic impregnations and subjected to aging. This is done in order to remove the whiteness of freshly polished wood. For this, solutions of salts of iron, copper, chromium are used. As a result, it is possible to match the color and shade of the carved platband to match the wooden window frame. It remains to open the tree with varnish or oil impregnation and install the carved decor on the window.

Conclusion
Very often, instead of making new decorative elements, the owners of wooden houses prefer to buy old carved architraves, preserved in villages, abandoned houses and buildings. Often, the cost of a set of carved architraves for three windows of a building's facade is cheaper than hand-carving one architraves by a modern craftsman. In some cases, real works of art made by hand by craftsmen of the last century are found among the old decor. Such carved platbands are usually subjected to deep restoration and are installed not on the outer parts of the windows, but inside the room.