Shower head “Tropical rain. Do-it-yourself rain shower: step by step instructions Shower rain step by step installation
The phrase "tropical shower" appeared relatively recently, and for many people it is a mystery and is associated with a lot of questions, the answers to which we will try to find in this article. Together with the website, we will deal in detail with this bathroom device and see what a rain shower is, what it is and how it works, why is it needed and how to make it yourself?
rain shower photo
Rain shower: it's not a luxury, but a unique hydromassage device
Have you ever wondered why children, and sometimes adults, love to run in the rain so much, especially when it comes to warm summer weather? The answer to this question is simple - water purified from all kinds of pollution gives a person a lot of energy, and drops of water falling on the body relax all his muscles. It is this effect that is inherent in the operation of a device called a shower "tropical rain" - this is its complete imitation.
If we are talking about such a device, then in most cases it means a huge watering can installed on the ceiling. The jets emanating from it fall not only on a certain part of the body, but also completely pour over it over the entire surface. You yourself understand that it is unlikely to achieve such an effect with a portable watering can with a hose. In addition, such devices are equipped with a special switch that allows you to adjust the intensity of the "rain" - by setting the lever to one position or another, you can adjust both torrential downpour and rain in the form of large drops of water.

Tropical shower with backlight photo
Shower systems with a rain shower: four types and their differences
Oddly enough, a rain shower can have different manufacturing options - some of them are adapted specifically for, while others are for baths. Even systems designed for the same plumbing fixture may differ in their design. On average, the following types of tropical shower systems can be distinguished.

Studying all these systems and comparing their capabilities and pricing, you can only come to one conclusion - if you want to have a real and high-quality tropical rain shower at home, then do it yourself!
Do-it-yourself rain shower: do-it-yourself technology
Among all plumbing products, it is difficult to find one that can be made easier than a tropical rain shower. Everything here is quite simple and understandable, and most importantly, its manufacture does not require a large number of all kinds of components and mechanisms. In fact, only three things are needed - this is a mixer, a large watering can and water pipes. This system is best combined with a concealed shower faucet, which will control the flow of water not only to the shower, but also to the bath itself. Naturally, due to some features of this shower, it is better to give preference to a concealed mixer.
How to make piping for a rain shower system, see the video.
So, the assembly and installation of a home-made tropical rain shower begins at the stage of wall repair - for it you will need to arrange a strobe system. The center of this system is designed to install a mixer. Four gates must be drawn to this recess - two of them for water supply pipes to the mixer, the third for the pipe supplying water from the mixer to the bathtub and the fourth gate is equipped with a pipe that will supply water directly to the shower head itself.

Do-it-yourself rain shower photo
Having dealt with the strobes, we proceed to laying - it all depends on the type of pipeline you have chosen. Naturally, taking into account the hidden method of laying pipes, it is better to give preference to such reliable systems as copper or polypropylene. From the mixer, the pipe that supplies water to the shower is laid up to the very one, then a little along the ceiling, to the place where the watering can will be installed, and then down a little to go down to the level with the future. Without the latter, it will not work to hide the pipes.
In principle, at this stage of work, this is all - then it continues in full. To complete the work related to solving the issue of how to make a rain shower with your own hands, all that remains is to install a watering can and a mixer control lever. Everything is extremely simple here - the watering can is wound into the outlet of the water pipe in the ceiling with the help of tow or FUM tape. After installing the watering can, the rain shower can be fully used.

How to make a rain shower
In conclusion, I will add only one thing - a home-made rain shower in the manner described above can be installed not only in the shower, but also above the bath. The only thing that will need to be foreseen is that which will prevent water splashing during the reception of water procedures.
A rain shower is a system that mimics rain shower drops in a bathroom. The falling water not only looks beautiful, but also promotes maximum relaxation of the body, reduces stress and has a therapeutic effect. Ready-made solutions have a fairly high cost, so the article will discuss how to create a rain shower with your own hands.
Accessories for work
The rain shower system is quite easy to assemble and requires a minimum number of parts. When buying accessories, pay attention to the diameter of the pipes and their connections - they must all be the same size. If some components differ in diameter, you should stock up on adapters in advance.
To create the shower presented in the article, you will need the following components:
- Plastic pipes, as well as their connections and corners.
 Plastic pipes and connectors
 - Water outlet.

- Nipple.

- A diverter that switches the direction of water flow.

- Rain shower head. Purchased from local sellers or, for cost-saving reasons, ordered from a Chinese online store (for example, Aliexpress). The minimum size is 8 inches (20x20 cm). The larger the watering can, the better it will be to convey the atmosphere of rain covering the entire space.
 Rain shower head
  Rain shower head view from the back

The length of plastic pipes, the number of adapters, joints and angles is calculated in each specific situation separately.
It is recommended to start creating this system during the next renovation in the bathroom due to the fact that it will be more aesthetically pleasing to hide the supply pipes in the wall. In general, the installation process is carried out in the following sequence:
- Pipe laying. It is necessary to pierce the walls in those places where it is planned to install a mixer and a ceiling watering can. Then lay the pipes and connect them to the water supply system.
 Wall chasing and pipe laying
 - Installing a water outlet on the ceiling. A plastic pipe is led to the installation site of the watering can, in the case of a false ceiling, it should not protrude beyond its limits, since this design allows only the element that splashes water to be left on the surface.
 Water outlet on the ceiling
 - Mixer and diverter connection. In this rain shower system, water is supplied through a flexible hose to a diverter, which in turn directs the flow of water to one of the showerheads.
 Connected diverter
  General view of the system in the connected state
 - Ceiling mount installation. The connection procedure is performed using a nipple.

- Further the holes in the tiles are filled with silicone and closed with chrome bowls.
This completes the creation of a tropical shower with your own hands.
 Do-it-yourself rain shower - final result
  Side view
 It is advisable to select a flexible hose from the mixer to the diverter of such a length that it does not sag. As a result, when taking a shower, it is possible to switch to a removable watering can or a tropical one, depending on the current need. If the space is not equipped with a pallet, then it is installed in the floor
Coming home after a hard day's work, we really want to immerse ourselves in an atmosphere of calm and relaxation. This can be facilitated by such a unique invention of English scientists as a tropical shower. What is it and which model to choose? Let's try to understand everything in order.
Kinds
Despite the common name, there are several types of this bathroom equipment.
The main common feature for all is the presence of a large diameter watering can. It is due to this that it seems that you are standing in a real pouring rain, and not in your own bathroom.


Panel
The most expensive option, but also the most effective. The device is a panel from which water actually flows. The shape and size of this accessory may vary. Its unique feature is that it mounts directly to the ceiling or wall.
In fact, if you open the water, you will get the feeling that it is pouring straight from the ceiling. Due to this, such a stunning effect of a tropical downpour is achieved.
An additional plus will be a significant space saving in the bathroom, as the equipment will be hidden behind the wall and ceiling.


This option can be mounted both in the shower and in the bathroom. You may have to turn to specialists, since it can be problematic to make a hidden installation of the system for a beginner. You will only have to enjoy a pleasant procedure that will help restore strength.
Manufacturers offer various options for this device. Some of them are equipped with special lighting, which creates an atmosphere of magic and mystery. Other options built into the wall are equipped with a hydromassage function. As a nice bonus, some models can be equipped with a thermostat.


Rack
This is a more budget and affordable option. Its installation does not require special efforts and knowledge. The equipment is a rack (rod) with a large diameter watering can. The advantage is that you will not need to hold a watering can in your hands. Fix it on the rack in a position convenient for you and turn on the water. The bar itself is securely attached to the wall. When choosing and installing, it is important that the height of the rod is convenient for all family members.
It is this type that is the favorite today. It's all about ease of use, affordable price and the absence of complex additional work associated with installation.
Another advantage is the versatility of the device. It can be easily installed both in the shower cabin and in the bathtub or bowl.


Rain shower faucet
We all at least once in our lives chose a bathroom faucet and imagine what it is. So, next time, pay attention to a model that appeared on the market not so long ago, namely: a faucet with the effect of a tropical shower.
It differs from the usual to us only in the size of the watering can itself. Although he is still far from the "Tropical Downpour" panel. The diameter does not exceed 25 cm. This is larger than the standard size, but smaller than what is offered in built-in models. Of the advantages, you can highlight the low price and the ability to do all the installation work yourself.


Watering can
The easiest and cheapest way to feel what a rain shower is like in a city apartment. For installation of this type, you do not have to break the walls or even change the faucet. Visit a plumbing store and choose a large diameter watering can. Some models will indicate that this is a rain shower, and some may only have a standard article from the manufacturer.
For installation, remove your old watering can, which is attached to the hose and install this model. Tropical rain - fast and cheap. It, of course, does not look as impressive as the panel, but it also costs many times less.


Peculiarities
The classic rain shower is still a built-in panel. The rest of the species are models with the effect of a tropical shower.
Here we will talk about the features of this particular species.
- Watering can shape. It can be round, square or rectangular. There are no special differences between them. They are designed to fit into the interior of any bathroom.
- customizable with silt water flow and various modes.
- Since it is a built-in modification of a conventional shower, it is practically invisible when it is turned off.


Advantages and disadvantages
A rain shower is undoubtedly an interesting and useful device, but is everything as good as the manufacturers tell us about it? Using this innovative product can be somewhat challenging. The obvious advantages include the following facts.
- A wide watering can is more convenient to use than a standard one. When the flow is directed towards the body, it covers a large area.
- Possibility to regulate the force of the flow. Some devices even provide such exotic modes as spring and autumn rain.
- Backlight. According to scientists, light can affect our mood and well-being. In this case, taking a shower will not only be beneficial for health, but will also bring aesthetic pleasure.
- Possibility of self-installation. With a standard set of tools at hand, you can mount this system yourself.
- massage effect. Hydromassage has long been recognized as a healing procedure. By installing a rain shower, you can enjoy it at home every day.


Manufacturers
On the market now you can find models of an expensive price segment of well-known and trusted brands. Such models, of course, will delight you with flawless work for a long time. There are both Chinese and Korean counterparts. You need to be more careful with them. The joy of such a bargain can pass quickly, because it is very difficult to find a high-quality inexpensive model.
- Wasserkraft. A German company that, among other things, manufactures brass rain shower systems. This choice of material for him was not chosen by chance. The thing is that it is a durable material that is not subject to corrosion. This becomes a key point in constant contact with water.
- Grohe. Only high quality materials are used in production. In the product line of this company, you can find innovative and non-trivial solutions.


- Hansgrohe. German manufacturer of bathroom accessories. This company has been on the market since 1901. It is not surprising that for such a long period of time it has managed to establish itself as a reliable manufacturer of high-quality equipment. As befits the Germans, all products are characterized by conciseness, modern design and durability.
- Kaiser. Another German brand that produces household appliances and bathroom equipment. The production is located in China. Therefore, there is no need to talk about purebred German quality.


- Gappo. The company has been on the Russian market relatively recently, since 2002. Produces various types of mixers. The most popular models from this company are those with touch controls.
- frap. Chinese manufacturer, whose models are very similar to those produced by world brands. Belongs to the budget segment of the market.
- Ganzer. Another German brand, but all production is in China. I must say that most users note too high prices and at the same time the low quality of the products themselves.


According to online stores, this is exactly what the rating of rain shower racks by manufacturer looks like. The leader of this rating Wasserkraft specializes in the production of sanitary ware and bathroom equipment. Reliable and proven manufacturer. This is confirmed by the numerous reviews of the owners of their products, posted on special Internet resources.


Installation and Troubleshooting
Depending on the chosen type, the stages of installation of equipment may vary. For such types of rain showers as a watering can and a mixer, particularly complex manipulations during installation are not required.
The most important thing is to choose high-quality components so that during installation and operation you will not be disappointed in your choice.
- Watering can. Just choose the model you like and change your old watering can for a new one.
- Mixer. Replace your old faucet with a new one with a rain shower effect using traditional technology and put the system into operation.
- Rack. Decide whether you will put the rack in the same place where you had a crane or it will be more convenient to move it. In the latter option, it may be necessary to lay additional pipes. If everything suits you, outline the line along which the rack will pass, install the mixer and use it.
- Panel. For this option, it is best to lay pipes at the repair stage. Although, if your bathroom hasn't seen repairs for 10 years, then maybe it's time to think about its cardinal transformation? At this time, you will install this miracle system. It is worth noting that backlit options may require additional laying of an electrical cable or extension cord.

Well-known manufacturers give a long-term warranty on their equipment. Another question is if the system was installed with violations of the installation rules. Another problem may be the low quality of water, which contains various impurities. Heavy metals, salts and other substances can adversely affect the performance of even the highest quality bathroom equipment. What to do?
If the failure occurred due to the fault of the manufacturer (a manufacturing defect was detected), then feel free to contact the service center. In this case, you can count on monetary compensation (refund of the amount paid for the goods) or a replacement with a new model.

Often users complain about the weak water pressure. Do you expect a real tropical downpour in all its manifestations to fall on you now, and instead you observe only a miserable stream that barely oozes through a mountain crevice? Perhaps the whole thing is in the pressure of the water supply itself. It is no secret that with different water supply systems in apartment buildings, there may be an increase or decrease in pressure on different floors. Try contacting the service provider or management company.
Another option may be clogging the holes in the watering can itself. It's also not the fault of the manufacturer. Heavy metals and other sediments build up over time and block the flow of water. It is unlikely that you will be able to solve the problem with water quality overnight, so just disassemble and clean the watering can.


How to choose?
The main criteria for choosing a tropical storm system include several of the most important indicators.
- Brand. Models from global plumbing brands are many times more expensive than Chinese counterparts. But no one can blame them for the low quality of their products. Therefore, if you have already decided to please yourself with a real tropical downpour for a long time, it is better to pay once than to suffer with repairs later.
- Appointment. Before buying, decide whether this system will be installed in a shower or bath. The thing is that the size of a bowl or bathtub can be quite modest compared to the diameter of the shower panel. In this case, drops that will fall on the floor cannot be avoided.
In addition, it is important to understand which option suits you best: wall or upper ceiling.

A design with a wide area of vertical irrigation, similar in appearance to a tropical shower, is commonly called a rain shower. A similar impression was achieved with a wide diameter shower head and a vertical (diagonal) installation.
A characteristic feature of this type of shower system is its static nature with minor adjustments. In other words, it is not possible to adjust or remove the main atomizer. Regulation of this type of shower system is not provided, since the perimeter of spraying water is from three hundred millimeters in diameter - this makes it possible to completely cover a person. With a wide system, such a distance to the shower head prevents comfortable showering due to the fact that an impressive amount of water is selected beyond the boundaries of the shower cabin, and there is a risk of flooding the entire bathroom.


Advantages and disadvantages
A tropical shower system differs from a simple analogue in some exceptional features of installation and further operation. Therefore, it is recommended not to chase modern innovations, but to carefully approach the decision to install a rain shower in your home.
The positive aspects of this system include:
- wide water spray perimeter (dense and uninterrupted water flow);
- in the process of using the shower, your hands are free (no need to guide and hold the shower head);
- exotic look (creating a unique interior in the bathroom, a rain shower is not the most popular option in Russia).


A rain shower has a number of characteristic disadvantages:
- complex and time-consuming installation of a shower system;
- the presence of special technical conditions in the room;
- mandatory use of an additional mixer.


The shower system is fixed to the ceiling or wall surface. Often a design of this type requires a low ceiling and a fairly large space inside the cabin - this will protect the walls from water splashes and the occurrence of fungus.
To use the rain shower, one faucet will not be enough. The fact is that this shower system is designed for use with additional shower racks. The complexity of the installation work lies in the creation of the wiring, namely: a complex system of pipes and preparation of a place for the future installation of the mixer to the wall will be required.


For those who prefer stylish minimalism, it is recommended to install a tropical faucet in the ceiling.


Arrangement of a system for taking a shower
A tropical faucet is not quite a complete option for comfortable, all-round use of the shower, so There are four different ways to fix this:
- install a tropical faucet above the surface of the bath bowl or shower tray;
- install a shower rack;
- complement the tropical faucet with a simple shower head;
- install an additional mixer.


A rain shower system for a bathroom with a mixer is designed in advance or on a finished finished surface. Depending on the mixer model, the hoses are mounted on the wall surface or under its finish (tiles, PVC panels).
Control elements are often located close to the mixing spout. They allow you to adjust the flow of cold and hot water or switch it to another faucet. This method is suitable for any type of bathroom, provided that the hose is located on the surface of the wall surface. Today, finding a wall and ceiling rain shower system is not difficult. The first method is the most practical in connection with saving water and space.


The rain shower column with faucet does not have an outlet for normal water supply. Outwardly, such structures look like ordinary shower racks with static watering cans, there is another option with an additional manual watering can. This option is applicable both in the shower cabin and in the homemade shower. And it also has a number of distinctive features: hydromassage function, lighting, the presence of a thermostat to select the desired temperature.


Installing an additional shower head with an existing tropical faucet can be done both in a regular shower cabin and above the surface of the bath bowl. The only drawback of this model: you need to hide the hose from the rain shower head. Based on a shower head. The tropical looking watering can is used as a nice addition that makes the bathroom more functional and more inviting. Some models require the installation of only one watering can - the top one. It can be used to bathe children or pets.
Not the most aesthetic, but less time-consuming option is the installation of a free-standing mixer. Very often used for the bath: in addition to the shower head, a simple mixer is needed to fill it. Installation takes place on a common pipe system, or a separate liner is made.


How to choose?
A tropical shower bar for the bathroom is available on the shelves of all hardware stores. When buying, pay attention to the dimensions of the products, the manufacturer, whether there are different options, and also what materials the product is made of.

Dimensions
The parameters are individual and directly depend on the perimeter of the bathroom. Removal and watering sizes are among them. For static shower heads that are fixed to the wall surface, a large extension will create difficulties in operation. The dimensions of the watering affect the width of the shower head: the wider the watering, the larger the diameter of the watering can. For watering cans intended for fastening to a ceiling surface, there are only one dimensions, one size. The extension length for such a model is set during installation, it is not recommended to make it less than fifty millimeters from a nearby wall.
Important: when choosing the dimensions of watering, be sure to consider the size of the shower or bath bowl. The dimensions of the removal are in response to the comfort of operation, because the larger it is, the farther it should be located from the walls.

materials
Depending on what materials were used for manufacturing, the cost of a tropical watering can and all its components may vary. Budget products made from metal powder or coated with a thin layer of aluminum plastic are most susceptible to mechanical stress. They crack and break more often.
More expensive models made of an alloy of copper and aluminum, is just a concession to design ideas. Externally, the products have high aesthetic qualities, but there is very little practicality in them. Copper under the influence of a constant flow of water and oxygen will quickly begin to oxidize.


The manufacturer prudently covers copper faucets with a specialized protective film. But soon after the damage, copper oxide is formed, which is expressed by an abundant dense coating of a green tint. The most practical of all the options proposed by the manufacturers will be a faucet made of pure stainless steel or with a chrome surface. Galvanized products are lightweight, low cost and high strength. Products from zinc are undemanding in leaving. They are not as susceptible to oxidation as copper.


Manufacturer
The more famous the manufacturer, the higher the cost of production. This is a kind of quality guarantee. After all, a large brand cares about its reputation and is more careful about the release of quality products. It is recommended to pay attention to the manufacturer, especially if you are planning to update and completely change the interior of the bathroom. Quite often, manufacturers produce lines of sanitary ware designed in the same tone and color scheme, which create a single ensemble.
Among the manufacturers of a shower with a “rain” spout, we can distinguish companies Bravat Phillis and Kaiser. Reviews about their products are mostly positive.


Hydromassage function
Shower panels with hydromassage function and rain shower are additional features that make the shower multifunctional. Water massage is circular, located separately on the wall surfaces of the shower and point in the presence of the main diffuser in the shower. The latter option is extremely popular, as it does not require additional installation work. As for the cost and laboriousness of the installation, they are much lower, but the usefulness of such a hydromassage is extremely small. A high-quality hydro massager is circular. But it is rarely found on the shelves of plumbing stores.
The hydromassage option is installed exclusively in shower cabins; in the bathtub, the Jacuzzi function is used.


Backlight
An important attribute of any shower cabin is the backlight. Light sources are installed on control panels or mounted on the surface of the shower head. At first glance, this may seem inconvenient and impractical, but the vertically incident light illuminates the entire area of the shower.
LED or halogen lamps are used as light sources. The LED lamp is a safe and budgetary way to additionally illuminate the shower cabin. It is quite bright and does not need a complete repair when it fails. Halogen lamp is replaced with a new lamp if damaged.

The installation process for rain showers and experience showers is highly project specific. The main role is played by the material of the ceiling and how you want to position the shower - build it into the ceiling or just hang it on a pipe.
Suspended rain shower installation

Decorative bracket
The easiest way to install a rain shower is to screw it onto a mixed water pipe coming down from the ceiling or onto a wall bracket. In the first case, the pipe can be aesthetically removed through any type of decorative ceiling using a special decorative bracket.
It is worth starting work on installing a rain shower with meal planning (if you have a backlit model). Power supplies are one of the most frequently failing electronics elements, as they take on the load from power surges. In this regard, we advise planning the location of the shower power supply in such a way that, in the event of a breakdown, it can be easily accessed. Our rain showers have a standard cable length of 3m, but can be extended upon request. Therefore, you can, without any restrictions, choose a convenient place for the location of the outlet from which the shower will be powered.
Also, if the model you have chosen does not have the included backlight control panel, then the socket into which the shower will be turned on should be controlled using a switch - otherwise the rain shower will glow around the clock.

Bracket for fixing the shower on the wall
It should be noted separately that for your safety, when placing a socket under the ceiling in the bathroom itself, it is better to choose a special version for rooms with high humidity.
If you have a decorative ceiling in your bathroom, then you should provide two holes in it - one with a diameter of at least 25mm for the outlet of a pipe with water and another 15mm for the outlet of the power wire. After the electrical and plumbing wiring is done, you can turn on the power supply to the outlet and hang the shower. In this case, you should start by winding the shower onto the pipe and only after that connect the backlight wires.

So, to install a rain shower in a hanging version, you must:
- Bring up the 1/2 ″ pipe with mixed water;
- Make a socket for powering the shower - so that it and the power supply can be accessed after the repair is completed;
- If you have a decorative ceiling, then make a hole in it for the wire that feeds the backlight;
- Connect the power supply to the socket, bring the end of the backlight wire through the hole in the ceiling;
- Screw the shower onto the pipe;
- Connect the lighting wires.
Flush ceiling installation
This is both a more time-consuming and effective installation method - the rain shower looks like a thin overlay on the ceiling and does not stand out in the overall interior of the bathroom. This installation method is compatible with absolutely all types of decorative ceilings - stretch, plasterboard, slatted, cassette.

Now this setup has been greatly simplified by the advent of special. Thanks to the presence of mounting holes, the frame can be easily fixed behind the decorative ceiling.
In this case, it is worth starting the installation of a rain shower from the water supply to the ceiling. Please note - if you are going to install a shower using a frame, the eyeliner must be flexible! To do this, use high-quality metal-plastic pipes, or - even better - corrugated stainless steel pipes.
Basic options for mounting the frame
- Fastening the frame to the concrete ceiling with perforated steel strips. The main disadvantage of this method is that the metal strips are quite flexible and the frame suspended from them will move freely like a pendulum in one of the horizontal planes. Because of this, this installation method is recommended only for plasterboard ceilings - this way the rain shower will hold securely in the hole made under it. For convenience of perception, the decorative ceiling is not shown on the image (it should be no more than 7mm below the frame).
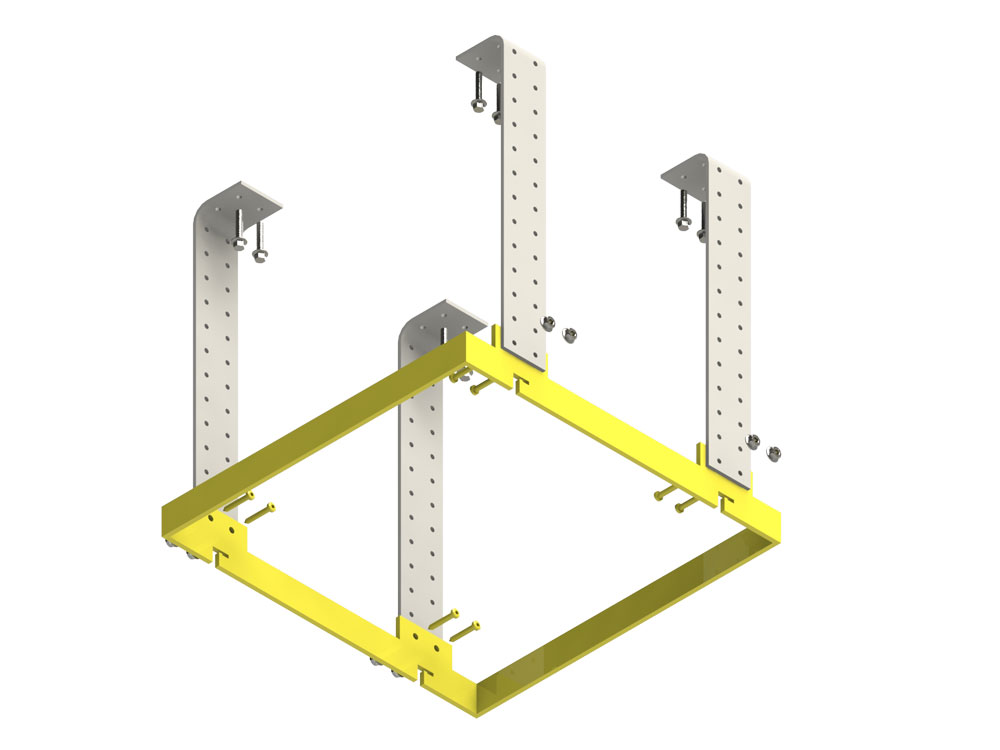


note- when installing the frame, check its horizontal level. If the rain shower is tilted in any direction, the water from it will not flow evenly, worsening the impression of water procedures.

Important also take into account that during installation it is better to orient the frame so that the grooves into which the shower will “drive in” look in the direction opposite to the water supply. This is necessary so that jerks of water pressure do not knock the shower out of the frame after installation.
Installing a rain shower in a frame
After the frame is installed under the ceiling, and a flexible pipe is connected to the shower, the shower can be installed in the frame. Beforehand, you only need to connect the wires coming from the power supply and the shower.
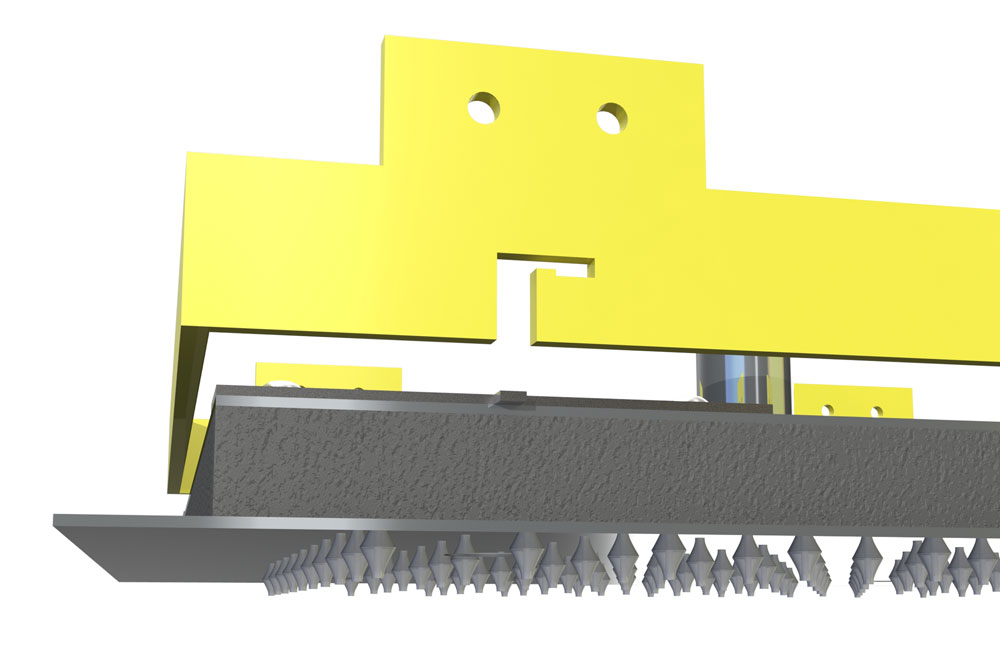
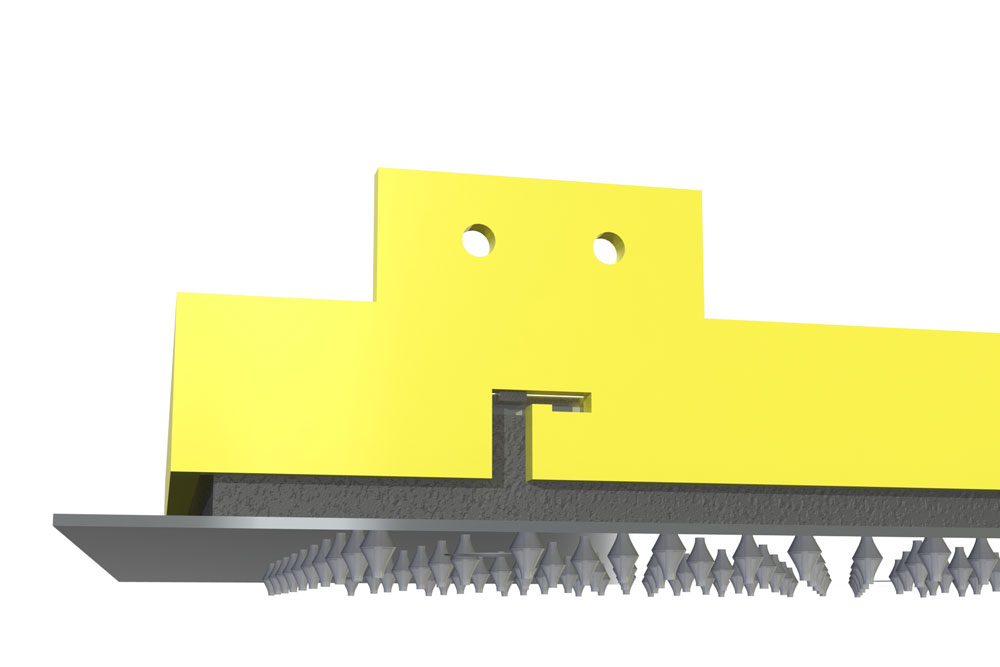

After installing the rain shower into the frame, there will be a gap of 1-2 mm between the ceiling and the face of the rain shower. For a more reliable fixation of the shower in the frame, we advise you to tightly lay this gap with a synthetic rope (any rope made of synthetic material will do - the main thing is that it does not decompose from moisture). This will ensure that the shower is firmly fixed in the grooves and a guarantee that it will not be knocked out of them by vibrations of the pipe when water enters. This is especially true when, after turning off the water, the flow is mixed with air through the pipes, creating strong vibrations.
So, the process of installing a rain shower flush with the ceiling consists of the following steps:
- Lead a 1/2″ pipe with mixed water under the ceiling. The pipe does not have to be placed above the installation site of the shower, as it will be connected to it with a flexible connection.
- Attach a flexible liner to the pipe - metal-plastic or corrugated stainless;
- Make a socket for powering the shower - so that it and the power supply can be accessed even after the repair is completed;
- Make a hole in the ceiling to fit the size of the installation frame;
- Plug the power supply into a power outlet and lead out the wire from it through the hole in the ceiling;
- Fix the frame under the ceiling using one of the methods proposed in the article, orienting it with grooves in the direction opposite to the water supply;
- Connect the wire from the shower and from the power supply;
- Attach a flexible eyeliner to the shower;
- Insert the shower into the installation frame, sliding it to the limit along the grooves;
- Strengthen the gap with a synthetic tourniquet.