Swan from a 5 liter plastic bottle. Do-it-yourself swan from plastic bottles: creating a composition
The graceful bird has always fascinated with its grace. It became possible to place a symbol of fidelity in your garden, having available material at hand for everyone. Information on how to make a swan from plastic bottles, offered in three options, will allow everyone to choose the most appropriate way.
Swan planters from bottles
Crafts based on plastic bottles differ in different categories of complexity. A step-by-step guide will help even a novice master to cope with the task of decorating a swan. The main thing is to be patient. One bottle of 5 liters and a lot of white plastic containers with a volume of 1 liter are the main material of a spectacular craft. You will also need:
- metal rod for the swan's neck;
- fishing line, adhesive tape and thin wire for connecting individual parts;
- metal mesh serving as the base of the wings.
Preparation of individual parts
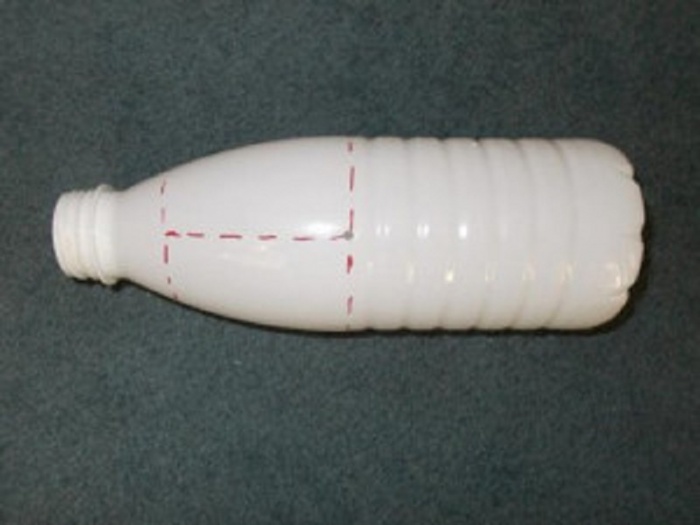
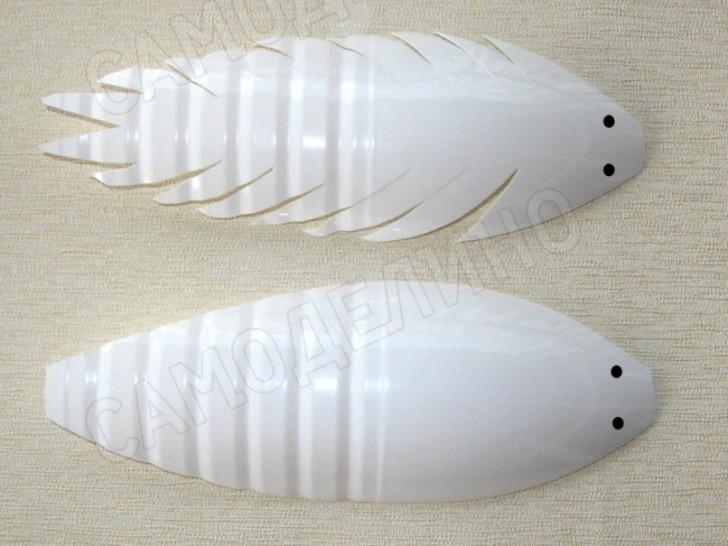
Making a swan precedes the preparatory stage. Work begins with the cleaning of plastic bottles from the remnants of labels and glue. On a clean container, markings are made according to the photo. The upper line is drawn 2 cm below the neck, the lower line is 1 cm higher than the corrugated part of the plastic bottle. There is a perpendicular line between them. The cut is made as straight as possible.
For the neck, parts from plastic bottles with a neck are cut into 6 parts, cylindrical elements are divided into 8 fragments.
Attention! All corners on the blanks are rounded, 3 paired holes are formed at the base of the petals.
A neat swan head is obtained from a 0.5 liter plastic bottle as follows:
- the neck with the cork is removed;
- on a cone-shaped section, an incision is made along the seam;
- all other incision lines go with a gap of 0.5 cm;
- the ends of the clothespin, which will play the role of a swan's beak, are melted over the fire;
- holes are pierced on them with an awl, holes are formed at a similar distance in a plastic bottle.
The basis of the swan's body is a 5-liter container, on the bottom and lid of which holes are made to fix the neck. The opening on the side should allow the hand to easily get inside the container.
Assembly process
When the individual elements of the swan are decorated, you can proceed to the assembly of parts:

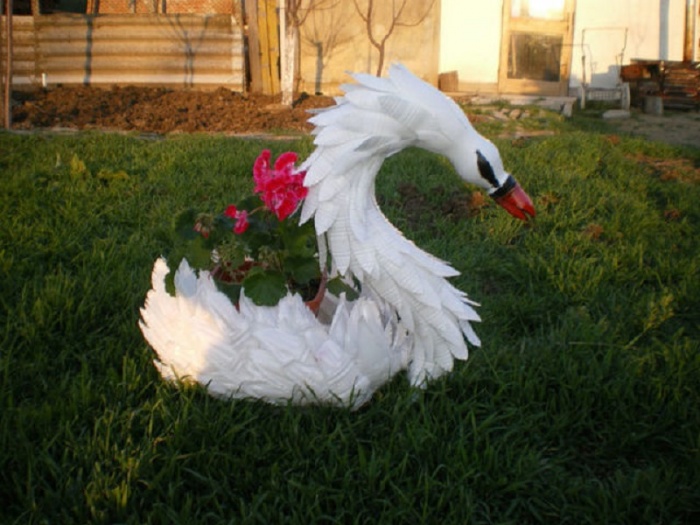
The result of a painstaking process will be a spectacular swan made of plastic bottles, similar to the photo below:


Combination with tire
There is another interesting and affordable option for making a bird with a majestic neck bend.
Frame
According to the proposed master class, a swan made of plastic bottles will turn out to be no less bewitching. The main difference is that the function of the trunk is performed by a tire with a diameter of 50-55 cm.
Hull shaping:
- The cover is cut in half. Work carefully so as not to injure yourself with the cord.
- One part is shortened by 10 cm.
- Both parts are connected in the shape of an egg about 45 cm wide and securely fixed.
The result will be the workpiece shown in the photo:

Head
Making a swan head:
- The basis of the part is polystyrene 20x12x10 cm.
- The head with the beak, after cutting out, is carefully polished with sandpaper.
- A 5 cm deepening is prepared at the back of the head to fix the neck.
- The swan's head is evenly treated with putty.
- After the solution has dried, the surface is polished with paper of a finer grain size.
- The workpiece is coated with white, black and blue paint. An example is the following photo:

Neck
The process of creating a bird neck based on plastic bottles:
- A rod about 2 m long is given the desired shape.
Advice! It is better to refuse a steel part, it is too difficult to bend and can burst.
- Corrugations will need about 80 cm. When using old material, it is thoroughly cleaned of contaminants.
- One edge of the corrugation is made with cuts for mounting the swan's head.
- The swan's neck is fixed to the body and head with self-tapping screws.

Plumage
For the plumage of a swan you will need:
- plastic white bottles - about 40 pieces;
- construction mesh;
- pliers and knife;
- wire, cutters.
Painting the mesh with white paint for outdoor use will help to avoid corrosive processes. One plastic bottle serves as the basis for 5-6 swan feathers. On each blank from a plastic bottle, 4 holes for the wire are prepared. It is optimal to use copper material, which bends easily. Feathers are connected with overlapping wire to hide the connection areas. The process of formation of the wings and tail of the swan is identical, the difference lies only in the outlines of the grid.


Mounting and installation
When all the parts from the tire and plastic bottles are ready, they begin to assemble the swan. The site on which it is planned to place a decorative figure is made out with bricks, a board or a car tire. This will be a kind of podium.
The connection of the neck with the body is carried out with self-tapping screws. The end of the rod is bent in such a way that it is possible to fix it in the ground. The wings are fastened together with wire, clamped at the back with a rod. Next, the tail of the swan is fixed. The head, made from a plastic bottle, is screwed to the corrugation with screws. An elegant bird made of plastic bottles with your own hands will become a worthy decoration of the site.

Grace in the garden
Another craft option based on a large plastic bottle also has practicality, thanks to the possibility of placing flowers inside.

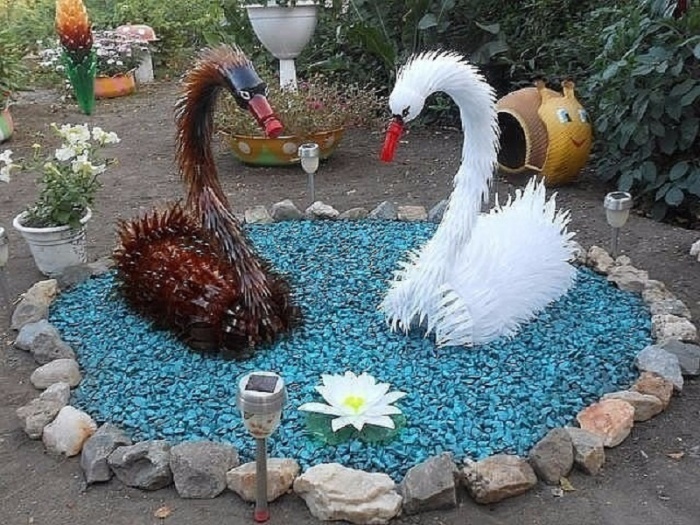
Make graceful swans floating on a picturesque lake out of plastic bottles. A palm tree, also made by hand, is reflected in its smooth surface.
The content of the article:
It is not difficult to make a cottage extraordinarily attractive. To do this, it is not necessary to spend a lot of money, it is enough to put empty plastic bottles in bags, and then choose ideas from those proposed and bring them to life. Such work inspires, allows you to make the site well-groomed. Neighbors and guests will certainly pay attention to it, and the owners themselves are pleased to be in such an environment. Start the transformation with a simple job that will allow you to arrange a fabulous corner in your backyard.
Bottled lake or pond

To make the reservoir itself, no special skill is required, depending on its size, you will need 30-250 bottles. First, outline with a shovel the place of the future fabulous pond. Inside its outlines, select the turf. You can put it in a pile, cover it with a dark film, periodically sprinkle it with water and kitchen waste, and you will have a wonderful compost next year.
If you are using a non-virgin piece of land, then simply loosen it with a shovel and, starting from the middle to the edges, lay the blanks. To make them, cut the neck of the plastic bottles to the shoulders, now press the blanks upside down into the ground so that the container peeks out 8 cm above the soil surface. You can use the lower halves of the bottles left over from creating other things for this type of site design. The main thing is that they should not be shorter than 10 cm.
If you are using only the bottom of plastic bottles, then fill it with soil, turn it upside down so that the blanks rise above the ground. Place containers close together to minimize gaps.
After completing several rows of inverted plastic bottles, paint them blue. It is better to do this immediately, because if the lake is large, it is difficult to get into its center. If you do not have numerous containers available, make the lake gradually. The border can be decorated with large stones. To make the pond look picturesque, plant a few plants around the edges.
Decorate the lake with water lilies. How to make such crafts with your own hands was described in one of the previous articles, and from this one you will learn how to make a swan from improvised material. Such a bird looks great not only near the lake, but also in any other corner of the garden.

For this type of creativity, you will need a tire from a car wheel. Paint it white, attach strong wire to the outside with iron staples. It should wrap around the bottom of the tire, then bring it up and bend it in the shape of a swan neck.
Now put a plastic water hose on the wire, if you don’t have one, a piece of watering rubber will do. Slightly cut its upper part on both sides, put the bird's head here. To make it, cut a soft bottle below the shoulders, making the cut curly. Put the blank on the wire, make a beak from a small ketchup bottle. If you do not have one, then cut a triangle out of plastic, glue its two opposite sides. After placing the beak in place, cover it with red paint. You can make a head out of synthetic foam rubber, and take a hose from an old vacuum cleaner for the neck.
Paint the head and neck white, and mark the junction of the beak and face with black, so that the suprafrontal part and the eyes of the bird are clearly visible.
If you have extra time, then before making the swan, modify the tire a little. As you can see in the photo, on the one hand there are small cuts on it, on the other - solid, it is made in such a way that the tail remains. The place of the cut is fastened with a bolt with a screw.
Bird with fluffy feathers from plastic bottles
Do-it-yourself swans are elegant if they are beautifully feathered. To do this, you will need white plastic milk bottles.

In the next photo you see how to make wings. To do this, cut out their base in the form of a triangle with beveled corners from a metal mesh. To make plumage, take white plastic milk bottles. Cut off the neck and bottom of each. Divide the resulting canvas into 6 parts, also round each of them with scissors. These are feathers. To attach them, use an awl and thin wire. Make punctures in the blanks and tie them to the wire mesh.
Cover it with feathers on both sides. Attach 2 fenders to the tire with self-tapping screws. You can do it differently by pulling the wings together with wire through the tire.
How are graceful birds made from plastic bottles?
Another graceful swan can be made from the following materials. For work you will need:
- large plastic bottle of rectangular shape;
- putty;
- thick wire;
- bandage;
- sand.

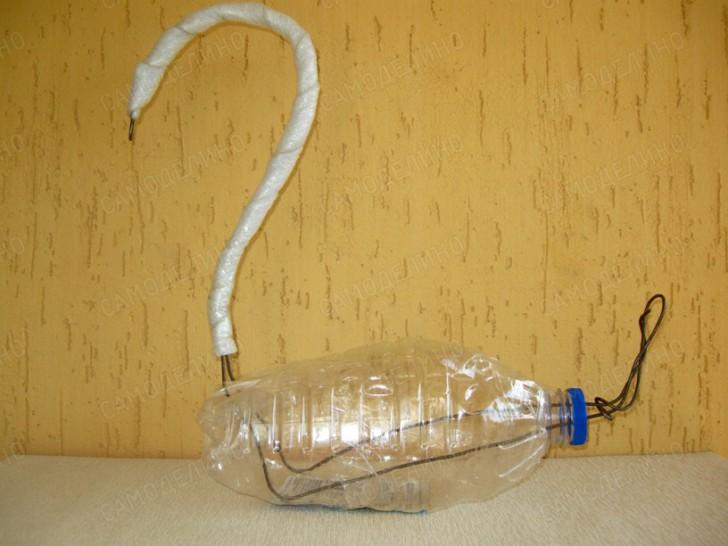
Now thickly grease the entire outer part of the canister with putty. Take the bandage, starting to wrap it around the wire from the bottom up, also generously coat it with this solution. As a result, you will get the neck of a graceful bird. Where the head will be, the bandage will need to be wound even more, layer it with putty. Finish this part of the workpiece.
Let's get to the wings. As in the first case, they will need a large-mesh iron mesh. To attach it, first coat the body of the bird with primer, let it dry, then attach the mesh and fasten it to the sides of the swan with putty.

You can leave the wings as they are, or decorate them on the outside with feathers from plastic milk bottles, and hide the mesh on the back under a layer of putty.
It remains for you to let the product dry, then paint the eyes and beak of the bird in the desired colors. If you want to use the swan as an original flowerpot for giving, then fill the canister with sand only a quarter, and pour fertile soil on top and plant your favorite flower. Or make a second bird. As a result, you will get such beautiful do-it-yourself swans.

How to quickly make snow-white birds from bottles?
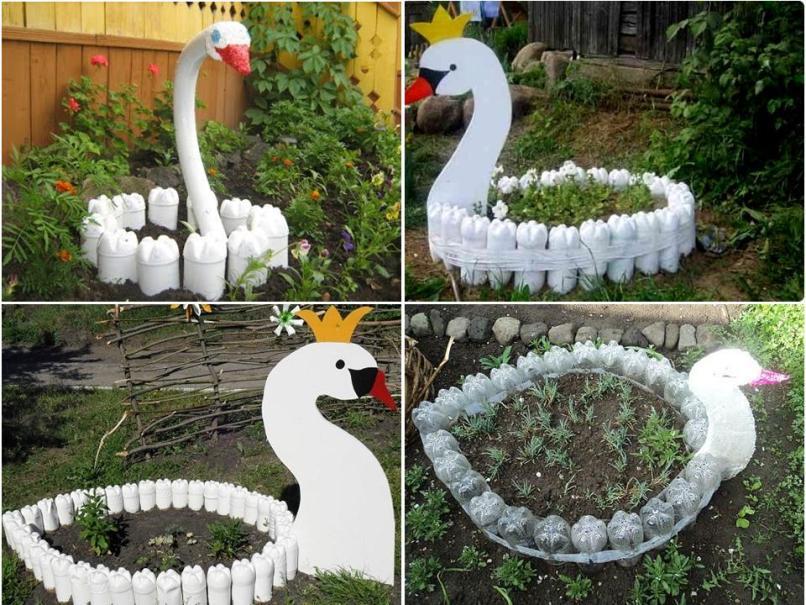
If you have some empty containers, and you want to decorate your site as soon as possible, then read how to make a swan quickly and from a small amount of materials. Also, it can not only decorate a summer cottage, but also become a beautiful and original flower bed. For this, transparent containers are quite suitable, they need to cut their necks on top of their shoulders.
Outline the shape of the future flower garden on the ground. Fill the bottles with sand or waste soil, such as clay, paint them white. When the paint is dry, dig the bottles about a quarter into the ground according to the marked markings, turning them upside down. To keep them well, fasten them in a circle with a wide adhesive tape in 2-3 layers. It also needs to be covered with white paint.
The head and neck of the swan are made of plywood. First draw this part of the bird on the workpiece, and then cut it out. As shown in the photo, decorate this part with the appropriate paints. Pour fertile soil into a flower bed, plant flowers and you can admire the original creation.

Plastic swans can be made without much hassle. To make the following, you only need:
- 5 liter canister;
- milk bottles;
- scissors;
- glue;
- paints;
- wire.

Lay the canister horizontally on most of it, cut off the upper sidewall from it, pour it on a third of the wet sand. Insert the wire into the hole made by the soldering iron in the cork, bend it in the form of the neck and head of a bird.
Cut one off the milk bottle. Cut it from the bottom to the shoulders into 6 parts, round the resulting feathers with scissors. Decorate the entire container in this way, and then put the blanks on the bird's neck in turn. Insert its beak into the neck of the last upper one. You can also make it out of plastic or polymer clay.
Now we need a few more milk bottles. Cut 4 feathers from each, stick them on the canister, starting from the bottom, so that the rounded part of the feathers looks up and slightly to the side. After the glue has dried, put the flower pot in the canister. The master class uploads a story on how to make graceful swans out of plastic bottles.
We decorate a country pond-lake with plastic bottles

If we imagine that the lake with swans swimming in it is located on an island, then why not install a palm tree on its shore? It is also made from plastic bottles. It is very interesting to make such products with your own hands. If you do this with your children, they will also grow up to be creative people, able to look at any materials and find craft ideas.
For a palm tree you will need:
- metal fittings of the required length;
- brown and green plastic bottles;
- scissors;
- candle or lighter.
First, peel off the labels. If they are glued too well, then put them in hot water for 40 minutes, then remove them, sometimes helping yourself with a knife.
Now cut off the bottom of the bottles, make the cut zigzag, slightly bend the resulting large notches outward. Stick the rebar in the intended place so that it holds tightly, start stringing the bottles neck down.
This creation technology is suitable if you do not have enough containers. If it is larger, then use only the bottom of the bottle. Drill a hole in each with a drill, and then string it on a metal rod, as shown in the photo. And in the next photo you see how you can make a trunk for a palm tree if you have an unnecessary log and bottoms from brown bottles. They are nailed or attached with screws to a wooden base, but the bottom is left free so that the tree can be dug into the ground.

How to make palm leaves from bottles?
When you decorate the trunk of the southern tree, proceed to its leaves. For them, you will need a green plastic container. A master class on making palm trees from bottles will describe this process in detail.
There are also many options for obtaining this part of a tropical tree. If you like the wooden base idea, then you can make the leaves the easy way. To do this, you need large plastic bottles with a pre-cut bottom. Cut them from the bottom to the shoulders, not reaching the neck, into many small ribbons.
Now drive metal rods into the upper part of the wooden palm tree, bend them slightly and string them neck down on each bottle. What you get is also visible in the photo.

And here is another way to make leaves from plastic bottles. A container of any size is suitable for this, you need to cut off the bottom from it and make 4 cuts on large bottles, and 3 cuts on small ones to the shoulders, round them. These are leaf blanks.
Now make a thin fringe along the edges of each sheet. In the center, leave a gap of 1–2 cm - this is the vein of the leaf.

Put a brown bottle without a bottom on top of the barrel with the neck up. On the cover, make 6 holes crosswise with a soldering iron or a drill. Insert one rod or wire through the two holes opposite, through the other two - another rod, and through the third pair of holes - the third wire. Now string the first leaf blank on each rod, then the second, and so on. You should have 6 leaf pieces, each consisting of six bottles. For reliability, fasten them together on the covers with wire.
To prevent the bottles from jumping off the rod, simply bend it on the reverse side. And here is what you get as a result.

If you want to visually see the process of making a palm tree, then watch the video:
The swan is a beautiful bird that adorns any pond. But not everyone can afford to buy and care for real swans. But you can make your own, artificial swan from improvised items.
Such a swan can be used to decorate a garden or playground.
You can also make a swan, in which you can pour earth and plant flowers. One way or another, both you and the children will enjoy the aesthetic pleasure of such crafts.
How to make a swan out of a tire

1. Prepare old tires, preferably "bald", and mark the cut lines with chalk.
2. Start cutting along the lines, then bend it so that you get wings.

3. In order for the head and neck with the breast of the swans to keep their shape, it is advisable to use a stainless steel plate, which must be bent so as to give the shape of the head, neck and breast.

4. After that, you need to screw the plate to the rubber using inconspicuous small screws.
5. Also cut out the eyes from the rubber and, using the same screws, attach them to the swan's head. And after that, cover our swans twice with white water-based paint, only make the noses red.

6. It remains only to fix the swan in the halves of the covers, pre-painted in the color of the water (blue, light blue, green), and your swan swims in the pond.
How to make a swan from a wheel

This is another option for making a do-it-yourself swan from a tire. To make it, prepare, as always, an old wheel, chalk, a sharp knife (just in case, also prepare a hacksaw or jigsaw) and paint.
1. Using chalk, draw on both sides of the wheel all the details of the future swan, i.e. head, tail, wings, neck, beak.
2. Start with a sharp knife to cut out all the details along the contour lines.
* In case some details do not lend themselves, you can use a hacksaw or a jigsaw.
3. Bend back the wings and neck. If the neck is difficult to bend, plywood will help you with which you can fix it.
4. It remains to paint the swan.
How to make a swan (video)
Watch the video tutorial on how to make a tire swan if you want to understand some of the details. In this lesson, a jigsaw was used.
How to make a swan out of a tire

1. The first thing to do is to mark with chalk the places on the tire that you will cut. The images show these lines.
* If your knife is sharp enough, then everything will take you no more than 20 minutes.
* It is worth noting that it is very difficult to cut thick rubber, so use a sharp knife, which is periodically moistened with soapy water.


2. The hardest part of the tire must be knocked out with a chisel or grinder. This part will serve as the head and tail of your "swan". The whole thing will take no more than five minutes.

3. It's time to flip the tire.
4. It is advisable to properly process the head and tail of the rubber swan, as you can get scratched due to uneven edges.
5. It remains only to paint the swan - you can use white or a very unusual and beautiful bronze color.
How to make a swan from modules

Crafts from plastic bottles. Swan.

No need to get rid of plastic bottles if they have already been used for their intended purpose. There are many crafts that you can make from them.
For example, there are several ways to make a beautiful swan for the garden. Moreover, such a swan will not only decorate your garden, but will also benefit.
You will need:
Plastic bottle 5 l
Milk bottles 300 g
Hose with hard wire
Wire
Scissors
1. Using a marker, mark lines on a 5-liter plastic bottle, along which you will cut next.

2. Cut off the top of the bottle first and leave a neck that you need to secure the swan's neck in the hole.

3. For the swan neck skeleton, use a stiff wire hose. Insert it into the bottle through the neck and fasten the neck to the lower body with a wire. You have a swan frame ready.


4. We prepare feathers for a bird. Take a white plastic bottle (usually used for milk) and cut off the neck and bottom.

Start cutting the "feathers" - their width and shape depend only on your imagination.

It is desirable to cut the edges of the "feathers" with a fringe to achieve an even more realistic effect.

From the outside, heat each candle feather.

5. Start collecting two feathers and fix with wire.

6. For the bird's neck, use bottomless bottles. Depending on their number, you can choose the length of the neck. In this example, 16 bottles of 300g were used.
The part near the beak was made from the top of a bottle without a neck.
7. Where the beak is located, the hose ends and to fix the structure, you need to make holes on both sides in the bottle and in the hose. Next secure it with wire.

8. Close the lid and take a chemical cap to prepare the base of the beak. This cap needs to be cut in half, similar to the letter M.
9. Take another such cover and insert a beak into it - there is a groove inside, so that everything comes out exactly.
10. Glue the first and second cover.
11. Paint the beak, and place your favorite plants in the flower bed.
How to make a swan out of plastic bottles

This is not just a swan - this is a swan princess that will decorate any garden. It should be noted right away that the assembly of this swan is a laborious and rather lengthy process, so be patient and let's get started.
You can call for help in creating crafts from one or more people to speed up the process.
Prepare:
Plastic bottles
Thick copper wire (if you have thin wire, fold it in half so it doesn't break)
Stationery knife
Pliers
White and yellow paint (can be regular or in aerosols)
1. A plastic bottle swan should be started from the head and neck. Then these parts of the swan pass into the body. First, cut a plastic bottle under the head.

2. Cut off the parts of the neck of the craft. It is advisable to make 18 similar blanks in advance to get a neck.

3. Use an awl to pierce each piece.


4. Prepare the wire and thread it into the holes of the blanks, gradually stringing them to form a neck (you need to thread the bottom to the head). Attach your wire to the tip of the beak.


5. When you have collected all the blanks for the wire (1 blank for the head and 18 for the neck), start assembling the torso. Prepare 4 bottles and cut them as shown in the image:


6. In the same way, start stringing blanks on the wire. Insert a whole bottle into the last blank.
7. Fasten the other end of the wire.
8. To make the neck of a swan stronger, you must first give it the desired shape. To do this, simply adjust the depth of entry of one workpiece into another.
Use wire to secure all parts of the swan together.
Start piercing holes in the bottles that make up the neck so that the wire runs parallel to the floor (you need to do this on the floor and start preferably from the tail).


You should get a kind of "zigzag" of wire - it should "enter" and "exit" the neck where the two blanks enter each other.
9. Draw the topmost end of the wire where the crown is attached.


10. From a plastic bottle, cut out a crown for the swan princess.
11. Take the crown and fasten it to your swan's head. To do this, you need to make 2 holes in the neck of the crown and thread the wire from the neck into them. Next, you need to wrap the wire around the neck and clamp it with pliers.

12. It's time to assemble the body. The first thing to do is the stomach, which has two "sticks" and each of them is made up by connecting 4 large blanks (point 4) and 1 whole plastic bottle.

You need to "flash" these "sticks" using wire. You need to do this in a zigzag, parallel to the floor. It is necessary to get a rigid foundation for the swan.
13. We continue to make the body, namely its next row. The middle will be occupied by the neck of a swan, which means that you will need the help of another person - while you are "flashing" the second row, your assistant needs to keep your neck constantly in an upright position.

Yet, to begin with, you need to prepare 2 "sticks", each assembled from five large blanks and one whole bottle (for the tail). After that, all 3 blanks must be fastened with wire, setting the neck between two "sticks".


14. Pay great attention to fastening the curve of the neck in the front.

15. We are preparing the third row of the body. Start collecting another "stick" - use 4 large blanks and 1 whole bottle for the tail.


Thread your workpieces tightly into one another, and pour water into an untouched bottle to balance the neck and tail of the craft.
It should be noted that the stick does not need to be stitched separately. All you need to do is put it on top of the neck from the side of the body and attach it with wire to the side "sticks" of the 2nd row of the swan body.
16. It's time to make wings for your swan. To do this, you need to collect 2 "sticks", each of which contains 4 large blanks and one whole bottle. Bend the blanks as shown in the image and zigzag them again with wire.

To make the base of the wings, you need to make 2 short "sticks", each of which consists of one whole bottle and one large blank.
17. Start attaching the bases of the wings to the body of the swan. The image shows a top view, and on the right side is the bird's tail. To attach everything, use a wire that needs to be threaded through the bases of the wings and fastened to the already installed swan parts.

18. Attach the curved wings with wire.
Here's how it looks from above.

Here is a side view - here you can see that under the curved wing of the swan there is a short "stick" attached.

19. For the neck of the swan, you need to make additional stretches.

20. The neck construction can be made stronger with additional "stitches" of wire. You can also fix the neck in the desired position.


21. It's time to place the top of the bird on the belly that was assembled earlier. After that, fasten the structure with wire, threading it under the swan's belly. Next, thread the wire under the curved wings and secure to the back with pliers.
22. It's time to paint. To do this, you can use both spray paint and regular paint (but it will take more time). If you decide to use an aerosol, then you need to paint outdoors, and not indoors.

In this master class, you will learn how to make a beautiful flower bed out of the swan you made earlier.
You will need:
Plastic bottles
Plastic bags (preferably tight, such as laundry detergent or dry pet food)
stapler
Saw or knife
Pliers
Scissors
Soil (preferably special ready-made soil from bags).
1. First you need to firmly fix the swan in a place specially prepared for it. To do this, you need to dig a shallow hole.

To keep the swan straight, on both sides of it you need to hammer 2 wooden pegs, in the upper part of which you need to make small incisions.
Pull the wire through the notches, which will help the craft stay flat.

The wire is threaded, pulled together and fixed under the curved parts of the wings.
2. Prepare one tight bag and cut it so that you get a large rectangle.

Use this plastic "blanket" to cover the inside between the wings.
* The edges of your bag should protrude slightly from the wings.
3. You have got a kind of pot in which you need to pour earth for flowers.

4. Use a stapler to secure the front and back of the flower bed.

* If desired, you can cut off the excess edges of the polyethylene.

5. Now it remains only to plant something in the finished flower bed.
How to make a paper swan
How to make an origami swan
It would be nice, of course, to have a beautiful lake with white and black swans on your site. On a quiet warm evening, you can turn on the backlight, Tchaikovsky's music .... However, they say that it is better to have a tit in your hands than a crane in the sky. This also applies to the swan, so with some diligence with your own hands from plastic bottles you can create an almost living proud bird in your garden.
All sorts of different swans from plastic bottles
We will make a reservation that we have already touched on this topic.
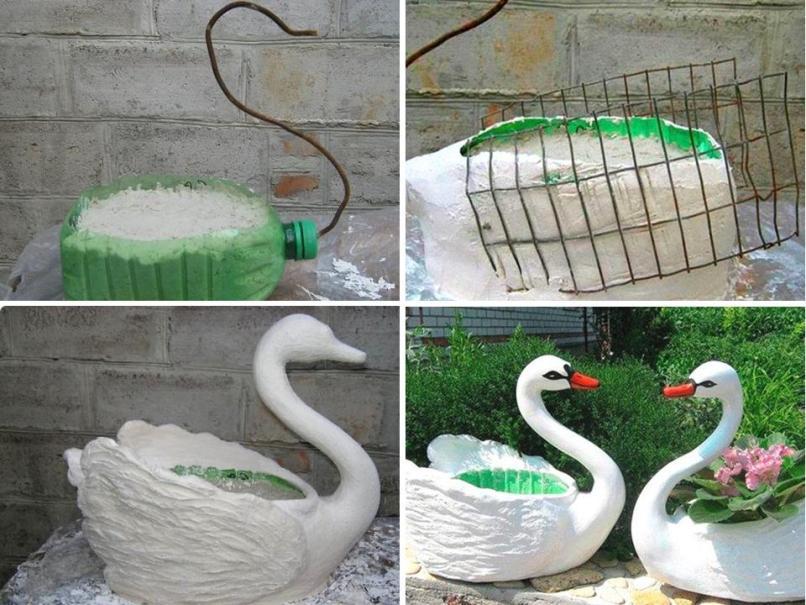
 In the photo below you see how a swan-pot is created from a five-liter container using gypsum.
 It must be admitted that there are many options for assembling a swan from plastic bottles. As soon as you set to work, you will do something in your own way, and you will get another performance. Below we consider four characteristic designs. There is no dispute about tastes, and you will choose what you like best. We will discuss the features of each proposal and give master classes for their manufacture.
Three variants of the snow-white bird
I liked the plywood version the best.
First of all, I want to tell you about the most interesting. The swan figurine in the photo below is made using plywood and white plastic bottles. It is convenient to fix the plumage of a plastic bird on a flat sheet. Little material is required. An elegant and thin neck is well reflected by a sheet of plywood. The body of the swan takes on a three-dimensional shape.

 In general, an elegant craft is created quickly and easily. The step by step instructions are as follows:


 Light and airy bird using polyethylene film
A proud bird for the garden can be assembled from a five-liter eggplant and plastic wrap. The appearance of such crafts, of course, attracts attention.
 Consider the master class step by step:
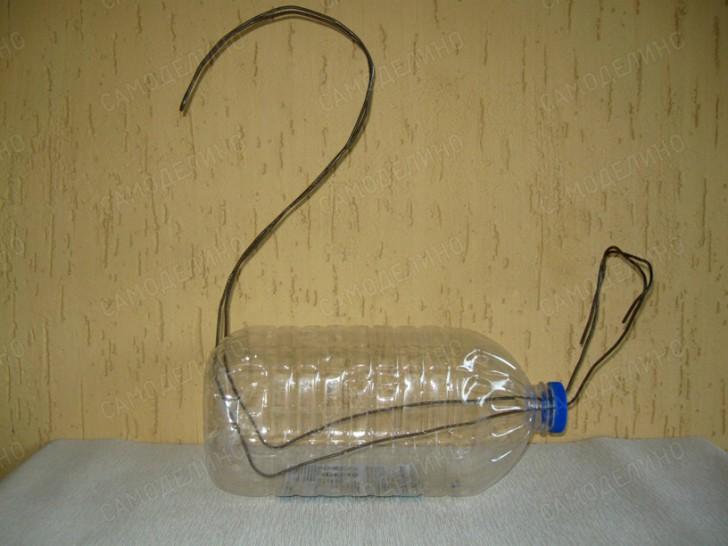
- Two holes are made in the bottom and cork of the container and a wire is threaded through, as seen in the image below. The wire will provide a frame for the neck and tail of the craft. In the bottle, you can cut a window through which you can manually guide the wire inside the case.
- The container is folded in front and behind to give a smooth outline to the bird. The required form is fixed with adhesive tape.
- Next, we need isolon. If there is no finished strip, you can cut tapes with a width of about 7 cm from a material with a thickness of 3-10 mm.

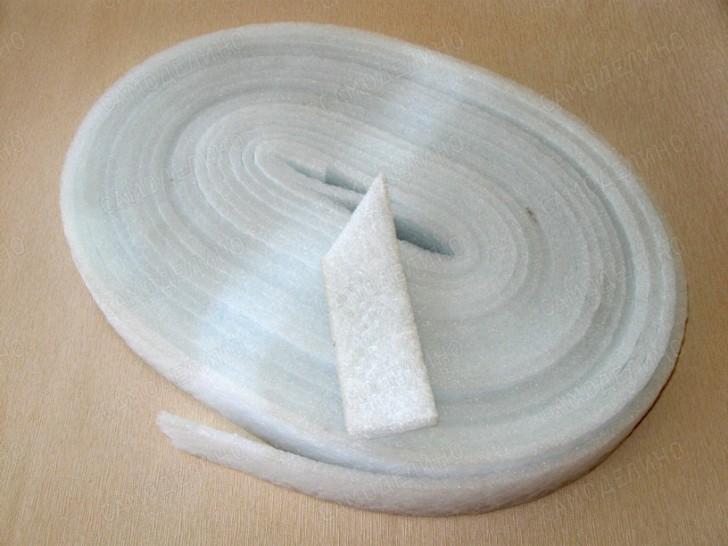 The entire workpiece is wrapped with isolon tape. The material is fixed with adhesive tape. The latter helps to smooth out the irregularities of the isolon. To form the head of a bird, several layers of isolon are required.
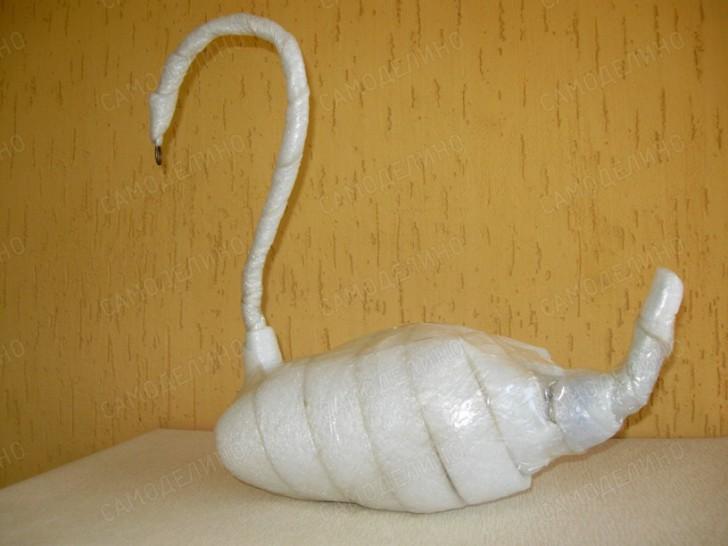
- Now you need to prepare a plastic tape to simulate the plumage of a bird. To do this, cut from a film 100-150 microns thick tapes 70 mm wide. The strips are cut across to a depth of 50mm in increments of 5-10mm. It is convenient to fold the film in several layers to speed up the work.

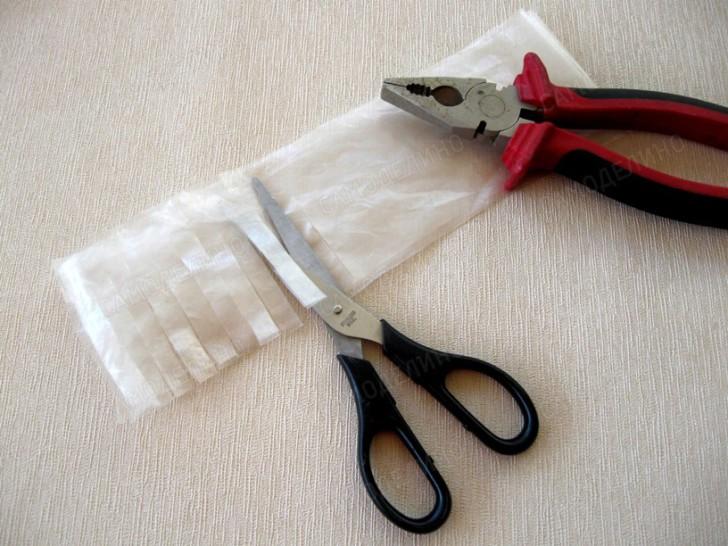
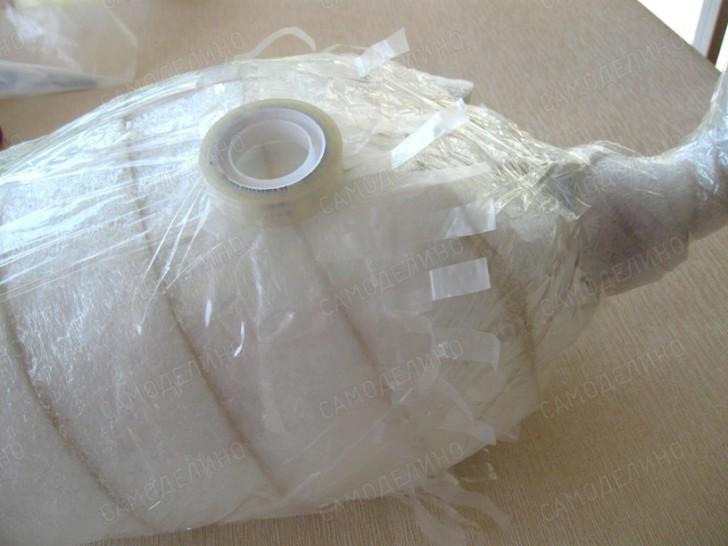
- The tail, body and neck of the bird are wrapped with a prepared tape. Each turn of the film is fixed with a narrow adhesive tape. The next layer is shifted by 20 mm relative to the previous one.

- It is convenient to make the eyes of a bird from black buttons. They are sewn to the head in the right place.
- A good beak will come from a red marker. Several short longitudinal cuts are made on the body of the marker to form the wide part of the beak. The marker is placed on the frame wire. The swan is ready!

 Metal mesh and tire for a large swan
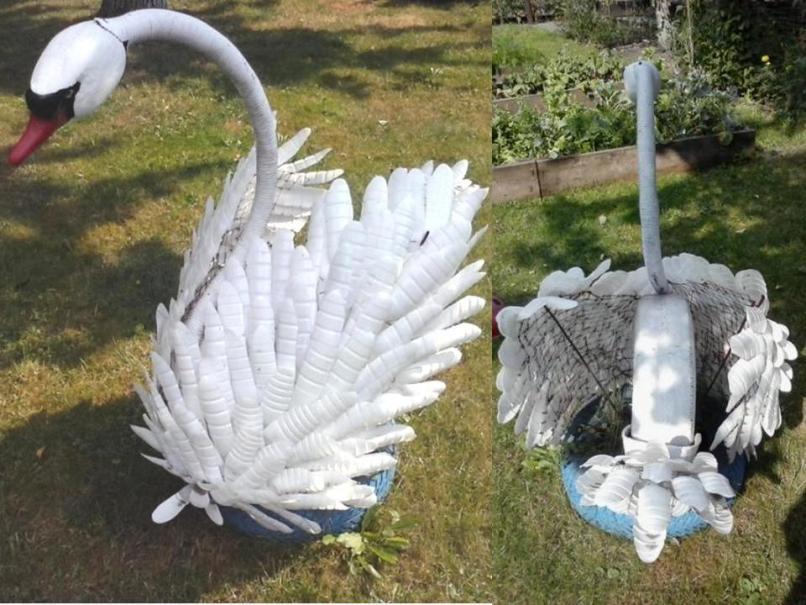
You will get a large bird if you use a car tire and mesh as a supporting structure. The tire can be half buried in the ground, or cut in half. In the latter case, the craft can change its location. You can hide it for the winter. The neck is made of wire, on which a corrugated hose is put on. The rubber of the wheel and the plastic of the hose must be primed in order for the paint to hold properly.
The bird's head is made of foam. The workpiece is sanded, puttied and painted. It is better to use putty and water-based paints that will not spoil the foam.

 Two bird wings are made of plastic feathers attached to a mesh frame. The feathers may be shaped as shown below. They are attached to the grid with pieces of thin copper wire through holes in the blanks. The wings are attached to the tire with wire.
 As follows from the picture below, the grid is cut out in the form of an oval with jagged edges. Well suited galvanized welded mesh with a cell of 20x20mm.
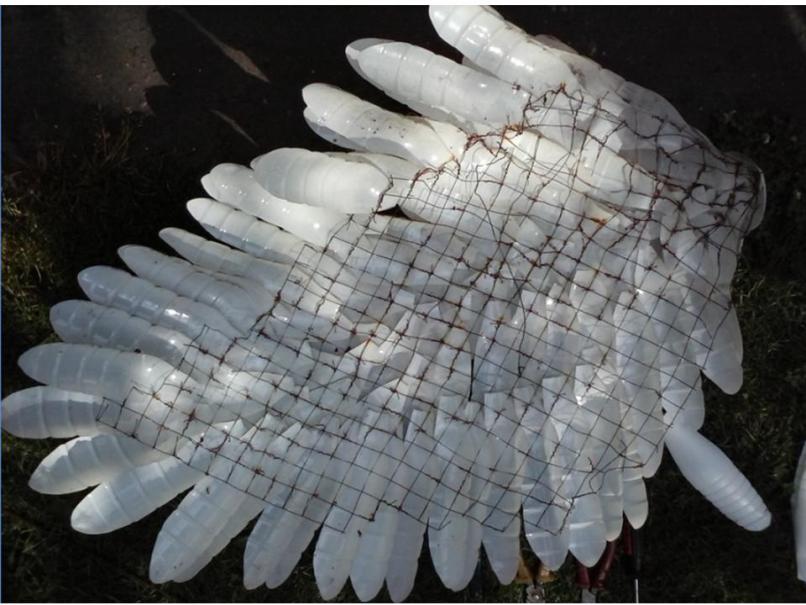
 The front side of the wing looks pretty decent. We make two wings.

 As you can see in the picture below, the fenders can be reinforced with thick wire supports at some distance from the tire. It will turn out a large and voluminous swan with spread wings. However, the craft does not have the best appearance from the back and you will have to find an appropriate location for it in the garden.

 In this scheme, two car tires are required. In addition to the wings, it is necessary to make a tail using the same technology.
A lot of bottles, a lot of work - and you get an almost live bird
"Delicious for the third." In conclusion, consider the fourth option, which looks great. However, it will take a lot of containers and even more patience when making crafts. 
 Master class for making a swan from plastic bottles:
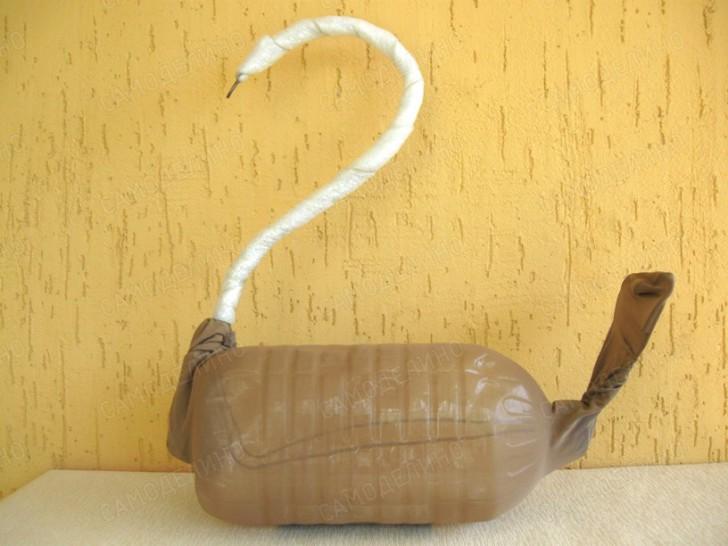
- We make a blank from a five-liter eggplant and a wire with a diameter of 3 mm. We pierce holes opposite each other in the bottom and cork of the bottle. The container can be cut through to adjust the wire from the inside.

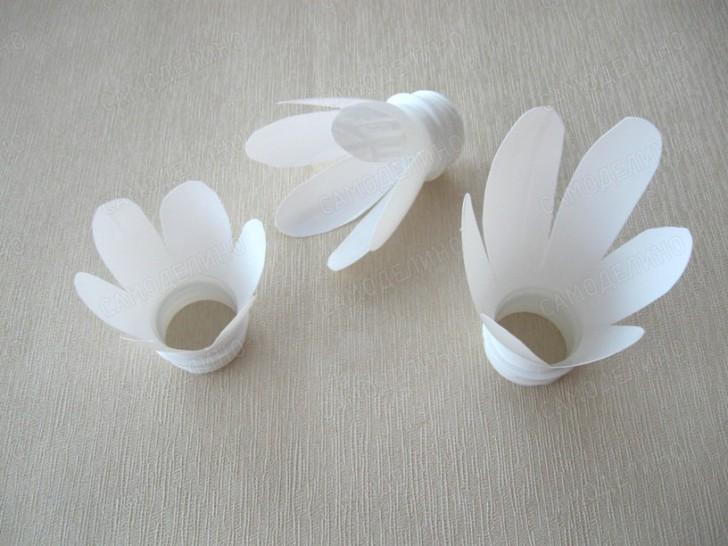
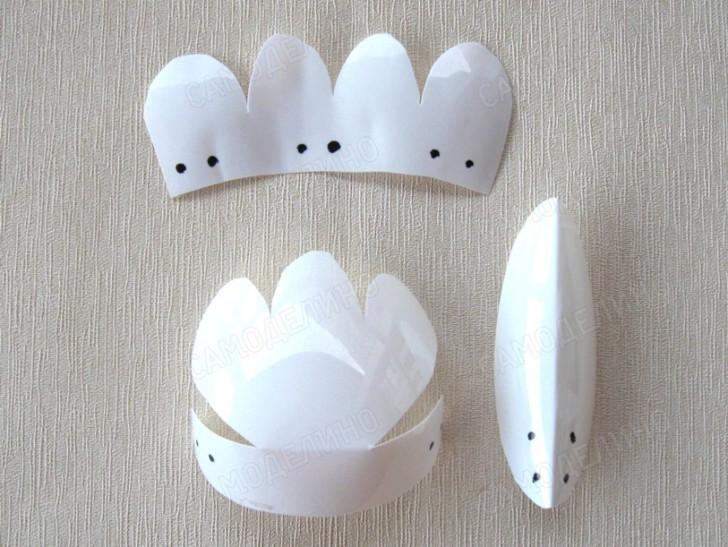
- To make a bird's head, take a white bottle with a narrow neck. Cut off the lower part and cut along in 5mm increments, as shown below.

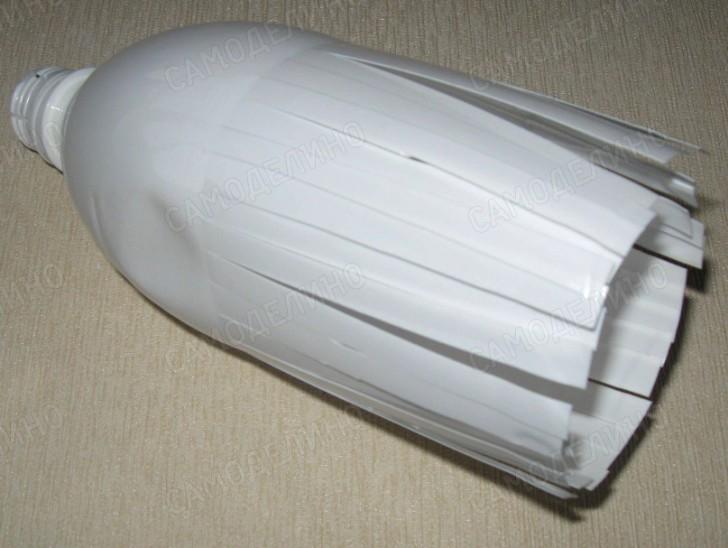
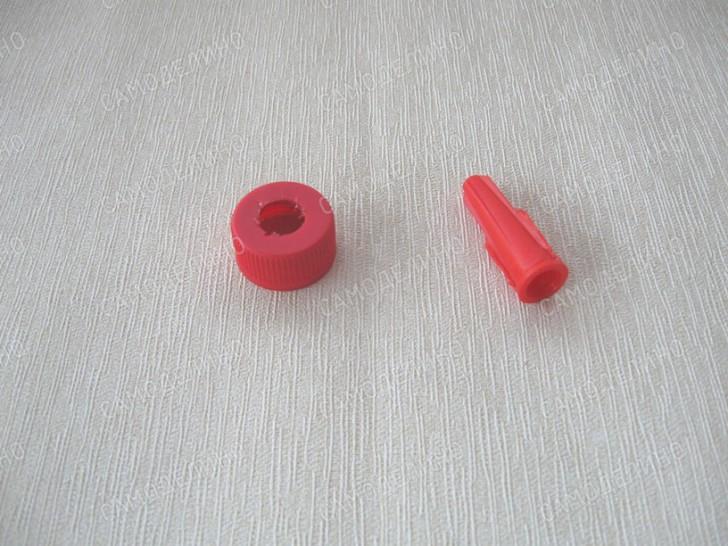
- We make a beak from a red cap and a cap from building sealant. Cut a hole in the cork and insert the red cap into it.

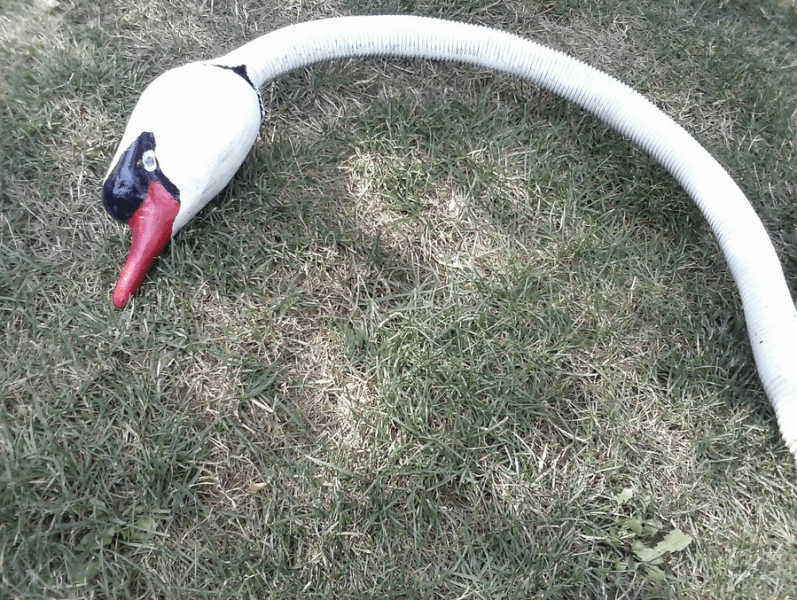
- The eyes are depicted with a black marker. The narrowing of the head will be formed on the narrow part of the neck detail, which is shown separately. During assembly, an elastic band for money is first put on the neck, which is then changed to a fishing line. It is better to melt the edges of the fishing line with a match so that the knot does not come loose.


- We make the details of the neck, as in the photo. They may have a slightly different size, it is normal to install in different places.
- The image below illustrates how the neck pieces and head will be installed. For the final fastening of the head, a copper wire bent in half clings to the upper part of the frame wire. Then the beak is unscrewed, and the copper wire is passed through the head. A thin wire is bent and wrapped around the threads of the neck of the bottle. The beak turns again.

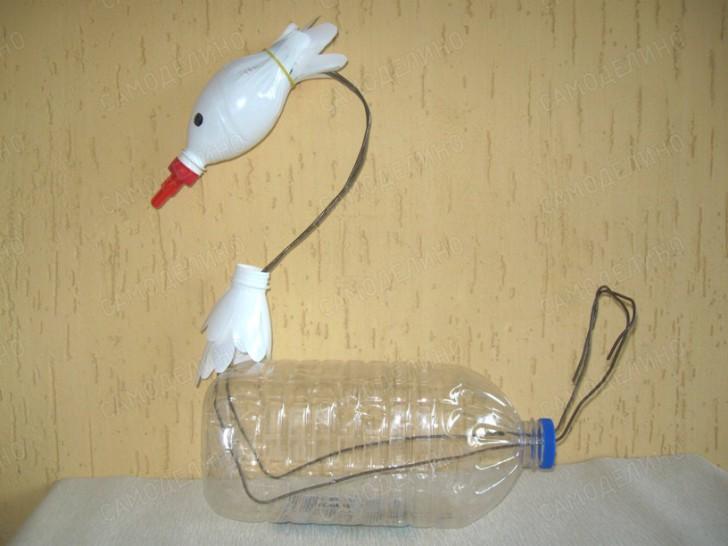
- In order for the parts on the neck to be evenly spaced and form a smooth bend of the neck, it is necessary to wind the isolon around the wire. The latter is secured with tape. Instead of isolon, bottle caps with holes can be used.
- To attach the "fur coat" of the swan to the body of the workpiece, we stretch the stocking. We put isolon on the chest of the bird to organize a convex shape. We tie the stocking with twine.
It shouldn't sag!

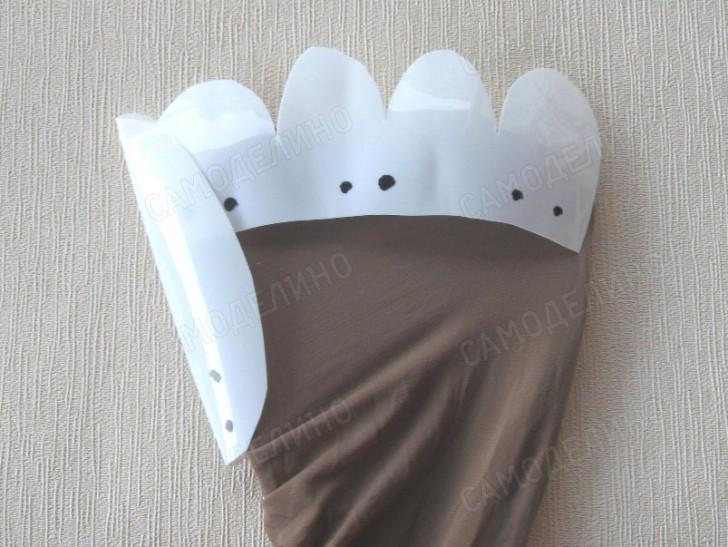
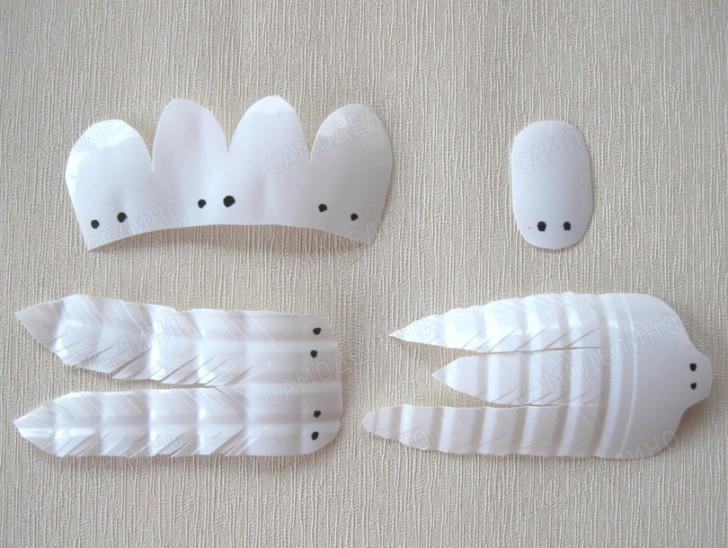
- To make the tail plumage, cut out the details shown below. We make holes through which we sew the details to the stocking.

- The image below shows how to mount the tail pieces.
- The lower bend of the tail closes the element of a special shape.
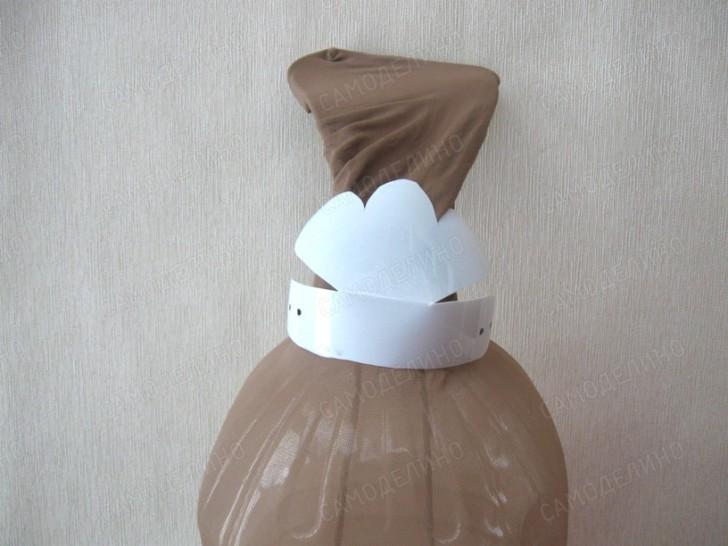
- The body of the bird is sequentially sheathed with the details shown below. In places of bends it is convenient to use separate ovals. The wings located on the sides are cut from the side in increments of 3-5 mm. Accuracy of work determines the type of future crafts.
 We have completed our review of various options for making a white swan for the garden. If you do not limit your imagination, you can build both very simple and quite complex beautiful bird crafts.
Any summer resident dreams that his site was the most spectacular among the rest. As soon as they do not decorate the local area, but the most common way is to create figures from plastic bottles due to the ease of installation and the availability of material. Birds and animals are most often performed. Today we will talk about the creation of a noble swan bird with graceful outlines from plastic bottles. Such a craft will become the highlight of the whole garden and will definitely not go unnoticed.
Varieties of swans from bottles
At the moment, from plastic bottles, you can create any configuration and design of a swan. Moreover, it can be not only decoration, but also a functional addition to the site, for example, a planter. The final result depends only on the imagination of the master and the materials and techniques used in the process of work. Among the variety of options for creating from plastic bottles, you can easily choose the one that is most suitable for the time spent, materials and just the algorithm of actions for a particular master.

Planter in the shape of a swan
To complete such a craft, you will need one bottle of 5 liters and a sufficient number of small plastic bottles. It is best to take those in which milk was bought, since they are white, which will be relevant for a swan, and subsequently it will not be necessary to color the material. In addition, you will need a metal rod to create a long swan neck, a metal mesh to decorate the base of the wings, adhesive tape, thin wire and fishing line that serve as connecting materials.

We carry out blanks
The preparatory step before creating a swan is to clean plastic bottles from dirt, labels and glue. Next, markings are made on each small bottle.
So, for starters, a line is drawn 2 cm below the neck of the bottle. The lower dotted line should be 1 cm above the relief part of the bottle. They are connected by a strictly perpendicular line. It is necessary to mark and cut the details as evenly as possible.
After cutting off the neck from white bottles, you do not need to throw away these parts, they will serve as a decoration for the swan's neck. The lower part under the neck is cut into 6 rounded parts. You can hold them over a burning candle for a bit to get a more realistic look. At the base of the finished petals, 3 paired holes are made.

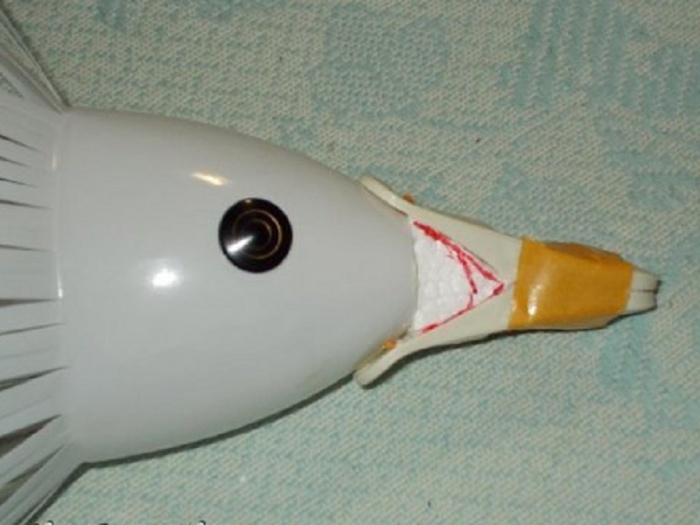
The head of the swan is a 0.5 liter bottle. It is performed according to the following algorithm:
- Removing the neck plug.
- Making an incision along the seam in a cone-shaped section.
- Cutting lines with a gap of 0.5 cm.
- Gluing a clothespin to play the role of a beak.
- Cutting a fringe on a bottle from the side of the bottom.
The basis of the body of the swan is a bottle of 5 liters. Holes are made on it from below and from above to attach the neck.
Construction assembly
After all the components of the future swan are completed, you can begin to assemble it. First you need to fix the eyes on the head of the swan. It is best to do this not with glue, since with the constant influence of the environment they will quickly fall off, but to fasten the buttons with wire.
The blank of the swan's beak must be wrapped with tape so that the halves of the clothespin do not fall apart. From above, the design is decorated with a red cloth or foil.
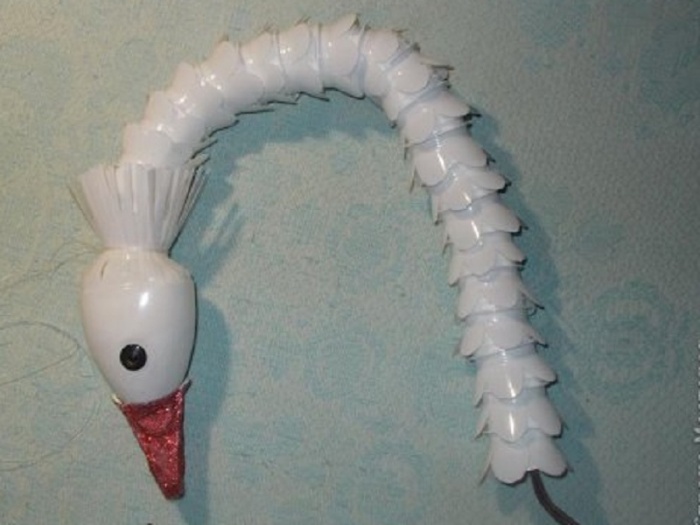
Next, you need to fix the neck rod in the head of the future swan with wire, and fill the bottle itself with padding polyester. After that, you can string the bottle necks created earlier on the rod. The fringe on the head is fixed with fishing line to cover the beginning of the swan's neck.

The rod from the swan's neck goes through a large plastic bottle and out. The whole body of the bird is shaped with nylon threads or a nylon stocking is pulled over it. Strong synthetic threads, starting from the tail, mount parts of the plumage, stacking them on top of each other to hide the fixation points.
As a result, a chic swan will turn out from the bottles, which, in addition to external beauty, will also serve as a spectacular container for planting flowers. You can put such a craft anywhere in the site, but the most organically the swan will fit into the territory near the artificial reservoir, if one is present on the site. And if it is not there, then from the same plastic bottles it will not take long to simulate a pond.

Swan from bottles and tires
If there is one or more tires available in the summer cottage or in the garage, it is quite possible to build a swan from them. The combination of plastic bottles and rubber allows you to get not only beautiful, but also resistant to external influences and turning over crafts for the garden.

Execution Technology
To create the body of a swan, a tire with a diameter of approximately 50 - 55 cm is taken. So, the formation of the body of the future swan follows the following technology:

The head of the future swan is made from a piece of foam plastic with dimensions of 20 * 12 * 10 cm in this way:
For plumage, birds will be needed
- plastic bottles preferably white;
- pliers and a sharp knife;
- construction mesh;
- cutters and wire.
When calculating the number of bottles, one should take into account the fact that one container will become the basis for 5 - 6 feathers. Petal-like elements of the same size are cut out of it, on which 4 holes are created for fixing on the grid. For more believability, the edges of each petal can be slightly melted or just cut a fringe on them.
Important! The mesh is pre-coated with an anti-corrosion compound to extend the life of the finished swan.

All swan feathers must be mounted on a piece of mesh, shaped like a wing, with overlapping wire so as to cover the joints. Even on the inside of the wing, it is necessary to create several rows of feathers so that the net is not visible in the finished design. The tail of the swan is done in the same way.
After the preparatory work, they proceed to the direct assembly of the structure. The connection of the neck with the body of the swan is made by screwing in the bolts. It is important to bend the end of the metal rod from the neck so as to fix it in the ground. The wings must be fastened together with wire and fixed with a rod. After that, the tail of the swan is installed.

Putty and bottle figure
An interesting version of crafts for a summer cottage is a swan from a five-liter bottle, designed in the form of a sculpture. This is a unique creation that allows the fantasy to run wild. Such a swan will decorate the veranda, terrace and even look good just in the clearing. Among other things, it is very practical, since inside it is possible to create a small flower garden. If you decorate it with white flowers, you can achieve the effect of bird plumage.

The main stages of making a swan:

After completing the figure of a swan, it is necessary to wait for it to dry completely, carefully process it with sandpaper, and then paint it in the likeness of a living bird. The swan is a symbol of fidelity, so it is best to pair it up right away. Such figures will enliven and diversify the landscape of the suburban area. Marigolds can be planted in the recess from a plastic bottle, which will complete the composition.

Spectacular film swan
From a plastic film and an ordinary five-liter bottle, it is easy to assemble a real proud swan, which no guest will pass by without surprise. Consider the manufacturing technology step by step:
- We make 2 holes in the bottle and stretch a thick wire into them that can keep its shape. It will become the frame of the neck and tail of the future bird.
- To give a neat and smooth outline, the bottle is slightly crushed in front and on top. The resulting form is fixed with adhesive tape.
- Ribbons about 7 cm wide are cut from isolon. The entire swan blank is wrapped around them and fixed with adhesive tape.
Important! The head is also formed from isolon, but with more layers.
- A plastic film is being prepared to create the plumage of a swan. To do this, strips of ribbon are folded into several layers and cut so that a fringe is obtained. 17
- The whole bird is wrapped with such blanks, fixing the film with narrow tape. Each subsequent revolution is shifted by 2 cm relative to the previous one.
- The head is supplied with button eyes. They are easy to just sew on.
- The beak can be made from a red clothespin or marker. In the second case, it is necessary to make several cuts on it so that the wide part of the beak can be formed. After that, the marker is mounted on the wire.

Such an unusual swan will bring originality to the landscape of any site, and with any breath of wind, its plumage will sway easily, which is also very unusual.

Conclusion
The swan on the site is a wonderful decoration that will bring variety to the landscape of an ordinary summer cottage. Thanks to the creation of figurines of this bird from plastic bottles, you can not only take time, develop your imagination, get a spectacular decoration, but also get rid of unnecessary containers. Thanks to the presented master classes, everyone will be able to choose the equipment for themselves and update their site.