The roof of a private house - types of construction, the best design ideas and modern forms (75 photos). Do-it-yourself gable roof truss system: an overview of hanging and layered structures Roof schemes for private houses
The last stage of building a house is the arrangement of the roof. Traditionally, a gable roof is erected for any residential building, for outbuildings - a shed roof. The technological processes of installation, fastening and arrangement of a roof with a truss structure in a gable version of the roof have been perfected for centuries, and these operations do not change depending on the type of roofing materials (clay tiles, corrugated board, metal tiles, asbestos slate, metal or plastic).
Varieties of gable roof
People say: “the roof of a house”, that is, it means not only the shape, but also the reliability of the design, which has a long list of advantages:
- A variety of options for the roof scheme and architectural forms of the roof;
- Simple calculations and profitability of the roof;
- Natural runoff of atmospheric precipitation;
- The simple geometric shapes of the roof provide a low chance of water accumulation and roof leakage;
- Large usable attic area, it is possible to make an attic;
- Good maintainability, high strength, durability and wear resistance of the roof of two slopes.

The three most common gable roof options are:
- Symmetrical gable roof: This is the most popular solution due to its absolute reliability and ease of execution. Symmetrical slopes evenly distribute all the loads on the Mauerlat and the walls of the house. The choice of roofing material does not depend on the type and thickness of the thermal insulation layer. Bearing loads can be easily increased by making the truss system from a thicker beam, jibs and struts can be attached anywhere. A negative factor - a full-fledged attic in such an attic will not work - or there will be low sloping walls with many "dead" zones, or a small but rectangular room;
- Asymmetric roof of two slopes: Different slope angles of the slopes reduce the useful area of the attic, but on one side you can make a full-fledged living space. Due to different angles of the roof slope, the load on the load-bearing walls and the foundation of the house is distributed unevenly, which requires recalculation of the load capacity of the base and load-bearing walls of the house, recalculation of the types of materials and their quantity, as well as changes in the methods of insulation, waterproofing and finishing;
- Asymmetric gable roof with internal or external break: Allows you to design living spaces without regard to the roof structure. Disadvantages - the same as in the paragraph above.

Preparation for the construction of the roof of the house
The shape of the roof and its design can be chosen based on - the dimensions of the building, the material of the bearing walls, the geographical location of the site play a role. These and other parameters specified in the project determine what loads the gable roof can withstand during operation.

The angle of inclination of the slopes has a certain optimal range in which weather conditions have the least effect on the formation of maximum roof loads. If the slope angle of the slope is ≤ 400, then this limits the possibilities of equipping the attic or a full-fledged room in the attic, and the slope angle ≤ 100 increases the load on the roof from rain, wind or snow. If you want to definitely have an attic or a room in the attic space, it is better to use the option of a broken asymmetric roof, and if the walls of the house are more than 6 meters long, then the rafter system must be strengthened with additional runs. 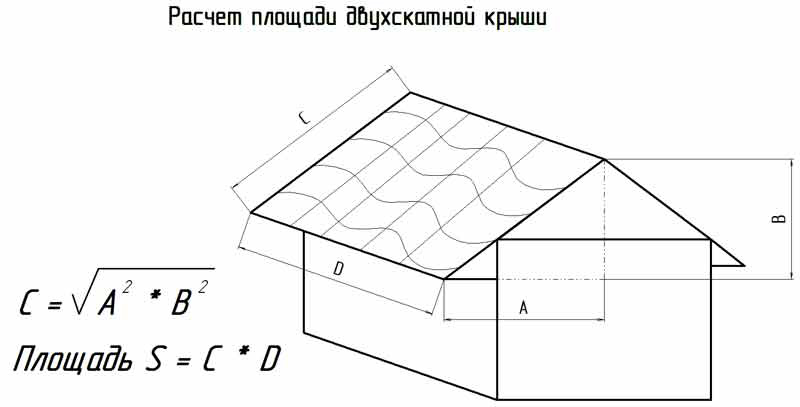
When calculating building materials for a gable roof, it is necessary to proceed from the axiom that the weight of roofing materials should be as small as possible so as not to load the walls and foundation of the house. Wooden elements will be stronger not only with an increase in their cross-section, but also with the use of suitable wood species. The main parameter in the calculation of materials is the total roof area, and a symmetrical design in this regard is calculated more easily than others - it is enough to know the perimeter of one slope, double its area, and get an accurate result.

The main load from the weight of the roof is assumed by the long walls of the house, so the truss system is built on the principle of load distribution along the system. For a small house (≤ 6 m), it is more practical to use a hanging rafter system (without supports); when building a larger house, a layered rafter system with a more complex configuration is used. 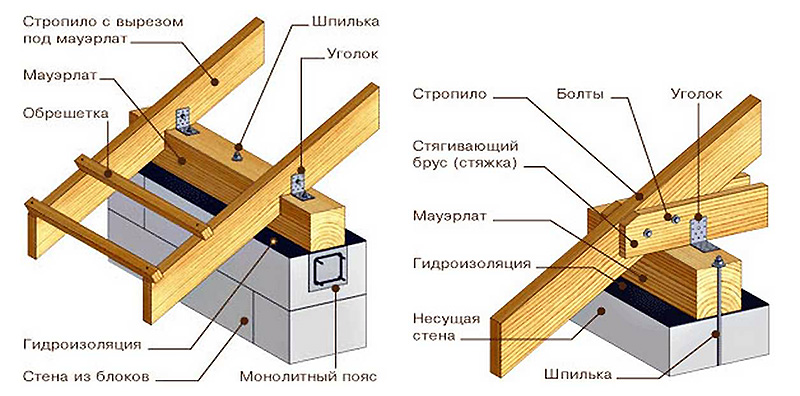
A finished gable roof for a private house consists of the following elements and assemblies:
- Mauerlat is a wooden (sometimes metal, if the roof is covered with rolled metal) beam or log, which is attached to the surface of the outer walls to support the rafters on it;
- The rafter system, the design of which is selected based on the design of the house;
- Struts (diagonal fastening of the rafters between themselves) and skates (beam along the ridge of the roof for fastening the slopes);
- Lathing - serves for the installation of the roof and elements of hydro-sound insulation;
- Warming and moisture protection;
- Roof covering.
How to mount a mauerlat
Mauerlat on the walls of the house holds the weight of the roof, evenly distributing it on the walls and the base of the house. The width of the Mauerlat beam should be equal to the width of the wall. The beam is impregnated with an antiseptic and substances that increase the fire resistance of wood. The outer border of the Mauerlat should not protrude beyond the outer edges of the walls. 
The Mauerlat is attached in different ways. A steel wire Ø 8-12 mm is laid in the brick wall, holes for the wire are drilled in the tree, and through them the timber is tied to the wall. Also, the beam can be fixed with staples, threaded studs in one or two teeth, metal plates, wooden surfboards or anchors through the same holes in the Mauerlat. The pediments and the lower edges of the batten are attached either directly to the Mauerlat, or to a beam of a smaller section, which is nailed (screwed) to the upper trim.
floor beams
When arranging beam ceilings for the roof of a private house, it is necessary to use a wooden beam with a section of 200 x 100 mm. The larger the area of \u200b\u200bthe house, the larger the cross section of the supporting beam should be. The installation of beams begins with the fastening of the extreme elements along the long wall of the house. Then the points are marked at which the remaining floor beams will be attached. 
The crate is mounted on longitudinal beams, which are located at a distance of 50-60 cm, and are attached to the Mauerlat with nails 200 mm long or by any of the above methods. The beams are carried out beyond the edges of the walls to a distance that determines the width of the cornice - from 30 to 50 cm. The cornice will be nailed (screwed) from below to these beams. Since the pediment will be equipped at the ends of the roof, a tie-in is made into the groove on the Mauerlat transverse beam to fasten the cornice and the pediment. When erecting a sloping roof for the attic, the gable will have a fairly large area, so it is necessary to ensure the design of the ebb and the gable overhang. 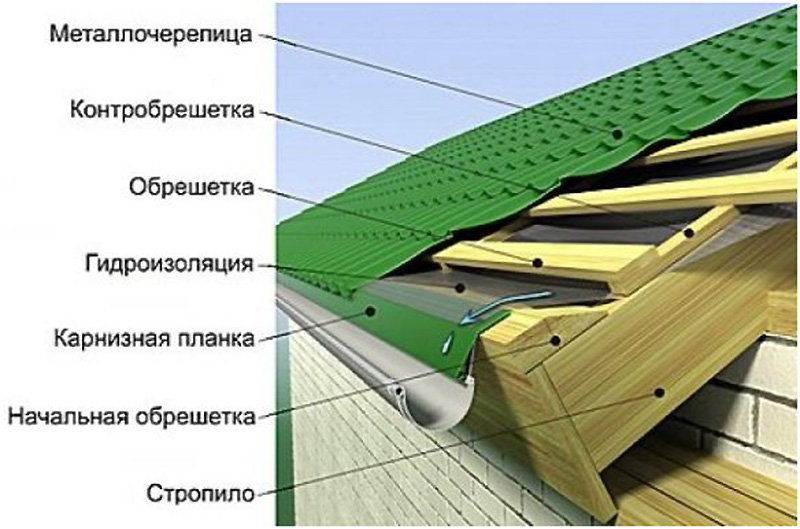
The rafters of a gable roof are several identical wooden beams of the same length and section. After the installation of the floor beams, a ridge beam is attached, for which beams with a section of 100 x 50 mm are fastened with spacers along the central longitudinal axis of the house. The height of the racks in a typical gable roof scheme is equal to the distance from the floor to the upper surface of the Mauerlat. Instead of a beam for a ridge, boards with a thickness of 50 mm can be used.
Before installing the truss system, it is recommended to make a large-scale template. To do this, the board from the truss structure must be attached with one end to the timber, the other to the ridge, and mark its length. This will be the template length of the rafters. 
The truss system is also mounted according to the template, observing the sequence of processes. After installing and fixing from the lower end of one rafter beam, you must immediately fasten the opposite rafter, and connect the beams with their upper ends to each other through the ridge. The rafters are nailed to the ridge beam, and to the floor beam - with steel brackets or a corner, self-tapping screws or anchors. For a roof of any shape with two symmetrical or asymmetrical slopes, boards are attached along and across the rafters to give the system rigidity.
Fronton and cornice
The pediment is sewn up after the construction of the truss structure is completed. Modern materials are increasingly replacing traditional wood when sheathing gables, and now use clapboard, siding, corrugated board, and other durable decorative finishing materials. Any sheathing material is attached to the frame, which is mounted in advance. Regardless of whether or not there is a room or an attic in the attic, a window opening must be left in the pediment - for ventilation and minimal natural lighting of the space. 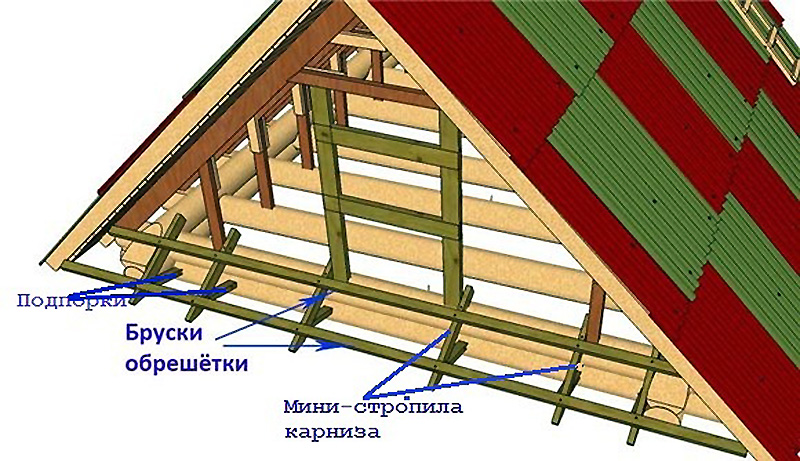
The cornice must be equipped around the entire perimeter of the house - it is necessary for moisture and wind protection of the truss structure, the walls of the house and the foundation. Since every self-respecting owner necessarily makes drainage around the perimeter of the house, they are also attached to the eaves, and drain pipes to the walls. The plastic drainage system is mounted on plastic clamps. From below, the cornice boards or the frame of the cornice are painted, sheathed with siding, clapboard or corrugated board - in unison with the pediment finish. 
The roof is mounted on the crate, and, based on the type of roofing materials, the sheathing is first made with vapor barrier, hydro- and heat-insulating materials. For roofing, you can use ondulin, metal tiles, ceramic materials, soft tiles, etc.
- Self-tapping screws for roof construction must have a manufacturer's mark and EPDM gaskets ≥ 2 mm thick, otherwise roof leakage cannot be avoided;
- Poor-quality protective coating of fittings under the influence of weather conditions will quickly collapse, which will lead to leakage at the attachment points, and an ugly appearance in the form of rusty or dirty spots;
- The absence of a snow retention system is the possibility of unexpected snow coming off the slopes, which can lead to failure of the roofing and drainage system;
- Poor ventilation is the formation of condensation in the under-roof space.
According to statistics, every second homeowner built his home on his own. According to their reviews, self-erecting a roof is one of the most difficult stages for non-professional builders. Therefore, it is very important to approach this stage, having in mind a complete understanding of all the nuances of the process. To figure out how to make a roof with your own hands, you need to study the device, installation technology, the procedure for work and the features of fastening all components of the structure.
Roof types
First you need to decide on the form. To date, the most popular types are:
Form FeaturesCovering the roof with one single slope will save nerves and materials, since structurally this is the simplest option. If you make such a frame yourself, then the labor intensity of the work will be the least, and the installation speed will be high. But this form has a drawback - there is no possibility of arranging a full-fledged attic or attic, since the under-roof space is too low.

A gable roof is mounted much more often. It is a little more difficult to manufacture, but allows you to get more space. Compared to the four-slope, it has less complexity and mass, but it will be necessary to make triangular gables along the ends of the building.
 Gable - the most popular form
 Before proceeding with the independent construction of a roof with four slopes, you will need to seriously prepare. Such a system has more elements than the previous two. In addition, there is no way to make full-fledged windows in the attic, since the roof structure is devoid of gables and installation is difficult or unavoidable.
 The four-slope is difficult to construct, but savings are achieved due to the absence of gables
 For an attic, a combined design with. In this case, the lower part of the roof has a greater slope than the upper part. This assembly allows you to raise the ceiling in the room and make the house built more comfortable.
 A broken line is not the most “architectural”, but very efficient in terms of space used
 Calculation
Before starting work, you need to make a design calculation. It makes no sense to calculate sections of all elements. In most cases, they can be accepted constructively:
- mauerlat - 150x150 mm;
- racks - 100x150 or 100x100 mm, depending on the section of the rafters;
- struts - 100x150 or 50x150 mm, taking into account the convenience of connecting with rafters;
- puffs - 50x150 mm on both sides;
- runs - 100x150 or 150x50 mm;
- pads with a thickness of 32 to 50 mm.
The calculation is usually performed only for rafter and sloping legs. It is required to choose the height and width of the section. The parameters depend on:
- roofing material;
- snow region;
- the pitch of the rafters (selected so that it is convenient to lay the insulation, for mineral wool between the elements, 58 cm should remain in the light);
- span.
You can choose the cross section of the rafters using general recommendations. But in this case, it is recommended to make a small margin.
 The calculation is usually performed for rafter legs
 If you do not want to delve into the intricacies of calculations, you can use special ones.
If you intend to make a warm roof, then the height of the section of the legs is selected taking into account the thickness of the insulation. It must be mounted so that it does not protrude above the supporting beams. You also need to take into account that for mineral wool a ventilation gap of 2-4 cm is made between it and the coating. If the height of the rafters is not enough for this, the installation of a counter-lattice (counter-rail) is provided.


Step-by-step instructions for performing work
The sequence of stages of the construction of the roof is as follows:
- taking measurements of the building box (the dimensions may slightly differ from the design ones);
- preparation of materials and tools, wood treatment with an antiseptic;
- fastening the Mauerlat to the wall;
- installation of a ridge crossbar, if needed (for layered rafters);
- frame installation;
- strengthening the roof with the help of racks, struts and puffs;
- waterproofing;
- crate;
- provision of ventilation;
- installation of drips;
- cover installation.
Fixing the Mauerlat
In order for the roof to be securely fixed, care must be taken to securely connect it to the wall of the building. If a wooden house is being built, then the Mauerlat is not required - the upper crown of a bar or log acts as this element. In this case, fastening to the wall is carried out using special “floating” fasteners. They are sold ready-made, most often they are called sleds. This version of the roof device allows the entire structure to slightly shift when the walls shrink without damage and deformation.
 "Sliding" mount in a wooden house
A similar situation arises with a frame house. In this case, the upper wall trim will be the Mauerlat. It is attached to the racks of the frame with a gash using corners, staples or nails.
 Methods for attaching rafters to the strapping in a frame house
 The construction of a roof made of brick, concrete blocks or concrete implies fastening through a Mauerlat. In this case, there are several ways.
There are four ways to put the Mauerlat on the wall:
- on staples;
- on studs;
- for anchor bolts.
Mauerlat can be fixed on brackets. In this case, wooden blocks are laid in the masonry from the inside. They should be located at a distance of 4 rows from the edge. One side of the bracket is attached to the Mauerlat, and the other to the same bar in the masonry. The method can also be classified as simple. It is not recommended for large buildings with high loads.
 Mauerlat fastening on brackets. In the laying of the wall, antiseptic wooden bars are provided with a step of 1-1.5 m
 Do-it-yourself fastening during roof installation can be carried out through studs or anchor bolts with a diameter of 10-12 mm. Fasteners are laid in the masonry. A Mauerlat is temporarily placed on the edge, you need to lightly hit it with a hammer. After that, recesses remain on the beam in the places of fasteners. On them you need to make holes for the studs. After that, the timber is put on the fasteners and the nuts are tightened. The method is ideal for walls made of lightweight concrete in the presence of a monolithic armo-belt.

Fastening rafters to Mauerlat
In houses made of brick or stone, it is more reasonable to carry out with the help of a rigid attachment of the rafters to the Mauerlat. In this case, you can use both layered and hanging systems. The design assumes two ways:
- with a notch;
- without notch.

In the first case, the rafters are hemmed with a slope so that they are tightly adjacent to the Mauerlat. For the removal of the cornice, fillies are provided. They are attached to the leg with an overlap of at least 1 m. Rigid fixation of the knot should be done using self-tapping screws, nails or staples. But the assembled frame will have greater reliability if metal corners with holes for self-tapping screws are used for fixing.

The method without cutting often does not involve the use of fillies. In this case, the frame overhang is provided by the beams themselves. This option is simpler than the previous one, since it does not require high accuracy. It is suitable for beginners. For a snug fit to the Mauerlat, in this case, use persistent bars or boards. Rigid fixation, as in the previous case, is performed with metal corners on both sides.

Fastening rafters to the wall
The frame made must be fixed to the box of the building - this will not allow a strong gust of wind to tear off the roof. To do this, it is necessary to take as a rule the use of a twist of two wires with a diameter of 4 mm. They are wrapped around the leg at the place of support on the Mauerlat, and after that the wire is attached to the wall on an anchor or ruff about 4-5 rows before the cut. The element must be laid in advance in masonry.
 Windbreak protection
 For a wooden house, you can simplify the task. You can assemble the frame using staples. This option will speed up the process. But it is important to remember that this method is only suitable if the walls are made of wood.
System Gain
How to strengthen the frame with spans of more than 6 meters? It is necessary to reduce the free span of the rafters. For this, struts and racks are used. It is necessary to make reinforcement taking into account the layout, it is important that these elements do not interfere with the stay of people and harmoniously fit into the interior.
The struts are usually placed at an angle of 45 or 60 degrees to the horizontal plane. Racks cannot be supported on the floor span. They are allowed to be installed on the underlying walls or beams and trusses thrown between the walls.

Tightening is necessary to reduce thrust. Because of him, the rafters can simply disperse. This is especially true for systems with hanging beams. To assemble the frame, use two puffs, which are attached on both sides of the rafters. Fixation is carried out on self-tapping screws, nails or studs.
At the top, the rafters rest on an intermediate or ridge run. Depending on the chosen system, location and width of the span, it is made of timber with a cross section of 50x100 to 100x200 mm. Fastening is carried out on connecting metal plates, bolts or nails.

crate
Before starting work at this stage, it is required to lay a waterproofing material. Builders recommend using a vapor-diffusion moisture and wind-protective membrane. It is more expensive than plastic film, but provides better protection. Your home is not a reason to save money.

The roof requires fixing the crate. The type depends on the chosen roofing material. For metal, a sparse crate made of boards 32-40 mm thick will suffice. Under bituminous tiles, a solid crate of 25-32 mm boards or moisture-resistant plywood is needed.
Ventilation of the under-roof space
Before proceeding to the stage of laying the roof, it is worth considering the ventilation of the under-roof space. This will protect the structure from mold, fungus and destruction.
 Proper arrangement of ventilation under the roof will protect the structure from the appearance of fungus
 For ventilation it is necessary to provide:
- air flow through the eaves (the filing of the cornice is made with a rarefied board or special perforated spotlights);
- air movement under the coating (there should be a gap of 2-3 cm between the insulation and the roof);
- air outlet in the area of \u200b\u200bthe ridge (for this, a ridge and / or point aerator is installed on the roof).
Roofing
The type of roofing is selected from aesthetic and economic considerations. It is also worth studying the offers of manufacturers and finding out the permissible slope. For example, bitumen shingles are not recommended for laying at a slope of more than 45 °.
 Seam roofing is a lightweight, fireproof and durable coating.
 The wall material must provide reliable waterproofing. Its installation is carried out in strict accordance with the manufacturer's instructions. There are five most common types of coverage: roof insulation.
1.
2.
3.
4.
5.
To save money, the owners of country houses prefer to do some of the construction work with their own hands. How to make a roof in a private house - many developers ask this question. But before carrying out work, you should study all the information about the roofs. You need to know what roofs exist, get acquainted with their shapes and design features. It is no secret that these elements perform many functions. The range of their characteristics is not limited to the protection of the internal space of the house from the penetration of moisture, cold air currents and snow. Our article will tell you all about the features of roofs, and the construction of the roof will also be described in detail.
The device of the roof of a private house and their types
Modern construction has found application for various types of roofs of houses. Of course, each type requires an individual. Let's talk about the most common, as well as their advantages and features.

Do-it-yourself roof of a private house: preparation
In addition to choosing the type of roof, consider what material will be used to cover it (more: ""). Based on this, the parameters of the truss system are determined. The weight of the roofing affects its pressure and loads. Therefore, it is important to resolve the issue with the method of fastening roofing elements. Finally, it is worth deciding on the additional parts of the truss system.
The best option for calculating the material for the rafter system and roofing is the presence of a roof drawing. The diagram usually indicates all the attachment points of the truss system. They, in turn, reinforce the elements.

The greatest weight has a roof made of ceramic tiles. The rafter system and foundation (+ walls) must take into account the weight of this material. For the rafter system, coniferous wood is most often used. At the same time, its humidity should be no more than 20%. Wood should not contain knots and blue.
Tools for arranging the truss system:
- vapor barrier material;
- waterproofing film;
- insulating material;
- iron staples;
- self-tapping screws, nails, screws;
- roofing tools.
How to build a roof of a private house: truss system


The device of the rafter system implies the support of the lower end of the rafter on the Mauerlat. In this case, the upper end rests both on the skate and on the opposite rafter. As a result, roof trusses are created. They are connected using a ridge beam or two boards that form a ridge. To strengthen the rafter legs, special spacers, struts, struts, stretch marks and crossbars are installed. All these elements make the truss structure sufficiently rigid and durable.

When equipping a gable roof, the first two structures of the truss system (triangles) must be assembled on the ground. Only after complete assembly, you can lift them to the roof. Spacers are used for temporary reinforcement. Then, the elements are connected using a ridge beam or boards on both sides. Next, the installation of the remaining rafter legs is carried out. For the convenience of workers, floor beams are usually laid on the Mauerlat. Also, a temporary flooring must be present.
For fastening the truss system, they use not only tie-ins and cuts, but also iron staples, metal corners, self-tapping screws and nails. The rigid frame of the truss system will provide struts, crossbars, ties and stops. Sometimes it becomes necessary to lengthen the rafter legs. In this case, the first step is to splice two rafter boards. At the junction, shorties are installed on both sides.
Roof construction of a private house: crate
Having finished installing the rafters, you can fill the crate. For its arrangement, you will need boards (2.5 cm thick) or bars. The crate can be either solid or have gaps. But before that, waterproofing should be laid along the rafters. When creating a living room in the attic, it is best to insulate the roof in advance. Insulation is placed in the space between the rafters. The material can be mineral wool or polystyrene.

To create a residential "warm" room in the attic, lay the insulation in a double layer. The thickness of one layer should not be less than 50 mm. The insulation layer contributes to the absorption of noise from outside the room. A vapor barrier membrane is laid on the insulation. It protects the material from the formation of condensation on it. In order not to spend money on repairing the roof of a private house once again, follow all the instructions and recommendations. Try to properly lay the layers of the roofing cake.
Roofing
Perhaps the main stage of the whole work. The arrangement of the frame with roofing material is a very important procedure. Today you can find a wide range of materials for every taste and price category. The most affordable and reliable material is slate. However, many are confused by its appearance. As an alternative, you can use modern polymer variants of slate - euroslate or ondulin.
Today, more and more developers prefer another roofing material - metal tiles. The coating is relatively inexpensive, while it has the buyers with its appearance and excellent performance. The downside of the metal tile coating is the low level of sound absorption.
Roof shapes, professional advice, video details:
Thus, the roofs of houses are made both by hand and by specialists. But it is worth noting that the first option can sometimes outperform the work of experienced installers. This is due to the fact that the owners of country houses are trying to do high-quality roofing work. It is logical that a well-designed and executed roof will last for many years, so you should order from trusted specialists. At the same time, it is very important not to spend your financial resources on additional repairs. It is better to carry out all the work with high quality once and arrange comfortable housing for yourself and your loved ones.
After completing the assembly of the roof, you can begin to equip the drainage system. How to carry out such work can be found in the article: "". We recommend that you watch photo and video materials on this topic in order to be aware of all the innovations in the construction market.
The roofs of private houses are divided into several different categories, depending on the shape, structural elements, complexity of the device, and other things. Choosing the type of roof during the construction of a building should take into account many factors: the amount of precipitation in a particular area, structural strength, wind load, arrangement of living rooms in the attic, etc.
The roof of the house performs several important functions at once:
- provides hydro and noise insulation;
- creates a barrier from the wind;
- acts as a thermal barrier.
The durability of the structure depends on the quality of the structure itself and the roofing material. Also, these indicators affect the cost of heating rooms inside the building.
Flat and pitched roofs
Roofs of houses can be flat and pitched (sloped).
Depending on the architecture of the building, an appropriate roof structure is selected even at the design stage. Drawings are created, and calculations are carried out, taking into account all the features of this architectural structure. The layout of the roof - the attic or living quarters - is also thought out in advance.
 Country cottage with a flat roof
 Flat structures are found mainly in countries that receive a small amount of annual precipitation. Since with abundant rainfall, water will accumulate on such a roof, and it may begin to leak. In the vastness of our country, pitched roofs are used in the construction of buildings. The plane of such structures is located at a certain angle, usually it is more than 10 degrees and depends on the abundance of precipitation that falls during the season in a given region.
You can learn more about all the other advantages and disadvantages of flat roofs from this special video.
Much more often they use roof projects of private houses with an inclined structure, which can have several slopes at once.
Attic and attic roofs
According to their design, roofs can be divided into non-attic and attic. In non-attic, the bearing elements of its design are at the same time the ceiling of the upper floor of the house. They can be ventilated or non-ventilated. Attic roofs have an attic floor that separates their structure from living quarters.

Roof purpose
When choosing the roof of a house, you should decide in advance how its space will be used: as a simple attic or living space. These points significantly affect what shape and type of roof is suitable for your home.
The main types of roofs of houses in shape
Roof structures of private houses in their form can also be divided into several types:
- lean-to,
- gable,
- hip,
- multi-forceps,
- attic,
- tented,
- domed,
- conical,
- flat.
 The main types of roofs for private houses
 For shed roofs, the angle of inclination usually does not exceed 20-30 ⁰. The planes of mansard roofs are set at an angle of 45-60⁰ in the lower part and 25-35⁰ in the upper part. For conventional gable structures, this figure is in the range of 25-45⁰.
Hipped roofs suggest the presence of 4-8 planes for better removal of rain and snow.
Beautiful roof structures of private houses are obtained by combining several gable elements or types, however, maintaining such structures in good condition and installing them is not an easy task.

shed roof
It has a fairly simple form. At the same time, this type of roof is extremely rare in the arrangement of private residential buildings, since with such a design, the load on the rainwater drainage system increases significantly, and they simply do not look too beautiful.

 Private house with pitched roof
 In most cases, such roofs are used in the construction of outbuildings of small width. If you still decide to equip just this type of roof, then you will need an enhanced drainage system with a greater throughput.
Gable roof
Also having a very simple design, they are the most common type of roofs for private low-rise buildings. When arranging it, you can use almost any roofing materials.
 Scheme of the device of a simple standard gable roof of a private house
 Hip (four-pitched) roof
The hip (four-pitched) roof is more common in the southern regions. With this option for arranging the roof, the attic has no gables, and the dormer windows, in most cases, are located at the intersection of the ridge with the hip ribs. By design, a hip roof is much more complicated than a gable roof, so it is more often used in cases where a building needs to be given aesthetic appeal.
 The design of the hip four-slope roof of the house
 Multi-gable roof
The multi-gable roof type is distinguished by an impressive number of different options, depending on the size and number of gables (pediments). Its construction is recommended to be trusted only by experienced professionals, since its arrangement is accompanied by the formation of sunken corners, which require very precise and accurate roofing work.
 The device of the multi-gable roof of the house
 mansard roof
As a rule, they equip in cases where it is planned to use the attic for living quarters. This type of roof has a broken profile and, accordingly, is somewhat difficult to manufacture. It is often a kind of multi-gable and gable roof.
 Scheme of a broken mansard roof
 Other types of roofs of private houses
In addition, conical, domed and combined types of roofs are quite common. Conical and domed roofs are often used as decorative or separate elements of more complex building structures. The combined type is one of the most common types of roofs, as it combines several elements of individual types at once.
 Private country cottage with a conical roof
 The choice of the type and shape of roofs for private houses
When choosing the shape and type of roof, it is necessary to take into account the factors on which its performance depends. First of all, you should pay attention to the slope of the roof. In snowy areas, it is advisable to select structures with simple and steep shapes, since snow will practically not accumulate on such areas.
In areas with strong winds, the strength of the wind load must be taken into account when choosing.
The higher it is, the greater the angle of inclination, area and height of the roof. In addition, it is necessary to take into account the fire requirements for roofs.
Read also
Insulation of the roof of the house
Glass roofs for private houses
Many owners of country cottages dream of enjoying the view of the starry sky. Roof projects for private houses may involve both partial glazing and the arrangement of a transparent dome. Glass roofing is installed on the terrace, balconies, veranda.

The shape of the roof for private houses and various kinds of structures is made in the form of an inclined plane, a dome, a sphere. Panoramic glass roofs are mounted on several slopes, which significantly increases the viewing area. During the installation of this design, it is necessary to use reinforced aluminum and steel profiles.

Glass roofs for private houses have their own distinctive features. When designing the structure, it should be taken into account that it will be necessary to periodically wash and repair the glass. The roof, like windows, will fade over time from dust and precipitation on its surface. It is also advisable to install a heating system on the windows so that in cold weather ice and snow do not accumulate on them, and you can enjoy the views.
Materials for transparent roofs
To create transparent and, at the same time, warm and safe roofs, they use:
- triplex glass,
- plexiglass,
- polycarbonate,
- transparent slate.
Ordinary glass is not used to create transparent roofs because of its high fragility; if broken, fragments can harm human health.
- Triplex is the safest material for creating a safe coating.
- Laminated glass also does not shatter when broken, however, the light transmission is not very high and it is very thick.
- Wired glass is sometimes used for roof glazing. If the glass breaks, the fragments will remain in the metal mesh frame.
- Plastic translucent materials - polycarbonate, plexiglass and slate have excellent properties (lightness and high strength), which make it possible to use them to create complex sliding structures.
The device of a simple roof of a wooden country house
House roof projects usually involve the maximum use of attic space, for which the room above is expanded and insulated. The resulting usable attic area can be used for housing.
The roof structure of a wooden house consists of a frame and a roof. The roof frame consists of load-bearing and fastening elements. The main part includes: rafters, Mauerlat and crate. Important additional frame elements are crossbars, struts, racks, etc. They give rigidity to the structure.
 The design of the elements of the roof of a wooden house
 The height and volume of the resulting room depend on two factors: the angle of inclination and the number of slopes. Typically, projects for the roofs of country houses involve a gable broken shape. This design is the most convenient for human life. Sometimes on the second floor the plan includes a balcony. Be sure to take into account that at the maximum point the height of the attic floor should not be less than 2.2 m.

The inside of a conventional gable roof can also be used as a living area. There are bedrooms or an office here. In this case, the height of the middle part of the room should not be less than 1.8 m.
The roof consists of materials that provide heat, hydro and vapor barrier.
When constructing a roof, special attention is paid to the choice of insulation. It is also worth stopping at the roofing material, which is more suitable in terms of characteristics for your building.
 Detailed scheme of the roof of a wooden house
 - Waterproofing provides protection from precipitation, so the coating should not have damage on its surface, and even very small holes.
- The vapor barrier ensures that there is no condensation, which can cause dampness in attics and attic rooms. Also, the inclusion of window openings in the projects of the roofs of country houses, which will allow ventilation, will allow to exclude the dampening of the wooden structure. The location and number of vents affects the ventilation of the attic and its illumination.
- produced depending on its design features. Rigid material is laid on monolithic floors. From above they make a screed and mount the floor covering. On wooden structures they are laid: vapor barrier material, insulation, a subfloor is made and only then the floor covering is installed.
