Mounting pgp to the ceiling. Installation of a wall of tongue-and-groove slabs: the cost of work per square meter
Groove blocks are a building material that is used for the installation of interior partitions. They are produced from gypsum during low-temperature processing of natural gypsum, therefore their second name is gypsum boards. This building material is characterized by high dimensional accuracy.
Types of tongue-and-groove blocks
There are ordinary and moisture resistant gypsum boards. The gypsum board groove can have a trapezoidal or rectangular shape. There are full-bodied and hollow gypsum boards. For the construction of walls inside rooms with dry or normal humidity conditions (apartments, hotels, offices, schools, industrial buildings), ordinary gypsum boards are used, and for rooms with high humidity, moisture-resistant gypsum boards are used. The composition of moisture-resistant gypsum boards includes hydrophobic additives.
Gypsum boards are a very cost-effective building material. And thanks to the high quality of their front surface, there is no need to spend a lot of money on finishing work. A gypsum board wall can be wallpapered, painted or tiled with ceramic tiles.
Plasterboard installation is very simple and easy. And due to the low price, the use of gypsum boards gives a significant advantage over the construction of interior walls made of bricks in apartments or cottages. Another advantage of gypsum boards is their resistance to fire.
How to mount tongue-and-groove blocks
In order to build one square meter of a partition, 5.5 gypsum blocks and approximately 1.5 kg of glue are required. In order to enhance sound insulation in the place where the partition adjoins the wall, use a cork gasket. If there are no strict requirements for sound insulation, then the blocks can be mounted to the enclosing structures directly on the adhesive solution.
First, the surface on which the partition of tongue-and-groove blocks will be built is cleaned of dust and dirt. It is built before the installation of a clean floor. Then markup is done - using a cord or laser level. Marks are transferred to the walls with a plumb line. In the event that the floor is uneven, a leveling layer must be applied. Laying can be done no earlier than in a day.
Before starting installation, it is necessary to prepare an adhesive solution, which was advised by the manufacturer of gypsum boards (usually it is quite affordable). To do this, the dry mixture must be poured into a bucket with the required amount of water. Then mix thoroughly and leave for 2-3 minutes. It must be taken into account that the viability of the composition is only 1 hour, and the consumption of glue per 1 m2 of masonry is only 1.5 kg.
Foreman's advice: When mixing glue, use only a clean container and clean cold water.
In order for the blocks in the masonry to interlock better, they must be laid with the groove up. To do this, the comb is removed from the tongue-and-groove blocks of the lowest row of masonry. The laying of the first row is done according to the level and carefully aligned in one plane. When laying the next rows, the adhesive is applied and distributed over the grooves of the already laid row. The vertical seam of each tongue-and-groove masonry block must also be filled with adhesive. The thickness of the seams should not exceed 2 mm. During installation, the gypsum blocks in the masonry are settled with a rubber mallet. Laying is done in a run - at least a third of the length. Additional elements are easily obtained using a hand plate. The elements of the last row of masonry are sawn at an angle so that there are no voids between the partition and the ceiling.


Foreman's advice: if there are potholes on the tongue-and-groove blocks, then they need to be filled with putty.
If it is necessary to make an opening in the partition, the width of which does not exceed 800 mm, and above which there is only one row of masonry, then it is not necessary to install a jumper. In this case, it will be enough to install and leave a support in the opening until the glue dries.
If the width of the opening exceeds 800 mm, then a metal or wooden jumper must be installed above the opening. To give the outer corners of the structure additional rigidity, you need to strengthen them with a metal profile. Internal corners can be reinforced with reinforcing tape.

Installation of gypsum boards can be carried out not only by a professional, but also by a novice builder. At the same time, an experienced worker can make 20 m2 of wall per shift.
Foreman's advice: when fastening objects that exert a slight load (mirrors or bookshelves) to a wall of tongue-and-groove blocks, wedging corrosion-resistant dowels can be used. When installing hanging cabinets or sanitary ware, corrosion-resistant bolts must be used that penetrate the wall through.
Gypsum boards are an affordable, profitable building material for building walls indoors. To build a wall of gypsum boards, you do not need special knowledge, you just need to watch a detailed video of laying gypsum blocks.
Video
Interior wall partitions, in most cases, are not load-bearing structures in the house. They must have sufficient strength and good soundproofing properties. The design of the partition should easily withstand intra-house communications and hanging furniture.
In this article we will talk about tongue-and-groove gypsum (gypsum) slabs (GWP). This material is used to create interroom and interroom partitions. With a competent approach to the construction, partitions made of tongue-and-groove gypsum boards (GWP) will meet the requirements listed above. But you need to focus on the fact that the installation of tongue-and-groove plates is competent!
If you neglect the observance of construction technology, then the installation of tongue-and-groove partitions will end with the fact that instead of a solid monolith, the builder will get a shaky and uneven wall, ready to collapse at any moment.
Kruchenkov FORUMHOUSE user, Moscow.
At home I have a partition in the bathroom made of tongue-and-groove slabs. Apparently, when a hole was made in it for a sewer pipe, something went wrong. Now, if you shake this structure by the edge with your hand, you can hear the blocks knocking against each other.
On FORUMHOUSE you can find a lot of similar examples. And if the partition was originally built contrary to the existing technology, then defects can be corrected only by completely destroying the structure.
But do not be afraid, because the technology for building wall partitions from PGP is quite simple. And if it is treated with due attention, then the impression of the work done will be very positive.

AlexDo FORUMHOUSE User
I've worked in construction. The buildings of the old fund were reconstructed. So, all partitions were made of gypsum tongue-and-groove plates, work is a pleasure. As a partition - that's it. Easily and quickly fit. The walls are even. After puttying, they are ready even for painting, even for wallpaper. The fasteners in the plate hold well. Noise isolation is also normal. But if anything, you can make a crate, lay mineral wool and trim with a trailer or panels.
A little about the practicality of GWP
Manufacturers of gypsum boards guarantee that this material provides reliable fastening of standard elements of a modern interior. This means that GKL partitions can withstand loads comparable to those on walls made of other standard materials. Hanging cabinets, household appliances, stretch ceilings - all this is mounted without problems on a tongue-and-groove gypsum partition. It is possible to expand the functionality of a wall partition made of PGP by mounting metal-plastic water pipes (with a diameter of not more than 16 mm) and electrical wiring elements into its body.
Grachev68 FORUMHOUSE User
And you can also put doors without extensions in the tongue-and-groove, lay the electrician without problems, hang shelves and TV more reliably.
Tongue-and-groove slabs - what is it
Standard GWP are of two types: full-bodied and hollow. The construction of solid slabs is more durable, but this material is significantly heavier than its hollow counterpart. For this reason it is not recommended
use as part of partitions mounted on the floor with
wooden joists.

Hollow GWP provide high sound insulation (43 dB) without overloading the floor structure. Some people believe that all kinds of pests can live and multiply intensively in the internal space of hollow slabs. But such an opinion has not yet been seriously confirmed.

Ordinary (solid and hollow) tongue-and-groove slabs are used for partitions or wall cladding in rooms with dry and normal humidity levels. If the partition is planned to be placed in a room with a high level of humidity, then preference should be given to moisture-resistant plates that have a peculiar greenish tint. Keep in mind that such GWPs are slightly heavier than regular full-bodied products.

Preparatory work
List of tools for working with tongue-and-groove plates:
- Marking cord:
- Hacksaw with a wide blade and a large tooth;
- Roulette;
- Putty knife;
- Drill with a nozzle for stirring mixtures;
- Bucket;
- Building level and plumb;
- Rubber mallet;
- Square;
- Screwdriver.
In accordance with the recommendations of manufacturers, the length of the wall partition made of PGP should not exceed 6 m. The maximum height of the structure is 3.5 m. It is possible to increase these parameters, but the maximum strength of the partition is ensured only if the specified dimensions are observed.
The base for the wall of the tongue-and-groove slab must be even, stable and completely free of dust. If the floor is concrete, and there are differences on it exceeding 3 mm, then it must be leveled before starting installation work; create a leveling layer. For this, a mortar based on sand and cement is suitable (the mortar grade is not lower than M50).
 Alignment of the wall from the GWP.
The solution is applied to a clean dampened floor. To obtain an ideal surface, you can create a kind of formwork and fill it with mortar clearly at a horizontal level. After complete drying, the base must be coated with a primer for concrete.
If you can do without a leveling layer, then the base for the future partition, as well as the junction of the partition to the enclosing walls in 2 layers, are covered with a primer.
If the partition is mounted on a wooden floor, then the base must be reinforced with a strong, even beam.

Kirill147 FORUMHOUSE User
According to the technology, gypsum tongue-and-groove panels require an even base - a screed or a separate non-flexible beam under the partition.
When the base is ready, you can mark the location of the partitions and doorways. This is done with the help of lacing, a plumb line and a level.
Installation of HGP can be carried out at temperatures from -10 to +30°C. Building material must be brought into the room in advance. This will help him "get used" to the desired temperature regime and insure the partition against deformation (when the temperature changes, the plates may slightly change their volume).
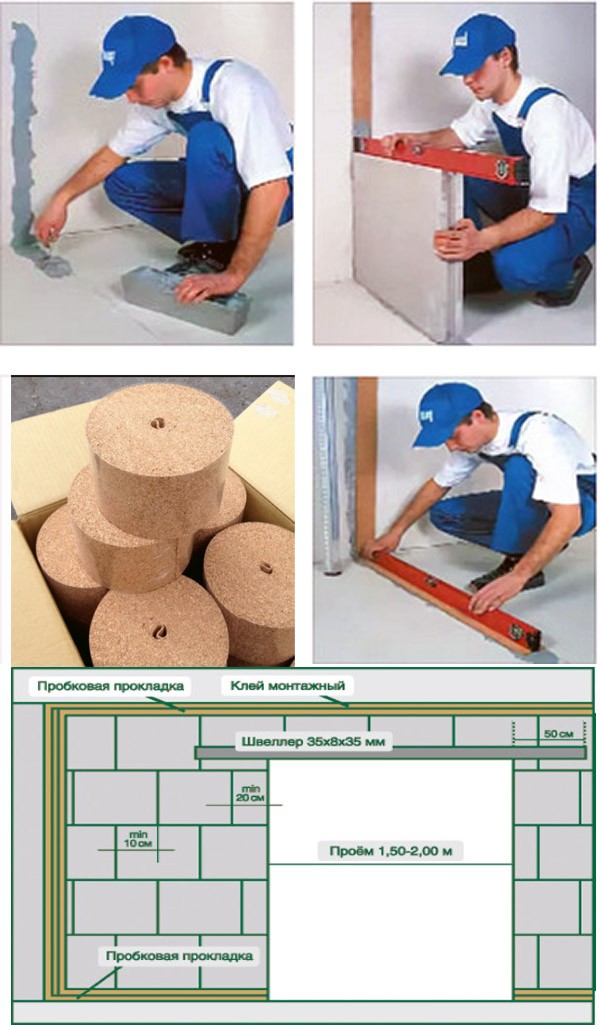
Installation of an elastic gasket
To ensure that temperature fluctuations and deformation of the bearing elements of the building do not lead to the destruction of the partition over time, the HGP structure should be isolated from the base and adjacent walls with a special elastic (damping) tape. The damper tape for PGP protects the wall from mechanical damage and increases the soundproofing qualities of the partition. Elastic tape is a special cork backing (at least 75 mm wide), which we will glue to the base and walls in accordance with the markings. Plates and tape are fixed with the same mounting adhesive.

Consumables intended for installation work (building mixes, gaskets, dowels, suspensions, etc.) should be selected based on the recommendations of the manufacturer of the PGP. At negative temperatures, the installation of the GWP is carried out using a frost-resistant adhesive gypsum mixture.
Glue with a spatula in a thin layer is applied to the prepared surface. The tape is rolled out from above and pressed lightly with your hands. The adhesive sets within one hour. After this period, you can start building the partition.
PGP installation
The damper gasket under the tongue-and-groove slabs is covered with a layer of assembly adhesive, on which the lower, first row of the GWP is laid. The plate can be positioned with a groove up or a groove down - it does not matter. But if the groove is at the bottom, then the comb will not have to be sawn off so that the plate becomes even. It is allowed to install the upper row of plates vertically (if necessary, due to material savings).
During the laying of the first row, the vertical groove of the tongue-and-groove plate and the base of the floor are smeared with glue. Particular attention should be paid to the observance of vertical and horizontal levels. The plates should be planted with a mallet.
The thickness of vertical and horizontal joints should not exceed 2 mm. After installing the next plate in its place, use a spatula to remove excess glue at its joints.
Additional elements for filling the gaps between solid slabs, walls and openings are easily cut from the GWP using a hacksaw.
The relative displacement of the vertical joints in the laying of the PGT must be at least 10 cm. This is a prerequisite for ensuring the strength of the structure.
At the intersection of two partitions made of gypsum tongue-and-groove slabs, as well as at the corners, the slabs are laid in such a way that their joints overlap each other. The tongue-and-groove elements that interfere with the correct dressing device should be cut with a hacksaw.

After the partition is ready, its outer corners must be reinforced with a perforated metal profile and puttied.

It is often asked whether it is necessary to glue tongue-and-groove partitions with a sickle. Yes, the inner corners are glued with a sickle and smeared with putty.
Fastening the partition to the wall
The strength of the junction of the partition from the tongue-and-groove to the walls and the base is ensured by the installation of additional elements: mounting brackets, fittings or hangers. It is more convenient to use mounting corners or suspensions. After all, they are attached to the plate with the help of ordinary self-tapping screws, and to the walls - with the help of dowels. Plates of the 1st, 3rd, and 5th rows are attached to the side walls. It is possible more often, but there should be several (at least three) mounts. A strong abutment of the base is created for every second slab.
Direct hangers during installation can be installed directly into the groove of the plate, having previously cut them to the required dimensions.

Between the top row of masonry and the ceiling of the room, you will need a technological gap of at least 1.5 cm. It must be left and foamed with mounting foam. After drying, the excess foam must be cut off, and the seam must be puttied. Between the top row and the ceiling, additional fasteners are installed at the same frequency as below.
Creating doorways
For the device of door or window openings, the width of which does not exceed 90 cm, masonry can be done without additional reinforcement. In this case, an auxiliary structure made of wooden beams is mounted above the opening, which is removed after the top row slabs are laid and the mounting adhesive has set.

If the width of the opening exceeds 90 cm, then a wooden or metal jumper should be installed above it. The ends of the jumper should protrude beyond the opening by 50 cm on each side. This will ensure an even distribution of the load on the partition.

The door (window) frame is attached to the partition using frame dowels and mounting foam.
Interroom partitions from PGP
Inter-apartment partitions made of PGP, unlike interior partitions, are made double. A technological gap of 4 cm is left between the plates. First, one partition is erected, then the second. In order to enhance sound insulation, the space between the slabs is filled with soundproofing material, mineral wool, etc.
Installation of communications
The design of partitions made of PGP allows you to install hidden wiring. Gypsum boards are strong enough to allow vertical grooving and are thick enough to accommodate junction boxes. Technological cavities inside hollow GWP can be used as horizontal strobes.
If the channel selected for laying the wire is expanded with a crown with a diameter of 45 mm, then the cable will pass through it without difficulty. The main thing is not to clog the side hole of the plate with glue during installation work.

In order to make it more convenient to pass the wire through horizontal channels, non-through mounting holes can be made in the side surface of the partition.

Some doubt the safety of vertical chasing of plaster walls. But, according to the manufacturers (and the builders themselves), there is nothing to be afraid of.
Manufacturers of building materials are constantly using innovative technologies to improve quality and speed up repairs. In addition, it is important to minimize costs and simplify the construction process. For zoning space with the least difficulty, you can use partitions made of tongue-and-groove slabs. They are a good alternative to plasterboard walls and allow you to get a smooth and stable structure.
Types of tongue-and-groove plates and their advantages
The tongue-and-groove plate differs from other similar materials in the presence of groove-comb joints at the ends. This feature makes it possible to connect adjacent elements, ensuring the smoothness of the surface and the strength of the partition.
There are two types of tongue-and-groove slabs: gypsum and silicate. Each type has its own advantages and disadvantages, which should be taken into account when building walls.
For the manufacture of gypsum blocks, building gypsum and special plasticizers are used. This material compares favorably with others and makes it possible to produce high-quality partitions from tongue-and-groove plates. They can be both standard and moisture resistant (green) and suitable for use in rooms with any level of humidity.
The main advantages of gypsum boards are: environmental friendliness, high fire resistance, good sound insulation. In addition, hollow blocks can be used, which will reduce the weight of the structure. Their only drawback is the difficulty with hanging shelves and other additional elements. But solid blocks can withstand almost any load, which distinguishes them even from plasterboard partitions.
The main advantage of any partition made of tongue-and-groove plates is the simplicity of finishing. It is not necessary to plaster such a surface, it is enough just to prime it. After that, it can be painted or wallpapered.

For the manufacture of silicate boards, water, quicklime and quartz sand are used. The resulting material has high strength (compared to gypsum) and moisture resistance. At the same time, they are “not afraid” of fire and absorb sound well.
Partition wall installation instructions
The process of installing walls can be considered using gypsum blocks as an example. This material is one of the most sought after in any repair and is perfect for the construction of interior partitions. Installation should be carried out after finishing work on leveling the floor surface. It is best to use materials from well-known manufacturers. For example, Knauf. This will avoid unpleasant surprises and problems.
To install partitions from tongue-and-groove plates, you need to purchase a number of components and the necessary tools:
- gypsum boards;
- mounting adhesive;
- putty for gaskets;
- gaskets (suitable from treated felt or cork);
- drill;
- mixer;
- hacksaw;
- level;
- rule;
- rubber mallet;
- roulette;
- marker or pencil;
- ribbon or twine;
- putty knife;
- wedges.
After the issues of purchasing materials are resolved, you can proceed to the implementation of the main points of the installation. The installation diagram will look like this:
- markup;
- cleaning of dirt from all surfaces adjacent to the future partition;
- gluing the gasket to the installation sites of the plates (Fügenfüller putty is used);
- installation of the first row of tongue-and-groove plates;
- laying the second row;
- installation of the last row (the edge of the plates must be beveled);
- sealing seams;
- finishing.
At first glance, everything is simple: a partition made of tongue-and-groove plates is assembled as a constructor, and there are no problems. But there are some nuances that need to be taken into account.
Firstly, at least a day before installation, it is necessary to bring the blocks into the room. This is necessary in order for the material to “get used to”, that is, to accept the desired humidity and temperature. Secondly, laying is done with the groove up. The grooves are subsequently filled with putty. Before laying the second row, you need to cut the first slab into two parts. This is necessary to arrange the vertical joints in a checkerboard pattern and to impart mechanical strength to the structure. Important: the width of the seams horizontally and vertically must be equal!

After the installation of the partition is completed, the surface of the tongue-and-groove plates must be primed. This will ensure the adhesion of the decorative layer and avoid the occurrence of surface defects. For decor, any type of wallpaper and coloring are suitable. The main thing is to choose the ornament or shade you like and carefully apply it to the partition.
Here are a few tips to help you complete the installation of walls in the most efficient way:
- “In many sources there is information that a slab partition can be installed in one day. It is not right. It is best to let the first layer “settle” for a day, and then continue to work.” Zoya makes repairs with her own hands.
- “Although they say that work with tongue-and-groove blocks is carried out practically without dirt and dust, this is not entirely true. The sawing process is quite dusty, so you should be prepared for constant cleaning.” Oleg, a novice repairman.
- “The material is quite new for our market, but already popular. I liked it not only for the smoothness of the surface, but also for the ease of installation. I only hung shelves and a TV on the finished wall, but I didn’t dare cabinets, ”Dmitry is repairing the dacha.
At first glance, partitions made of tongue-and-groove blocks are an ideal option for building walls and zoning space. However, this material also has its drawbacks. Information on how to solve problems that arise during installation and operation would not hurt. Share with us your experience!
If there is a need for zoning the premises, then one of the options for creating a partition is the use of tongue-and-groove plates.
This is a relatively new building material, which allows you to simplify the construction of the partition as much as possible its installation is quick and easy.
The specified building material has the form of monolithic slabs, which have exact geometric parameters, they are connected to each other using a tongue-and-groove lock. For the manufacture of such plates, building gypsum is used, they can be regular or moisture resistant.
 Since building gypsum is used to create such plates, they can “breathe”, do not burn, do not emit harmful substances, and do not smell, therefore they are ideal for the construction of interior partitions and decorative ones.
Standard plate size 667x500x80 mm, they have area 0.333 cm2, weight about 29 kg.
To create one square meter of a gypsum partition, you will need only 3 plates, which allows you to install partitions simply and quickly. Unlike, you do not need to mount the frame and fillerThe advantage of this material is that it turns out a flat and smooth surface, you just need to seal the seams and you can glue wallpaper, paint or lay tiles.
Mounting
Before carrying out the installation of a partition of plates, it is necessary to check the condition of the base. It must be strong, horizontal and motionless. If the old screed does not meet these requirements, make a new one. The mounting technology is reminiscent of
The differences in the height of the base should not exceed 1 cm, if this is not done, then it is leveled.
To carry out the installation of a tongue-and-groove partition, you need to have the following tools and materials:
- tongue-and-groove plates;
- adhesive composition;
- gaskets, they can be felt or cork;
- putty;
- construction mixer or drill with a special nozzle;
- hacksaw;
- level;
- plumb;
- rule;
- measuring instruments;
- rubber mallet;
- putty knife;
- wedges.
 Before starting the installation of plates, base must be cleared of debris, dust, after which it is covered with a layer of primer.
 The marking of the future partition can be done after the primer layer has dried.
Mark the doors, and to facilitate installation work, you can pull the cord.
 Marking is applied to the walls and ceiling, for which they use a plumb line and level.
Now you can prepare the solution, for this, water is drawn into the container and the dry mixture is gradually poured, everything is constantly mixed well, it is done with a mixer or a drill with a special nozzle.  The composition should be infused for several minutes and you can proceed with the installation of the plates.
It is necessary to prepare the glue in small portions with the expectation that it will be enough for you for 30-40 minutes of work.
You can lay the slabs directly on the floor, then you will get a rigid mount. The adhesive is carefully applied to horizontal and vertical surfaces, on average for mounting 1m2 of wall you will need 1.5-2 kg of glue.
When using the second method, the slabs are laid on a special cork gasket, which allows increasing the sound insulation of the walls. For this use tape 7.5 cm wide, which is glued around the perimeter of the partition.
 Gasket mounted on glue, its horizontalness is checked and it is necessary to give 20-30 minutes so that it is well fixed.
Laying of plates can be carried out both up and down with a groove, but it is more convenient to place it up, since it is easier to apply glue in a groove than on a ridge.
In this case, on all plates used for mounting the first row, it is necessary to remove the comb, do it with a chisel or a hacksaw, and then level the plane with a planer.
Laying slabs is carried out similarly to laying bricks or cinder blocks: glue is applied to the base, the plate is installed, upset with a rubber mallet and its horizontalness is checked. If alignment is required, wedges can be used.
During the installation of the following rows, the adhesive must be applied both on the horizontal and on the sides so that the boards are securely connected from all sides. 
The seam thickness is about 2mm, all excess glue that has come out of the plate is removed with a spatula.
For wiring, strobes are made in such partitions, and to install sockets, holes are drilled with a special nozzle installed on an electric drill.
 If it is necessary to install pipes of large diameter, then install a double wall.
Noise isolation device
Manufacturers indicate that sound insulation coefficient standard tongue-and-groove plate 80 mm thick, is 43 dB, which is a sufficient indicator to create comfortable conditions in the room.
In practice, this indicator is often lower, therefore, in order to increase the soundproofing characteristics of such a structure, it is recommended to carry out its additional soundproofing.
 For this, materials with good soundproofing characteristics are used. Special membranes can be glued directly to the wall surface.
To protect the room from noise as much as possible, such membranes glue on both sides of the wall. This allows you to increase the sound insulation coefficient up to 30 dB.
If you have the ability to create wide walls, then create a double wall from the tongue-and-groove blocks and between the walls, a heater is laid, usually it is mineral wool.
This method allows you to get high soundproofing characteristics and reliably protect the room from extraneous noise.
Do-it-yourself erection of a strong and reliable gypsum partition requires experience in construction work, if not, follow the following expert advice:
- during the installation of partitions made of gypsum boards, don't rush. Some people point out that a tongue-and-groove partition can be made in a day. It is better to let the first row freeze well, and then proceed to the installation of the next rows;
- Please note that when cutting boards quite a lot of dust, so get ready to have something to clean it up;
- the strength of the material allows you to hang shelves or a TV on such a wall, but they can no longer support the weight of the cabinet.
Conclusion
If the soundproofing characteristics of the wall are very important to you, then they can be increased by creating double partitions, between which insulation is laid or the wall is covered with noise-absorbing materials.
Follow the instructions, and you will be able to create an interior partition in the house with your own hands, which will have high strength and soundproofing characteristics. Or make a decorative
Useful video
See the video for the installation technology of VOLMA tongue-and-groove plates:
In contact with
Redevelopment of an apartment is a common thing, it remains only to decide on the material and technology for the construction of new walls and partitions. We propose to pay attention to tongue-and-groove gypsum boards - a practical, affordable and versatile material.
Tongue-and-groove slabs and their scope
Tongue-and-groove slabs (PGP) are rectangular blocks of gypsum fiber 80 or 100 mm thick. The size of the plates is standard - height 500 mm, width 667 mm. To strengthen the connection between the plates, their edge is made in the form of grooves and ridges. The technology allows erecting up to 4 m2 of partitions per hour.

Standard plates are used in rooms with a normal humidity regime; for bathrooms and baths, moisture-resistant GWPs are used. The slab can be either solid or hollow with horizontal through holes with a diameter of 40 mm. A hollow slab is not only distinguished by its reduced lightness and thermal conductivity; when laying plates of one row, it is guaranteed that the holes in the cross section are aligned by at least 90%, which allows the use of cavities as technical channels for laying electrical wiring or pipes.
Preparing the installation site
GWP are universal in application and can be mounted in almost any building conditions. Due to their low weight, they do not require a foundation and can be installed directly on the screed and even on a solid wooden floor.

The only requirement for the place of construction of the partition is that the base should not have a horizontal height difference of more than 2 mm per 1 meter. If the floor in the room does not meet these requirements, then a leveling screed with a width of 20-25 cm is produced.
The surface of both the screed and the floor must be coated several times with a deep penetrating primer, then dried and cleaned. It is optimal to mount the GWP even before the plastering of the bearing walls, so the finishing coating will turn out to be more solid.
Damper pad device
To compensate for thermal expansion and settlement of the building, a tape of elastic material is laid at the junction of partitions to the floor and walls. It can be rubber, cork or silicone tape.

The base is covered with a thin layer of GWP adhesive and the tape is laid. It takes 6-8 hours to harden, after which the construction of the partition can begin.
Installation of the first row
Installation of GWP is carried out strictly in rows, starting from the bottom. The first row is basic and must be correctly oriented in space, vertically and horizontally. The most common error during installation is the "waviness" of the partition, which occurs due to a slight displacement in the grooves. To eliminate this phenomenon, when laying each slab, you need to use a rail-rule and check the general plane of the partition along it.

The first row should be laid from the corner. The place where the slab touches the floor and the wall is covered with GWP glue, then the block is installed with the ridge up and its position is leveled. It is convenient to use a rubber mallet to move the plates. Be sure to fasten the first block to the wall and floor with the help of L-shaped plates, the role of which is successfully performed by direct suspensions. To use them, you need to cut off the toothed comb from the edges and bring the thickness of the plate to the width of the comb. The plates are first attached to the base using quick-mount dowels with a length of 80 mm or more, then to the slab with black self-tapping screws at least 60 mm long.

Subsequently, the plates are fastened through one: on one side to the floor, on the other - to the previous plate with a preliminary coating of the joint with a thin layer of glue and strong pressing. To control the placement of slabs according to the project, it is convenient to use lacing or a laser level. It will also not be superfluous to mark the partition on the floor and walls, indicating the places for doorways.
Construction of partitions and adjoining to load-bearing walls
The second and subsequent rows are laid with a seam offset of at least 150 mm. The plate is located strictly in the plane of the partition due to the tongue-and-groove connection. It is enough to control the horizontal level of the installation and the lateral roll. The end plates are attached to the bearing walls with L-shaped plates or reinforcing bars 8 mm thick.

To offset the joints and remove the edge of the partition, trimming the additional elements to the exact size will be required. It is best to use a regular wood saw with a thick blade and set teeth. If the partition does not adjoin another wall, its end can be made perfectly even by increasing the thickness of the adhesive in the vertical seam from 2 to 6-8 mm.
Device for doorways
The vertical edges of the openings do not need additional reinforcement. For laying slabs over an opening with a width of less than 90 cm, it is necessary to build a supporting U-shaped bar, which can be removed after the glue has dried.

Openings with a width of 90 cm or more require laying on top of a row of slabs of a carrier beam - a 40 mm board or a reinforced CD 70 mm profile. To reach one level, it is recommended to cut the slabs laid on top of the crossbar. The jumper is laid in the partition at least 50 cm on each side.
Corners and intersections of partitions
At the corners and junctions of the partitions, it is necessary to strengthen the masonry. To do this, the plates are shifted through a row, alternately blocking the joints. In places of relocation, it is necessary to remove the ridges, they are cut with a hacksaw into sections of 4-5 cm and chipped off with a chisel.

The connection can be additionally strengthened by segments of direct suspensions or welded T-shaped elements from smooth reinforcement. In any case, additional trimming of the ridge to the desired distance will be required.
Top Row Bookmark
When laying the top row, the greatest amount of waste is generated due to trimming to the desired height. They can be glued and laid in voids, since this row of the partition does not experience a strong functional load.
Electrical wiring is usually laid in the voids of the upper row, so it is important to prevent glue from getting into the holes. To facilitate cable pulling, you can additionally drill holes or make transverse holes with a diameter of 45 mm.

When laying the top row, it is necessary to maintain a gap from the ceiling of at least 15 mm to compensate for the deflection of the ceiling during settlement. The top row also needs to be fastened to the ceiling of every second slab. Upon completion of installation, the remaining space is blown out with polyurethane foam.
Interior finishing options
With proper installation of the GWP, the curvature of the surface is no more than 4-5 mm per meter of the plane. This is an acceptable indicator for pasting walls with wallpaper. The outer corners of the partitions must be protected with a corner perforated profile, planted on the starting putty. The inner corners are also puttied, strengthening them with a sickle. The joints between the boards are sanded with an 80 grit abrasive mesh, then the entire surface is coated twice with a high adhesion primer.

Alignment of walls from PGP can be carried out with any finishing putty, but it will be necessary to strengthen the coating with a fiberglass mesh. Often puttying of partitions is used only to hide the seams, as a rule, the layer does not exceed 2-4 mm. Tiling can be carried out directly on the surface of the GWP with preliminary priming.