Beautiful beds in the country with their own hands: photo, device and options. Organic farming: how to lay smart beds How to plant beds in the country
How to arrange beautiful beds for the lazy, high and smart beds - this is what a gardener needs to know who wants to make his life as independent as possible from garden worries. If you wish, you just need to master the way to design lazy beds, which you can see in the following photos. A bed of this type will allow you to enjoy a well-deserved rest in the country and will not require weeding every time. In addition, it is not only convenient, but also increases the productivity of crops.
Everyone knows how much time and effort should be devoted to each planted crop, which, however, sometimes does not even justify the result: seedlings may not germinate or may not end up with a normal amount of harvest. In this case, you should pay attention to the technology of lazy beds on your site!
Nice and comfortable
The lazy bed is a completely new approach to gardening that will allow seedlings to grow on their own and yield several times more. It is based on the rule that says that it is impossible to dig and weed the earth, except for its preparation and planting itself. Even if constant weeding can remove weeds and fluff up the earth, sooner or later it will dry out and will not be able to provide sufficient moisture for crops.
In this approach, the very preparation for future planting is very important - it is advisable to do this in the fall, when you can collect material for mulching the soil (you need to cover it with straw, sawdust, cones, etc.), which, in turn, will prevent weeds to germinate in an area with such a cover.
- Install your own irrigation system. It is not necessary to choose the most expensive systems available in stores. In the case of such vegetable gardens, those from which you only need to press a button are quite suitable - and there will be no need to water with your own hands. Watering will allow you to make beautiful beds: green and lush. Also worth noting: watering can be done infrequently, but plentifully, giving the plants the necessary moisture until your next visit.
- A tool for working in the garden is a guarantee of saving time. Therefore, it is worth choosing one inventory and for many years. It can include not only the usual shovel and buckets, but also various little things that will make your work easier. Also find a place for inventory in advance.
- At the beginning of the planting season, dig up the ground once, prepare it for future seedlings or seeds. Plant plants and no longer disturb the ground: mulching will do its job and keep weeds out. All that remains for you before the harvest is to water the beds in the country on time.
This is an interesting and effective way that is suitable for both lazy gardeners and experienced, knowledgeable gardeners. A bed of this type will justify the efforts made and can bring a lot of amenities.
High bed as a way to get an intensive harvest
Although this is a very time-consuming process at first - building the frame itself and watering the beds, but it is she who will allow you to forget about the bad climate and low yields.
The high bed is always under the rays of the sun, which contributes to the warming of the earth layer, so it can be planted already in April without fear of freezing, and the lower mesh will prevent the invasion of moles and mice. A not too wide frame (within 150 cm) will allow you to take care of the garden bed on both sides. If you divide it into two strips of 80 cm wide - you can even do it yourself greenhouse by passing the film over both landings. It is worth noting that it is high beds that give the earliest harvest, first of salads, and then of fastidious vegetables. The only problem is more frequent watering, since water does not linger in such soil for a long time.
Despite all the difficulties at the beginning, the landing justifies the efforts invested in it and serves for a long time without bringing much trouble, and the garden bed has a beautiful view.

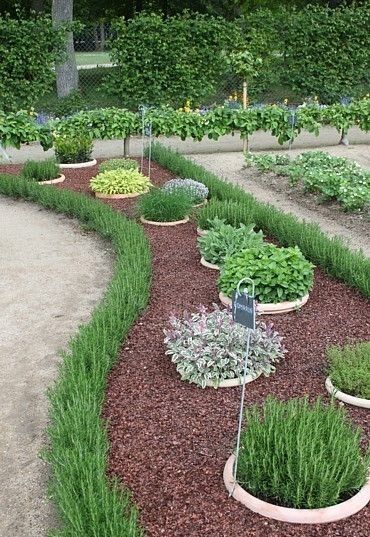
Digging up a smart bed for fragrant herbs is necessary only once, before planting seedlings. Further, it requires a minimum of attention and care.
Before each owner of a backyard, summer cottage or garden plot, the question arises of the correct placement of the garden on his site. The very word "correct" suggests that there are certain rules, norms or mandatory principles according to which the garden should be equipped. And some general principles, of course, can be identified - but it is precisely some. This is due to the huge variety of conditions in which the sites are located, and besides, the personal preferences of the owners are of no small importance.
At all should not blindly copy someone else's experience, especially if this is experience gained in another soil-climatic zone. But what about? What should beginner gardeners do?
Choosing a place for the garden
Let's start with a question that inevitably arises when planning: where to place a garden on the site, what part of the total area to allocate for it. After the simplest calculation of the need for vegetables (see), it usually turns out that it is enough to allocate a plot for a garden about 3 acres. More or less - will depend on the composition of the family and the desire to experiment with any cultures.
Under the garden allocate the sunniest place, without shading on the south side. Unlike the garden, which is located on the northern slope, it is preferable for the garden southern exposure. This is the case if the garden is only a garden. The garden plot is subject to certain requirements:
- high doses of fertilizers (both organic and mineral) are applied under vegetables;
- provide good air permeability to soils, for which baking powders are introduced in the form of straw cutting, straw manure, coarse-grained river sand;
- create optimal conditions for moistening, remove excess water through drainage or arrange watering with insufficient moisture;
- protect the site from the prevailing winds by planting ornamental or fruit trees on the windward side, but so that there is no shading - all vegetables are photophilous.
Recently it has become fashionable to arrange decorative vegetable garden. Here, vegetable crops also perform design functions, so they are already selected for their decorative qualities. But it's still exotic. If you are interested in the topic of an ornamental garden, read the articles on the principles of its organization from the list of recommended literature for the lesson.

It is undesirable to plant vegetables in the aisles of the garden, where there is shading, competition for water and nutrients, there is a danger of contamination of products with poisons used to protect the garden. Yes, and vegetables work best in open areas.
We place greenhouses and greenhouses
There are a lot of vegetable crops, and they are very diverse in their external characteristics and growing characteristics. The desire of the gardener to provide himself with early vegetables leads to the need to allocate an area for insulated soil. Now there is no problem in acquiring various greenhouses and greenhouses or materials for their independent construction.
In protected ground, heat-loving vegetable crops are grown in small quantities: tomatoes, pepper, eggplant, cucumber, vegetable marrow. To obtain early greenery in insulated soil, they are sown as compactors salad, dill, parsley and other herbs. To meet the need for early vegetables, 4-5 plants of each crop are usually sufficient.
The area under insulated soil is usually no more than 100 sq.m. But in areas with cool summers, growing heat-loving vegetables in the open field is problematic, and they are grown only under shelters. In this case, greenhouses are needed, and their area will already be higher - up to 300 sq.m and even more. Of course, it is better to grow unrelated crops separately, for example: cucumber with zucchini in one building, and tomatoes, peppers and eggplant in another. But if there are few plants, then it is difficult to implement, and not too necessary.
Dedicated to the features of growing vegetables in greenhouses next lesson- . There we will consider in detail all the important nuances.
We build beds
The beds are made in the spring, just marking the paths. The paths between the beds should provide free passage and the ability to get your hand from the path to the middle of the beds. As a rule, for this the track width should be not less than 40-50 cm. The length of the beds themselves can be arbitrary, and the width can be convenient for work: such that the hand can be freely reached a little further than the middle of the bed. This is necessary for manual work - sowing, weeding, harvesting.
Beds for individual crops (like greenhouses) are best placed with a long side from North to South- so the plants will be better lit during the day. The number of rows of plants in the beds is arbitrary.
Usually the beds are made rectangular shape. According to their device, they can be different. So, in the south they try to make them flush with the soil surface or even deepened, and in the center of the country and in the north - raised. The edges of the beds are usually not limited to the frame, but when arranging narrow ridges according to the Mittlider or warm steam beds, a frame is made of boards or flat slate, and other materials.
Various ways of arranging ridges: recessed or raised, in a frame, and so on - it is better to master gradually. For more information about what beds are, how to build them, what are the advantages and disadvantages of various options - read the articles from the reading list for this lesson.

Under large plants (with a large bush) or creepers make wide distances between rows - from 40 to 90 cm, and between small plants, on the contrary, the aisles are reduced to 15 cm or even less. The largest row spacings require pumpkins and climbing squash- more than 1.5-2 m;
- wide aisles are needed for tomatoes, pepper, eggplant, bush squash, beans.
- narrow aisles - for beets, carrots, green crops.
Schemes for placing plants on the beds:
- roots- 6 cm between plants in a row and 10-15 cm between rows; it is also convenient to place most of green and aromatic plants;
- nightshade support will be required for each bush; place them according to the scheme 50 × 50 or 70 × 70 cm;
- early cabbage placed according to the scheme 40 × 40 cm;
- late cabbage- according to the scheme 50 × 70 cm;
- cucumber: when growing on a support, leave 25-30 cm between the bushes; when grown without a garter, 60-70 cm are left between plants, and row spacing is increased to 90-120 cm;
- bush type squash placed after 40 cm;
- climbing squash- after 70-120 cm.
Soil Requirements
The garden area should be fertile. Vegetables were traditionally grown in rural courtyards, where a lot of organic matter was introduced into the soil, but in modern garden plots there is a completely different situation, additional reclamation measures may be required - for example, when groundwater is shallow, drainage is arranged with excess water runoff into arranged reservoirs or wells.
Usually, beginners just need to fertilize in the fall:
- organic(manure, humus, composts from organic waste) at the rate of 60-100 kg per 100 sq.m;
- mineral complex where there is nitrogen, phosphorus and potassium (azofoska, nitroammofoska, foskamid, autumn and others) - up to 5 kg per 100 sq.m.
Gives good results sowing perennial grasses(lucerne, clover, sainfoin) for 2-3 years and their plowing. Instead of perennial grasses, you can plow annual herbs as green manure. These can be mixtures based on barley or oats with vetch or peas. Before plowing the grass, it is necessary to grind and apply nitrogen-phosphorus fertilizers on top at the rate of 1-2 kg per hundred square meters.

Compost - good organic fertilizer
Fertilization of individual vegetable crops has its own peculiarities. So, organic matter (manure, humus, compost) is added under cucumber, zucchini, late and middle cabbage, and only humus or well-decomposed compost is added under tomato, pepper, eggplant. Only mineral fertilizers are applied under onions and root crops, early cabbage.
Dedicated to fertilizers and top dressings separate lesson: . You can also find more information in the reading list for this lesson.
What is crop rotation, why is it needed and how to organize it
You cannot grow the same crops every year in the same place. Specific pathogens accumulate in the soil, pests overwinter on plant residues, the soil is unilaterally depleted, harmful substances accumulate in it - decay products that are toxic to plants.To avoid these negative consequences, scientists came up with crop rotation- scientifically substantiated alternation of cultures in time and territory. In small areas it is difficult to apply full-fledged crop rotations, here they are more often used fruit cycle- alternation over the years of some crops with others.

During fruit change, one group of crops changes to another in terms of nutritional requirements. It is better if, after the crops under which organics were introduced, there are crops that make good use of decomposed organics, and after them - crops with predominantly mineral nutrition.
For example, like this:
- medium and late cabbage;
- tomato;
- carrot.
Or like this:
- cucumber;
- pepper, eggplant;
- beet.
Required for some crops early harvestable predecessor. For example, only cucumber, zucchini and greens are suitable for winter garlic, since garlic is planted in the fall, and it is also necessary to prepare the soil for it. Perennial vegetable crops are grown in open areas, where they can be more than 3-5 years in one place.
Details about the organization of crop rotation (fruit rotation) in the garden, favorable and negative combinations of crops, their correct alternation and other nuances are discussed. in one of the next lessons: .
Organization of watering in the garden
Vegetables are demanding not only for soil fertility, but also for providing moisture. Even in regions that receive sufficient rainfall, there are times when irrigation is required. Therefore, the site should be water source in the form of a centralized water supply system, a well or a container for several tons of water.
If a ground water are located closer than 60-70 cm from the surface, it is better to arrange their removal outside the site or into a drainage well. In arid regions, it is necessary to take care of artificial irrigation, creating a supply of irrigation water on the site in containers or pools.
You can supply water to the vegetable plot with a hose, a stationary pipeline, or using a drip irrigation system. It is better to choose a reinforced or corrugated hose that is resistant to kinks, lightweight polypropylene pipes that are UV-resistant, free-flow low-pressure drip lines.

But with any method of irrigation, it is necessary to determine water quality. Here it is necessary to find out the degree of mineralization, the presence of toxic salts, the pH value. Analysis can be carried out in zonal scientific institutions for agriculture or laboratories that control the quality of drinking water.
If the water meets the requirements, then it can be safely used for irrigation, but if the water is excessively saline, or contains toxic salts, or is very hard, then it is better to collect and use rainwater, use filters (which is of course expensive) - in any case, use it less.

There is rule: the toxicity of water is the less pronounced, the higher the content of organic matter in the soil.
Determine landing time
Each crop is sown and planted at its own time. If possible, insulated soil is often used to extend the time for the crop to arrive: various types of greenhouses, greenhouses. Various films and non-woven materials are used as a translucent coating, and seedlings of heat-loving crops are planted in such facilities: tomatoes, peppers, eggplant, cucumber and zucchini, as well as such cold-resistant crops as early cabbage, cauliflower, Beijing - to obtain earlier products.When using insulated soil, it is important that the seedlings are not only of high quality, but also certain varieties and hybrids, capable of recouping as much as possible the cost of structures and films.

Also, vegetables can be sown directly in open ground or planted seedlings. Green crops are usually sown first in the ground, followed by carrots, onions, beets, and then seedlings of heat-loving crops and cabbage are planted.
Selection of varieties- it's complicated. It is better to focus on the assortment recommended for a particular zone. There are many options and each has its pros and cons. We talked in detail about how to choose varieties of vegetables for your garden.
How to care for a vegetable garden
Garden care is loosening row spacing- usually after rains, waterings or fertilizing. As the plants develop, the loosening depth will first increase and then decrease so as not to damage the growing roots.top dressing carried out to correct nutrition. It is better for them to use special brands of complex water-soluble fertilizers containing 5-7 trace elements. When applying fertilizers, the enclosed instructions are usually followed.

There is also a need for protection against pests, pathogens and weeds. The use of herbicides - means of weed control, in small areas is impractical. Still, they are not safe, and it is difficult not to damage the cultivated plants themselves. Manual weeding remain the most effective means of weed control.
Among plant protection products there are not only chemical, but also biological, and they should be given preference. But in the fight against especially dangerous diseases and pests, chemical protection should not be neglected. At the same time, it is necessary to strictly adhere to the regulations for the use of plant protection products, not to exceed the dose and not to shorten the waiting period - the time during which, after processing, it is impossible to work with plants and use products for food. This will be discussed in detail in one of the following lessons -.

Vegetable crops are divided into single collection and multi-collection. For multi-collection, continuous flowering and crop formation are characteristic. In crops such as tomato, pepper, eggplant, zucchini, cucumber, fruits are harvested as they reach removable maturity. Their yield increases with regular harvesting. Cabbage, root crops and onions are harvested once, when fully ripe. Many cultures practice a combination of periodic collections and one-time cleaning. In dill and lettuce, for example, you can first pick off part of the leaves, and at the end of the removable maturity, the whole plant.
Gardening is a fascinating business: as you master some issues, new, even more complex ones appear. This process is creative and akin to art.
Before every gardener with the advent of spring, the question arises of how to equip the beds so that the crops have all the conditions for development and fruiting. In addition, the correct arrangement of the beds greatly facilitates their care.
Recently, high beds made using a frame made of boards are gaining popularity. However, not everyone has the opportunity to build them due to the lack or shortage of wood material. Do not despair, because there are many more ways to make beds in the garden without the use of boards.
Most often, a garden is planned using the following beds:
- standard;
- narrow;
- high.
Standard beds
Such beds are located at the same height as the garden, do not protrude above the soil and do not go deep into it. The location of the beds, their width and length depend only on the preferences of the gardener. The distance between the rows is usually made no more than 50 cm in order to gain access to plants for care. To mark the beds, pull the rope or use a special garden marker.
Standard beds are good to do on flat areas that are evenly lit by the sun.
narrow beds
For arranging narrow beds, only a flat surface of the site with good lighting is suitable. Their feature is a rather large row spacing (up to 1 m), despite the fact that the width of the beds themselves is only 45 cm. Narrow beds rise slightly above the soil surface (by 20 cm).
In the place where it is planned to break the beds, they dig up the earth and apply fertilizers (the aisles themselves are not fertilized):
- dolomite flour;
- mineral complex.
This type of beds is also called beds according to the Mittlider method - the scientist who invented it. To increase the yield on high beds, he recommended regularly watering them and applying commercially manufactured top dressings, excluding compost and manure.
Raised beds (without the use of boards)
To arrange high beds, a frame 90 cm high and 120 cm wide is pre-mounted, which is filled with nutrient soil. Raised beds may vary in size. The basis of the frame, in addition to the boards, are:

Stationary slate beds - video
Most often, a dacha is not only flowers and rest, it is also a harvest. These are seedlings in the spring, shoots, transplanting into the ground and other concerns. If you are a gardener who cares not only about the harvest, but also about a neat, well-groomed plot with fences, then you probably wondered more than once how to arrange beautiful garden beds in the country with your own hands?
Beautiful garden in the country with their own hands


If you started a dacha not only for the sake of flowers and fruit trees, then you definitely have beds. And usually the most difficult work is their improvement. Because you need to provide so many important nuances in order to fully enjoy the harvest afterwards. That is why we want to figure out together with you what kind of beautiful and correct beds they are?


Vertical beds - how to create, what are the features, pros and cons
If you have a small plot, but you want to use it to the maximum advantage, then you should think about creating vertical beds. Thanks to them, with small areas, you can get an excellent harvest, only once making enough effort for this.

These beds are great if you want:
- save space,
- grow more in a limited area,
- grow in open ground
- simplify your care and reduce the number of likely weeds,
- facilitate watering and harvesting.
Thanks to their simple design and mobility, these beds are easy to assemble and move. And at the same time, you yourself can choose how many bushes or seeds you need for seedlings.
Varieties of vertical beds
There are several types of vertical beds:
ladder type- are created from boxes of different sizes, stacked on top of each other according to the principle of a ladder,

tubular- are plastic pipes of a selected diameter, filled with soil, with holes for seedlings,

suspended- where the beds are located one above the other, being suspended or installed on a structure similar to a stepladder,

pyramids- are created according to the principle of stairs, but each new tier is smaller than the previous one on all sides and is located in the center, eventually creating the appearance of a pyramid.

Clear instructions for creating different types of vertical beds
Creating a vertical bed is not difficult, but it all depends on your skills, the tools in your arsenal, and the materials you have at your disposal.
Most often they are made from boards in order to extend the life of their structure and get the maximum benefit. After all, wooden beds last longer, are more stable and harmless to future seedlings. But their arrangement requires more knowledge and experience in using tools such as a drill, screwdriver and jigsaw (if you need to cut the boards to the intended size).

In general, the basic set of materials for creating a wooden vertical garden bed is the same:
- boards,
- beam,
- nails,
- self-tapping screws,
- priming,
- seedlings or seeds.
First, decide on the size of the largest and smallest beds. Saw the boards into the cuts you need, and then assemble boxes from them, which you stack on top of each other and fill with soil.
Do not forget that even experienced craftsmen use a pencil and a tape measure so as not to be mistaken with the size. Wear thick gloves to protect your hands.
Take advantage of a very clear, step-by-step master class by Ekaterina Komkova, who talks about how to build a very neat pyramid for your seedlings.

And if you liked a place near a fence or a wall of a country house, then it’s more suitable for you, as in the relena75 master class:

They take up little space and, which fit perfectly into small areas, and due to their design are also very mobile. After all, they are so easy to move from place to place or put away for storage at the end of the season. Yes, and they are made no more difficult than their more massive girlfriends. See for yourself by following the instructions from the video lesson of the Country Expert:
However, a pallet can also become a bookcase.

Tubular beds do not require much effort to manufacture. And they take up much less space compared to the previous ones. And the harvest will give a worthy full-fledged garden.

To create it, it is enough to cut pipes of a suitable diameter, make holes on them with a special nozzle for a drill, dig into the selected place, fill with soil and your garden is ready!
They are great for growing strawberries or cucumbers.
If you want to understand the intricacies of creating such compact beds, then you should pay attention to the master class of a country craftsman with the nickname Adek.
Disadvantages of vertical beds
But, like everything else related to the dacha, vertical beds are not a panacea. Indeed, due to all the same design features, they also have disadvantages.
- the soil in them is quickly depleted,
- the soil often has to be watered due to drying with a small volume of the bed itself,
- if your region has severe winters, then the ground will freeze, which is bad for perennial crops,
- you will need to make an effort and stock up on patience, as well as the tools to create them.
In addition, due to limited space, not every crop will take root on a vertical garden - plants with a powerful root system will not be able to fully develop.
Therefore, it is best to grow in such beds:
- salad,
- basil,
- cucumbers,
- strawberry,
- dill.
Warm and high beds - basic requirements, pros and cons
As you can see, vertical beds are not suitable for pumpkin, corn and potatoes. Therefore, it is worth considering other options for growing garden crops. For example, if you have plenty of space but the ground is cold, then you might like the option of tall, warm beds, great for tender, heat-loving crops.


In fact, a high bed is a mound of fertile soil, bounded on four sides by a fence. She is:
- easy to assemble and disassemble
- does not require much care and attention,
- well suited even for rocky terrain,
- gives an excellent harvest.


In addition, due to the closed nature of the ecosystem, there are many times less weeds in such a bed, which means that weeding will require less effort.

They are divided into permanent and temporary. And, as the name implies, some can be used for several years in a row, while others are more often collected for growing seedlings. But both of them, in their essence, remain ordinary garden beds.
And most importantly, if the idea of \u200b\u200bcreating a warm garden bed for a summer cottage with your own hands visited you, then you do not need to put in a lot of effort.

Very efficient and comfortable...

... and can be made from improvised materials!
General rules for the design and assembly of high beds
The optimal height is considered to be 15-50 cm from the ground (depending on the root system of the crop you want to grow.
The width varies from 90 to 120 cm.
The mandatory composition of each bed includes soil, drainage and biofuel (which will become humus, giving the main fertilizer of the root system).

But the materials for fencing can be completely diverse:
- boards,
- plastic boxes,
- pallets,
- metal profile,
- wooden boxes.
Everything will depend only on your idea and what is now at hand.
The most common and stable are the beds of the boards. If you lay them with roofing material before falling asleep with earth, then they will last a very long time, since they will be isolated from moisture and decay.

Boarding fencing…

...metal...

... and again with boards
And creating them is quite simple if you follow the detailed instructions of Evgeny Afanasyev given in the master class.

If you are not friends with tools or do not have enough time to organize a permanent garden, then you can solve the issue differently. After all, such beds are good because they only require a high fence. Plastic vegetable crates or pallets stacked upright and hastily hammered together to form a square, and even concrete blocks can be a better solution.
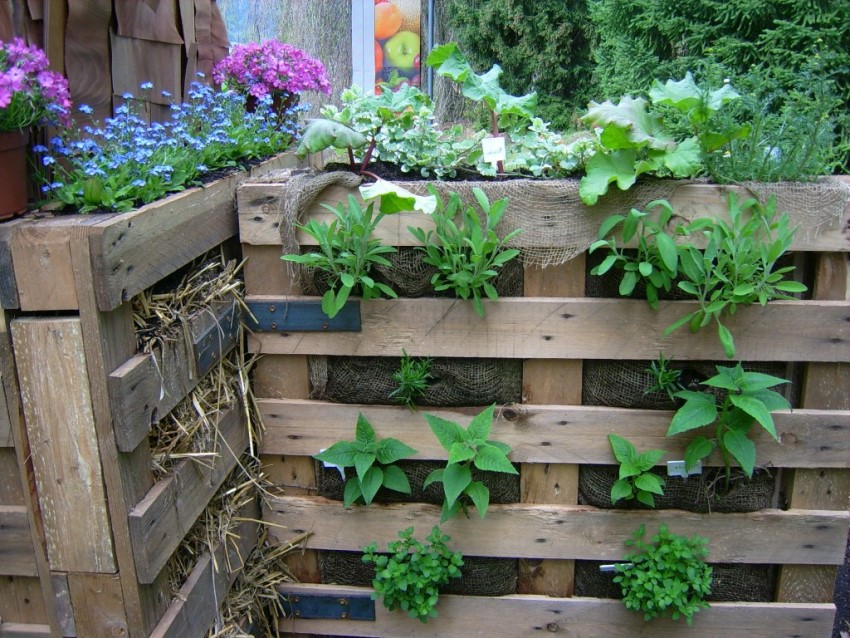
Pallet fence...
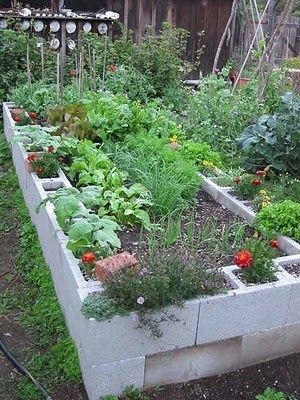
...and concrete blocks.

Yes, you do not need to have a carpentry education to organize a garden bed. It can be made even in an old barrel.
And even weave!
If you want to plant a couple of seedlings as an experiment, then you can get by with pocket beds.

Here you do not need to be able to saw and plan, but the skill of sewing and sewing is useful. After all, such a homemade product for a summer residence and a garden, created by oneself, will appeal to every needlewoman.
Take an old organizer for small things, combs or other household items, put film, soil and fertilizer into the pockets, sew on strong loops so that it can be hung on any wall or fence, and that's it - your miniature bed is ready!

As you can see, do-it-yourself beds for summer cottages and gardens are created from a variety of materials and varying complexity. For some, you will need an impressive set of tools, but the result will give a good harvest or, for others, only a few boxes and a couple of barrels will be enough, although the result will also be joyful and very pleasant. The main thing you should know at the beginning of the season is that any idea for a summer residence can be brought to life with your own hands - from a garden bed to a personal garden with the most exotic flowers.

Gardening is a favorite hobby of many of our fellow citizens. In other years, only having your own garden plot allowed you to keep the family budget afloat, but today the garden can be considered as a source of fresh and environmentally friendly products for the family table.
But in order to get a rich harvest, it is very important to master the competent technology of tillage, because otherwise you will not be able to ensure a normal vegetative process for the crops you grow. In particular, it is very important to know how to properly make beds in the garden. This article is devoted to consideration of this issue.
Initial soil preparation
If you are going to use some area for beds, it must be processed and dug up as carefully as possible, simultaneously freeing it from debris, roots of plants and trees. If you plan to make beds on a site on which some backyard buildings previously stood, you will have to spend a lot of time cleaning it from construction debris. As a rule, in this case, a lot of glass, bunches and remnants of boards remain in the ground. All this must be removed.
In addition, after that it is desirable to bring a layer of normal soil there, from which the beds will be formed. Of course, you can try to grow plants on the remaining soil, but its fertility will be a big question.
What should be paid special attention to?

Before you properly make beds in the garden, it is very important to prepare the bottom layer of soil. The fact is that with its strong compaction, moisture will constantly linger on the beds. In dry years this is good, but the rest of the time there will be a constant risk to plants, as their roots can simply rot.
For loosening, it is advisable to use a cultivator, since it will be very difficult to manually loosen the earth properly. Important! If this is your first time making beds in this place, it is advisable to give the soil for research: it may be too acidic or alkaline. It is better to immediately add appropriate additives to it, because otherwise it will not be possible to grow a rich harvest.
Among other things, we would recommend planting green manure on newly cultivated lands. In their quality, it is best to use alfalfa or other legumes. No need to sow rye, as it makes the soil very acidic. An exception can be made only for highly alkaline soils. Of course, in this case, all agricultural activities take much more time, but all costs are paid off.
When the issue with the soil is completely resolved, you can start marking the beds.

Of course, the creation of beds always begins with delineating the boundaries and digging, but it is important to remember that high crop yields can largely depend on other factors. Before you properly make beds in the garden, it is also important to choose their location in relation to the cardinal points. This issue should not be approached lightly, since the yield of plants depends on the correct choice of location.
Let's give some generally accepted rules that should be followed when creating sites for growing various crops. So, ridges for vegetables are located in the direction from north to south. It is best to make them rectangular. It is believed that it is more convenient to process the ridges if they have a width of 1.2 m. The length can be any, it all depends on your preferences and the size of the site.
They make at least 40 cm wide, but it is preferable to provide even wider passages, since in this case it is possible to strengthen the edges of the ridges with boards or slate.

Approximately the same requirements apply to the breakdown of flower beds or rabatok. Of course, it is much better to make their corners rounded, since those look much better. Before you properly make beds in the garden, it is best to outline their future boundaries with twine and a few pegs. Don't forget to indent as otherwise you won't have room for aisles.
What to do if you arrange a bed in a former meadow?
Important. In this case, it is necessary to carefully remove the sod. Make it into compost: this fertilizer contains a huge amount of nutrients that contribute to a significant increase. Here's how to make a good bed that will give you a great harvest!

Digging up the soil should start from the edge of the string stretched along the border. The shovel must be worked in such a way that a neat and well-defined line is obtained. In this way, we dig the entire border of the garden. Be sure to pay attention to how dense the earth is at the depth of the shovel bayonet. If there is a lot of clay there, you will have to dig two or three bayonets of a shovel deep into. Or use a cultivator or even a tractor.
We use a chopper or a hoe!
After removing the layer of sod, you will find that under it there is quite decent, but still somewhat dense soil. If the soil is too compact, it is preferable to work it with a hoe, as in this case you tear the roots of the plants, and the structure of the soil becomes much better. Since making a garden bed with your own hands can be difficult, you need to purchase all the necessary tools for tillage in advance.
In a word, the creation of beds is a rather troublesome and time-consuming business. Therefore, it is worth taking care of preserving the results of your work, strengthening the resulting ridges. The easiest way to use the boards is to hammer in pegs to support them. But much more durable is the blind area made of bricks or natural stone. Besides, she looks much prettier.
When making a garden with your own hands (including beds), do not forget about the accuracy of your work. Such a personal plot will give you a lot of positive emotions!
And how to make beds in the garden, if you want to get a harvest from them as early as possible, starting from April-May?
Making warm beds

In order to get a rich harvest and cucumbers in our middle zone, the natural growing season is not enough, because the earth warms up too late and freezes quickly. Since it is not difficult to make a warm bed, you can correct this annoying misunderstanding without spending money on building a greenhouse or even a greenhouse.
By the way, what is it? In this case, before starting the development of the site, it is necessary to dig a ditch 40-50 cm deep, which completely repeats the contours of the future bed. Layers of manure are laid there, which must be alternated with the remains of tops, rotten wood and similar organic residues. You can also use kitchen waste.
Before you make a warm bed, you can also purchase it. It heats up best. Having thrown a layer of waste flush with the edges of the ditch, we lay fertile soil on top of them, and the thickness of its layer should be at least 40 cm, otherwise the roots of the plants may burn out.
Further actions
After that, we cover the finished bed with a film and leave it for a couple of days. When the ground warms up noticeably, you can plant seedlings. It is better to combine this method with the installation of a film shelter. In this case, planting can begin almost immediately after the snow melts and the strong morning frosts disappear.
Here's how to make beds in the garden. There are some difficulties with this, but as a result you will get an excellent harvest of your own vegetables.