How to keep the color of fallen leaves. How to dry leaves and flowers for herbarium and paintings
Dried leaves are sometimes an indispensable component of crafts or a memory in the form of a herbarium. A variety of sam0delka.ru are made from them, and they can also be used in the interior. Some of them can be used as flavoring for tea. There are several ways to dry leaves.
dry leaves for crafts
1. If you need voluminous leaves, for example, for a bouquet, they need to be laid out in the sun one at a time or combined into bunches. In this case, the edges of the leaves may curl slightly. If you want to achieve a rich color, you should avoid direct sunlight. To speed up the process, you can use warm air from a hair dryer.
2. Leaves, previously covered with paper towels, are placed between the sheets of the book. Wet leaves should first be rid of moisture by blotting with a towel. It is important that there must be a distance of at least three mm between the leaves, otherwise the weight will be insufficient. The dried plant book should be checked every week.
3. There is a special device - a flower press. The leaves placed in it, due to the free passage of air, dry quickly. You can either buy it or make your own. The leaves are separated with paper towels and placed under the press. As towels get wet, they need to be changed.
4. Large leaves dry well in the microwave. To do this, a cup of water is placed in it and the leaf itself, wrapped in paper towels, on a plate. You need to dry for 10 seconds, each time checking the condition of the plant.
5. The brightness of fresh leaves can be preserved by drying them with an iron. Each sheet is wrapped in waxed paper and covered with a towel on top. Each side is ironed for about two minutes.
6. A solution of water and glycerin will help keep the texture of the leaves, but will give them a brown color. The leaf is placed in this solution for several days. After holding it for a couple of weeks, the sheet will remain forever.

Leaves for tea
1. Fresh herbs must be thoroughly washed and dried on a towel.
2. Microwave drying is suitable for instant results. The leaves are placed between paper towels and dried for 30 seconds. This method will not work with juicy greens.
3. Plants with hard leaves dry well. Hanging in small bunches in a dark room. All moisture will have time to evaporate from them. Before drying, small greens are best placed in a paper bag with a prepared hole.
4. Fleshy leaves must be dried quickly, as they tend to become moldy. To do this, in the microwave, paper towels and leaves are placed sequentially in several layers. Plants should not touch each other.
5. Dry leaves keep well in airtight containers. They can be crushed first. They are great as a condiment or addition to tea.

leaf skeleton
1. You need to choose leaves with pronounced veins.
2. Pour water into a saucepan. For safety, gloves must be used, and at the end, rinse all tools with running water.
3. Edible salt added to water will gradually soften the leaf, leaving a veined stem. It can be replaced with soda ash. It will take 30 grams.
4. Leaves are placed in the finished solution.
5. You can simmer the leaves over low heat or bring to a boil first, and then lower the temperature.
6. The leaves should be simmered until they completely disintegrate. As water evaporates, it must be added.
7. Finished leaves are carefully placed in a container of cold water. They should not touch each other.
8. The pulp is carefully removed from the leaf with a stiff brush. If necessary, it can be washed with running water.
9. Wash all dishes well with soapy water.
10. The resulting leaf skeleton can be dried in any way possible (spread out on paper towels, between the pages of books or under pressure).

Dried leaves are easy to use. And the use of simple methods will turn a boring activity into an exciting pastime.
Autumn is rich in natural materials, from which you can make a lot of things with children or decorate a house. In this small selection, I will tell you what can be done with leaves, flowers, cones, etc., so that they retain their original appearance longer.
Leaves, flowers, fruits, berries
Collected autumn leaves can be saved in 3 ways. In any case, they need to be washed well and spread out for easy drying.And then there are options: 1. Iron the leaves through paper or newspaper and fold them into a book (under pressure). You can not iron the leaves, but after waiting for the water to dry, just fold them into a book and wait a few weeks until they dry. To speed up the process, the leaves can be shifted with paper, which should be changed periodically so that the leaves give up their moisture faster. The leaves, after drying, become somewhat darker than their natural color. The leaves will dry out and become brittle. They can be used for applications, drawing up pictures, etc. Small dry leaves are convenient to use for decoupage of a lamp jar
2. Put the leaves in glycerin, diluted in hot water in a ratio of 1:2. Cool the solution, place the leaves in it and keep them for about a week. As the solution evaporates, it must be topped up, and when darkened, replaced with a new one. The leaves are soft, elastic and shiny. In the same way, you can save small fruits and berries (rose hips, hawthorn, mountain ash, chokeberry, paradise apples, etc.)
Also, in this way, you can not only save flowers, but also make compositions out of them in a bottle. To do this, place flowers in a container, pour in a solution of glycerin in the same proportions and keep the flowers for 2-3 weeks. Then drain the darkened solution and fill the container with a new one. Close the bottle hermetically, decorate and enjoy the beauty
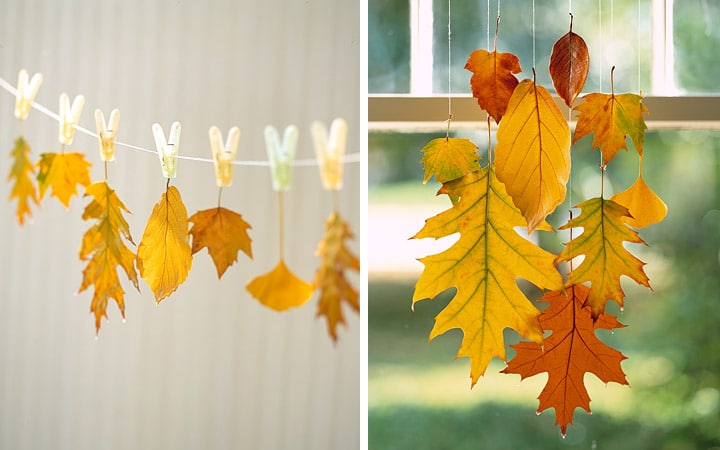
3 . The fastest way is to dip the leaves in melted wax. To do this, melt a candle in the oven or on the stove and dip a leaf into liquid wax, let it drain and put it on paper to harden. It is important here not to overheat the wax so that it does not burn (do not allow white bubbles to appear in the liquid wax), and also to remove the leaves from the wax quickly, otherwise the wax layer will be very thick. The leaves are moderately soft, over time they harden a little, but still remain suitable for various crafts.From these leaves you can make an autumn garland
Or decoration for the room. Glue a piece of paper with a glue gun to one end of the thread or fishing line, and a paper clip straightened in the shape of a hook to the other. Use a paper clip to hang the leaves on a chandelier or on curtains.
Using the same method, you can save flowers and fruits-berries. In the photo on the left, materials treated with wax, on the right, not. All the berries and flowers are of the same crop, that is, I picked them, on the same day I dipped some of them in wax, and left some of them in their natural form for comparison
Hawthorn
Flowers
In this photo, the roses in wax are on the right.
Lay out in front of the child all the natural materials available and let him make an autumn wreath on the door of his room. For the basis of the wreath, you can take a ready-made base from the store or twisted from newspaper and adhesive tape, or simply cut out of thick cardboard. It is most convenient to glue with a glue gun (with the help of an adult)
cones
Cones are perfectly stored and so, butto keep the cone exactly closed, it must be dipped several times in a thick transparent glue, diluted in half with water. Also conescan be bleached. To do this, they must be immersed in a solution of whiteness or a cleaning agent with bleach (I found the cheapest whiteness and a good toilet bowl cleaner at Fix Price for 47 rubles). As bleaching progresses, the solution becomes darker due to the escaping pigment from the buds. Depending on the strength of the remedy, the bumps are bleached from several days to several months. If the intensity of whitening suits you. then we take out the cones, wash well in soapy water and dry. After drying, the buds become lighter than when wet. Doesn't smell much of chlorine
You can make many beautiful crafts from bleached cones. Such light cones look very original, while being “natural” compared to cones painted with white paint.
chestnuts
chestnuts keep smooth and shiny if they are still fresh covered with any transparent varnish. If you only have shriveled chestnuts, soak them in cold water overnight or longer until they shrink. Then they need to be removed from the water and left in a cool place until completely dry.
Leaf skeletonization
The bright colors of autumn make you want to catch and hold on longer. Leaves are just a miracle of shades that should be used to decorate an apartment as part of color therapy. 🙂 But how often, having brought some beautiful leaf home, we notice that it quickly loses color and shape, and it is useless to use it in decor.
Today is the most successful way, get water, soda, books :))
Water and bouquets

The easiest way to keep the leaves longer is to pluck them straight from the branches. Not to say that the autumn leaves are very strong on the branches, but still this is a great chance to keep the bouquet in its original form. Before putting the composition in a vase, cut the branches with a sharp knife and lightly split. You can add a few tablespoons of glycerin or a teaspoon of sugar and an aspirin tablet to the water. Periodically spraying the leaves with water from a spray bottle will help the bouquet retain its fresh charm.
Skeletonization and decor


The skeleton in the decor is a somewhat strange combination, unless we are talking about leaves and flowers. This technique allows you to make things so delicate that you can’t believe that they are of natural origin.
You need to prepare a soda solution (about 3 tablespoons per 1 liter of water) and carefully spread the leaves in the solution. Boil them over low heat from an hour to two, until the leaves darken, periodically pouring soda. Then we lay out the leaves on paper and beat them with the bristles of a toothbrush. The pulp of the leaf crumbles and a cute skeleton remains. 😉 Then the sheet needs to be dried, you can paint or leave the resulting natural shades.
Some florists prefer the dry skeletonization method: you can clean the leaf from the pulp without pre-soaking. In this case, it is better to use a natural bristle brush, and the harder the pile, the better.
To prevent the sheet from being too brittle after cleaning, you can sprinkle it with hairspray.
Acrylic lacquer and garlands


Simple and stylish garlands - they decorate the veranda and the house very much, but in the event that the leaves remain in their original form, without losing their shape and color. Beauty can be helped by special floral sprays or acrylic varnish, which is also sold in a spray - in hardware stores.
Leaves sprinkled with this varnish look shiny and fresh, protected from damage and do not fade. The varnish is intended for wooden furniture, plastic, glass, but it will perfectly protect the leaves too 🙂
You can also use a special floral varnish for the leaves to shine the flowers. Another remedy is ordinary vegetable oil, which can be applied to the leaves with a silicone brush.
Drying in a book and vertical decoration


For the type of décor that needs clean, crisp lines, the leaves can be dried the old-fashioned way. Spread them between the pages of the book, and then every day shift to a new page. The moisture from the leaves will be completely absorbed in about a week, for strengthening it is worth lowering them into a solution of water and PVA glue 4: 1 and dry well. And then you can already use the leaves in their original form, or paint.
Pictures of leaves sandwiched between two glasses look very stylish, and this decor lasts a very long time, the colors do not fade.
From the leaves preserved in this way, you can make a panel that looks like it was painted with oil paint.
6 easy steps
- Sanding the wood base.
- Using a marker, draw a maple leaf on the board using a template.
- We glue the leaves, trying to maintain volume, without applying glue to the entire surface of the sheet.
- We press each sheet with a press after gluing for half a minute.
- We correct the leaves, trying to maintain a natural shape.
- Glue the branch to the base of our "leaf".
Updated: April 20, 2019 by: Olga Fomina
Almost any flower - from a fragile field to a luxurious garden rose, any leaf and blade of grass can become not only a part of the school herbarium, but also turn into an ikebana, a postcard for your beloved grandmother, material for decoupage, scrapbooking and a real picture that will become an excellent decor for your home . But for this you need to know how to properly dry the leaves and flowers.
There are many ways to dry plants and other natural materials to preserve their original shape and color. There is even a way to instantly prepare leaves and other raw materials for autumn crafts and herbariums. And he will help you a lot if you learned tonight that your child needs to bring this very herbarium to school tomorrow.
But sometimes you should not rush, especially if you want to create something unusual and unique from the gifts of nature. And then air or volume drying comes to the rescue, allowing you to preserve both the shape and color of beautiful delicate flowers. You just need to be patient so as not to spoil anything inadvertently.
And then real magic is born under your hands and the flowers continue to delight the eye when a blizzard sweeps with might and main outside the window.
Air drying without hanging
 If there are no suitable conditions or places for hanging plants, then they can be wrapped with paper napkins (preferably rice) or other moisture-absorbing material, and then laid out in boxes or on top of cardboard.
Flowers usually dry out in 2-3 weeks.
This method is suitable for plants such as ammobium, periwinkle, heather, gypsophila, goldenrod, kermek (statice), lavender, echinopsis and the like.
Air drying in a vase with water
 Some plants wither very quickly, so it is difficult to dry them in their original form. Therefore, a combined method is used for them: air drying plus water.
The tips of the stems must be cut diagonally and put the plants in a vase of water, submerging no more than 4-5 centimeters.
As the water evaporates, the plants will dry out.
After the buds have puffed up a little, remove the flowers and cut off the tips of the stems that were in the water to prevent mold.
Then dry the plants by laying them horizontally on cardboard or paper.
This method is suitable for such plants as artichoke spherical, heather, carnation (after full bloom), gypsophila, hydrangea, lavender, bulbous, yarrow, chicory and the like.
Air drying with hanging
 Air drying is an indispensable method for large flowers and plants that are needed for crafts or winter bouquets.
For such drying, you need a dark (without direct sunlight), dry, cool room with excellent ventilation (pantry, attic, garage, attic).
Depending on the type and size of the plant, the drying process takes a different amount of time.
What flowers can be dried?
Using the air method, it is easy to dry ornamental herbs or spikelets of cereal plants (rye, wheat, barley, etc.), as well as medicinal or useful herbs (mint, St. John's wort, nettle, etc.).
Of the flowers - cornflower, hydrangea, decorative bows, poppy, rose, lilac (cut immediately after the lower flowers bloom), physalis.
 Cereals
Harvest the ears a couple of days before flowering or after the spikelets become light straw in color.
After harvesting, collect the ears in small bunches, placing the tops of the plants at different levels.
Tie the stems tightly, but not tight, and trim the ends of the stems to align them.
Hang the bunches spikelets down on a stretched rope or wire, at least 15 centimeters from the ceiling. The gaps between the beams are 10-15 centimeters.
You can fix bunches of flowers on hooks, paper clips or clothespins.
Leave the cereals to dry completely.
 Flowers
Cut flowering plants as soon as the flowers open. Remove the bottom pair of leaves, or all of the leaves if you only want the flower itself.
Tie the plants at the base of the stem, 5-10 per bunch. It is better to wrap every 2-3 stems, and at the end of the whole bouquet with a tourniquet, elastic band or twine, so that the flowers do not fall apart after drying.
But do not tighten the rope too tight and do not wind it excessively so that moisture does not accumulate in the ligation points.
Hang bunches of flowers or spikelets down on a stretched rope or wire, at least 15 centimeters from the ceiling. The gaps between the beams are 10-15 centimeters. You can fix bunches of flowers on hooks, paper clips or clothespins.
In a bunch, the leaves should be well ventilated, and the flowers should not touch each other.
Leave the flowers to dry for 15-30 days. If the petals are thick and dense, or there are no optimal conditions, then the drying time can be increased to 40 days.
When the flowers are completely dry, the petals will be hard and brittle to the touch.

General rules
Large flowers and flowering branches should be dried one at a time (hydrangea, peony, rose, lilac).
Thorns must be removed from roses.
It is better to bind different types of plants separately, because their drying time may vary.
Volumetric drying of flowers in a wrapper
 Absorbent cotton
In addition to powder drying using bulk substances, absorbent cotton wool can be used. In this case, the petals also retain their shape and color well.
Place all petals, including the most central ones, with pieces of cotton wool. Hang the plant by the stem on a hook or rope.
The flower head usually dries out in 5-6 days, but the cotton wool can be removed only after the stem has completely dried.
Toilet paper
Drying flowers with toilet paper flattens the calyx and leaves marks on the petals without falling apart.
The flower is shifted with paper in the same way as with cotton wool.
Waxing fresh flowers and leaves
 Fresh flowers can be covered with paraffin, including a bouquet presented for the holiday. Almost all types of flowers can be treated with paraffin.
Dip the brush in melted paraffin, then carefully and delicately work the petals and leaves.
It is better to start from the extreme and move to the center of the bud.
After the petal is completely dry, you can move on to the next one.
Beautiful leaves are the highlight of this season. Some fall foliage looks more beautiful than flowers in summer, because it is filled with vibrant, genuine colors. But in order to preserve this beauty, you will have to make an effort.
Foliage selection can be done with children, brothers, sisters, and then make a beautiful family bouquet. When looking for craft materials, follow these guidelines:
- choose flat, not twisted specimens without streaks or tubercles;
- collect foliage of different colors, do not get hung up on one tone, otherwise your autumn bouquet will be boring;
- dry wet leaves under pressure, otherwise they will not be preserved;
- leaflets that accumulate less moisture in themselves can be preserved with glycerin or silica gel.
How to keep autumn leaves for a long time
There are several ways to preserve seasonal beauty.
Pressing
Pressing the foliage is the easiest, but the result will not last as long as we would like. After it, the foliage often loses its shape, and then quickly dries out if not constantly under pressure. However, this is one of the most common ways to save autumn beauty. How to dry leaves under pressure:
- Choose dry flat leaves.
- Lay them between newspapers or waterproof waxed paper - a layer of wax will seal the cracks and make the leaves smooth.
- Take a couple of heavy books, put paper in the middle. A large weight will not allow the herbarium to twist.
- Place more heavy books or any other weight on top.
- Leave the book in a cool, dry place. After a week, check the leaves - they should dry out, but if something went wrong, only rot will remain from beauty. If during this time nothing happened to the leaves, hold them under pressure for as long as possible.
After pressing, the foliage can be used to design a room or decorate furniture by placing the dried branches on interior items and then covering them with a transparent cloth. Such decor will make the apartment even more comfortable.
Application of silica gel

Silica gel is a white powder that is used to dry shoes. It resembles salt and can often be found in shoe boxes. Silica gel removes moisture, so it helps a lot when drying shoes. Powder can be purchased at any craft or hardware store.
Silica gel is a powerful thing, it will cope even with thick wreaths. Therefore, in order for the craft to be stored for a long time, the composition should be preserved in this way. The drying process by this method consists of several stages:
- Choose moist elastic specimens.
- Sprinkle a 3 cm layer of silica gel on the bottom of a thick microwaveable dish.
- Lay the yellow leaves on top, leaving some free space.
- Completely cover the material with another layer of powder.
- Place the dish in the microwave at medium power, uncovered, for about 2 minutes.
- Check the leaves periodically. When they are dry, take them out and let them cool.
The use of glycerin solution

Marinating in glycerin is one of the best methods for preserving herbarium. When using this liquid, the foliage remains flexible and soft for several years. So you can save not only leaves, but also whole small branches.
- Make a one to two solution of glycerin with water, pour into a flat tray.
- Fold everything into a glycerin composition, and then cover with another dish. Allow the herbarium to fully submerge in the solution.
- Leave the leaves to soak in glycerin. Check every 2-3 days to keep them soft and bouncy.
- After filling with glycerin, the herbarium must be removed and the remains wiped off.
After the glycerin solution, the foliage can also be used for wreaths or garlands. With their help, you can transform the interior of the table, make rings for napkins and dishes.

Those methods that we talked about above have one significant drawback - in the pursuit of storage time during drying, you can deprive the bouquet of the beauty that you were just trying to preserve. The probability of such an outcome is small, but still it is.
- Choose fresh, damp maple leaves and place them between two paper towels.
- Put this "sandwich" on a tray that can be heated in the microwave.
- Put in the microwave and turn it on at medium power.
- Check the herbarium every 30-60 seconds. With high humidity and thickness, this process will take longer.
If too long passes, the leaves can ignite and flare, so keep a close eye on them before they crumble and shrink. Only you can protect the leaves from drying out, and the house from a fire.