How to make a rear axle for a go-kart. We build a go-kart with our own hands
Homemade go-kart with your own hands.
What you will need:
Square/round tube for frame and support
Seat
Steering wheel
Slab
Round rod
Assorted bolts
Step 2: Frame


We built a frame from 1" square tubing that had been sitting next to the house for years. We started by researching racing kart frames and came up with a design.
Step 3: Spindles


To assemble the spindles, you take a piece of 1 "7" long flat stock and bend it so you have a 2"-3"-2" U shape. Make two of them. Once they are bent, drill a hole the size of the bolt you are using on the top and bottom. Now cut a piece of round pipe that is slightly smaller than the inside height of the spindle. This piece should fit snugly against the bolt you are using so that the pipe can rotate freely around the bolt, but not so tightly that it is difficult to rotate. Now for the part that actually rotates, I used 1/2" square pipe to make this part. Weld a bolt that is long enough and wide enough to fall onto the wheels you are using onto the piece of pipe that the bolt goes through. At a 90 degree angle to this part, weld another piece of pipe to which the steering components will be attached.
Step 4: Steering Shaft


The steering shaft is a piece of 1/2" hollow round tube. The length is determined by where you want the steering wheel. We made our shaft to be about 18” long, which was perfect for use since both were thin. You will need two industrial washers to hold the shaft in place so that the wheels actually turn instead of the shaft.
Step 5: Management


We made the steering components from one piece. We welded a round piece to some of the tie rod ends and then to an industrial washer. The tie rod end is secured with a bolt that we welded to the square rod on the spindle. Now you need to make a steering knuckle to which the steering shaft is welded. We took a 4" section of 1" square pipe and welded two large bolts to opposite sides of the pipe, and these bolts sit inside washers that are welded to the round stem.
Step 6: Front Wheels


We used wheels from old mini bikes for the front and rear. It's as simple as putting the wheel on and bolting it on.
Step 7: Rear Wheels


The axle for the rear wheels is made from axles from mini bikes we had. We measured the distance we needed the wheels and sprockets to clear and trim them. Weld the axle to the side of the frame.
Step 8: Engine


We used an old 3 HP motor. for installation on a homemade go-kart. We used the original engine mount and welded it to the frame.
Step 9: Seat and Controls


We used an old spot we found on the side of the house. We cut off the legs and weld them to the frame. We used mini bike brakes and put a handbrake on the side. For the gas pedal we used a brake lever from one of our mini bikes and welded a support onto the front bumper. The brakes operate on another brake lever from one of the minibikes, and we welded it to the support panel on the side of the seat.
Step 10: Final Product
After making this DIY go kart there are some things that I would have done differently if I had the material. I would make the rear axle solid to make it stronger. I would have designed the pedal placement better, we didn't think about the pedals when doing the steering. Future updates include a larger engine with a clutch and possibly a gearbox so we can shift it. Once everything was completed I painted everything black.
Not only children love to drive mini cars, but also adults. That’s why they go to a karting club and rent a karting, and some want to make it themselves. In order to make a go-kart yourself, you will need certain knowledge, materials and tools.
What is karting
Karting is car racing using mini cars (karts). A kart is a mini sports car of the simplest design without a body with a small engine. But there are such cars with powerful engines, this will already belong to the class of “superkarts”. Cards of this class are capable of reaching a maximum speed of up to 260 km/h.
Device card
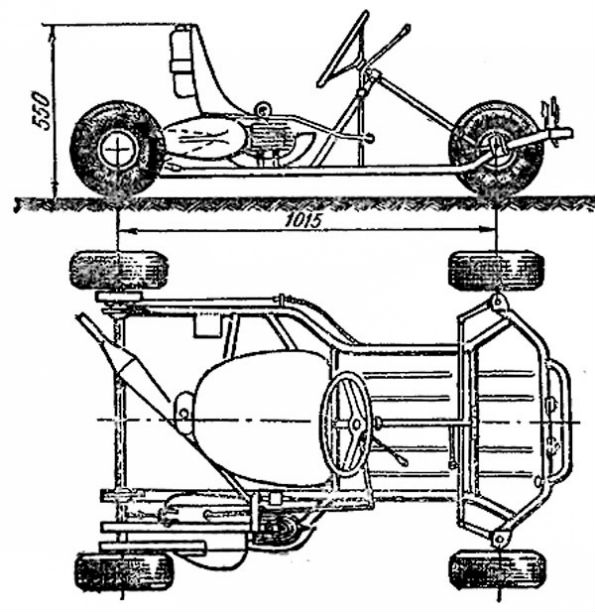
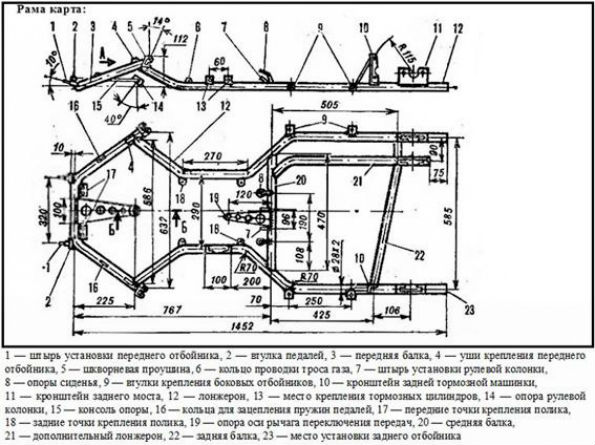
PIONEER class karts
1 — front upper bumper; 2 — gas pedal; 3 — brake pedal; 4 — gear shift lever; 5 — rear bumper; 6 — brake disc; 7 — main brake cylinder; 8 — frame (chassis); L — steering column bearing; B — steering column thrust bearing.
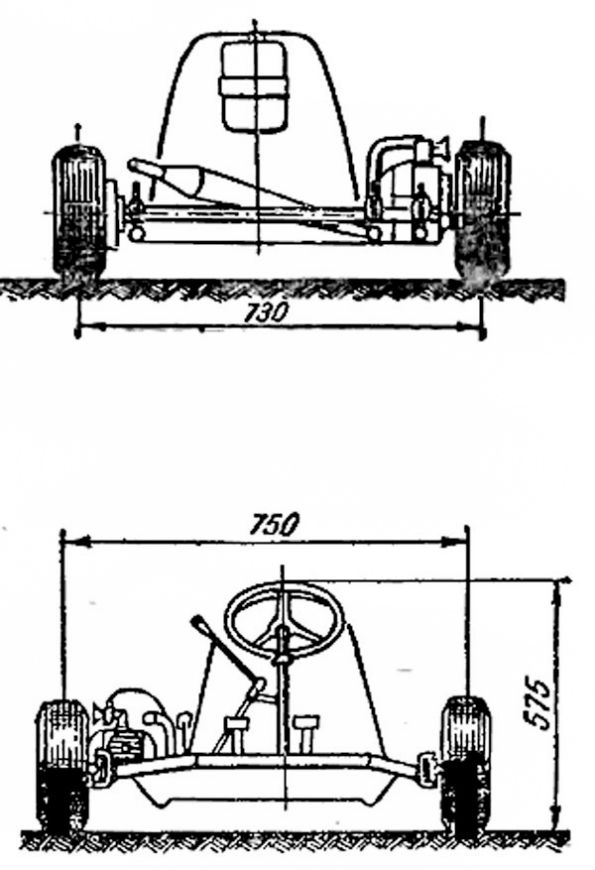
Overall dimensions of the go-kart:
- Length: 1015 mm;
- Front width between wheels: 750 mm;
- Rear width between wheels: 730 mm.
Even small children can take part in karting races. Below is a table of ages and racing units corresponding to power.
| Class | Age of participants | Machine frame | Engine | Rules |
|---|---|---|---|---|
| Micro | 6-8 | Homologated | IAME Parilla 60 (Italy) | The speed is about 60 km/h, competitions are local and throughout Russia. The technology is reliable. There are many participants. |
| Mini | 9-10 | Homologated | IAME Parilla 60 (Italy) | There are many participants, the speed is about 80 km/h, competitions both in Russia and local ones. The technology is reliable. |
| Super Mini | 10-12 | Homologated | IAME Parilla 60 (Italy) | There are many participants, competitions both national and local, the equipment is reliable, the speed is about 100 km/h. |
| Pioneer | 8-11 | Any | Domestic 50 cm³ with gearbox | An outdated class, there are few participants in all-Russian competitions, the equipment is unreliable, speeds are about 60 km/h. |
| Cadet | 10-13 | Any | Domestic 50 cm³ with gearbox | An outdated class, there are few participants in all-Russian competitions, the equipment is unreliable, the speed is about 80 km/h. |
| Mini Rocket | 8-11 | Any | Raket-85 (Sweden) | Outdated class, only local competitions, reliable equipment, speeds about 60 km/h. |
| Rockets | 11-13 | Any | Raket-85 (Sweden) | Outdated class, only local competitions, reliable equipment, speeds of about 80 km/h. |
| EasyKart-50 | 5-8 | Birel E.K. | IAME Parilla 50 EK (Italy) | Mono series, only local competitions, reliable equipment, speeds of about 40 km/h. |
| EasyKart-60 | 8-13 | Birel E.K. | IAME Parilla 60 EK (Italy) | Mono-series, many participants, reliable equipment, speeds of about 80 km/h. |

Karting project
The materials you need to assemble a mini car can be bought cheaply at a salvage yard or bought new.
You will need the following parts:
- steering wheel (for convenience, it is better to buy one ready to make yourself from leather, fur or wire);
- armchair;
- pedals;
- steering column (shaft);
- steering knuckles;
- steering rods;
- pins;
- axle shafts;
- pedal mounting block;
- master and working cylinders of disc brakes;
- wheels.
It’s better to get the seat from a foreign car to make it more comfortable to drive. Such old rotating parts as the kingpin and steering knuckles must be checked for functionality so that they do not jam. Check brake cylinders, tubes and hoses for leaks. The remaining parts should preferably not be rusty.
At scrap metal collection points (scrap of non-ferrous and ferrous metals) you can buy the following parts inexpensively:
- metal sheets, strips, tubes;
- bearings;
- gears;
- chains;
- wheels;
- motor.
 To represent the kart device, it is advisable to have a diagram or drawing of the kart project. There are no clear dimensions for amateur cars. Everyone does at their own discretion, chooses the sizes for themselves. The main criterion for designing a go-kart is the height of the person who will be driving it. Better yet, install a chair with a slide to adjust the length of the pedals.
Rather than drawing up a diagram from scratch, it is better to download a ready-made project on the Internet and modify it, change some dimensions.
For steering rods of homemade karts, steel rods with a diameter of 8 to 15 mm are usually used. The steering pendulum is made from a metal plate 5-7 mm thick.
The general finished drawing looks like this:
 Dimensions can be changed, but it is better to stick to standard sizes so that the dynamic and technical characteristics do not change.
- The usual overall dimensions of a karting for a teenager are: length - 1.3 meters; width - 0.76 meters.
- Overall dimensions of a mini sports car for an adult: length - 1.8 meters; width - 1 meter.
With a kart length of 1.32 meters, the longitudinal distance between the front and rear axles ranges from 1.00 to 1.22 meters.

If possible, we buy new parts. So, a list of devices and parts for creating a map with your own hands:
- Transmission, steering and brake systems:
- Transmission;
- hand brake;
- steering wheel;
- wheels;
- steering and drive shafts;
- gas and brake pedals;
- bearings.
- Motor:
- engine (you can use the engine from a chainsaw or lawn mower-trimmer);
- chain;
- gas tank;
- fasteners (bolts, nuts, washers).
- Chassis card:
- 2.5-centimeter square pipe (inch), 9.2 meters long;
- steel pipe with a diameter of 2 cm, a length of 1.8 meters;
- pipe with a diameter of 1.5 cm, a length of 1.8 meters;
- a steel plate slightly larger in size than the engine and 0.5 cm thick;
- metal or plywood for the bottom and seat;
- seat (preferably sports). By the way, it wouldn’t be a bad idea to bet on cards.
- Transmission, steering and brake systems:
In addition to the necessary materials and parts, you will need a welding machine. The kart chassis must be welded with high quality so that the welding seams are not destroyed by vibration.  To purchase all the necessary new materials you will need about 30,000 rubles. But it’s more convenient and easier to make from new parts.
How to make a go-kart frame
It is better to cook and assemble according to the drawing. Put all the dimensions on the diagram in advance.
- Cut the pipes to the specified dimensions and clean them.
- Weld the frame.
- Reinforce with stiffening ribs where it makes sense.

After welding, you should get a frame like this for the kart. 
What engine is on the go-kart?
The most suitable internal combustion engine for karting is a chainsaw engine and a trimmer (lawn mower). After disassembling the saw, all unnecessary parts must be removed from its engine: handle, chain, tank, etc.
The difficulty here arises in remaking the sprocket. You need to sharpen the teeth of the chainsaw sprocket a little. Two holes must be drilled in the cooling system casing for mounting to the subframe. 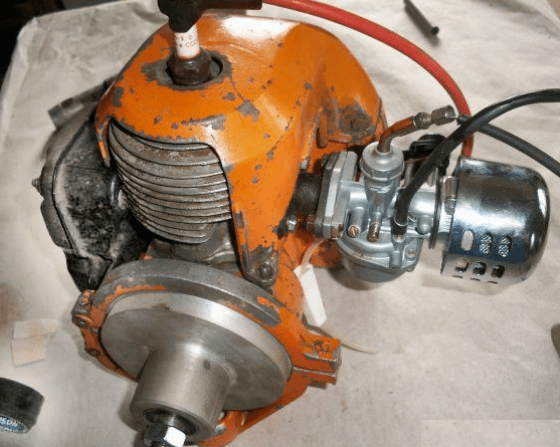
The internal combustion engine of a go-kart is installed at the rear. To do this, you need to weld a thick plate on the back of the frame. The motor must be secured so that its sprocket is in the same plane as the wheel sprocket.
If you buy all the necessary parts in the store, it may be more advisable to buy a ready-made kart racing unit right away.
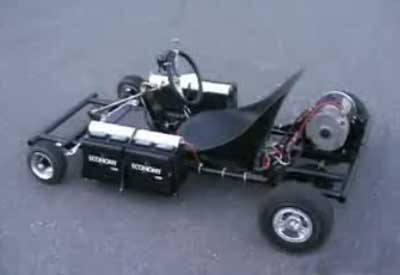
One of the car map options looks like this:

Today, one of the hobbies of both adults and children is karting. These small, but at the same time fast cars allow you to gain not only your first driving skills, but also an unforgettable experience of racing on a go-kart track. Anyone can construct such a machine at home. To make your own go-kart, consider the drawings with dimensions and step-by-step assembly instructions.
Drawing development
Most often, the determining factor of the future design is the presence of certain parts.

If you purchased a seat with a slide from a car as a chair, then the kart can be made long and the distance to the pedal assembly can be adjusted. Thus, people of any height can sit comfortably behind the wheel.
You can take any diagram you can find as a basis. It is customized to fit your parts and components. This is much easier than drawing up a drawing from scratch. In the case of developing a diagram, it is necessary to take into account the features of attaching the chair to the chassis, methods of fixing the brake system cylinders, and the parameters of the kingpins. Particular care should be taken when attaching the steering rods to the pendulum. Often, a metal rod with a cross section of 4-15 mm is used to make rods. A 5-7 mm metal plate is used as a pendulum.

Preparation of materials and parts
When all the preliminary calculations have been carried out, all that remains is to select the necessary parts, after which the structure can be assembled. If finances allow, almost any parts and mechanisms can be purchased in the store. In another situation, you can try to find parts in old pieces of iron in your garage or shed.
To design components and systems of a sports car, you will need the following parts and assemblies:
- chassis. It is assembled from a 25*20 mm profile metal pipe. A 5 mm thick plate is welded under the engine mount in the rear of the frame, which should be slightly larger than the size of the motor;
- power unit. This mechanism can be taken, for example, from an old lawn mower or moped. To be able to transmit torque to the rear axle, you will need a chain that will fit the selected sprocket. Additionally, you will need a fuel tank and fasteners;
- transmission. To construct it, a large number of parts are prepared: wheels, steering wheel, gearbox, steering shaft, bearings, pedals. Many people use wheels from a scooter, a small steering wheel from a car, and pedals made of metal.

The main tool for assembling the machine is a welding machine. If you do not have experience working with this device, then it is better to seek the help of a specialist. Since the base of the card is a frame, welding of its elements must be carried out with deep welding of the metal. The seams must be made even and neat. If the welding is unreliable, the contact between the elements will be poor, and cracks may appear at the joining points, which will make the operation of such a product quite dangerous.
Making go-karts
When everything necessary is prepared, you can begin assembling the structure. Let's consider a detailed description of the installation.
Chassis installation
The chassis is assembled according to the drawing. It is better to prepare it on a 1:1 scale on graph paper. The pipe is cut into pieces in accordance with the diagram. All frame elements are welded. To increase strength, wedges are inserted into the corners.

Then attach the front axle plugs. For its manufacture, a metal pipe with a cross-section of 20 mm is used, which is attached to the load-bearing structure using two bushings. The connection is made using bolts. The plugs are installed before starting work on the steering mechanism.
Having figured out how to make the front axle, move on to the rear. It is mounted in such a way that it is welded to the frame, but at the same time rotates without difficulty. This is achieved by fixing the support bracket of the holder to the rear axis. After this, the metal plate is welded to the chassis and reinforced with a bolted connection so that the bearing is pressed securely.

They make the bottom and install the seat of a sports car, for which metal and plywood are used. The seat is made so that when cornering the driver sits confidently in it and does not fall out, as can be seen from the photo.

They also leave room for the steering wheel, pedal mechanism and levers.
Motor installation
Depending on the engine used, some modifications may be required, for example, the removal of unnecessary elements. The drive from the motor is made by a chain, which will require the installation or modification of a sprocket.
To mount the engine at the rear of the frame, a plate is welded. The motor is placed so that its pulley is aligned with the pulley on the axle. Make markings for the bolts. After this, the steering drive is assembled: a metal rod with a diameter of 20 mm is used for the axles, and a metal rod with a diameter of 15 mm is used for the drive. The latter must be bent at an angle of 90°. To align the steering wheel, special connections are used that allow wheel alignment to be adjusted.

Install brakes and wheels. It is better to use the latter in a small size, which will provide good acceleration. Attach the wheels to the axles.

To increase safety, it is advisable to install brake discs on each wheel. The brakes can be supplied from a motorcycle. Mount the brake pedal so that your hands are free.

Connect the ignition and manual throttle. The gas can be controlled with your foot or like on a lawn mower.

After reading the manual for making a go-kart with your own hands and looking at the drawings with dimensions, it will be much easier to design the car. If you have welding skills, then such a design will not cause any difficulties. The main thing is to get the necessary parts and set aside time to assemble such a vehicle.
A go-kart is a sports microcar without suspension, very popular among young people interested in motorsports. Often in such competitions (especially in Russia) racers take part in karts made by themselves. Indeed, why pay someone money if you can design your own vehicle, especially since the costs for this are minimal (and not only from a financial point of view).
How to assemble a go-kart with your own hands? You will find out the answer to this question in this article.
How to make a go-kart with your own hands? Selection of technical characteristics for a vehicle
Firstly, you must have an idea of what size your future car will be. To properly assemble a karting with your own hands, you should draw a plan diagram on paper. Only with this help will you be able to correctly assemble the go-kart with your own hands. Drawings of this transport are shown in the photo below.

This is roughly what your diagram should look like. The most important thing to note here is the length of the wheelbase and overall dimensions. By the way, the longitudinal distance between the axles on go-karts should be no less than 101 and no more than 122 centimeters with a total length of 132 cm. The diameter of go-kart wheels should not exceed 35 centimeters. It is these characteristics that will contribute to stable and safe driving in this type of transport.
How to make a go-kart with your own hands? A little about the frame
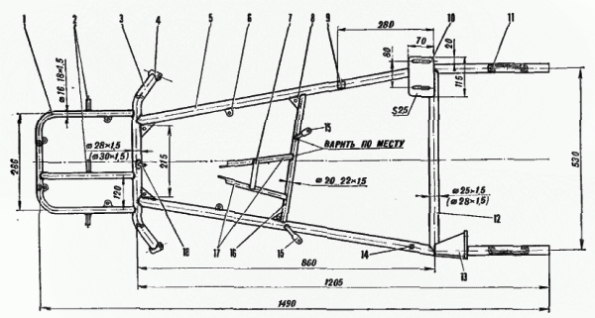
The best place to start assembling a kart with your own hands is from the frame. It is more convenient to draw it in full size on graph paper glued to an A1 sheet or thick cardboard. Such a diagram will serve as a plan according to which individual components and elements will be adjusted into the rough. The frame diagram should be drawn in several projections - side and top views. In this case, the front spar is depicted separately.

Now we begin to make a slipway for assembling the frame. This element will be required if the machine will be produced in a small series (that is, as in our case). As a base for the slipway, a duralumin sheet of steel measuring 170x90 centimeters should be used. In this case, the thickness of the material used should be about 15 centimeters. A longitudinal line is drawn along the axis of the element (this will be a trace of the plane of symmetry of the transport frame), and perpendicular to it - a base line (for mounting the pin bushing clamps).
The holes in the bushings are cut using a special machine. Fixing longitudinal spars are mounted on the slipway. The frame itself is assembled from several elements:
1. Two spars.
2. Front bump stop.
3. Front, rear and middle crossbars.
4. Steering column mounting brackets.
About the engine and chassis
As for the engine, go-karts are often equipped with two-stroke single-cylinder air-cooled gasoline units. You should also think about a special protective device that will protect the pilot from possible burns from the internal combustion engine. The braking system is also installed on the go-kart yourself. It must use at least two wheels.
Proportions
Pay attention to the ratio of the sizes of all leading components and assemblies in the machine. The width of the go-kart platform should correspond to the dimensions of the frame, and its length should correspond to the distance from the seat to the pedals.
Other important details
The design of this vehicle also needs to provide special guards that will prevent your feet from slipping off the pedals. The same applies to the seat - it should not be such that the driver flies from one side of the go-kart to the other when cornering. Ideally, the pilot sits tightly in the seat and does not move to the side during sharp turns and high speeds (with the exception of possible overload of the internal organs).
Individual parts of the gearbox should be covered with a special shield for ½ part. Also pay special attention to the fuel tank. Remember that its volume should not exceed five liters, and the container itself is securely fastened in order to completely prevent unauthorized release of fuel to the outside. You should not make an excessively large tank - five liters is enough for a single-cylinder two-stroke engine, the working volume of which is only a few tens of cubic centimeters.

All parts of the steering system and chassis must be cottered. It is also permissible to use an ignition system, shockproofing agents, and carburetors of any type (foreign or domestic production).
What parts cannot be used during assembly?
According to experts, it is prohibited to use the following elements in the design of this vehicle:
1. Body.
2. Fairings.
3. Steering with worm, cable, chain or gear drive.
4. Differentials.
5. Various superchargers and fuel injection.
6. Pedals that, when pressed, extend beyond the dimensions of the frame.
Follow these rules, you will assemble the safest possible unit in the shortest amount of time!

So, we found out how to build a go-kart with your own hands, what details you should pay attention to when assembling. Good luck!
Nothing quenches the need for speed like racing a go-kart. You can assemble it yourself from a kit of spare parts or from a sketch - it will be an exciting and fun garage project for amateur mechanics of any age. Depending on what tools you have, you can learn how to design a cool go-kart yourself, weld the chassis correctly, and achieve a powerful ride. See step 1 for more details.
Steps
Part 1
Design- Get creative with your project planning and draw a detailed diagram to make sure you have enough materials to complete the job. Look at other kart models for inspiration, and talk to mechanics who already have experience building karts.
- You can also find schematics for many different models online if you prefer to let someone else do the design. Use the template and modify it to your liking.
-
Carefully consider the dimensions of the go-kart. They are determined by the age and height of the driver. For teenagers, suitable sizes are 0.76 meters wide and 1.3 meters long, for adults - 1 meter wide and 1.8 meters long.
- It is very important to design the kart as accurately as possible using specific measurements, otherwise it will be difficult to select the right materials and quantities.
-
Gather materials. If you're on a budget, look for inexpensive parts at a junkyard. Or you can use salvage parts from an old lawnmower or broken go-karts from a flea market. Shops that repair lawn mowers may give you unwanted parts or broken trimmers, as well as a used four-stroke engine with a power of 10-15 horsepower with a horizontal shaft and a clutch drive. Here's what you'll need:
- For chassis:
- 9.2 meters of 2.5 cm square pipe
- 1.8 meters of 2cm round steel pipe
- 1.8 meters of 1.5 cm pipe
- Steel plate 0.5 cm thick, slightly larger in width and length than the engine
- Plywood or metal (for seat and bottom)
- Seat
- For engine:
- Engine (you can take the engine of an old gasoline trimmer)
- Chain to match the sprocket hub
- Bolts, washers
- Fuel tank
- For transmission:
- Wheels
- Gearbox and handbrake
- Drive shaft
- Bearings
- Steering shaft
- Brake pedal
- Throttle/gas pedal
- For chassis:
-
Get a welding unit. If you don't know how to cook, you will need to hire a welder. The most important part of a go-kart is the strong chassis that will hold you in place while you ride. They also house the engine. If you intend to make a multi-piece chassis, welding should be done at a fairly high temperature and penetration, with neat welds. Otherwise, the elements may not be welded well, and bubbles, cracks will appear at the welding points and/or they will only be strong in appearance, which will turn your kart into a death machine.
- If you've never done welding, don't start by assembling a go-kart. Start with small pieces to practice.
-
Consider purchasing a kit of parts for the kart. If you are not interested in inventing and welding kart parts yourself, buy a construction kit with detailed instructions and diagrams, which you can easily assemble without welding using simple tools.
- The pleasure of assembling a kart yourself without the hassle of designing a model and finding materials will cost you about $550.
Part 2
Chassis and steering column assembly-
Cut the metal pipe into the required lengths according to your drawings.
- On most models, the camber angle of the front wheels is narrower than the rear, allowing the wheels to turn, allowing the chassis to spin slightly. To achieve this, strengthen the steering axle at the front corners, where the wheels will be, to ensure easy rotation.
- To make it easier to navigate the dimensions, you can draw marks on the floor with chalk where you work, and do not have to take measurements again each time. You can even draw the entire model on the floor and lay out the parts on top of it.
-
Weld the frame elements in accordance with the diagram. Press the parts down with a concrete slab while welding, making sure the welds are holding well and the chassis is secure. They must be strong enough to support your weight and the weight of the engine, so welding cannot be done haphazardly. To increase strength, insert wedges at all corners. Use concrete blocks to secure the frame in an elevated position while you work.
Assemble the front axle plugs. Make the axle from a strong metal rod with a diameter of 2 cm and two bushings attached to the frame. Secure the structure with washers and cotter pins, screwing them into the axle.
Install the rear axle of the wheelset. You will likely need to attach the axle holder with a support bracket to the rear axle, meaning the axle will be welded to the frame but will be able to rotate freely. Weld the steel plate to the chassis, securing the pressure plate on the outside with high-strength bolts and machine nuts to clamp the bearing.
- Instead of doing this yourself, you can purchase ready-made structures called “support-bearing units.”
-
Use plywood or metal to make the seat and bottom of a go-kart. To save money, you can use a seat from a used go-kart, find a car seat that fits in a junkyard, or make one from a simple seat with a cushion for support. Leave room for the steering wheel and control levers.
Part 3
Installing the engine and steering column-
Install the engine mounts. Weld a steel plate to the rear of the frame to strengthen the engine. Place the motor on the plate and mark the holes where the bolts will be inserted so that the motor pulley lines up with the drive pulley on the axle.
- Attach the pulley to the axle before inserting the axle into the bushings. You can also use a set screw to reinforce the pulley or weld it directly to the axle, but it must lie in line with the engine pulley.
-
Assemble the steering gear. Use a 1.5cm steel rod for the drive and a 2cm steel rod for the axles. To bend the 1.5cm rod at a right angle, you may need to use a soldering iron to heat the steel.
- To align the steering wheel, adjustable joints are needed, because it is very important to correctly adjust the camber and toe: the vertical of the front wheel and the tilt of the steering wheel.
-
Install wheels and brakes. Get small racing wheels to give your go-kart optimal acceleration and controllability. Attach them to the axles and begin installing the brakes to secure the kart.
- To install the brakes, attach the disc to the rear axle and the caliper assembly to the chassis for the most professional setup you can make. Sometimes this mechanism can be found in relatively good condition in broken motorcycles. They fit true to size and will be easy to work with.
- Install a foot brake pedal no matter what type of accelerator you have. Leave driving and a minimum of other actions to your hands.
- This kart uses a centrifugal clutch, but modifications can include a tension belt drive system or a hand- or foot-operated gas/clutch pedal.
- The mechanism does not have an accelerator, which can also be added using a simple lawn mower cable, or a more complex foot pedal.
- This instruction assumes that the mechanic will use scrap parts from broken lawn mowers and other sources. It will probably be cheaper to buy a ready-made kart than to assemble it from new purchased parts.
- The price of the simplest card reaches 60-70 dollars, if not more. A good set of models can be purchased for about $40, some even cheaper. The price of the drawings is just under $80. It might be worth considering this unless you're a pro.
- It is often recommended to purchase a set of drawings of well-designed and thought-out models that incorporate tried and tested motoring principles: Ackermann angles, castor angles, kingpin angles, and so on. You're more likely to finish and enjoy your go-kart if you build it from a good blueprint.
Warnings
- Check the kart before going to the track as parts may come loose or break.
- Since the model is simple, without high-tech engineering and design solutions, it is not recommended to use a high gear ratio or a large engine. Speeds above 15-25 km/h can cause failure of insufficiently well-designed elements.
- Wear protection while driving - helmets, pads, etc.
- This is not a real car and should NOT be driven on the road under any circumstances!
Draw a detailed diagram of the future karting. It can be of various sizes, shapes, models. Almost any element can be added to the design of these homemade machines. The basis is a chassis, a simple engine and a steering/braking system.