How to make a fence from round timber with your own hands. Secrets of installing wooden poles
A few centuries ago, our ancestors created a reliable and beautiful fence from sharp wooden stakes - a picket fence. Today, this functional protective structure is once again becoming popular in suburban construction. The palisade is the perfect addition to a site with elements of "ethno" decor or decorated in a "rustic style". In addition to the decorative appeal, the log fence serves as an excellent protection against the encroachments of unwanted guests. Breaking such a fence is beyond the power of even strong men with remarkable abilities. The palisade is a great alternative to traditional concrete, brick or metal protective structures. You can build a palisade in just a few days, and a wooden fence will last for decades.
The palisade is assembled from cylindrical wooden logs with the same trunk diameter. Since today the owners of suburban areas do not need to defend themselves behind a powerful palisade from enemy attacks, it is enough to use logs with a diameter of 10-15 cm to equip the fence.
The height of the logs is determined taking into account the purpose of the enclosing structure. For an external fence that reliably protects against the penetration of thieves, logs with a height of at least 2 meters will be required. For the arrangement of internal fences that delimit the areas of the site and enclose domestic animals, small logs half a meter high are suitable.
So that the logs do not stagger in the wind and are securely fastened, they must be deepened. It is possible to fix the logs on a transverse beam raised above the ground, which is fixed on the supporting pillars of the building envelope. In this case, the logs will not be buried and will be placed at full height above the ground.
When determining the height of the product, it should be borne in mind that with the traditional method of arranging 1/3 of the height of the trunk will go to fixing the structure

Choosing the material for the fence, it is necessary to focus primarily on the quality of the logs
Savings are not appropriate here: the service life of the entire structure depends on the quality of the product. Therefore, it is better to spend more, but get a fence that will definitely last a couple of decades, than to save money and buy a fence for only 2-3 years. The surface of the logs in cross section should not have any notches and protrusions. A distinctive feature of the paling is the pointed tops.
A sharpened log looks like a large pointed simple pencil. The logs are sharpened at an angle of 35-40 ° using an ordinary small hatchet.
Log processing and protection

Today, a simpler method of protective wood treatment is used. Before digging in, the lower part of each log is immersed in hot bitumen.
The process of building a fence
The traditional way of arranging a palisade looks like this: the pointed lower end of the log is stuck into the ground, then a little water is poured into the hole and the same pillar is re-sticked. The log is screwed in until it is firmly fixed in the soil. To facilitate the process, a heavy hammer is used, but they work with it very carefully so as not to damage the integrity of the logs. Some builders, in order to protect the stakes from chips and cracks, put protective plastic caps on the hammers.
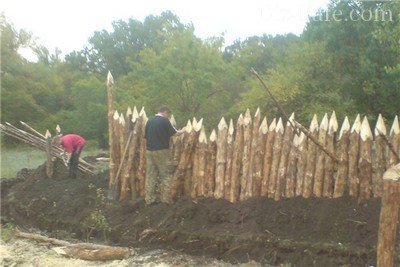
The modern version of the construction of the palisade provides for the arrangement of a trench half a meter deep
The bottom of the trench is covered with 20-30 cm of sand or gravel "cushion". After that, stakes are installed close to each other, preventing the formation of gaps between them. The trench is covered with a layer of earth and carefully compacted. To increase the efficiency of compaction, the soil should be watered. It is possible to increase the reliability and strength of the enclosing structure by additionally using two horizontal bars made of thick timber. They are placed parallel to each other: the lower one is at a height of 20 cm from the ground level, and the upper one is 20 cm below the tops of the palisade.

At the final stage of arranging the fence to make the palisade more natural, it is desirable to treat its surface with a transparent varnish, primer or wood stain
Advice. Using different concentrations of stain, you can increase the decorativeness of the fence by painting it in honey-golden or brown-chocolate shades.
Decorative option - wicker palisade
To stylize the interior space of the site, you can use a wicker palisade.

A beautiful wicker fence will not only serve as a fence for paths and flower beds, such an element of landscape design will rightfully become a real “highlight” of decor
Some of the main advantages of wicker fences include:
- Environmental friendliness. When arranging the fence, only natural components are used that do not harm human health.
- Decorative. Multi-level wicker fences look interesting in any corner of the site: as miniature fences for mixborders, as elements of zoning the territory, and even as a full-fledged high fence.
- Ease of erection. Even a novice gardener can master the technique of weaving a fence.
For the manufacture of such a fence, you can use branches of a flexible vine, hazel, willow, and even oak or pine.

Wattle material is harvested in the fall. At this time, sap flow in plants slows down and growth stops. Branches 1-3 cm thick are best suited for work.
When deciding to equip on the site, it is necessary to mark the territory. A shallow trench is dug at the designated place, which is filled with a layer of sand. Such a sand "cushion" will provide drainage, thereby preventing rotting of the buried part of the stakes.
After that, you can drive in small stakes, placing them at a distance of half a meter from each other. The base is ready, you can start weaving.
Advice. To give the branches more flexibility, they can be pre-soaked for a couple of days in warm water. To extend the life of stakes and branches, they must be treated with an antiseptic.
Weaving starts from the bottom tier. The technology is quite simple: the rods must be wound in turn from opposite sides of the stakes and stretched to their full length. As necessary, short rods are lengthened, while long ones are cut with secateurs.
I am answering your question about the installation of a wooden fence in my house.
materials
For the device of a wooden fence, I needed the following materials:
- logs (pine) with a diameter of 180 mm and a length of 6 m (for poles)
- edged board 100mm wide, 25mm thick and 4 meters long (for picket fence)
- bars with a section of 50x80 mm, 6 meters long (for the sick)
- bars with a section of 50x50 mm, 3 meters long (for a rail-tie)
- bars with a section of 40x80 mm, 4 meters long (for the frame of the gate leaves and the gate)
- garage hinges, self-tapping screws, wood-grouse screws, nails 120mm and 60mm long
- decorative antiseptic
Material calculation
I will calculate the materials based on the size of my site. The width of the plot is 38 meters, the length of the plot is 30 meters.
1. Pillars
- poles installed from each other at a distance of 3 m, installed - 45 poles
- the pillars were buried in the ground to a depth of approximately 1.2 m, the height of the pillars from the ground surface was 1.8 m. Total: 3 m
2. Lie down
- for the fence device I used six-meter bars with a section of 50x80 mm
3. Fence
- for the fence I used pine boards (moisture content? 20%), before the fence, I pre-processed the boards for the fence on a woodworking machine (trimmed on both sides and sides)
4. Gate and gate
- I made the gate and the gate, like a wooden fence, for the frame of the gate and the gate I used a pine block with a section of 40x80 mm and boards, the same as for the picket fence
- gate size - 3.8 m wide and 2 m high; the size of the gate is 1.2 m wide and 2 m high.
Note:the height of the gate and the wicket is indicated by the height of the frame sheathing with a picket fence, the height of the frame itself is 1.6 m.
The need for bars and boards for gates and gates: bars -5 pcs. (0.07 cubic meters), boards - 42 pcs. (0.17 cubic meters).
Fence device
Step one. Drilling holes for poles
I made holes for the posts with a drill (knife diameter - 250 mm). Why is the diameter of the drill blades larger than the diameter of the pillars? The larger diameter of the pit is necessary so that it is possible to lay broken bricks or medium-sized stones in order to strengthen the pillars in the ground.
The pits were drilled to a depth of 1.5 m, a layer of crushed stone about 30 cm thick was poured at the bottom of the pits - this is necessary so that the water does not accumulate around the pillars, but goes into the ground.
Step two. Pillar preparation and installation
Before sawing the logs, I sanded and chopped off the knots. After the log was cut with a chainsaw into pieces 3 meters long. Next, it is necessary to treat the logs with an antiseptic. But I did not treat the part of the logs that will be in the ground with an antiseptic, I chose the method of processing fence posts, which was still used in those days when people did not know antiseptics, bitumen, etc. I charred this part of the logs on the fire.

To char the underground part of the pillars (D) on a fire, I made a formwork from road curbs (A), inside which a fire will be built, a layer of crushed stone 5-8 cm thick was poured onto the bottom of the formwork, this measure is due to the fact that during long-term burning of the fire to avoid burns soil. In order to put more fuel inside the formwork at a time, I made linings of bricks under the logs (B) - the height from the surface of the bottom of the formwork to the logs is about 45-55 cm. Under the other ends of the logs I placed trimmings of the bars (C).
In order for the logs to be charred to a certain size (110 cm, maximum 120 cm - the depth of installation of the logs in the ground), I wrapped the log with a strip of foil (D) about 20-25 cm wide. The foil does not burn, and will serve as a limiter on the impact of fire on the surface of the log.
The approximate processing time for four logs (one bookmark) was about 1 hour. When firing, the logs must be rotated in a circle - an interval of 10-15 minutes. The log should not just turn black from soot, but it should be charred, cracks characteristic of wood charring will appear - their depth should be at least 5 mm, maximum - 10 mm.
Note:the time of charring logs on a fire can be different, it depends on the intensity of the burning of the fire, the fuel used, the humidity of the wooden poles.
Important!
It is impossible to use roofing felt, roofing material, polyethylene film, etc. as a waterproofing of the buried part of the log, in this case the service life of wooden poles is reduced by 50-60%!
The charring of poles can also be carried out with a blowtorch or a gas burner, but at the same time you will have an additional expenditure part of the money - gasoline, gas.

While the next batch of poles was charring on the fire, ready-made poles (B) could be installed. The pillars were installed in a pit on a gravel bed (A). To seal the pillars, I used broken brick and natural stone (B). Stones and bricks, laid in the gap between the pillar and the walls of the pits, were tamped with a trimming of a bar (section 50x80 mm), a clay castle was made around the pillars (G) so that melt and rain water could not flow directly under the fence posts.
Step three. Fastening came down

Slegs - transverse bars attached to the poles to which the picket fence is attached.
To fasten it to the poles, I made markings at the top and bottom of the poles, applying a rail - template to the poles, checked the horizontal position of the rail - template using a level.
According to the markup, I made cuts in the posts - the width of the cut in the post should not be more than 1 mm wider than the width of the cut, since the installation of the cuts in the cuts in the posts should be carried out with an interference fit (that is, the cut should be hammered into the cuts with a mallet - a wooden hammer or the butt of an ax through a spacer), the depth of the cut is equal to half the thickness of the leg.
When the cuts were made in all the pillars, I proceeded to fasten them down - the fastening was carried out using nails 120 mm long. After that, he treated the legs and the above-ground part of the pillars with a decorative antiseptic.
Step four. Fastening and configured trimming of the picket fence
A fence made of boards 100 mm wide, 20 mm thick and 2 m long was prepared in advance, so it only remained to fasten the boards to the slabs. The picket fence was attached to the rails not with a solid shield, but, leaving a distance of 2 cm, a rail 2 cm thick and 5 cm wide served as a template. Why was the fence not attached with a solid shield?
- first: after the boards begin to dry out more, gaps of various sizes will begin to form in a solid shield - this will negatively affect the aesthetic appearance of the fence
- the gaps between the boards contribute to better wind resistance, while the pressure of the air flow is significantly reduced.

When fixing the picket fence to the rails, I controlled the height level not along the top of the fence, but from below, since the top of the picket fence will be aligned with the configured trimming.
For the configured cutting of the upper part of the picket fence, I made a template from a strip of plywood, cutting out the configuration of the top of the fence I needed along one edge. Trimming was done with an electric jigsaw.
Step five. Gate and gate installation

Before installing the gate and gate, I attached boards 30 mm thick to the posts, this made it possible to achieve maximum verticality of the surface to which the gate and gate will be attached (pillars made of non-rounded wood have bumps and a taper of the trunk).

For the canopy of the gate, I used garage overhead hinges. The hinges were fastened to the gates to the upper and lower bars of the frame of the gate leaves with screws - a “capercaillie” 50 mm long, and fastened to the pole 150 mm long.

The canopy of the gate was made using smaller overhead hinges, which were attached to the gate and the post with the help of wood screws.
The distance from the ground surface to the lower part of the gate and the gate left about 10 cm, so that in winter, when the snow cover grows or if it is necessary to raise the height of the path, the gate and the gate open freely.
Note:if it is required that the gap between the ground surface and the gate or gate be closed, then hard rubber strips can be attached to the bottom (for example, a strip from a conveyor belt, which are used in agricultural machinery).
Installation of wooden gates and gates

The device of the gate leaves began with the manufacture of the frame. At the ends of the bars, I made notches - “in the paw”, the depth of the notch is 1/2 the thickness of the bar (I used a 40 mm thick bar for the frame, respectively, the depth of the notches is 20 mm). The frame racks were fastened with the help of self-tapping screws (as seen in the photo) - fastening along the “square”. To give the frame of the gate leaves rigidity, I installed jibs in each corner joint.

In the center of the side posts of the gate leaves, I made a groove for installing a transverse rail into it, which will serve as both a coupler for the side posts and a place for attaching the sheathing of the gate leaves. The groove for installing the rail was made using an electric drill (the power of the drill must be at least 1 kW) and a finger cutter, the groove depth is 4 cm, with a frame rack width of 8 cm.
Frame assembly sequence:
- the first to assemble the side posts of the gate frame and the rail - screed, a layer of epoxy glue was applied to the spike of the rail (this guarantees reliable fastening of the screed and frame posts)
- the second step will be the connection of the upper and lower bars with the side racks of the frame, before fastening them together with self-tapping screws, you need to check that the corners of the frame are 90 ° (the check was carried out using a square, you can use a regular school square)
- the last step in assembling the frame is the installation and fastening of the jibs.
Important!
The assembly of the frame of the gate leaves and the gate must be carried out on a flat surface in order to avoid distortions, which will lead to an uneven connection of the structural parts of the frame.

The wicket frame is assembled in the same way as the gate leaf frames. After the frames were ready, I sheathed them with a picket fence and treated them with a decorative antiseptic.

He slammed the doorknob into the gate - the lock. To install such a handle in the gate you need:
- in the side rack of the frame, you need to make a selection using a finger cutter and drill holes for installing and fastening the lock handle mechanism
- attach a latch to the post, which will ensure that the “tongue” of the locking mechanism of the handle snaps into place and the gate will be securely closed.
In order for the fence to serve for at least 20 years, it is necessary once every three to four years to cover the surfaces of the picket fence, slabs and the above-ground part of the pillars with a decorative antiseptic or paint (oil), if your fence was originally painted.
If your site is flooded in the spring, or clay soil that does not drain moisture well, then in this case it is recommended to dig a gutter along the fence, through which water will drain from the fence posts, which reduces the risk that the posts will become unusable after 7-10 years.
(19
ratings, average: 4,18
out of 5)
 For a long time, the palisade was a hallmark of small Russian cities and border guard fortresses. The protective barrier was sufficient to avoid being taken by surprise and to repel the fleeting cruel onslaught of the cocky steppes. Palisade fenced the place of future large settlements. Mighty logs, pointed at the top, testified to the steady determination of the population to defend a new small homeland and at the same time marked the central part of the city being laid.
Types of wooden fencing
The genetic memory of the descendants of the peoples who inhabited Ancient Russia preserved memories of a palisade, a fence of vertically placed logs, as a powerful and reliable protection against external encroachments. In addition, a country house, surrounded by an old fence, acquires a special charm.
There are several options for making such a fence. Each of them differs in the material used and the amount of financial investments required. The fence can be an exact prototype of a fortress palisade (another name for a wooden fence) or represent its “budget” version.
 To build a palisade according to all the rules of ancient fortification art, you will have to lay out a large sum of money. It is necessary to immediately discard fantasies about the gifts of the forest in the form of fallen trees. In order to collect the required number of logs, you will either have to spend most of your life looking for material, or live in a wooded area, where hurricanes and falling trees are often. In some cases, the design of a fence made of stakes does not lose its relevance and deserves consideration. We will talk about how to make a wicker fence with your own hands below. For now, let's focus on the main variant.
The construction of a monumental structure requires not only creative, but also purely economic approach with elements of technical and budget calculations.
The traditional version of the palisade involves the construction of barrier lines of logs dug or driven into the ground, with a snug fit to each other. This method has a number of advantages:
- lack of technical difficulties in the production of works;
- minimal need for additional consumables;
- mounting speed.
The main drawback is the fragility of such a structure. All the tricks associated with organizing a sand cushion, firing and processing a part of the log immersed in the ground with a septic tank, if they extend the life of the wooden structure, are insignificant. And for those who hope that the palisade will protect and decorate their estate for many years, this option is unacceptable.
Temporary performance will grow significantly if you prepare the foundation for the fence.

Such a fence-palisade design, when using a solid basic and consumable material, is guaranteed will serve the owner for two or three decades.
Materials and tools
To build a real palisade, you should prepare:
- the required amount of "round timber" of a given diameter (optimally from 10 to 15 cm) and length;
- metal rods (dowels), which can be made independently from reinforcing bars, with a section of 12 mm, a length of 20-25 cm, depending on the standard diameter of the log;
- building brackets;
- pipes-glasses.
Such a structure is a monolith, which eliminates the need for additional bar lintels and maintains the aesthetic usefulness of the structure.
It is possible to do the cutting of the upper part of the log with your own hands. From the tool you only need well sharpened ax. The reinforcement is cut using a "grinder" equipped with a cutting disc. The diameter of the drill for the through holes should be a couple of millimeters smaller than the cross section of the dowels, which will provide a good holding tightness of the joints. Staples to enhance the tightening effect are slightly bent along the inner arc.
For those who find this version of the fence too costly, we can offer some alternative to the palisade, which actually does not require financial investments.
 For the organization of this type of enclosing structure, solid tree trunks are not required. Yes, and a palisade in the usual sense of the word, a wicker fence can be called a stretch. Wattle stake, can be made from any pole. Most often, medium branches of trees are used for this, preferably hardwoods. For most regions of Russia, blanks made of pine or birch are relevant.
The material for knitting the wattle cloth is also harvested independently in any possible places. In the floodplains of the rivers, there are usually many thickets of shrubs and trees of the willow family. Thin and flexible willow branches- excellent material for a wicker fence. In the forest you can find thickets of willow or hazel. The main requirement is that the branches are “live”, filled with juice. This will help to avoid creases during the working bend of the vine.
Implementation options
There are several options for wicker fences. They differ in the way of weaving:
- horizontal;
- vertical.
and structural integrity:
- with a single frame;
- prefabricated from individual segments.
 horizontal weaving reproduces the traditional village life with a simple way of life, but dear to the heart with its simplicity and good nature. Stakes driven into the ground, pointed at the bottom, are located 50 cm apart. Weaving starts from the bottom row, covering with a snake the possible number of vertical elements of the frame. Each subsequent row starts from the opposite side, forming, superimposed on the previous one, an infinity sign, and if it is simpler, the number "8". The protruding "tails" of the branches are cut with pruners.
often practice modular wattle forms. Separately, one and a half meter segments are made, subsequently mounted at the site of the fence.
Wicker fences, where the elements of the canvas are arranged vertically, are more reminiscent of their menacing appearance than a guard fence than a village fence. To carry out such a design, the stand-bearing stakes are driven in much less often - after about two meters, but they have much larger dimensions and are interconnected by three jumpers. Branches for weaving a barrier of this type are taken from three to five centimeters thick. Each subsequent row starts and exits from the opposite side of the previous one. As a result, the top of the fence is crowned with a V-shaped wooden bristle, which at one glance discourages uninvited guests from entering the fenced area.
In the modern world, fortifications have lost their functional necessity. The good old log fence has been supplanted by cheaper alternatives. Practical landowners resort to cast concrete fences, slate, brick, or even metal roofing profiles.
But can any of these materials compare with the aesthetics of a log fence? A horizontal palisade or vertically stacked tree trunks are almost the only option for owners of plots decorated in ethnic style. In addition, the height and configuration of the fence depends only on your preferences. Let's take a closer look at the most beautiful, reliable and durable version of the fence of your own site.
Features of log fences
There are no perfect things in our world. So the log fence has a lot of advantages, balanced by a number of disadvantages. First, let's look at the strengths of such structures:
- decorative properties. In the age of glass and concrete, expressive wood texture and warm natural colors cannot but inspire.
- Quick installation. In four strong hands, the installation of a log fence is much faster than the installation of the same concrete fences. First of all, because there is no need to wait until the base of the supports hardens.
- Strength. Properly installed log structures resist wind and other natural forces perfectly. No wonder the ancient Kremlin was surrounded by palisades.
- Inaccessibility. Climbing over a palisade with pointed tops of logs is quite difficult. In addition, such a design is also impervious to idle glances from the outside.
Such fences also have weaknesses:
- Maintenance complexity. Wood without additional processing has a shorter service life than other building materials. Therefore, the protective coating and impregnation will have to be updated periodically.
- Price. The high price of logs as a building material also influenced their displacement by more affordable materials.
- combustibility. Yes, it is difficult to overcome a high log fence, but ill-wishers can always set fire to it. In addition, this is an additional danger in case of accidental fires.
In general, the advantages of log fences fully balance their shortcomings. Therefore, before starting the installation of such a fence, you should carefully weigh your own priorities and compare the design features with the operating conditions in order to avoid unpleasant surprises.
Log processing
Before starting construction, it is necessary to process the material to increase its resistance to various destructive factors. On the other hand, you can purchase material with all the necessary impregnations and coatings. Minimum log fence should be protected from insects and moisture.
The treatment of the part of the log immersed in the ground with hot bitumen or creosote will help prevent rotting. An alternative archaic option is charring with a fire or burner. For reliability, it is recommended to process the first 20 cm of the outer part of the log.
To increase the service life, it is better to impregnate the cylindering for the fence along the entire length with compounds that increase resistance to atmospheric phenomena and reduce the combustibility of wood.
When building a palisade, each log is traditionally sharpened at an angle of 30 to 45 degrees. To complete the task, any available ax will do. But this is more of a recommendation than a requirement of the technical process. With the same success, you can not process the upper part of the fence in any way.
As an additional protection and decorative element, a small two-sided slope from the roof is installed on the upper parts of the logs. In general, there are a lot of design options for the future fence, and some of them will require additional processing before installation. For example, choosing grooves in span supports for horizontal placement of logs.
Material selection
It is necessary to choose the most well-finished logs of the same thickness as possible. The closer their shape is to the cylinder, the neater and tighter the fence will be.
The preferred configuration depends on the type of future fence. For palisades, the use of logs with a diameter of 100-150 mm is justified. In general, this is the best option for other types of fences. It is better to calculate a suitable length with a margin of about 40 cm - you can always cut off the excess, but you can’t add it without losing strength.
It is necessary to choose exceptionally well-dried logs. Otherwise, drying trunks will decrease in volume, creating gaps in the fence.
The required number of logs is easy to calculate by dividing the length of the proposed fence by their diameter. A few spare logs will also come in handy here. Because it is always better if they remain unused than if they are not available in case of need.
Mounting
After purchasing the required number of logs and processing them, you can proceed to the construction of the fence. The process starts with a trench. Along the entire length of the future fence, it is necessary to dig a ditch, a third of the length of the installed fence elements, but not less than 50 cm deep. Then its bottom is covered with a layer of compacted rubble 20 to 30 cm thick.
Without a reinforcing "pillow", the fence will sink deeper into the ground under its own weight and, as a result, its integrity will be compromised. Massive fences are installed on a strip concrete foundation.
Prepared logs are placed in the finished recess, several pieces at a time. The base of the span is covered with earth, followed by a dense compaction. To increase the strength, the rammed earth can be moistened with water.
In the process of installing the fence, in any case, you will need to wield a hammer or even a sledgehammer. In order for the metal tool not to damage the wood, special softening plastic pads are used. You can find similar accessories in the nearest hardware store.
When constructing a fence from horizontally located logs, one should start with the supporting parts of the spans. Their location is pre-marked. At the installation site, sleeves are concreted from steel pipes of suitable diameter, into which the supports are then placed.

Today, it is not often possible to meet fences, palisades, cottages or private houses. Increasingly, more transparent structures are being built, and the log palisade is undeservedly forgotten. But the advantages of such a fence make us return to this and remind summer residents about it.
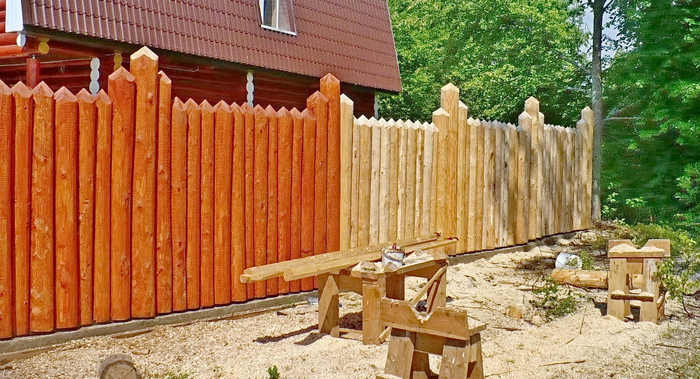
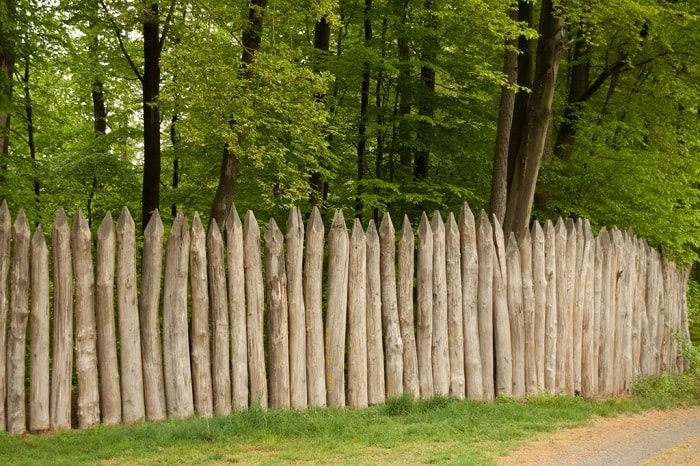 Classic picket fence made of hewn and pointed logs
 It consists from logs pointed at the top, which are located close to each other. Such a fence is not always appropriate. If in the old Russian tradition, then such a fence will fit in well.
Palisade in the country is easy to do with your own hands, most importantly, be patient. 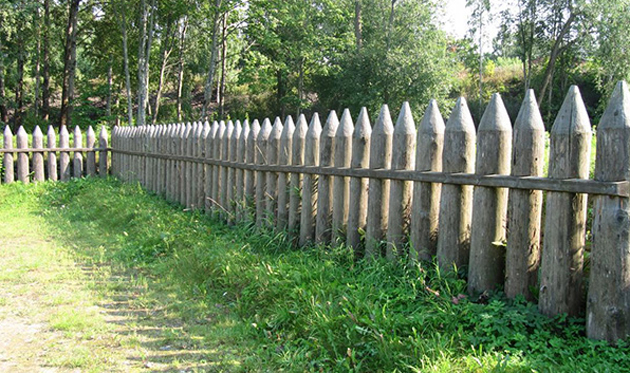
Fallen trees can be used for construction. You only need to buy fasteners, so the fence will cost almost free.
The palisade has undeniable advantages that make designers and builders pay attention to it:
It is easy to build a fence with your own hands. You will need wooden logs with a diameter of 10–15 cm. It is hard to imagine a more reliable and impregnable fence.
However, there are also disadvantages:
The palisade has more advantages than disadvantages. Therefore, it is worth considering the option of building this type of fence.
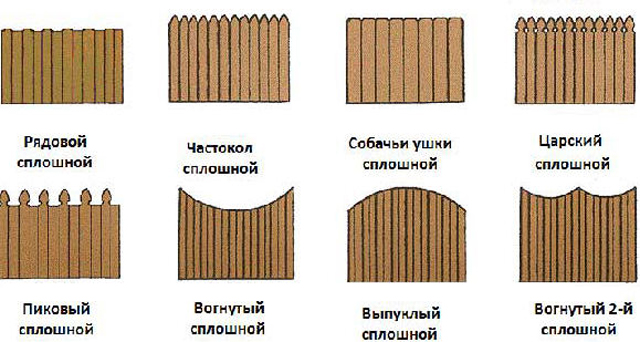 Existing options for the shape and design of wooden fence spans
 Palisade Features
There is no need to talk about reliability, everything is obvious. Now these are not installed, so two meters are considered the optimal height. A round log fence of this height will not be easily overcome by intruders, especially considering that the stakes are pointed at the top.

If you do not use the site for agricultural purposes, such a fence will be an excellent barrier from prying eyes.
Materials for building a palisade
All materials needed for a picket fence are divided into two groups: basic and auxiliary.
The main ones are: logs, slabs and boards, and the auxiliary ones are nails. You don't need to save on buying nails. It is best to choose galvanized stainless nails.
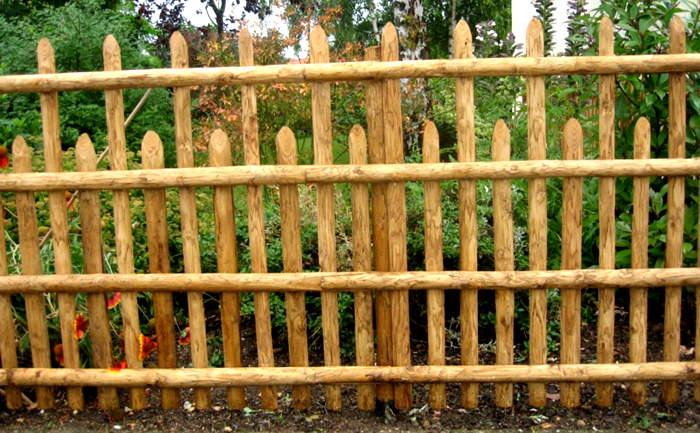
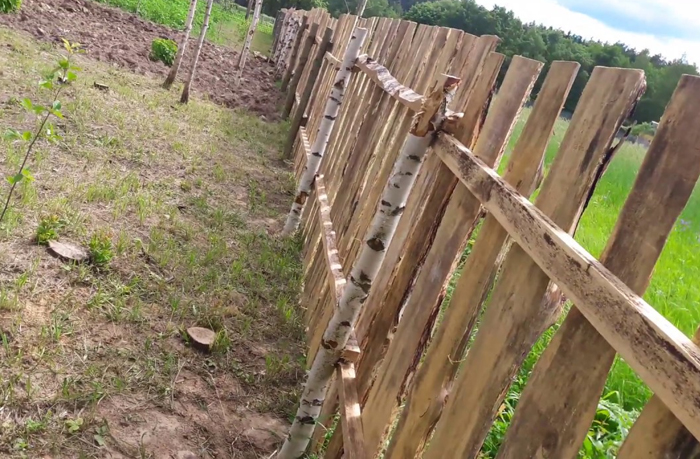 A simple slab fence design is perfect for a garden plot
 Logs can be prepared by yourself. To do this, you just need to get out into the forest and cut dry trees with a trunk of the same diameter. However, it is difficult to find material of the same size in the forest, so it is better to buy it.
Before installation, you need to choose the type of fence. There are two types. The first assumes that the pillars will be buried in the ground by a third.
In the second option, the pillars are installed on a pre-prepared foundation. The choice of log length will depend on the design of the fence. Usually the palisade is made of conifers.

Samples of material must be of the same size, length and diameter. To calculate the number of posts needed, divide the length of the fence by the diameter of the stakes.
The optimal diameter of the pillars is 150 millimeters. Larger poles do not look as aesthetically pleasing, and smaller ones are less reliable.
Remember that a third of the pillars will be in the ground. Therefore, if a fence 1.6 meters long is needed, then the stakes should be 2.4 meters long.
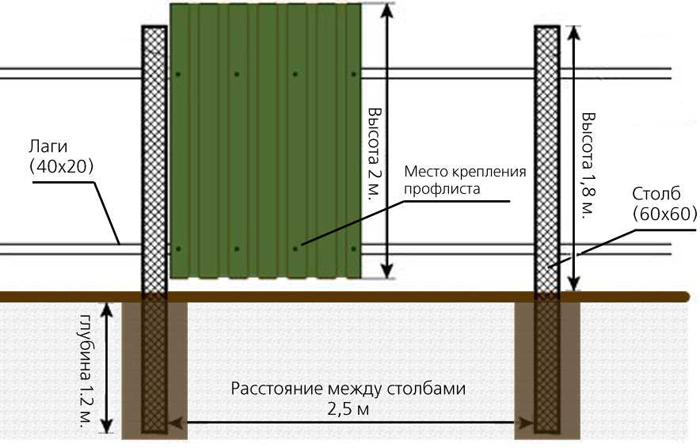
 Dimensional drawing for installing fence posts
 How to determine the size of the fence
When determining the size, the following points must be considered:

Option for joining palisade logs
Usually a palisade is made of logs pointed at the top. You will have to make these points yourself (at an angle of 30-40 degrees).
Log pretreatment
Protective treatment is carried out before installation. That part of the palisade that will go deep into the ground should be lubricated with moisture-proof material, such as bitumen.

At the preliminary stage of installation, earthworks are carried out - excavation of soil under the trench. The bottom of the recess should be lined with a layer of gravel. This will help the water not to stagnate near the base of the fence, but to go deeper into the ground.
Logs require primary processing, which will extend the life of the fence. Processing is carried out in several stages.
At the first stage, the stakes are treated with solutions that protect against insects.
 An example of a processed and painted palisade-type fence with gates trimmed with forged elements
 At the second stage, the logs are charred. The lower part, which is dug into the ground, is exposed to moisture. As a result, it rots, which leads to the destruction of the fence.
To eliminate this, it is necessary to char the lower end of the log in a small flame. A part of the log is charred, which is buried in the ground and about 20 cm above the ground.
The third stage is tarring the lower end of the log. Treatment with drying oil or bitumen is needed if you have not charred the stakes.
Palisade construction
Logs are stacked in a trench in several pieces, carefully compacted with earth. To facilitate compaction, you can moisten the soil with water. When all the stakes are installed in their places, they finish the structure with varnish. This will make the palisade more beautiful, as well as more resistant to moisture and precipitation.
If you decide to build a palisade on the foundation, then the rotting of the pillars located in the ground is excluded. However, the appearance of such a fence is losing its originality.
 Existing options for installing poles in the ground
 When building, use the following recommendations:
Various options for installing support pillars for a palisade

- For a fence without a foundation, they dig a moat. Its depth should be at least 50 cm. Crushed stone is laid on the bottom with a layer of 15–30 cm, on which the logs are installed, tightly without gaps. The base is covered with earth and intensively compacted.
 An example of installing a wooden fence without a foundation