How to make a cabinet from natural wood. DIY bedside table How to make a beautiful bedside table
Self-assembled furniture will be an excellent decoration for any interior, moreover, it will help save money and emphasize the taste of its owner. A do-it-yourself bedside table is easy to make, drawings for any chosen model and assembly diagram are available for public access, and materials can be purchased at any hardware store. However, starting to make furniture, namely a bedside table with your own hands, you need to familiarize yourself with some of the features of the process and technologies.
Having decided to make a bedside table with your own hands, you need to decide on its future dimensions. To determine the parameters of a future piece of furniture, it is important to understand in advance what place in the room will be reserved for this element. The standard dimensions are the determination of the height according to the level of the bed, the standard width is 50 cm, and the depth varies from 30 to 35 cm. A bedside table of this size can most often be found in a furniture store.

If the space in the room allows, then you can make furniture of any size yourself. The height can be more or less than a standard bed. The dimensions of the bedside tables will depend only on the chosen design, as well as the materials from which it will be made.

Features of design and choice of materials
Having decided on the size of the future bedside table, you can proceed to the planning stage. To do this, you need to determine in which style the furniture will be made, and approximately imagine its appearance. You can choose a ready-made project presented on the Internet, or you can develop your own.
To do this, it is enough to depict the future table, cabinet on a piece of paper with your own hands. Then separately draw each detail and paint their dimensions. A computer can greatly simplify the design process. There are many programs on the Internet that are used to create designs and drawings, many of which are used by furniture designers. For starters, the basic version of the simplest program is quite suitable. It will help you understand exactly how the furniture design process works, in particular, how to make bedroom furniture.

The accuracy of the drawings is important not only for planning, but also for the precise fitting of parts during the manufacture of blanks for the future bedside table.
A bedside table for a bedroom is usually made of chipboard. They are quite inexpensive and can be easily bought at any building supermarket. There you can find accessories and all the necessary details. In order to make parts of the required size, you can turn to any local company that is engaged in sawing. These services do not cost much at all, while the risk of spoiling the material from lack of experience is completely eliminated. In addition, even an experienced craftsman is not immune from chips at the edges of the material, if you work with ordinary home tools.
However, if you already have certain skills in working with wood, then you can quickly learn how to cut blanks from chipboard using a conventional circular saw. There are special techniques and tricks that are designed not to spoil the material.
In order for the shelf to look good and be protected from mechanical damage, it is necessary to close the ends of the blanks. To save material and time, it is enough to hem with melamine or a special PVC edge only those parts that will be visible. There is no need to trim the inner surfaces, which will be covered by the walls and body of the future bedside table.

After that, you can begin to assemble the product, strictly adhering to the instructions and plan. It is very important to strictly follow the assembly sequence and take into account the dimensions of the parts and drill, so as not to spoil the workpiece.
The standard material that manufacturers use is chipboard. Having developed your project, you can use almost any material, including wood. It is enough to process the solid wood to make it look expensive and elegant. In addition, wood products will last much longer, fit into any interior and are environmentally friendly. This option is a little more expensive and requires more skill from the assembler, but the result will exceed all expectations.
Non-standard projects and materials
Many creative bedside tables that you can easily make yourself were invented to save money on furniture purchases. However, some of them look stylish and original enough to take a place in the room. Designs will help breathe a second life into old things and organically fit into the interior of the bedroom.
The manufacture of furniture from pallets is gaining great popularity. You can buy them in a building supermarket, paint them in any color. From pallets, you can make both a bed and other pieces of furniture. If we talk about a bedside table, then it will be enough just to combine two pallets to make the shelf the right height. By the same principle, you can use old boxes. They can be equipped with special rollers so that each of them slides out.

A wonderful do-it-yourself bedside table can be made from an old suitcase by attaching legs to it. You can also breathe new life into old chests that are easy enough to paint. A stack of old books tied with a leather belt or self-tapping screws is also a great addition to any bedroom.

Another interesting idea would be a bedside table with stretch rope shelves. To make it, you will need to assemble a box of the required size, drill rows of holes at the level of the shelves and thread a strong rope through them.

The ideas for bedside tables do not end there, it is enough to apply imagination and a little effort to get a unique, stylish and functional piece of furniture.
Bedside table is a diverse concept. It can be a bedside container for newspapers and a tea mug or a huge TV stand with built-in speakers and an electronic rotary system to attract the viewer's attention. Such a simple concept - and an infinite number of options. A do-it-yourself bedside table is made quite simply, but it is important to decide on the necessary design. My friend needed a cabinet for the kitchen with one top drawer. Please.
The appearance of the manufactured bedside table
For the manufacture of nightstands are needed
Here I give a list of tools that it would be better to keep in constant readiness for everyone, along with a fishing rod, a favorite gun and chess:
- Drill driver. The battery will be optimal if there is also a puncher on the farm.
- Set of drills. In this case, wood.
- Bit set. If you want to assemble furniture with your own hands, the set should include a bit, which is a hexagon for confirmations.
- Cutter for hinges 35 mm in diameter.
- Iron.
- Roulette.
- Pencil.
- Carpentry tool called "right angle", with a measuring ruler.
- Sandpaper, dry cloth.
I’ll immediately note about the iron and other objects that are not clear from the first time. Since you will be forced to order sawing on the side (a chipboard sheet measuring 1830x2440 mm is the smallest), it makes sense to save on edge gluing. Now on sale is a 0.5 mm thick melamine edge in the color of the material, which is easy to glue yourself. Since it is with an adhesive base, it is enough to attach it to the desired end with the beautiful side up and iron it with a heated iron. With a dry rag, we press the still hot edge to achieve a good grip. Excess edges are removed with a blunt knife and the edges are processed with sandpaper.
Bedside table detailing
A do-it-yourself cabinet may differ in content, functionality and appearance. It largely depends on the amount you are willing to spend on fittings. Here I am writing the details of the simplest and cheapest pedestal. Drawer without skids, facades - laminated chipboard.
- 772x500 - 2 pcs., cabinet sidewalls.
- 368x500 - 2 pcs., bottom and shelf.
- 368x100 - 3 pieces, plinth and two upper strips.
- 480x110 - 2 pcs., drawer sides.
- 334x110 - 2 pcs., box front and rear walls.
- 150x395 - drawer front.
- 515x395 - cabinet door.
All dimensions are for chipboard 16 mm thick.
We take a special, kitchen countertop, 28 mm thick. Its size is 525x400 mm.
Fiberboard for the back wall of the cabinet and the bottom of the drawer:
- 670x395 mm - rear wall.
- 475x365 mm - the bottom of the box.
I have already written how to glue the edge, now it's time to prepare the parts for assembly. The main fasteners for us are confirmations, under which it is necessary to drill holes. We drill into the plane with a diameter of 8 mm, into the end of the parts - with a diameter of 5 mm. The figure shows which parts are drilled into the end, and which into the plane - simply based on the overall design of the pedestal.

Bedside table assembly scheme
List of required fittings
A do-it-yourself nightstand is also our calling card in front of everyone who doubted our abilities, therefore, even in an inexpensive version, fasteners should be taken as seriously as possible. We buy in the furniture fittings store:
- Confirmations 5x70 - 22 pieces. It is enough to fasten the clamping bars and the plinth by one confirmation on each side.
- Self-tapping screws 4x30 - packaging. They will come in handy for other jobs around the house, but specifically here they are needed in order to screw the countertop to the upper slats, and the drawer front to the front wall of the drawer box. All of this comes from within.
- Self-tapping screws 4x16 - packaging. These are fasteners for hinges and hardboard (DVP). You should buy with a secret hat, and also deepen it into the bottom of the box - so as not to scratch the shelf.
- Furniture hinges - 2 pcs. Since the milling cutter is 35 mm in diameter, we also buy the corresponding loops.
- Furniture handles - 2 pcs. On the front of the drawer, it is better to additionally buy screws for handles, 35 mm long.

Scheme of assembling the drawer of our curbstone
Making a bedside table
It is better to coordinate the manufacture of bedside tables of such a model with friends or acquaintances - simply because two and a half pieces can be made from a chipboard sheet. The assembly is so simple that you can start selling "extra" cabinets. For the full satisfaction of potential customers and your own, screw furniture legs, the so-called “hooves”, onto the sidewalls from below. They will help to set the cabinet on an uneven floor. Adjustable legs of this type can also be found in specialized stores selling furniture fittings.

Finished nightstand
We have already understood how to make a bedside table with our own hands in general terms - it remains to take into account two very important technical points.
- Selection for loops. One constant to remember: The distance from the front edge to the center of the hinge hole is always 22 mm. Naturally, for loops with a landing size of 35 mm. Above and below the door, it is usually marked at the level of 60-80 mm - this is not critical if there are no design features. Then you can simply attach the facade with screwed hinges to the sidewall at the desired height and fix it to the body.
- Right angles. When assembling a drawer or cabinet box, always check the geometric correctness of the resulting parallelepiped. Otherwise, the product will turn out to be lopsided and with badly opening facades.
That's all, good luck with your work.
A bedside table in the bedroom or a nightstand next to an armchair in the living room is an integral attribute of the interior of many apartments. Of course, now you can buy any cabinet in stores, but will it be unique? We bring to your attention 10 unusual ideas on how to make an original bedside table with your own hands from different objects and materials.
1. Bedside table with your own hands from the drawers
Place a wooden box from vegetables, fruits or a postal parcel on legs or wheels. Attach a shelf inside the box. The drawer can be placed both horizontally and vertically, as well as making a high cabinet of two or more drawers.

The box can be decorated, for example, with cut branches. How to make such a nightstand with your own hands, read.

2. DIY nightstand with rope shelves
From an ordinary wooden box or box, as well as ropes, you can make a nightstand with a flexible design. You can customize the shelves and different rope holders yourself, depending on the items and things that will be stored in the cabinet. To do this, you need to drill rows of holes in the side walls of the cabinet and even on top. Pull a strong natural or synthetic rope through the holes and make different shelves and compartments for things.


3. Bedside table with your own hands from books
Unusual and original bedside table design for the bedroom or living room. Pull stacks of books with belts, ties or tie with thick ribbons. At the same time, place wooden modules, square or rectangular boxes between the stacks. It can even be thick cardboard boxes from shoes or small household appliances. Old books, vintage leather belts and wooden elements will give the nightstand a unique charm and style.

4. Nightstand from the chest
The chest has long been the main piece of furniture in huts and huts. Now ancient or modern chests are a rare phenomenon in the interior. However, if you are the owner of an old grandmother's chest, then you can make a vintage nightstand out of it with your own hands. The capacious space under the lid of the chest will allow you to store many things, including bed linen or toys in the children's room. In addition, designers offer exclusive options for cabinets in the form of expensive leather chests. These ideas can be taken as a basis and inspiration. The transformation of a chest into a bedside table consists only in the decor of the chest itself. It can be both updated and aged, left in its natural form or painted.


5. Bedside tables from suitcases
Unlike antique chests, finding old suitcases is much easier. A do-it-yourself bedside table from a vintage suitcase will decorate the interior of the room, and also provide an additional closed storage space. You can even hang a small combination lock on the bedside table from a suitcase and store intimate things there. To make a cabinet, you can either stack several suitcases on top of each other, or put one suitcase on legs, for example, on a stool or table.


6. Do-it-yourself cabinet from a barrel
A do-it-yourself bedside table from a barrel will look very unusual in the bedroom or living room. A round wooden barrel is a ready-made cabinet. The main condition is that the barrel must be clean and free of foreign odors, such as wine. You can also cut a door in a barrel, put it on hinges, and attach a shelf inside. Another option - from one barrel you can make two bedside tables with your own hands, simply sawing the barrel into two even parts.


A metal barrel can also be useful as a cabinet, especially if it is old.

7. Bedside table with your own hands from a chair
Very often, a chair acts as a bedside table. We offer to improve it by turning it into a real bedside table with a drawer. To do this, it is advisable to choose a wooden chair without upholstery. Purchase in the store special fittings for drawers and the drawer itself according to the size of the chair. Attach the entire system under the seat. Also, under the box, you can nail another shelf from a square chipboard sheet.


8. Nightstand made of mirror and stool
If you have a stool as a bedside table, we suggest improving and decorating it. In the same way as in the case of a chair, you can attach a drawer or shelf between the legs of the stool, and you can use a framed mirror as a tabletop.

9. Bedside table from a ladder
A small ladder - a stepladder or a ladder for cabinets - is a great solution for a bedside table. Additionally, you do not need to do anything, if you wish, paint or age the stairs.


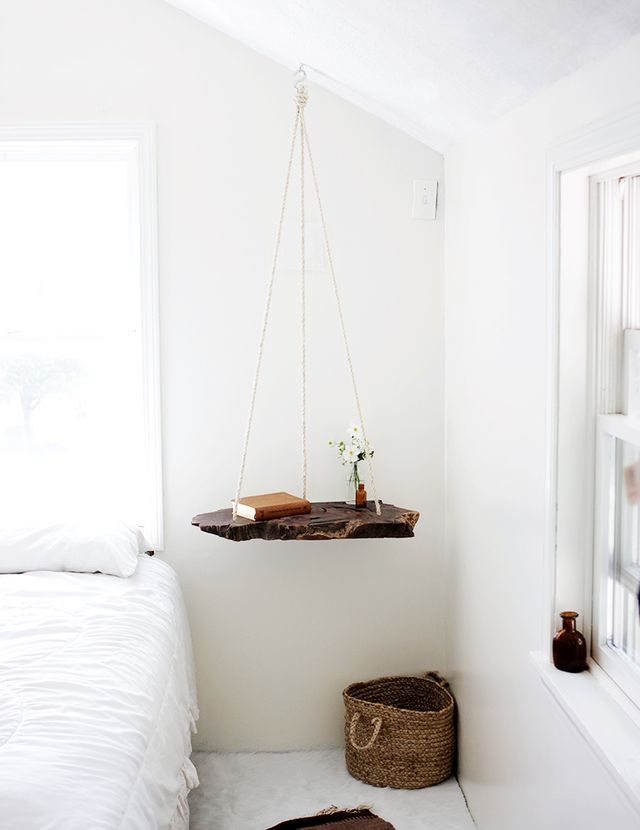
10. DIY hanging bedside table
A bedside table, or rather, a bedside table, can soar in the air! How to make such an unusual project for the bedroom - read.
Very often, after repair, it becomes necessary to purchase a new bedside table. However, you can do without going to the store, where finished products are quite expensive - you can do such a thing with your own hands. Moreover, unlike purchased furniture, it will be original and correspond exclusively to your preferences. In this article, we will talk about how to make a bedside table with your own hands, as a result of which you can save money and gain the necessary skills in working with furniture.
What can be made from?
To make an interesting and original bedside table with your own hands, you can use different, sometimes completely unexpected items. Let's look at some interesting options:
- From boxes - put wooden boxes for fruits, vegetables or postal parcels on wheels or legs. Fasten the shelf inside. This box can be placed both vertically and horizontally. You can also make a bedside table from several drawers by placing them on top of each other.
- From books - a very unusual option for a bedroom or living room. Tie the stacks of books with straps or tie them with thick ribbons. At the same time, place wooden modules, rectangular or square boxes between the stacks.
- From the chest - if you are the owner of an old grandmother's chest, then you can make a wonderful vintage nightstand out of it. And somehow decorating it beautifully, for example, using decoupage technique, you will get a real work of art.
- From suitcases - a nightstand made from old suitcases will decorate any interior, and also provide the room with additional space for storing things. To make a bedside table with your own hands from suitcases, you can either stack several suitcases on top of each other or put one on legs, for example, on a table or stool.
- From a barrel - such a bedside table will look very interesting in the living room or bedroom. A wooden round barrel is a ready-made cabinet, but it is important to make sure that the barrel is clean and does not have any foreign odors.
- From a stepladder - a small stepladder will be a great solution to make a bedside table. There is nothing to do in addition, but if desired, it can be painted or aged.
Wooden bedside table with drawers
To make a wooden nightstand with functional and spacious drawers, you will need the following materials:
- For the frame - 8 pine boards measuring 6.9 by 39.9 cm.
- For the top, bottom and side panels - 4 laminated pine panels measuring 45.5 by 70 cm.
- For the arrangement of drawers - 4 pine panels with a laminated coating measuring 17 by 43.5 cm.
- Screws 4 and 1.6 cm.
- Joiner's glue.
- Sponge.
- Dowels 1.8 cm long and 2 cm in diameter.
- Stain.
- acrylic sealant.
- Wood filler.
In addition to materials, you will also need the following tools:
- Electric drill.
- End saw.
- Pencil.
- Roulette.
- Sandpaper.
- Grinding machine.

Step 1. Assembly of the skeleton
We made a wooden bedside table with the help of a Crag conductor. This method makes it possible to assemble any other furniture without visible holes for fasteners. However, you can choose any other convenient way for you to make a bedside table with your own hands.
Important! First you need to draw a project drawing, because you may need a bedside table diagram at each of the manufacturing stages.
Operating procedure:
- First of all, armed with a conductor, make holes in all panels and frame supports.
- Next, fasten the side panel and boards with 4 cm screws.
Important! At this stage, it is necessary to ensure that the support is located on the same line of the edge of the product.
- Make holes for each drawer. In our case, the height of one is 15 cm.
Important! In order to measure the required height, you should use a pencil and a tape measure, mark a point 15 cm below the top support and 17 cm above the bottom panel, given that the cabinet will not stand on the floor, but on legs.
- Repeat the same procedure for each of the drawers.
- After that, you can continue to add all the necessary supports according to the previously applied markup.
- Cover the resulting design with the second side panel.
- At this stage, you should check the presence of all supports, and then screw the side panel with screws.
- Install the nightstand base in the same way.
Step 2. Designing the top panel:
- Before you make a bedside table with your own hands, you should close it on top with a wooden panel. Here you can turn on your imagination and make a small canopy behind the product or above the drawers.
Important! Attach the top panel with 4cm screws.
- Now you need to cut two dowels at a 45-degree angle. The dowels we used were too large in diameter, so we recommend using 2 cm. First of all, you need to cut out the back bar, and starting from it, adjust the size of the protrusions on the sides.
- Glue the finished dowels to the frame with wood glue and wait until completely dry.
- In order to fill the gaps around the dowels and in the places of their contact with the base of the product, it is better to use an acrylic sealant.
Important! Also at this stage, you can start painting the resulting structure, but we recommend that you do the finishing work at the very end.

Step 3 Installing the Guides
Now you need to install the guides for the drawers of your nightstand. For this you will need the following:
- 4 sets of guides.
- 4 boards for the back panel measuring 34.3 by 13.5 cm.
- 8 boards for side panels of drawers measuring 45 x 13.5 cm.
Having prepared everything you need, proceed as follows:
- First, make a markup. To do this, use a pencil and a metal ruler.
Important! At this point, mark all sections for all drawers.
- Now, armed with a screwdriver, fix the guides on the side panel, periodically checking the markings.
- Place a sheet of plywood under the side panels of the drawer, pull them out and install the rails.
- After the guides are fixed on all side walls, make two more connections by first removing the side panels.
- Slide the side walls back into the frame, thereby checking the installation accuracy and smoothness of the guides.
Step 4. Connecting the fragments of boxes and installing facade panels
At this point, the side panels of your nightstand drawers should be completely finished - all that remains is to attach the remaining panels.
It will perfectly fit into any interior and will be a good addition to the bedroom set. Following her example, you can make kitchen cabinets for storing household utensils, and in a larger version, the cabinet can easily replace a wardrobe closet.
Its design is as simple as possible and is perfect for a novice master who is just starting to master the furniture craft.
In addition, the cabinet is made of natural materials - laminated pine panels and pine boards, which is a rarity in our time, but working with such material is a real pleasure.
The author left the wood untreated. Subsequently, it can be painted, varnished, tinted with stain or decorative oil - there are a dime a dozen options, and this is a great opportunity for your imagination.

For work you will need the following materials and tools:
1. Materials:
- laminated pine and pine board:
1. two parts 455x700 mm (sides);
2. two parts 400x455 mm (top and base);
3. eight parts 70x400 mm (for boxes);
4. four parts 170x435 mm (front panels of drawers);
5. eight parts 135x450 mm (for the side walls of the boxes);
6. four parts 135x343 mm (the back walls of the boxes are made of boards 16 mm thick.);
7. four parts 340x430 mm (for the base of boxes made of 16 mm material.);
- four sets of sliding systems for drawers;
- 1800 mm pine stick with a diameter of approximately 25 mm;
- 16 mm screws;
- 40 mm screws;
- glue for wood;
- a sealant that is suitable for working with wood (for example, acrylic);
- varnish for wood (optional);
- composition for staining on a water, alcohol or oil basis (the author used the tone "Antique oak");
- the cloth.
2.Tools:
- miter saw, electric jigsaw, or wood saw with a fine tooth;
- screwdriver;
- an electric drill with a drill for wood;
- grinder with nozzles with coarse and fine sandpaper;
- construction roulette;
- pencil;
- square;
- paint brushes.
Step 1: preparing materials.
The latter are very convenient in the manufacture of furniture, since the individual boards are already glued together into a shield and have a pre-prepared perfectly flat surface. You do not have to do the meticulous work of gluing wood, and it will be much easier to attach large parts to each other.
Boards for the production of furniture, even in the domestic conditions of a home workshop, must be pre-planed so that they have the same thickness.
Sand the planed pine board with a grinder, first using a nozzle with fine-grained sandpaper at 240 and only then with fine-grained sandpaper at 120.
Mark the parts according to our list and cut them out using the tool most suitable for you: a miter saw, a jigsaw, or a regular hacksaw for wood with a fine and sharp tooth.
In the process of marking, use a square so that all corners are perfectly even and are 90 0 С.
Step 2: Assembling the cabinet.
Proceed to the most important stage - the assembly of the product. In order to prevent the wood from splitting during the screwing process, it is necessary to drill holes in the attachment points.
At home, an electric drill is most often used for these purposes, but the author advises purchasing a special machine that makes countersunk holes at the required angle. Such a machine allows you to make furniture without any visible joints. In the photo below you can see what such a machine looks like.
So, mark and make holes in the places of the intended connections and assemble the cabinet frame as shown in the photo.


Please note that the opening for each of the drawers must be 150 mm high.
If you are using a pine board of greater or lesser thickness, non-living 20 mm, recalculate the dimensions of the cabinet details.
The author, we must give him his due, originally processed the upper edges of the cabinet, using a natural pine stick for this. He could not find a stick with a diameter of 20 mm, so he used a stick with a diameter of 25 mm. It turned out to be a little big, but the overall picture is not spoiled.
Mark and cut the edge sticks at a 45° angle and secure them in place with an adhesive like liquid nails. You can also use wood glue, but the first option will add strength to your product.


The author will also fill all the cracks and corners with acrylic sealant. It is less susceptible to mechanical damage than the usual wood putty.


Step 3: Mark out drawers and install sliding systems.
Before proceeding with the installation of drawers and sliding systems, mark the cabinets. Use a metal ruler for this, following the example of the author, as shown in the photo below. So you get a smooth, perfectly parallel line.

Fasten the sliding systems along the previously drawn line using screws and a screwdriver. Fix the edges first, and then the middle part of the strips.

Step 4: making boxes.
The author used 16 mm thick material for the manufacture of boxes, simply because he was at hand in sufficient quantities. However, the boxes are heavy. Therefore, he advises using thinner and lighter material such as plywood where possible.
Proceed with the installation of the remaining elements of the sliding systems to the side parts of the drawers. It is much more convenient to do this until the moment of their final assembly.


Once the hardware is in place, assemble the drawers using the parts from our list. The author smeared the gaps at the junction of parts inside the box with sealant.


Step 5: protective and decorative wood treatment and finishing touches.
As a protective and decorative coating, he used stain in the form of a gel tone "Antique Oak". It not only tints the wood, but also protects it from adverse external factors such as humidity, ultraviolet radiation, as well as some chemical influences.

Clean the cabinet of dust and apply the staining compound with a paint brush or in any other convenient way. If the tone is not deep enough and does not match what is indicated on the label, repeat the procedure. Remove the remaining stain that has not been absorbed with a dry, clean cloth. Wait until the cabinet is completely dry.
At this stage, you can use a water-based wood varnish in order to additionally protect the wood from mechanical damage. It can be applied in several layers, lightly sanding each layer. Thus, each new layer of varnish penetrates and reliably adheres to the previous one.
You can also varnish the inside of the drawers. This will make it easy to clean the cabinet as it gets dirty. This is especially true if you are making furniture for the kitchen.
Finally secure the front panels of the drawers by flipping the cabinet on its back. To do this, place pieces of non-thick material on the reverse side under the box to push them out a little.