How to make a drilling machine with your own hands. Do-it-yourself plywood drilling machine drawings Mini do-it-yourself plywood drilling machine
It does not always make sense and expediency to buy a factory-made drilling machine. You can make a vertical drilling machine from a drill with your own hands. To do this, you need a drill and materials for making a stand. Such equipment is recommended for use in home workshops or garages, when drilling is not the main operation or is performed quite rarely and the accuracy of the hole can be neglected.
To speed up the process, just buy a specialized drill stand in the tool store. The result is a semblance of a household-level vertical drilling machine, which is not inferior in drilling accuracy to machines for home workshops.
The photo shows factory-made drilling stands. They can be purchased at any online tool store for prices starting at $200.
The article is intended to give you ideas on how to make a drilling machine from a drill yourself, so we do not give a clear algorithm for its manufacture, because it is made from improvised materials: some masters will have it, others will not. Therefore, we give the main ideas, and everyone will apply their design solutions and make their own vertical home-made drilling machine.
If you are not looking for easy ways, then we will make a homemade stand. The rack can be made of wood or metal. Wood will be cheaper, easier to manufacture, but durability will suffer.
Metal ones are more complex, but they have an incomparably longer resource and strength characteristics. The choice of rack material also depends on the workpieces being processed: with constant drilling of metal, it is better to make metal.
Machine assembly
Metal stands are assembled from corners for the carriage, a 50x50 square tube for the stand and 10x10 for the drill bracket, a strip for the base and lugs. The base and bracket are welded, after which all elements are assembled and bolted together. It is recommended to make several brackets with different adapters (clamping rings) for different types of drills. The carriage moves along the bar with the help of a steel cable wound around the handle drum. So that the carriage does not have play and does not fall down under its own weight, it is drilled, threaded and a bolt (or several bolts) is tightened. This selects the backlash between the carriage and the stand of the future drilling machine. The handle for moving the carriage is made from rolled products with a diameter of 6 - 8 mm.
By having several brackets with different clamping rings, it is possible to flexibly select drills and process almost any material.
In the future, home-made equipment can be upgraded and modified, for example, mark or install a scale that will indicate the length of the carriage movement. This helps when drilling blind holes.
There are several mounting methods:
- several clamps;
- on a metal bracket in the hole for the neck of the drill.
Video of a construction variant from a drill on a wooden stand.
The easiest option for making a homemade drilling structure at home
A homemade drilling machine from a drill will never replace a factory one and will always be inferior in build quality and drilling accuracy. The main advantage of homemade is low price, the ability to drill holes when the factory machine is not available for one reason or another.
Drilling is one of the most common technological operations in carpentry, so every craftsman knows how important it is to make a hole quickly, and most importantly, as even and clean as possible. When there is a drilling machine at hand, then drilling a hole evenly and quickly is not a problem. And vice versa - when it is not there, then the quality of drilling long holes can be difficult. In this article, we will offer one of the options for a drilling machine from a conventional household electric drill or.
Introduction
Drilling a thin workpiece is not a problem - even if the drill is not perpendicular to the drilling plane, then it will not be easy to visually notice that the hole is not even, therefore, as a rule, the master will be satisfied with the result. In such cases, you can drill "by eye". When the depth of the hole is large, then even with a slight deviation from the perpendicular, the "curvature" of the hole will be noticeable. For such cases, it is necessary to use special devices, and preferably a drilling machine. Therefore, this time we will try to make a home-made machine from a drill or a screwdriver.
original idea
This design is very versatile, since its base part (base and spindle box) is the working part of several other devices described in the following articles:
In these articles there are photos and videos of do-it-yourself machines.
 |
 |
 |
Thus, a part of the design of the described machine can be used for the manufacture and subsequent assembly of three more additional devices. If necessary, having all the components, you can assemble the devices you need at the moment at your discretion.
Preparation for work
Before starting work, you need to think over the sequence of all technological operations in the manufacture of a home-made machine, plan the manufacturing technology, determine the future materials and tools that will be needed in the process.
Tool
To make a machine from a drill or you will need the following tool:
- or .
- Electric jigsaw.
- Angle grinder (angle grinder or simply "grinder").
- Drill or .
- Grinding machine.
- Various hand tools: a hammer, a screwdriver, clamps, a crown on a tree (or simply a “crown”), a square, a marking pencil, etc.
Material and accessories
To make a machine with your own hands, you will need the following materials and components:
- 15 mm.
- Board pine, massif;
- Furniture guides for drawers;
- Sleeve;
- Furniture futorka;
- wing nut;
- Fasteners: M6 bolt, self-tapping screws of various lengths.
Main structural elements
The design of the drilling machine consists of the following main elements:
- Base:
- Vertical frame;
- Spindle box;
- Platform (horizontal support);
- Drilling table;
- Drill mount (), used as an electric motor and spindle;
- drill();
- Spring mechanism and drill feed handle.
Drilling machine manufacturing
To describe the whole process of making a homemade drilling machine, we will break it down into stages by structural elements, attach a photo with comments, and place a video below.
Base
vertical frame
Everything starts from the foundation. To assemble a vertical frame, it is necessary to take two types of bars, two of each size, made of pine or birch with a section of 30 x 40 mm and a length of 60 mm.

We fasten them in pairs among themselves in pairs, where one face is flush, and the other plane is offset. It is better to coat the joint plane with wood glue.


Spindle box base
For the manufacture of the spindle box (moving part of the machine), sliding (rolling) elements are necessary. For this purpose, furniture guides for drawers will be used.

It is necessary to cut 4 guides with a length of 120 mm, and also make stoppers at the ends to prevent accidental exit from each other.

To make the base, you need to use or make three blanks with dimensions:
- 140 x 155 mm - 1 pc.
- 155 x 55 mm - 2 pcs.
Then you need to install furniture guides on them.

And assemble the spindle box itself into a "U-shaped" construct.


If the installation was carried out correctly and evenly - without distortions, then the spindle box should move freely along the frame, without clamps.
Platform (horizontal support)
To make a platform (horizontal support), we need to make two blanks:
- 260 x 240 mm
- 50 x 240 mm


drilling table
For the manufacture of a drilling table, 4 blanks are required.
| The size | Qty | Description |
| 260 x 240 mm | 1 PC | table top |
| 260 x 60 mm | 1 PC | Vertical bar of the table |
| Rectangular triangle Legs: 60 x 60 | 2 pcs |

Since great efforts are possible on the table, it must be made strong enough, so additional strength elements will be required - these are corner stops. There are two of them and they must be installed at the corner of the plank and countertop.


Fixation of the drilling table on the frame is carried out with the help of a bolt, which is pressed with a nut from the reverse side. To install the bolt, you need to press the wing nut into the guides.


After that, you can install the drilling table on the frame by tightening it with a nut with a handle made of.

drill mount
The manufacture of the drill mount begins with the fact that two sheets are glued together and one blank is made with a size of 165 x 85 mm. This is a very important structural element and will need additional strength, so you need to glue two layers.
The drill will be fastened by clamping it in the seat of the front handle, and since it differs for different models, you need to decide on the model and, accordingly, the diameter of the bore for the tool that will be used in this machine. We drill a landing hole for a drill.


The first installation of the drill mount should not be strong, you only need to “bait” the part, since in the future there will be a perpendicular adjustment and, most likely, an adjustment of the installation position will be required. Installation is carried out with a pair of self-tapping screws on the back of the spindle box.


After alignment, it is necessary to more thoroughly fix the attachment of the drill to the spindle box (an additional 4 self-tapping screws), and also install an additional angle stop.

Spring mechanism and drill feed handle

In the future, we will need to install the drill feed handle, so the axis of its rotation will be the pre-installed futorka at the end of the upper spring mounting bracket.


Installing the handle on the machine is not a difficult task - one end of the handle must be fixed with a screw on the upper spring mounting bracket, and the end of the metal rod is attached with a screw to the drill mount.

Now it remains only to drill a hole in the drilling table so that during drilling operations the tool passes through the workpiece, while drilling will be complete and there will be no unnecessary chips on the surface of the workpiece.

Conclusion
Outcome
We made a drilling machine from a drill with our own hands, attached a photo of all technological operations! If you follow all the instructions described above, you will get an indispensable tool that will rightfully take its rightful place in your workshop.
Machine dimensions
Here is a table with the overall dimensions of a homemade drilling machine from:
Blank drawings
Here are drawings with the dimensions of all the details of the homemade drilling machine described above.


Video
Video on which this material was made:
An electric drill is a universal tool, since not only drills and cutters, but also wooden parts can be clamped into its chuck, if the device is used in a lathe. The need for a drilling machine arises when the home master needs to drill holes at right angles. In this case, the master faces a choice: buy a ready-made drilling stand or make a machine from a drill with his own hands. We will show you how to implement the second option.
In the manufacture of a stand for fixing a drill, it is necessary to understand the principle of its operation, and show imagination in the manufacture of its individual components.
Rack Option #1
For example, the following is an instruction for making a drill fixture from simple improvised materials.
- To attach the drill to the sled, clamps are used, under which a rubber gasket is placed.
- To raise and lower the movable part of the sled to which the power tool is attached, a rack with a lever is used.

- To limit the depth of drilling, an adjustable stop is installed under the lever.
- The fixed part of the slide is attached to the pipe with a flange.
- The vertical and horizontal parts of the pipe are connected by an elbow. Required for connection maintain a right angle. The vertical pipe is fixed in a flange screwed to the frame. Instead of a pipe, you can use “kerchiefs” made of chipboard, which are fixed to the frame and to the fixed part of the slide using euro screws (confirmations).
- On the movable platform, it is necessary to make 4 holes for the clamps used to clamp the body of the device. Also on the side that will be turned to the fixed part of the rack, it is necessary to glue the rails. For better glide, they are lubricated with paraffin.

- In order to prevent the body of the device from falling, 2 stops can be installed at the bottom, as shown in the figure.

- To align the body of the unit at a right angle, you can glue a rail of the required thickness (thickness is determined by the selection method).

- The guides in this design are made of aluminum profile. But you can also replace them with ball (telescopic) guides, which are used to install boxes in furniture. The task of the guides is a rigid (without backlash) and at the same time movable connection of the rack parts.


- To assemble the lever, and at the same time it could move, the nut should not be tightened all the way. To fix the nut and prevent its spontaneous unscrewing, another one is used, which is screwed nearby.

- The part of the lever attached to the movable platform must be rounded at the end.

- If you need the unit to rise to the top position after drilling, you can install a spring by attaching one end to the movable platform and the other to the horizontal part of the pipe. If the spring is short, you can lengthen it with a cord.
Rack Option #2
The figure below shows another homemade drilling machine, the stand for which can be made from thick plywood, and the rest of the parts from a wooden beam.

The role of the guide in a drilling machine made from a drill is played by an aluminum profile. But, if you do not find such a profile, then you can replace it with furniture guides(telescopic).

Rack Option #3
If you have a house lying around soviet era photo enlarger, then it can serve as the basis for a stand for a drill. This design already has rigid guides, as well as a gear mechanism that provides vertical movement of the carriage along them.

You only need to modify the design a little by attaching clamps to the carriage, and comfortable handles to the height adjuster.

Well, if you don’t have the desire to design devices for a drill with your own hands, or you just don’t have time for it, but you still need to drill a hole with a drill strictly at a right angle, then you can buy a ready-made stand at a price of about 1200 rubles.

Other options for drill machines
The drilling machine can serve as an engine for constructing various woodworking tools. Consider what else you can make a machine from a drill with your own hands.
Frazier
To make a router with a drill, you will need to take a regular clamp used for water pipes.

You will also need to find some chipboard (you can use a plate from old furniture), and then assemble such a structure as in the figure below.


This similarity of a router can be used, for example, for milling a groove in the end of a tabletop, for stuffing a T-shaped profile, or for shaped milling of the ends of wooden parts. Of course, it is difficult to achieve good quality milling in this way, since the machine does not have enough speed. For comparison: the spindle of a router can rotate at a speed of 26,000 rpm. and more, thanks to which a high quality surface finish is achieved.
You can also make a milling machine out of a drill, if you clamp it in this way, as shown in the figure below. In this way, a quarter is selected in a bar for inserting glass, for example, in the manufacture of a window leaf.


For turning small, round parts, you can make a device in which the drill will give rotational movement to the workpiece. The easiest way to perform wood turning is the one shown in the figure below.

Such a wood lathe can be made in minutes. To make it, you will need a wooden beam or board, a couple of corners, as well as a sharpened bolt.
A more “advanced” drawing of a lathe, which can be made from a drill with your own hands, is presented below.

If you do not have the opportunity to make such a device from metal, as shown in the drawing, then you can do a pair of clamps attached to a workbench.
The first clamp with a clamp can be used to secure the machine to the workbench.

As a clamp for a drill, you can use a small vice with a clamp clamped in them. With the second clamp, you need to clamp the homemade tailstock with a screw screwed into it to center and maintain the part. The end of the screw must be tapered.

As a handpiece, a bar of the required thickness is pressed against the workbench.
It is also not difficult to design a homemade lathe from wooden blocks as shown in the following figure.

For precision turning work with long and large parts, it is recommended to make a lathe from a metal profile(square).

In the manufacture of this design, it is necessary to accurately maintain the alignment of the headstock and tailstock. The unit to the headstock can be secured with a pair of clamps.

The tailstock must be movable in order to be able to process parts of various lengths.

The tool rest must also be movable and move both along the bed and across it so that you can move it closer to the workpiece to reduce the leverage. If the lever is large, the tool may be pulled out of the hands, and the part out of the chuck, which is fraught with serious injury.
It is important that the support platform rotates, for example, when machining a part at an angle.
If you make such a machine, then it can easily be converted into a universal one. It is enough to clamp an emery or felt wheel in the cartridge of the apparatus, and the design turns into a grinding machine from a drill. In the same way, you can make a grinding unit out of it.
A simpler model of a universal machine is easy to make from an ordinary planed board. To do this, you need to cut it into parts, and assemble the structure, as shown in the figure.

This is what the bed looks like when the table is removed.

The thickness of the board used in the construction is 2 cm. The length of the product is 50 cm. The width of the fixture is 20 cm.
The height of the racks is 9 and 14 cm. The height can be different and depends on what diameter the grinding wheel will be used. The whole structure is twisted with self-tapping screws. It is recommended to smear the joints of parts with glue before assembly.

On top of the racks, 2 clamps are fixed, one of which is cut and unbent. As a soft pad used cut polyethylene tube, nailed with carnations.

On the frame, it is necessary to make a small cut (groove) and expand it from the bottom side so that the head of the coupling bolt does not interfere.

Next, you should twist 2 boards measuring 20 X 27 cm with a bar between them, the thickness of which is 4 cm (this way you get a table). The bar is needed so that the hand can freely pass between the planes while screwing the table to the frame.

A groove is also cut in one plank to secure the table to the base. After that, the table can be attached using a screw with a washer.

Thanks to the grooves, the table can be moved to the required distance to the cartridge. If the table is rotated, it will be possible to move it across the machine. The length of the groove determines the distance that the table can be moved.

After fixing the drilling machine, you will get a universal fixture.

Now, if you clamp the drill chuck grinding wheel- You will receive a grinding unit. The presence of a reverse in the unit during grinding is desirable, but not necessary.

If set abrasive disc(for metal) from a grinder, then it becomes possible to cut metal rods. When cutting metal, be sure to wear safety goggles. You can also install a gear cutter, and cut thin plastic with it.

When installing abrasive wheel- it turns out a sharpener.

Such a unit can be used for turning knives, drills, planer knives, and also for sharpening tools for a wood lathe.
If you fix the guides on the table, and install the drill in the chuck, you get a filler machine.
Thus, the drill, thanks to the clamping chuck, is the basis for creating machines for various purposes. Such an increase in the functionality of a conventional drill will be very useful for a home craftsman who has various technological operations at his disposal.
You can drill a hole in any material without much effort by using a hand-held power tool, such as a drill, a drill driver. Probably everyone in the home workshop has such a tool. But when it becomes necessary to drill a large amount, also with great precision or at a certain angle, it becomes necessary to use a drilling machine.
Drilling machines for home production can be bought at stores selling such equipment. Basically, this is equipment of joint production - Russia - China, for example, under the name Caliber, Bison, Encore Corvette, there is a purely Chinese manufacturer. Prices for them from 7900 rubles. In principle, it’s not so expensive if you tweak the design a little, but the quality - as it turns out, it happens that it comes across and not bad. There are many models made in Switzerland - China, although they are more expensive, but the reviews are not bad.
 Drilling machine Caliber, previously manufactured in Moscow, power 400 W
 Joint production means that developments, for example, in Russia, are made by Chinese workers. At the same time, the name, design and quality of the machine is preserved.
On such a machine, with the help of devices, the accuracy of drilling will be much higher, you can install the workpiece in a vice and drill at the desired angle, the number of holes per unit of time will be produced more. In addition, if you need to drill holes with a diameter of, for example, 1.5 mm, you can’t do without a machine.
DIY drilling machines
If you buy a machine, then remake the stand, which is very thin and unreliable for most machines, and also constantly repair a failing spindle, it is much easier and more profitable to use the drill that you have and make a drilling machine out of it yourself using standard drawings and scheme . Of course, you should not use a hand drill, if you are already making a machine, then it is good and reliable, but if it is not possible to use an electric drill, and there is a manual one, you can use it.

The main thing in such a machine is to firmly fix the main stand-pipe, on which there will be a support for the structure and a screw that will be running. The drill, planted in the holder, will move along it.
 Machine from a hand drill, which can be completely assembled from wooden parts.
 Of the complex structures, only the vernier scale installed with a special drum can be named, but in extreme cases, you can do without this node. An example of how such a simple do-it-yourself drilling machine is made from a drill can be seen in the photo, where the author used a connecting rod to make a mount into which the drill will be attached. Also an original and at the same time simple solution for cable tension.
 General view of the machine
  Cable fastening on the principle of fastening a string in a guitar
 For the manufacture of a table and fastening a drill, you can use rolled metal, preferably a rectangular pipe. Of course, this is more likely not a machine, but rather an adapter for a drill, but it does its job well.
If the machine is small, rather a desktop mini machine that will be used for small jobs, you can make a structure for it from wood and plywood, as shown in the first diagram. In the manufacture, it must be borne in mind that such nodes as the lever that regulates the feed of the drill and the spring that gives rigidity to the mechanism must be present in the design. If the drill is mounted for permanent use, it would be more convenient to remake the start button.
Basically, with their own hands, such drilling machines from a drill are made desktop, so you need to take care that the plate stands firmly, there are no distortions on it. In addition, if possible, it would be nice to cut grooves for the movement of the vise, so that along with drilling, small milling work could be carried out.
Using a powerful drill to make a drilling machine, manufacturing features
For milling in combination with drilling and for long-term drilling in metal with a large diameter of drills, they make a drilling machine with their own hands from a drill that has high power and belongs to the class of professional tools.
 A powerful drill requires a more powerful stand
 A feature of using such a drill is its weight and high vibration during operation. Due to the fact that it uses a slightly larger engine, all parts are made of metal, double insulation is usually used, the weight of the drill is higher than that of household ones. Therefore, the manufacture of such a rack should be only metal, in addition, the table should be more massive.
 In this case, there are a lot of factory parts, but for a powerful drill, these parts are a godsend.
 We make the return spring also more powerful, as well as the cable on which the clamp works, must be at least 4 mm in diameter. We also make the handles more powerful, using a rolled metal rod with a diameter of about 12 mm. For the frame, it is better to take rolled metal, the use of a square or rectangular pipe will be especially successful, it can be 50 x 50 or 40 x 60. We take iron for the desktop at least 3 mm, we weld taking into account the right angle.
 We make the base for the rack
 We assemble all parts by welding or using 10-12 mm bolts. The finished board should look like this:
 The base plate is finished, it remains to paint
 Everything must be powerful enough.
 Ready stand with drill holder
  Lifting and lowering mechanism
 We take an asterisk and a chain from an old car, you can find it at a scrap yard.
Watch a video on how to make a do-it-yourself drilling machine from a powerful drill:
Horizontally - a do-it-yourself drilling machine made from a drill.
In order to drill a hole, for example, inside a long shaft, using a vertically drilling machine, even if purchased, it will not be possible to do this qualitatively, no matter how hard you try. Therefore, the idea of making a machine with a horizontal feed will be very useful.
Consider an example of the manufacture of such a machine. To begin with, we sketch a diagram and decide on the tool and materials for our home-made device.
 An example of making a do-it-yourself horizontal drilling stand
 You need to have either a circular or a sawing machine, a drill or a drill - a screwdriver, hand tools, such as a chisel, a hammer, various screwdrivers and similar tools.
If we make a fixture out of wood, as in our case, we need to prepare a board, it is better to take pine and plywood 12-15 mm, a piece of chipboard. Standard bolts, self-tapping screws, a bushing, you can take ready-made guides for furniture drawers, you can make it, a nut - an impeller, a handle, long bolts - these are like accessories.
You can try the next, more advanced version.
We assemble a frame from bars and chipboard boards, the width of the board is 20 cm, the length is about a meter. We make two guides that can be moved apart and fixed to a certain width with the help of fastening long screws. For precise drilling, we draw a line that runs strictly along the continuation of the drill. The table can also be raised to the required height with the help of long screws. We make it from plywood and before installation we grind and polish it well. The table is raised by rotating the handle and, as it were, shifting the rectangular prisms with an oblique side against each other. For better sliding on their sides, we stuff strips of laminate.
We install the drill in a special stand made of plywood or a board.
 Mounting the drill in a horizontal position
 A very good assembly option can be seen in this video:
According to the last example, even if you have to tinker with it, the design will be very reliable, it will be possible to withstand the minimum allowable deviations on it and, in theory, it should serve for a long time. Since such a machine will withstand vibration due to the position of the drill, the play in the joints will not increase.
It is advisable to make a drilling machine with your own hands in those situations when in a home workshop or garage it becomes necessary to drill holes in parts of various configurations, as well as made of different materials. It should be noted that such a device makes it possible to obtain holes with a sufficiently high level of quality.
When you need a homemade drilling machine
In manufacturing or repair enterprises, where the drilling operation is considered the most common, a special device is used to perform it, the models of which may have different functionality. So, it can be a compact desktop drilling machine, which has a simple design, or equipment equipped with several work spindles and numerical control.

For drilling holes in various materials, which is performed in a home workshop or garage, you can use DIY equipment. Naturally, for home use, you need a simple device that can be made from components and materials found in almost any garage or home workshop.
And in this article we will not leave unanswered the question of how to make a drilling machine at home, while spending a minimum of money. The drawings and experience of many craftsmen who have already passed this path will help us in this.
The need for such mini drilling equipment for metal, wood or plastic most often arises among those who are accustomed to independently carry out various repairs in their house or apartment. Also, quite often, radio amateurs are puzzled by the construction.
It would seem that a conventional drill can be used to perform such an operation, but such a tool is not always able to provide the required quality and accuracy of drilling operations. Homemade, in addition to its compactness, it has another important quality: drills of various types can be installed on it.

Drilling machine from a conventional drill
To make a small but functional drilling machine for your home workshop, you do not need to purchase special materials and components. The design of such a convenient and useful desktop device contains the following components:
- the base, which is also called the bed;
- a mechanism that ensures the rotation of the working tool (a conventional drill can be used as such a mechanism);
- supply device;
- a vertical stand on which the rotation mechanism is fixed.

The stand on which the drill will be mounted can be made from a chipboard sheet. This material is quite capable of supporting the weight of such a device. The bed of such a mini machine should be more massive, as it protects the entire structure from vibrations, which can adversely affect both the quality and accuracy of the resulting hole, and the comfort of work.
As a material for such a frame, you can use an ordinary furniture plate, the thickness of which is more than 2 cm. It is most convenient to use the base of an old photographic enlarger for this, having slightly modified its design. Sometimes an old microscope is used, but this is a rather rare option, since such an assembly will not be large enough and its use will be limited.

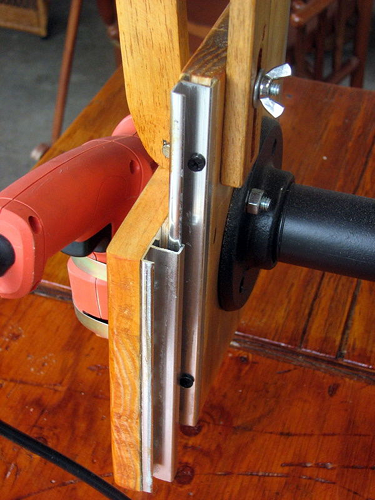
The quality and accuracy that a home-made drilling machine will provide depends mainly on how correctly and reliably the connection of its base and vertical rack is made. Important elements of such a micro machine are two guides along which the shoe with the drill attached to it will move. Such guides are best made from two strips of steel, which must be securely screwed to the rack with screws.
In the manufacture of the block, it is desirable to use steel clamps that will securely fix the drill on it. In addition, in order to avoid unwanted vibration processes during drilling, a thick rubber gasket must be installed at the junction of the block and the drill.
After that, you need to make a feed mechanism for such a mini machine, which should ensure the movement of the electric drill in the vertical direction. The manufacturing schemes for such a mechanism may be different, but it traditionally contains a lever and a spring in its design, which is attached at one end to the rack, and at the other end to the block with a drill. Such a spring gives the feed mechanism greater rigidity.
A drilling machine from a drill that is not planned to be removed from it can be made more convenient to use if you disassemble the native switch of the drill and mount a separate button on the frame of the mini equipment. This button will always be at your fingertips and will allow you to quickly turn the device on and off. As you can see, it is not difficult to make a drilling machine from a drill, for this it is quite enough to carefully read these instructions or watch the training videos in this article.
An example of a machine from a drill in more detail
As an example, let's take a closer look at one of the home-made drilling options assembled at home.

Making a machine tool using an asynchronous motor
The absence of an extra electric drill in the household is not a reason to abandon the idea of making a drilling machine with your own hands. Any electric motor can be used to drive the rotation mechanism of such equipment. Such engines, which were previously installed on various vehicles, are likely to be found in the garage or workshop of any home craftsman.
Asynchronous motors, which are equipped with washing machines, are best suited for the manufacture of a mini drilling machine. If you have such an engine, you can confidently use it to make home drilling equipment. Making drilling equipment with such an engine at home is somewhat more difficult than using a drill, but the power of such a machine will be much higher.
Given the fact that the weight of an induction motor is greater than the weight of a conventional drill, you will need a more powerful base and stand to accommodate the feed mechanism.
In order for such a mini drilling and filler machine to vibrate less during operation, it is necessary to install the engine on a powerful base and place it as close to the stand as possible. But here it is important to maintain the correct distance, since the convenience of mounting the belt drive depends on it, due to which the rotation from the engine will be transmitted to the drilling head.
In order for you to make such a machine at home, you will need the following structural elements:
- gear;
- a hexagon on which a pulley will be put on;
- two bearings;
- tubes in the amount of two pieces, one of which must be with an internal thread;
- clamping ring, which must be made of durable steel.
The hexagon also connects with a metal tube, bearing and clamping ring. Such a connection must be very reliable so that the resulting node does not collapse during operation.

The mechanism necessary to ensure the supply of a tool in such a mini machine should consist of a tube on which cuts are first made and gears. The tube will move by connecting its teeth with these files. An axle with a hexagon is then pressed into this tube, the height of which must correspond to the required tool feed.