How to make a path out of plastic corks. How to make a garden path out of plastic bottle caps
The practicality of plastic bottles is actively used by craftsmen in the arrangement of summer cottages. The presence and regular replenishment of plastic containers allows you to design not only small decor items, but also take on fundamental structures, such as garden paths. There are several options for arranging a path from plastic bottles, the choice of method depends entirely on the preferences of the owner of the site.
Characteristics of an extraordinary structure
Plastic bottles are a versatile material that is actively involved in the budget version of landscape design. But, before embarking on the arrangement of paths on the site, it is worthwhile to carefully study all the features of the future structure. The advantages of the path from plastic bottles are as follows:
- financial costs at a minimum level;
- stability under the influence of external factors;
- easy installation, you can involve children to help;
- with small additions to the creative process, the track can take on a bright and extraordinary look.

But any arrangement method also has negative features. Regarding the plastic garden path, these are such negative points:
- The presence of containers of the same volume and color in large quantities, it is especially problematic to collect traffic jams if the track will be made out of them.
- Strong temperature drops can cause deformation of the plastic bottles themselves or the entire structure as a whole.
- Over time, the material fades, and the path will become faded, despite the initial bright decor.
Attention! The most dangerous moment is the operation of the tracks after rain or in frosty weather. An excessively slippery surface may cause injury. Therefore, it is better to exclude movement under adverse weather conditions.

Preparatory stage
Regardless of the scope of the construction process, the work is preceded by a preparatory stage. The garden path, where plastic containers act as the main element, can be of several types:
- directly from the whole bottle;
- only the bottoms of the container are involved in the construction process;
- a beautiful ornament is obtained from plastic corks.
First, choose the appropriate type of path and collect the right amount of material. All the immediate environment will be happy to join the process, since everyone has an abundance of bottles in everyday life.
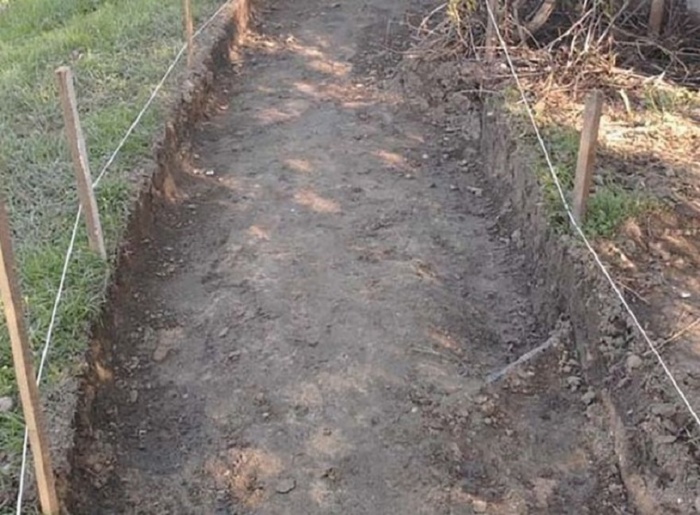
Then on the site it is necessary to make markings and dig a trench. The depth varies from the material that is taken as the basis:
- for whole plastic containers, a deepening of one and a half shovels will be required;
- if bottle bottoms are involved in the process, 15cm is enough;
- the cork path needs an even smaller recess, you can remove about 10 cm of the top layer.
A formwork of wooden elements is installed along the edges of the trench. It is recommended to fill the bottom with broken bricks or other household waste in order to subsequently prevent the subsidence of the path, for which whole bottles were used.

In each of the three methods, a drainage cushion is formed from sand. After spreading the material, it is carefully compacted, if possible it is recommended to use a roller.
Application of whole bottles
We turn to the main action on the design of the path from plastic bottles with our own hands.
Advice! Plastic containers for the track are selected the same according to four parameters: volume, shape, color and degree of rigidity.
All containers are thoroughly washed, the remnants of the adhesive solution and labels are removed. The containers are dry. The rigidity of the track will give sand, which tightly fill all the bottles. To speed up the process, younger family members are involved in the procedure. Children are always happy to tinker with sand, and helping adults in arranging the site is a double benefit.
Before filling, it is worth considering the design of the track. There are several decoration options:
- use a combination of plastic containers of two or three colors;
- cover the bottles with resistant paint;
- during filling, add candy wrappers, foil or paper to create bright fragments;
- the original replacement for bright paper will be a shell or sea pebbles.
Well-dried plastic containers are filled with dry sand and screwed tightly with corks. Then the containers are sequentially laid in a trench in a horizontal position. To make the path as smooth as possible, a wooden shield is placed on top of the bottles and rammed. Here again, the help of descendants is useful. Ask the children to jump on the shield - they will have fun, and you can take a break before the next stage of arranging the track.

To make the track strong and reliable, plastic bottles need additional fixation. To do this, a liquid cement solution is diluted and the gaps between the plastic containers are filled, bypassing the very top of the bottles. When the solution has completely hardened, the remains of the mixture are removed from the surface of the containers with a stiff brush to give it an aesthetic appearance.

There is another way to fix the track. high-quality dry cement is poured between plastic bottles, after which the path is carefully watered from a watering can. After the mixture has dried, at the final stage, the elements of the wooden formwork are removed.

Formation of paths from the bottoms
The use of only the bottoms of plastic containers for arranging a garden path is characterized by lower labor costs. The initial steps are identical to the design of the path from whole bottles:
- digging a trench;
- formwork is installed;
- plastic containers are washed and dried.
The bottoms for the track are cut off the same size, the approximate height is 7-10 cm. The trench is covered with a mixture of sand and cement, and compacted tightly. Then the base is carefully watered in parts from a watering can so that the water does not wash away the litter. Start building a path. It is also appropriate to apply a combination of colors. A sketch of the ornament is drawn in advance. When the fixing composition hardens, the formwork is removed.

Comment! The resulting surface is more suitable for decorative purposes and will perfectly cope with the task of massaging the feet. Therefore, it is better to arrange such a path from plastic containers in a small area of \u200b\u200bthe garden away from places of intense walking.

Organically looks decorative from the bottoms of plastic containers. The order of its arrangement is not much different from the construction of the track. The trench is formed to the width of one bottle. To make the lines even, they initially make markings with pegs, between which they stretch a dense thread, which later serves as a guide. Do-it-yourself path from plastic bottles in the photo below:

Cork ornaments
Patience and perseverance will require a path lined with plastic plugs. So that the material assembly stage does not stretch for a long period, involve the whole circle of acquaintances in the process. When the right amount of plastic stoppers is available, they should be sorted by color. An important stage in the arrangement of the future path is the drawing of an ornament or some kind of picture. It all depends on the ability of the master.

The main steps in the process of constructing a decorative path:

Attention! It is important to achieve a flat surface when laying. A wooden shield placed on top, which is pressed down, will help to correct the shortcomings.
How to make paths for giving with your own hands
One of the indicators of the well-being of any cottage is the presence of paths. They connect garden buildings, lead to a recreation area, separate beds.
To make such a path, you will need plastic bottle caps, cement, sand, boards and tile adhesive.
Country paths, in addition to their direct purpose, ease of movement in any weather, play a very important decorative role.
Such paths become the main element of the surrounding landscape.
Absolutely any material is chosen for their manufacture, but in order for the path in the country house to become truly unique and original, it can be made from the most ordinary traffic jams. This is an easy and very interesting task, which even a child will be able to cope with. But before you make country paths from traffic jams yourself, you need to draw rough sketches on paper. The house, the fence, the flower garden, the rest of the decor - everything should be in harmony with each other. The dacha should become a single entity. Next, you need to decide whether the paths will be monochrome or not, whether to make a pattern or ornament on them, whether they need a small fence. If it is decided to make an image or lay out an inscription, then this must first be depicted on paper, calculating how many traffic jams will be in each row. You also need to collect a sufficient amount of material used and only then get to work.
Construction of paths from traffic jams in the country
Before you start laying the plugs, you need to level the area and fill it with liquid from weeds, and after laying, tamp it down with a mallet.
Required tools:
- Shovel.
- Cord.
- Roulette.
- A hammer.
- Watering can.
Step by step work:
- Wash the corks well and dry.
- Make markup. To do this, you need to decide on the place of the track, drive pegs around the perimeter and pull the cord along them. If the path in the country house is with a bend, then on the turns the stakes are driven in at a small distance from each other so as not to disturb the smoothness of the line. Measure the width of the tracks with a tape measure. If the path is intended simply for walking, then its minimum width is 50 cm, if a wheelbarrow will pass along it or it will be used for other household needs, then it will be 80 cm.
- Sod is removed along the marked area, stones and plant roots are removed. Dig a small trench with a shovel and tamp the soil.
- If the path has a fence, then it can also be made using plastic bottles. Their necks down should be placed next to each other at the edges. A decorative fence can be made from any other improvised materials.
- Pour rubble into the trench. Smooth it out.
- Pour sand on top, tamp and lightly pour water.
- Covers bottoms up to be pressed into the sand. As the sand dries, it must be moistened.
Thus, you can lay out the usual straight path in the country house, enclose a flower bed, make a labyrinth, or simply lay out a small area on which flowers in pots will then stand.
If it is necessary to make a more durable coating, then it is better to lay the corks on a concrete solution. The technology is the same, but the sand is replaced by cement. You need to make such a path quickly, and it is better to spread the cement in small portions. When mixing the solution, special dyes can be added to it, then bright colors will be visible between the covers, and not a dull gray color. In addition to plastic corks, metal ones can also be used. They are also well suited for laying and decorating a summer cottage.

Once I read about colored cover tracks and had a burning desire to do something similar. My husband supported my desire to decorate the yard dachas, but proposed to make the tracks not completely from traffic jams, but only partially. By that time, we had already purchased paving slabs (our yard is quite large), so we decided to put corks from plastic bottles only where the whole tile would not lie. So ornaments appeared in the courtyard in corner places, around flower beds, along garden paths.
Now, after a while, I understand that my husband was right in many ways. In our area, you can’t understand when it’s autumn, when winter is continuous rain and ice. And walking even on a beautiful, but slippery surface, especially for an old person, is not safe. And wet plugs (she once made sure) really slip.


Reading articles on floriculture, I noticed that more and more people are addicted to cork art. And the fact that this is an art to learn and learn, I realized from my own experience.
That's what I want to draw attention to. Some advise, before laying the cork mosaic, to level the ground, slightly moisten with water and begin to “weave a carpet”. Believe me, such a carpet will not last long. After a while, one or the other cork rolls out.

The husband suggested using cement mortar (1 part cement and 4 parts sand). And I am very grateful to him. It is difficult to lay out even a small area of one, in hot summer the solution dries quickly, it has to be shed on top of the corks and tapped with a board so that the pattern lies evenly. It's hard work - to create beauty, but so exciting! Apparently, beauty requires not only victims, but also patience and time.
And how many traffic jams are leaving! You have to collect them everywhere. Recently, relatives, friends, and just acquaintances have become our assistants. Once they see what beauty is obtained from ordinary corks, they will not throw away the cork - they will bring it to us.
Needless to say, there is little time left to restore beauty - everyone takes away the garden and the garden. It is all the more pleasant that more and more summer residents are becoming, sparing no effort to make the site cozy and unique.
There is always little time left for restoring beauty in a summer cottage - all the forces take a garden with a garden. But recently, many people spare no time and effort to make their site beautiful and unique. Take plastic bottles, for example. With each trip to the country, summer residents carry drinks in such bottles with them, and a lot of this container accumulates over the whole summer. Of course, you can collect them in bags, take them away and just burn them. But it's bad for the environment. We offer another option and now we will tell you how a path is made from corks of plastic bottles. By the way, the bottles themselves can not be thrown away, but many useful things can be made from them.
 Advantages
 - cheapness. There are a lot of plastic bottles everywhere, you can ask neighbors and acquaintances for corks from them, or simply remove them from those bottles that are ownerless in the bushes;
- quite simple to manufacture;
- look elegant, beautiful and fun;
- long service life.
 1. First of all, select the type of future track. Think about what ornament you will lay out. Then prepare a place for the path. If necessary, dig a trench for one and a half spade bayonet under the garbage.
2. It is best to use cement mortar in proportions of one part cement and four parts sand. Some people, before laying the cork mosaic, level the ground, moisten it a little with water, and begin laying out the cork carpet. But for a long time it will not last, after a while the plugs will begin to fall out one after another. Therefore, use cement mortar.
3. Make a base from small gravel and tamp it down. Then put about five centimeters of the solution, place a metal mesh on it with a cell of 3-4. Then comes another layer of mortar about five centimeters. A strongly liquid solution is not needed, otherwise everything will float.
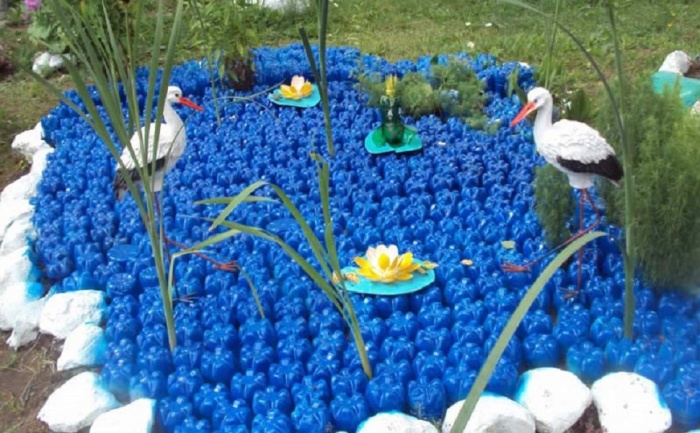
4. Start pressing the lid into the solution. Press them onto the fresh mortar until it sets. They can be laid out in the form of a selected pattern or simply in random order. It will be easier to work if you do not pave the entire path at once, but do it in parts, in sections of fifty centimeters. It is better to take multi-colored caps, the pattern of them will look very beautiful.
5. The covers pressed into the solution must be leveled with a sheet of plywood, on which lightly tap with a rubber mallet. To prevent the covers from being squeezed back, put the same plywood and press it on top with bricks around the perimeter and put one in the center. Then the load distribution will be uniform. The process, of course, is long, but it turns out indescribable beauty!
 1. Make paths from caps and bottoms of plastic bottles. You can involve children in this, let them cut off the bottoms of the bottles with scissors, and then help you make the path itself.
2. Prepare a place for the path and install the box formwork there. On a well-packed earth, pour a layer of sand into the formwork. Level and water.
3. Now start pressing the lids and bottoms into the wet sand. You can lay out a flower meadow from the bottoms, and lay out any pattern or picture according to the cross-stitch pattern with lids. Take your time and such original paths will bring beauty to your site and joy to all family members.
Where else can your imagination unfold, if not in the country. Here, in all its glory, the abilities of a housewife are manifested. In addition, often this does not require large investments. There is so much material around that is practically thrown out into the street. Empty bottles and corks from them are firmly in the first positions here. Decorations for giving are not only beautiful, but also very cheap.
And how much joy they can bring to children and adults. A plastic bottle goes into business 100%. From the covers you get beautiful panels on the wall of the house. You can make original paths from corks from plastic bottles in the garden or lay out a beautiful area near the house. You can organize a sports corner for the child, where he will not only play, but also receive a charge of vivacity. Covers can be used to build an obstacle course. It is better to lay them with the smooth side down, leaving the ribs on top. In this option, a good massage for children's legs is obtained. Paths from corks from plastic bottles turn out to be very beautiful if you make a pattern, choosing harmonious color combinations.

True, there is one condition. There should be a lot of prepared material, and it’s difficult to cope with this problem alone. You need to connect friends and acquaintances to collect the right amount. It may take several years to collect the material. But on the other hand, how nice it will be to warm the soul with your own hands. A photo taken in a warm season will allow you to remember a pleasant trifle even in winter. It takes a long time to collect corks, because their sizes are small, so you can come up with another option. For example, make paths from plastic bottles. There are several technologies that can be used. If you want to use the whole bottle, then it is better to make a border out of them, thus determining the shape of the path. For this purpose, we dig a shallow narrow groove on the sides of the track. In it, with the neck down, we tightly lay the bottles along the entire route. Then we return the earth to its place and tamp everything around. If the land in your country house is good, then you can stop at this stage.

If clay predominates, then it is better to make the inside of the path out of corks from plastic bottles. Or combine all parts of the bottles. The tropics created from plastic bottoms look very beautiful on the site. To do this, cut off the bottom of the bottle by 1/5 of its height. Leave the top for blanks that can be used to create a plastic palm tree. In order for the paths from corks or from the bottoms of the bottle to keep their shape well, it is advisable to prepare the base. If you follow all the recommendations, then first you need to pour crushed stone, compact it well and pour coarse sand on top. Having created a dense pillow, you can lay out a pattern of a track from corks from plastic bottles. This, of course, is a very laborious process, but what a beautiful site it turns out. If you want to make a more durable coating, then it is better to lay the corks on a prepared concrete base. But this must be done quickly, until the cement has seized. You can also use metal plugs. They also fit well and can serve as decoration.