How to make a harp out of cardboard with your own hands. DIY children's musical instruments
With my own hands. Of course, a master unprepared for this type of activity will not be able to make a violin or piano without special training, materials, and equipment at home. And this is a fact that should be accepted unconditionally. But how to make fairly simple musical instruments with your own hands - our article will tell those interested about this.
Where to find source material for crafts
Any object from which sound can be extracted is considered musical. And this is practically everything that surrounds us! If you carefully monitor one-year-old babies, it will become clear: the back of an iron bed, when hit with a spoon, makes a melodious ringing, similar to the sound of a metallophone. And if you knock wooden spoons on the table and chairs, you will get an amazing resemblance
It turns out that we are surrounded by continuous musical instruments! With your own hands you only need to decorate them in the desired way, collect them in one place and plant them next to the “musician”.
Gift for a drummer
For example, a beautiful one is made from a set of pans, lids and wooden sticks. Pencils, wooden spoons, and brushes are suitable as the latter. You can also carve special sticks for a beginning drummer from wood.
As you can see from the photo, making these with your own hands is quite simple. For beauty, you can even come up with a special emblem and decorate each item with it. For “plates”, metal lids mounted on a stand are suitable. By the way, metal buckets, mugs, bowls, basins will work great next to the pots. The main thing in this matter is to choose containers of different sizes that are capable of producing different sounds.
Tool for spoons
Everyone knows such a Russian as spoons. Even solo numbers are practiced, where the performers manage to perform quite interesting compositions.
You can expand the capabilities of spoon musicians by creating an entire installation for them. It will require a wooden matryoshka doll. By arranging them in ascending volume, you can get an excellent installation tool.
DIY Guiro
Skilled woodworkers can make quite professional musical instruments. Handmade ratchets are also of interest to musicians today.

Initially, guiros were made from the fruits of the gourd tree, on which notches were made. Its place of origin is considered to be Latin America. Modern guiros are musical instruments made by hand from solid wood with notches along which a scraper called a “pua” must be driven. The musician thus produces interesting chirping sounds when accompanying singing or performing his part in an orchestra.
Today, these kinds of musical instruments appear, made by hand from metal or plastic tubes. In Russia, rattles made of wooden planks with notches were an analogue of guiro.
Maracas, shakers - rattles
You can make musical noise instruments with your own hands from a variety of containers. Metal coffee cans, plastic yogurt bottles, Kinder surprise egg cartons, wooden boxes, and even inner paper towel or toilet paper cylinders made of cardboard are suitable for crafts. Only the latter need to be sealed at both ends so that you can put anything there. A shaker is also made from two disposable cups, gluing them together with tape.

To create a sound effect, grains, sand, small pebbles, beads, shot, and buttons are placed inside the container. You can attach handles to round containers and paint them with acrylic paints. Then you get very beautiful musical noise instruments, which you can build with your own hands from scrap materials.

Castanets
Children love to make a variety of crafts together with adults. You can also make musical instruments with your own hands at home.
You can make castanets using two large buttons with loops attached to them. These devices are worn on the thumb and middle fingers. The castanets knock when they touch and a sound is produced.

From absolutely unnecessary things, prepared for disposal in the trash, you can make quite interesting crafts. Do-it-yourself musical instruments are created by gluing covers onto cardboard pieces, after which the blanks need to be fastened together by folding them perpendicular to each other.
Tambourine
Children's musical instruments often contain bells and bells that ring beautifully. You can hang them on an empty paper towel cylinder or along the edges of disposable plates taped together. It is best to fold the latter asymmetrically.
Having brightly colored the instruments made in this way, you can use them in a children's noise orchestra.
Whistles and pipes
Easy to make DIY ones that produce sounds when the performer blows into them. They are made from hollow stems of grass blades, the bark of twigs, plastic handles, and cocktail straws. If the latter are cut diagonally at different lengths, you can get whistles that produce different sounds.

Whistles are also made from bean, pea or acacia pods. In childhood, everyone “played” such a musical instrument at least once.
Craftsmen make pipes from wood by cutting holes in hollow tubes. But this requires special skill. No less difficult - and just as interesting! - make a toy whistle from clay or salt dough. Usually a version of the “Dymkovo” toy is used here. Although you can make a little thing by hiding a ready-made whistle inside. By making several of these toys that make sounds of different pitches, you can even play some melodies on them.
You can make homemade musical instruments with your own hands from almost nothing. For example, a cap from a plastic bottle, on which a piece of rubber cut from a burst balloon is stretched, will become an exciting toy for a child.
You can also use empty bottles as a whistle. If you blow into the inlet from top to bottom, applying the container only to the lower lip and holding it vertically, you can make amazing sounds! Musicians change the inclination of the “instrument”, the distance between the lips and the hole of the bubble, the force of blowing air, and different melodies are born.
"Litrophon" or "singing bottles"
Today, more and more often, performers with such interesting instruments appear on stage that you are amazed! And what don’t they make them from! You can make it yourself, for example, from bottles or wine glasses, filling them with water.

Different heights of sounds produced are achieved by the amount of liquid poured, the material used to make the dishes, and changes in the volume of the container. The less water is poured, the thinner the sound. For beauty and convenience, the liquid is tinted.
Harp, or “musical comb”
Taking an ordinary flat comb (“hedgehog” will not work), you need to cover the location of the teeth with foil or tissue paper. By blowing into this simple instrument you can make cool rattling sounds.
Talented musicians from the stages perform various musical compositions on the harpa, including classical ones. Particularly interesting is this tool, made from a comb with different tooth thicknesses.
The main theme of Oginsky’s “Polonaise” or the melody of a folk song/hit comes out surprisingly similar to the original!
DIY guitar
This is truly amazing! But you can even make a guitar with your own hands from scrap materials, or simply from trash.
Closed cardboard boxes and empty flat plastic shampoo bottles are used as a base. Of course, the sound of the instrument will depend on the material of the guitar frame and the size of the hole cut in it.

It is also important to choose the right strings for your guitar. Most often, they take stationery or aviation rubber bands and pull them with different forces.
So now you don’t need to run to the children’s toy store if your baby is capricious. After all, you can simply make an exciting toy for him - a musical instrument that will become the child’s most beloved and expensive thing.
The harp is the oldest plucked string musical instrument. The harp has a triangular shape and consists of a resonance box, a narrow wooden strip with holes for strings, a front beam in the form of a column, and an upper body with pegs for fastening and tuning the strings.
From hunting to art
There are various legends that say that the first stringed musical instrument, thanks to which the harp and all other stringed instruments subsequently appeared, was made from an ordinary hunting bow. Primitive people noticed that the tension of a bowstring affected its sound, then one bow maker tied several “strings” to one bow, producing sounds of different pitches.
Images of a bow harp are present not only in the cultures of Ancient Greece, Egypt and Rome, but also in excavations, which indicates the emergence of musical culture on a par with the emergence of humanity itself.
Ancient Egyptian harp
In ancient times, harps came in various shapes and sizes. Egyptian harps were considered the best, and the name of the musical instrument itself translates as “beautiful.” Harps in Egypt were decorated very expensively, they were covered with gold and silver, strewn with precious stones and decorated with ivory.
In the Middle Ages, the harp was used in churches, monasteries and cathedrals. Learned monks not only wrote works for harps, but also included writings about the instrument in their inventories.
The appearance of the harp in Europe

The harp appeared in Europe in the 8th century. The first to appreciate the musical instrument were wandering people who needed a compact accompaniment suitable for performances. Large floor harps appeared in the 15th-17th centuries. Subsequently, its transformations followed, the purpose of which was to expand the range. There were even harps with two rows of strings - for the right and left hands. This model did not last long.
Along with external transformations, the boundaries of the tool’s application are also expanding. Now it is used in choral and orchestral works. To achieve an incredible transition of sound, several harps are used at once in one piece.
In 1660, a device was invented in the form of a mechanics with keys, which allows you to tighten and release the strings of the harp, while changing the pitch of the sound. This mechanism was not particularly convenient, so in 1720 a mechanism with pedals appeared, which was invented by Jacob Hochbrucker. The pedals acted as conductors, influencing the hooks, which in turn pressed the strings.
In 1810, the French master Sebastian Erard invented a new model of the “double harp”. This instrument was able to sound in all keys and became a new word in the world of music. It is the mechanism invented by Erard that is also found in modern instruments.

Sebastian Erard
The harp appeared in Russia in the 18th century and immediately became widespread. The instrument is used not only for performances, but also for playing music at home. Great Russian poets praised the harp in their immortal works as the most elegant and melodic instrument.
A child’s musical development is not complete without familiarity with musical instruments. And if the necessary tool is not at home, then you can always make it yourself. And even if it sounds completely different from the academic version, the pleasure from the manufacturing process and subsequent playing with such an instrument will exceed all your expectations.
Passionate mothers have prepared for you 4 master classes on creating a guitar, tambourine, piano and stringed instrument from scrap materials. I'm sure they will inspire you to create music with your children!
String instrument
Our string instrument is made very simply, in a minute. We will need:
- a tin lid from a box for tea, sweets or cookies, preferably square or rectangular, so that the rubber bands hold better;
- rubber bands.
Exactly after a certain interval we pull the rubber bands onto the lid. We had rubber bands that were slightly different in length, so when we pulled them and played them, they made a slightly different sound.
In principle, this can be achieved with the same elastic bands, just adjust their length using a knot. Let's start playing the strings with our fingers. The sound is reflected from the iron cover and becomes more melodic and loud.
Oksana Demidova and Fedya 4 years old, St. Petersburg.
To make the piano we took:
- a square candy box;
- color film;
- cardboard;
- plastic.
First, Dad cut the box to look like a real piano with a nice curve! Then he and Sonya began to cover the piano with colored film (there was no black film, so they made the piano red). Due to the presence of bends, I had to use my mother’s hairdryer to ensure that the film lay flat. Dad made a plastic insert inside (so that the structure would not sag) and covered it with light beige film.

Cardboard was glued to the bottom of the piano, which protruded slightly from the front. A keyboard was glued onto the protruding part (found on the Internet). Dad made three legs and a lid holder from plastic. The legs were glued with double-sided tape, and the holder with special glue. Now you can organize puppet concerts.

Olga Silina with her daughter Sofia (4.7) and her husband Andrei from Moscow.
Acoustic guitar
I'm a big music lover. I especially like string instruments. Therefore, it was decided to make something from strings. My eldest son and I spent a long time choosing what to make: a guitar or a balalaika. The guitar won. To make it you will need:
- box cardboard (the thicker the better);
- PVA glue (or glue gun);
- double-sided tape;
- pencil;
- awl;
- several rubber bands for money;
- stationery knife (or a regular one);
- two paper clips.
First you need to cut out the silhouette of a guitar from cardboard. You will need three parts with a neck and a hole in the body (socket) and two parts without a neck and hole. It is most convenient to cut with a stationery knife. Next you need to glue the two parts with the neck together. We used PVA glue for this.

Do you want to play with your child easily and with pleasure?
Then, stepping back a little from the bottom edge of the hole in the body, draw a line about 7 cm long and make a shallow slot along it. Insert a pencil or stick into the slot (first cut a piece of the required length from the pencil) and make four notches in it with a knife. This will be the string nut. Below the line, mark four points at equal distances from each other and make through holes in these places using a thick awl (you can use a screwdriver with a thin drill). On the top of the neck we do the same, only here the length of the pencil will be approximately 4 cm. This will be the front side of the guitar.

Now we take 4 rubber bands for money, cut them and tie one end of each rubber band to a paper clip. We thread each elastic band into the hole at the top of the neck so that the paper clip remains on the wrong side. We stretch the rubber bands and thread the second end of each of them into the holes in the bottom of the guitar (under the hole in the body) so that the ends of the rubber bands are again on the wrong side. There we tie them to the second paper clip. If you pull the rubber bands with different strengths, you can get different pitches of the “string”.
All that remains is to glue another cardboard part of the guitar silhouette with the neck on the wrong side so as to cover the paper clips with the rubber bands tied. And glue two parts of the body without holes on top. This way we get something like a guitar body with a resonator.
All that remains is to dry the craft and, if desired, color it with felt-tip pens or paint.

By the way, if you tension the strings well, the guitar sounds tolerable and you can play something on it.
Jaromir 4.6 years old, Arthur 1.8 years old and mother Anastasia Kalinkova, St. Petersburg.
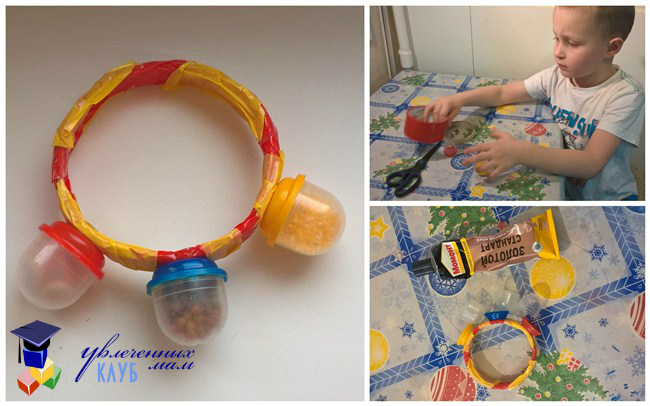
Tambourine
To make a tambourine we needed the following materials:
- paper ring from tape;
- multi-colored tape;
- glue;
- containers from shoe covers;
- various cereals;
- nails.
My husband screwed 3 shoe cover containers onto a paper ring using tape. We decorate the ring. We covered it with multi-colored tape. Beans, buckwheat, and corn grits were poured inside.

They sealed them with glue so they wouldn't open. The result is a tambourine that can even be given to children.
Svetlana Chaika, Vitya 4y. 5 months, Moscow, pos. Kokoshkino.
Noisemaker made from pistachio shells
We took the idea of making a musical instrument from pistachio shells from a magazine. First, we soaked the shells for about a day to make them softer, then we made holes in them. It turned out to be difficult, but a special tool for punching holes helped me with this. Then they put one shell on a thread and ordered a knot. It’s better to make the balls not long, as they get tangled during the game. I really enjoyed playing the noise, the sound is pleasant, not loud.

Irina Sartakova, son Nick, 5 years old.
Do you like the idea of making musical instruments with your own hands? Save it to your social network wall to repeat with your children!
Olga Khatyushchenko
You're probably already playing with with your kids various musical games, read to them musical tales, listen to the beautiful music. In the meantime, the baby does not yet go to musical school and doesn't play there for real musical instrument, you can make simple ones at home DIY children's musical instruments from the most available materials.
Of course, now the store has a huge selection of toys. musical instruments, but the manufacturing process will not leave the child indifferent. In addition, if you have noticed, children love to play on a homemade drum from a pan with greater pleasure than on a ready-made toy one. So let's show a little imagination and see what we can come up with.
Children's playing music is an active activity in which the child’s thinking is improved; The ability to show initiative and independence develops. And most importantly, his emotional sphere is enriched - a kind of immunity from life’s failures. After all, emotions make it possible to evaluate current events from the point of view of their significance for each of us.
The child grows and develops so quickly, and the previous toys no longer satisfy the child’s cognitive needs.
You can start with the simplest thing - a drum.

It can be made from a mayonnaise jar. Cover the jar with colored pictures, make holes on the sides and thread colored strings. For drumsticks, you can use any sticks, either wooden or plastic.

Take clean, dry cans and make holes in the sides, insert bells and decorate with colored pictures.
Rattles.

For the base, any plastic or metal bottles (from coffee, ketchup, yogurt) are suitable, as well as filling material that will make noise and attract the child’s attention. Any cereal, buttons of different sizes, beads will do.
Ratchets.

Make holes in the wooden plates and thread thick braid through them, decorate the plates with colored leaves.
Wooden box.
In a wooden box without a bottom, make a hole at the top and thread a ribbon with beads. Decorate the box with colored pictures.
I am sincerely convinced that during the manufacturing process tool you will have a large number of original ideas. Try to organize the design process in such a way that the baby takes part in it as much as possible. I wish you creative success!
Celtic harp for dolls (master class)We will need:
Thick and thin cardboard, a piece of wire, PVA glue, Moment glue,
Slip from any self-hardening plastic for soil,
toilet paper, acrylic paints, awl, toothpicks, wire cutters,
gold threads with lavsan, acrylic varnish.
First, of course, a sketch

Then I bend the wire according to the sketch - this will be the frame.
I cut out 2 pieces from cardboard according to the sketch.
I wrap the frame with a strip of fabric and glue it to one of the halves of the cardboard blank.

I glue both parts together.
I fill the voids between the parts with paper soaked in PVA.
Then I prime everything.


I'm priming everything again.


I pierce a lot of holes through with an awl (For those who want to make an instrument from plywood or wood - this step is unlikely to be feasible, the distance is too small) and on the sides I glue a pattern cut out of cardboard.
I cut identical pins from toothpicks with wire cutters and insert them into the holes.
The top row is an awl all the way through, the bottom row is halfway, only on one side.
And insert: First, cut identical pegs, then lubricate the holes with glue. While it dries, grease the pegs with glue and insert them into the holes, leveling the row so that everything is level. The glue sets within 1-2 minutes. During this time, you need to have time to trim everything. You can place a ruler on top and gently tap with a hammer. And then let it dry well. Better until the morning.))))
I paint the entire instrument with acrylic. I varnish it.
The last stage is tensioning the strings.

I make a knot at the end of the thread, lubricate it with Moment glue and insert it into the lower hole on the resonator. I wait about 5 minutes for it to dry and harden, then I carefully pull it and wrap it around the top peg, lubricated with glue. And in this way I stretch all the remaining strings. The process is quite long, but pleasantly meditative..))))
That's it.
For those who want to do the same from plywood or mahogany - a flag in their hands...
And my principle is that the thing should be light and made from accessible and cheap materials
