How to make original flowerpots from tires yourself? Tire flower pot Do-it-yourself flowerpots from tires for summer cottages.
To ennoble your site with beautiful flower arrangements, it is not at all necessary to buy expensive outdoor flowerpots. A unique frame for flowers of various shades and shapes can be made by hand. We decorate the cottage with flowerbeds from tires: interesting ideas and options for making flowerpots will help make the garden plot unique and inimitable.


Features and Benefits
By making a flower bed from a tire, you can realize almost any creative idea. Making such a budget option for framing flowers on the site is quite simple - just show a little imagination and make a little effort. Tire beds have a number of advantages:
- tires are durable;
- tires tolerate temperature extremes well;
- almost any paint fits well on the rubber surface;
- no need to spend money on material: almost everyone can find an old tire;
- improvised items can be used as decorative elements.


Due to the fact that rubber is a fairly pliable material, the tire can be given a variety of shapes. You can paint the product in absolutely any color. Such a product can be used not only as a decorative element, but also as a functional attribute of the site. For example, in such flower beds you can plant small seedlings.


Design
You can make a flower garden using ready-made examples, or using your own original ideas. You can supplement the finished design with any available materials: it all depends on your imagination and skill. The process of creating a flowerpot is often not completed after cutting and painting the tire. A product of complex shape in the form of an intricate figure must be supplemented with decorative elements. When making a flower garden, you may need the following materials:
- decorative and natural stones;
- construction metal mesh;
- plastic bottles;
- remnants of various building materials;
- colored glasses.


From several flower beds you can form bright compositions. A combination of multi-level flower beds of various shapes looks more impressive.. A popular option is a composition of flower beds in the form of cups and a teapot. For its design, you do not have to turn the tire inside out and cut out patterns on it. It is enough just to arrange several tires of different sizes, form handles from pieces of rubber and paint the finished products.

Unusual
In the children's play area, flower beds in the form of animals or fairy-tale characters will be appropriate. You can make a turtle from a tire and tread:
- the protector must be cut into four equal parts;
- in the tire you need to make 4 cuts under the paws of the turtle;
- pieces of the protector are inserted into the holes and fixed with staples.
- the tail is made from a small piece of rubber, fastened with wire staples;
- the turtle's neck can be made from a polymer pipe.
- a crumpled paper head is attached to the neck with adhesive tape.
- all structural elements are painted in the appropriate shades.
Other materials can be used to make the turtle's head, neck, paws, and tail. The product can be decorated with additional items (for example, put a small hat on the head of the turtle, and glasses on the nose).

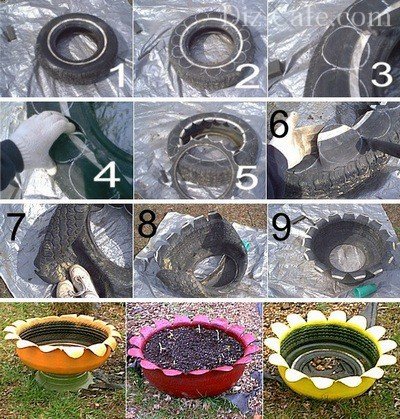
Flower
Near the house, flower beds that look like a flower will look good. Before you start making such a flowerpot, you need to decide on the shape of the petals. Petals can be in the form of a triangle, semicircle, rectangle or wavy. Sometimes they are narrow at the base and wide at the edges.
On the outer surface of the tire outline the contour of the petals. For marking, you can use chalk or a felt-tip pen. Using a shoe knife or jigsaw, cut out the petals. If the rubber is quite dense, and a knife will be used as a cutting tool, it is recommended to periodically dip the blade in soapy water during the cutting process.
Grasping the edges of the cuts, you must carefully turn the tire inside out. The finished product needs to be painted. Flower-shaped flower beds look more attractive if you use different shades of the color palette when painting.


On a leg
From a solid wheel (tire with a disk) you can make a magnificent flowerpot on a leg.
The workflow for creating such a flower bed consists of the following steps:
- in the tire, reaching the tread with a cutting tool, cut out the petals of the desired shape;
- then the upper and lower parts of the tire are turned out (the disk does not need to be removed - it will be the leg of the flowerpot);
- the upper part is painted in saturated colors, the lower part will be a kind of stem if it is painted green.

Swan
One of the most common options for flowerbeds from tires is a product in the shape of a swan. Such a flower bed is made in the same way as a flowerpot in the shape of a flower. The difference will only be in more complex cutting. You can use the ready-made scheme, which shows the lines of the wings, tail, neck and head of a swan for applying to the tire.
After marking the tire, the very shape of the swan is cut out. Next, you need to unscrew the tire and complete the formation of the swan. The beak can be made of rubber or any other convenient material, painted with orange paint and attached to the head with self-tapping screws. The eyes of a swan can be made from pieces of electrical tape.
Usually the figure is painted white, but no one forbids the use of other shades (you can make multi-colored plumage).
A master class on making a swan from tires, see below.
Required Tools
To start making flower beds from tires, you need to prepare the necessary tools. First of all, this is a tool that will be used for cutting rubber (knife, electric jigsaw, grinder). If you decide to use a knife, the blade must be sharpened well. It is worth considering that cutting thick rubber with a knife is quite problematic. To make your job easier, the blade must be lubricated with grease before cutting. If the knife will not be used as the main tool for cutting the tire, it can be useful for making small cuts.
Using an electric jigsaw as a cutting tool would be the best option. The more powerful the jigsaw, the easier it is to cut the wheel. For cutting tires, a quality steel blade with a reverse tooth is ideal. Cutting a tire with a grinder is much easier than with a knife or jigsaw. The disadvantage of this tool is that the rubber at the edges of the cut will be melted, the cutting procedure will be accompanied by an unpleasant pungent odor.
If for the manufacture of a flowerpot it is necessary to cut the protector, it is better to do it with a grinder.


Then you should decide on the type of paint for the flower bed. Almost any paint fits well on rubber. The following types are mainly used:
- aerosol;
- oil-based enamel;
- nitro enamel;
- car enamel.
If necessary, prepare a brush to paint the tire. You will need gloves to work, they will protect your hands from paint or other possible contaminants.. To apply the markup, you will need chalk, marker or soap. In the manufacture of complex figures, some elements will have to be made from improvised materials. To fasten additional parts to the main figure from the tire, you will need staples, self-tapping screws.

How to do?
Making complex figured flower beds from tires is a laborious process that requires patience and some physical effort. Whatever shape you want to give a flower bed of tires, the procedure for making a flowerpot will always be almost the same. Here is a step-by-step instruction by which you can independently make a figured flower bed from tires:
- We choose a tire. So that working with rubber does not cause unnecessary trouble, you need to take tires that can be easily cut (old, heavily worn, winter thin or imported).
- Thoroughly clean and dry the tire.
- Decide on the form. It is necessary to mark the cut line with chalk or a marker. The marks on the tire must be done as carefully as possible in order to facilitate the process of cutting out the figure in the future.
- Cut along the drawn line, and then take out the upper part. You can use a high power jigsaw.
- We turn the tire inside out (you need to take hold of the cut edge with your hands, having previously stepped on the middle of the tire and pull the rubber towards you with force).
- We grind the cut edges and process them with gasoline.
- At the end, the flower bed should be painted, dried well and, if necessary, decorated with additional elements.

View
All flowerpots from tires can be divided into two main types: solid and cut. The simplest option for a flowerbed of tires is a tire in its original form. You can improve the appearance of such a flowerpot using paints. Such flower beds can be placed in small groups, or made up of a multi-level structure.
A multi-level design will look more attractive if you give it the shape of a pyramid. To do this, you need to take tires of different diameters and install them on top of each other. The difference in tire diameter should be at least 20 cm. Hanging flower beds will be a more interesting solution. A hanging flower garden can be placed along a wall or a blank fence. The shape of such a flower bed can be very diverse.


The inner space of the tire must be filled with soil. As a drainage, you can use a mixture of small stones and sand. When making a hanging flower bed, several small holes must be made in the tire so that excess moisture can drain freely. Flowerbeds in the form of plants, animals or mythical creatures are more laborious, but they look quite impressive.
With the help of a tire and a cutting tool, you can realize any author's idea.


In addition to dividing into two main types, there is an additional classification of flowerpots from tires. Flower beds are divided by size and shape as follows:
- high;
- low;
- single-tier;
- multi-tiered;
- curly;
- round.


Material
The ease of manufacture of the flower bed, as well as its appearance, will depend on the material chosen. When choosing tires, you need to consider the following features:
- the process of making a flower bed will be easier from old tires, worn rubber is more pliable;
- imported tires are thinner than domestic ones and are more amenable to cutting;
- winter tires are more flexible than summer tires;
- tires with a metal cord are more difficult to cut;
- if in the manufacture of a flowerpot it is necessary to turn the rubber inside out, you need to select a tire with the most worn out tread.

A flower bed can be made from rims or solid (rims with tires) machine wheels. Such material is used much less frequently than the usual tires, but flowerpots made of disks look no less attractive. Whatever material you choose to make a flower bed, it must be thoroughly rinsed from dirt. This can be done with a garden hose.
Clean material will facilitate the process of making a flowerpot and will not spoil the cutting tools.


In addition to the basic rules for making flower beds from tires, it is important to know some of the subtleties of its placement on the site. It is better to place a flower bed on a well-lit and relatively flat area. In large areas, multi-tiered structures will look better. Having decided on the placement, under the base of the flower bed it is necessary to make a container from boards or other solid material.
It is important to prepare good soil for flowers. The soil mixture should not be too oily so that moisture can easily pass to the roots of the plants. It is important not to forget about the drainage layer, which can be made of expanded clay or gravel. To retain moisture in the soil and facilitate plant care, the area around the flowerpot should be sprinkled with gravel or sand.


It is better to paint the wheels in light colors: this will avoid overheating of the soil in the summer. When painting, also consider the following:
- Before painting, the tire must be thoroughly cleaned, dried and degreased. You can treat rubber from fatty contaminants with a solvent, gasoline or acetone.
- It is advisable to cover the tire with paint in several layers. A thin layer of paint can quickly wear off or crack. Applying many layers is not worth it, this will lead to a quick peeling of the paint. It would be optimal to paint the product two or three times.
- If you want to plant bright flowers in a flower bed, it is better to paint the tire in delicate light colors. In flowerpots of bright colors, it is better to plant light, small flowers.
- It is acceptable that the shade of flowers echoes the color of the flower bed.
- Painting a flower bed is not only from the outside. If you capture the inner edges with paint, the flower bed will look more voluminous.
- The flowerpot does not have to be painted in one color at all; interesting patterns of a different color can be applied to the tire.
To apply the pattern, you can use pre-made stencils made of cardboard.
Decorative elements of the garden are always very popular. A beautiful garden helps to break away from the worries of everyday life and fully relax. Flowerpots for summer cottages are not only an opportunity for the gardener to select the optimal soil composition for each green pet, but also the best way to place accents that can emphasize the harmony and splendor of the garden. Decorative pots can be purchased at specialized stores or you can create unusual flowerpots for flowers with your own hands.
Many gardeners, meeting in city front gardens with funny designs for flower beds made of car tires, often thought about the question "how to make a flowerpot from a tire that will become a worthy decoration of a garden interior."
Car tires, having served their time properly, can find a new life by becoming an interesting and functional element of garden decor.
Do-it-yourself flowerpots from tires are a quick, convenient and most importantly free way to create original decorations that can emphasize the beauty and magnificence of plants planted at the bottom. You can get hold of the material for making a flower pot at any tire shop.
To create an unusual element of the interior of the backyard, you will need a little imagination and about half an hour of physical effort to cut out the petals or other parts of the vase with a powerful knife or jigsaw.
The technology for making a do-it-yourself flowerpot from a tire is quite simple. Any tire size can be chosen: R12-R17, etc. So, let's go:
- Foundation preparation. The rim is cut with a knife along the border of the transition from soft rubber to thicker rubber around the entire tire. Under the tread inside the tire there is a metal cord, which will not be cut out. The cord will serve as a natural boundary to which cuts must be made from the center to the tread in the sidewall of the tire.
- Making cuts. Cuts 5-10 cm deep are made with a well-sharpened knife. The width of the grooves is any, but not less than 10 cm, since in the future they will act as the basis for the decorative elements of the flowerpot.
- Tire turning. After the cuts are made along the entire diameter of the tire, it is necessary to turn it inside out. To do this, the tire is turned over with notches down, the foot is fixed to the ground on the side with a solid rim in the transition area to the tread. To turn the tire inside out, efforts should be directed from the center of the product and at an angle of 45 degrees. Having turned out a small part of the rubber, further work goes easily.
- Studying decor elements. The tire turned inside out now looks like a real flowerpot, which is enough to add only small elements and paint it in the desired color. The sections of rubber between the cuts can later be shaped into petals, semicircles, triangles. Such garden flowerpots with their own hands will decorate the front area, patio, recreation areas.
- Filling the flower bed with soil. Any agro-textile material is placed on the bottom of the flowerpot, preventing the germination of weeds and providing the necessary drainage of water. The container is filled with fertile soil for planting plants and flowers. For this purpose, a tire from a truck is laid out at the base and filled with a layer of earth, on top - a flowerpot from R16-17 wheels, and a vase from R12-R13 tires on the third level.
Here's what the whole thing looks like:
To transform a tire into a pretty flowerpot, you first need to remove a very strong, hard inner rim, which is always placed where the wheel fits on the rim.
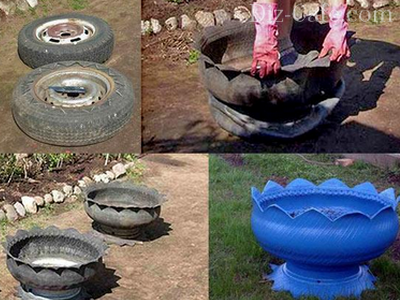
If you want to create a flowerpot for a garden on a stand, you can not cut out the core at all, but use it as a base for a bowl
Here are some design examples of what can be done in the same style:
Self-made concrete vases
If you want to create a spectacular decoration for a garden or flower garden that will last for decades, you can make decorative flowerpots from concrete with your own hands. You will need cement, sand, water and any form for pouring. If there are often no problems with the acquisition of material for manufacturing, then questions may arise with the search for a form, especially if it is original or complex. Ready-made forms can be found in hardware stores. Often they are made of plastic.
Before filling the mold with cement mortar, treat the inside of the mold with engine oil, grease, or concrete spray. Surface treatment will make it easy to separate the mold from the concrete later on. The solution is mixed in a separate container. Only after that it is poured a third into the mold.

A smaller container (also sprayed) to create a recess for placing a flower is immersed in the center of the flowerpot when the solution has set a little, but is still quite liquid
The voids between the walls are filled with mortar to the brim and left for several days to solidify. The template is easily removed from the concrete flowerpot after light tapping with a hammer along the entire outer side.
In the absence of the possibility of incurring additional costs for the purchase of a form, two ordinary cardboard boxes of different sizes can be used. To do this, the seams of the box are reinforced with tape. A thin layer of sand is poured onto the bottom of a larger box and cement mortar is poured onto one quarter of the box. While the solution is a little fastened, you should prepare another smaller box and cut out the bottom in it. Then install this box on top of the cement mortar. The voids between the walls of the boxes are also filled with mortar. It takes 5-6 days to harden the mold. The frozen flowerpot is removed from the mold. The bottom of the vase is drilled in several places to ensure sufficient water drainage. A concrete flowerpot is ready: you can fill up a layer of soil and plant flowers.
We bring to your attention an example of the manufacture of a concrete flowerpot using factory forms:
What else can be used as a flowerpot?
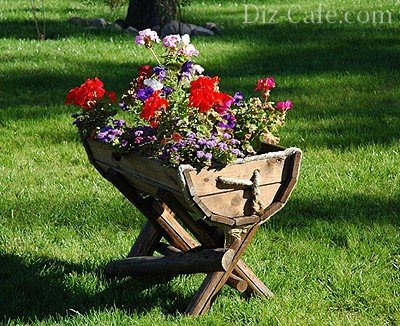
Outdoor containers for flowers, made of natural materials: wood, stone, most organically fit into the natural environment. Original flower vases can be created from old wooden barrels, tubs, boxes, carts.
A real masterpiece can come from an old stump. The basis for such a flowerpot can be found in the forest. Old tree stumps of various intricate shapes are perfect for creating unusual decorations. To create a recess for placing plants, holes should be drilled in several places on the surface of the stump at a small distance from each other. After that, the inner part of the wood is easily picked out with chisels. The resulting void in the center of the stump is filled with earth for planting.
In the hands of a craftsman, seemingly ordinary containers can be transformed into amazingly beautiful flower containers that will become a bright touch to any interior.
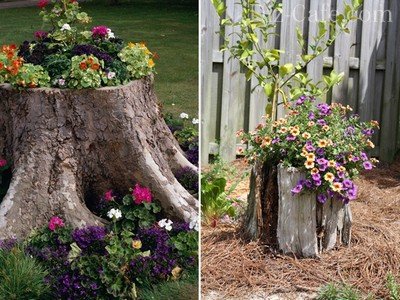
In such flowerpots, compositions from several types of plants look spectacular: petunia, viola, balsam, coleus, lobelia, pelargonium
To extend the life of a flowerpot made of wood, it is advisable to treat the surface with antiseptics and cover with a layer of varnish or drying oil.
The main advantage of outdoor flower vases is mobility, which makes it easy to change the “decoration” of the interior. Do-it-yourself flowerpots will become not only bright inclusions of the local area, they can organically complement and mask bald spots in flower arrangements of continuous flowering in flower beds.
For many, it is not at all news that worn out car tires can be used for or arranging a flower garden on the site. Flowerpots from old car tires have long been used by skilled gardeners. This is many times better than just storing old "bald" tires in the garage or recycling them. Do not forget about the tire recycling process, which is very expensive and also pollutes the environment. And burning a few thousand old tires consumes the amount of oxygen consumed by the population of an average European city in a month.
Old tires can find a second life as flowerpots for plants and flowers.
Convenient solution for a summer residence
The fact that gardening shops now have a huge selection of all kinds of flower beds and fixtures to improve the aesthetic appearance of the site or cottage is undeniable. But, do not forget about the cost of such products, as well as the banal dacha thieves. After all, they will easily take away the beauty that you just acquired to delight your eyes, especially if you put a flower bed behind the fence.

Rubber is very durable, it is resistant to degradation, rain and sun.
The decision to use tires for landscaping a summer cottage is very practical - because rubber is durable: it is difficult to decompose, the influence of the sun and rain, it is easy to process and paint. To everything else, you can also add pride in the work done by your own hands and, of course, the material benefit of this decision. Using a little imagination and spending very little time, you can build a whole masterpiece on your site, which, moreover, absolutely everyone can admire.
Back to index
Wide scope of fantasy for landscape design
Flowerpots made of tires can be completely different in diameter, height and color. If you have some skills, you can even make a vertical stand for them.
The simplest option, of course, is a car tire placed on the ground and planted with flowers.
A little imagination, and with the help of ordinary tires and paint you can create a real garden masterpiece.
But this idea is standard and rather outdated. Flowerpots made of tires with figuratively cut edges and painted with bright colors or any pattern that fits into the landscape and adds a special aesthetic to the site will look much more interesting and colorful.
You can stock up on the required number of tires at the nearest tire fitting workshop, there is enough of this stuff there, for a minimal fee or completely free of charge. You will also need to purchase tools and materials:
- paints;
- brushes;
- solvent;
- soap;
- chalk or marker for marking;
- shoe knife.
In order for the flowerpot to take on a cupped shape, the tire must be turned inside out.
In fact, the markup can be made in any shape you like - semicircular, rectangular, or leave the tire in its natural original form. You need to apply the markup with chalk or a marker. For marking with a triangle, we take a board with a right angle that is suitable in size, it is easier to mark and cut out such petals. Semicircular petals look more aesthetically pleasing, for them you will need a saucer or a carved round piece of cardboard, at worst, a pot lid will do.
It is best to cut the petals of a future flowerpot from a tire with a shoe knife, but a table knife is also suitable, you just need to sharpen it well. For better glide, it is worth stocking up with a strong soapy solution or a piece of soap moistened with water, on which you need to periodically wipe the knife.
When the cutting is completed, it is necessary to the wrong side. It is quite difficult to do this, since a certain dexterity and strength are needed. First, turn one side inside out, then flatten the tire into an oval, and only then turn out the rest. The pot of tires is ready. It remains only to determine what color to paint it and you can plant flowers.


It is always nice to make something useful out of a junk item, and if the craft turns out to be beautiful as well, the pleasure is double. One example is tire crafts. They make decorations for a country or garden plot, various flowerpots and flower girls, build children's attractions and even make country furniture - tables and chairs.
Flowerbeds and flower beds from tires
Let's start with the most, perhaps, simple flower beds and flower beds. Do you think it is difficult to make a multi-tiered one? Maybe, but not from tires. Take several pieces of different sizes, paint them in bright colors and fold them in a slide - one on top of the other. To prevent your slide from falling apart, fasten the tires from the inside with a screwdriver and self-tapping screws. Two per connection will suffice. Inside you fill up the soil, plant the plants. So that the soil does not spill out, you can lay the tire inside with a piece. It will remove excess water, but will not allow the earth to get enough sleep. A beautiful tiered flower garden is ready.
If you like flower beds of the correct form, you can make these. For example, folding a flower bed in the form of a camomile out of tires. First, lay out and fasten the tires together in the lower tier. Fill the middle of the tires with earth, as well as the free space inside the circle. There, for better drainage, you can lay broken bricks or other construction debris, sprinkle a little earth on top and tamp. On the prepared surface, stepping back from the edge by more than half the diameter of the tire, lay out the second tier. They are also fastened together, the middle is covered with soil, and the core is erected on top. At the very top, you can plant tall flowers, and on the lower tiers - curb or undersized.

Another option for flowerbeds of tires in the form of chamomile is in one tier. To do this, you will have to cut the tires.

How to cut tires
In general, when making crafts from tires, they often need to be cut. This is far from easy. It is more or less easy to cut off the side surface from the tread. People with strong hands and good knives do it by hand. Good, by the way, training for the hands and the entire shoulder girdle. If you already cut with a knife, lubricate the blade with grease: rubber constantly “jams” the metal, and the blade coated with grease slips well.
You can also cut off the sidewall with a jigsaw or grinder. Cutting with a grinder is relatively fast, but the stench is wild. Therefore, the grinder, even if there is one, only makes the first cut, so that you can introduce a jigsaw file. Further work with this tool. For cutting rubber, a blade with a reverse tooth made of good steel is taken.

If you have to cut the tread, it is useless to do it with a jigsaw or even more so with a knife. At least with an ordinary knife. Blades made of special steel can even cut iron cord, but hardly anyone wants to disfigure such a tool on an old tire. Therefore, most often they work as a grinder. To avoid trouble, the protector is fixed: always think about safety. If the sidewalls are already cut off, the tread band is quite elastic and can be compressed with a clamp. Cut, it does not spring.
Flowerpot from the wheel: turn out the tires
If there is a tire with an old rim, you can make a flowerpot on a leg out of it.

To do this, cut one sidewall along the tread. And they turn out. This is not an easy task: it requires considerable physical strength and perseverance. The rubber is elastic and it is impossible to turn it out the first time. If not at all, notches are made on the outside across the tread. They should be quite deep, but not through. It will also help if you make cuts along the edge with a depth of at least 5-7 centimeters. They will look like fringes on an inverted tire.
Why turn out? The inner surface is smoother, and the shape can turn out to be more interesting, especially if the edge is not linear, but jagged. You will get a gracefully bent decoration.

For details on how to turn a tire, see the video.
Similarly, you can turn out a tire without a rim. The sequence of actions is the same. First, one of the sidewalls is cut off - straight or in a zigzag. In order for the "petals" to be even, it is desirable to mark them. It is convenient to do this with chalk. According to the mark, they are then cut with an electric jigsaw or a knife (if the cord is synthetic).

They twist it like this: they step on the inside of the tire, take the edge with their hands and pull it up and towards themselves. It is important to achieve the first result: when at least some part is arched. If the tire looks like the photo below, this is already a success. It is developed by consistently turning the edge inside out and standing on the part that has already been turned out so that it does not turn back out.

Watch the process again in the video. This time, the tire is turned out without a wheel (by the way, they cut it with a knife).
Even by itself, such an inside-out tire looks good. If you paint it, it gets even better. If desired, they can be combined - different colors, sizes, installed in different ways: on a tire or on legs.

A high flower bed always looks beautiful. Especially with ampelous plants. It can also be made from tires, and there are several possibilities. In the photo below, there are two ways to fix the cut tires at different levels. The first is to use stumps for this, to which flowerpots are attached with nails or self-tapping screws. The second is to use reinforcement - three or four rods, on which to put rubber. Having set the tier at the right level, it needs to be fixed; on metal, this can only be done with the help of clamps.

It is not always possible to put a flowerpot on the ground: some areas are so developed that it is problematic to single out even one square meter. In this case, people came up with various hanging flowerpots, and also from old tires. Only a small part of the whole tire remains, so there is a lot of cutting ... please be patient. For example, you can make hanging planters in the form of a dolphin, parrot, rooster and other outlandish birds. For a few ideas, see photos.

Tire planter - parrot, rooster and dolphin
All these tire crafts. Only a small part of them - the heads - are often made of dense foam. Having cut and polished the part of the desired shape, it is fixed with self-tapping screws smeared with glue (this is a secret, remember), and then painted. How to make a parrot from a tire, see the video.
Below are step-by-step photos that capture the main stages of creating a table or ottoman from a tire. You will need two more circles of plywood or fiberboard of a suitable diameter, a hemp rope is used for finishing. Of the materials at hand, you will need glue and a glue gun, as well as varnish and a brush for applying it. To connect the circles with the tire, you will also need self-tapping screws - 8-10 pieces on each side.

Next, we take a glue gun and warm up the glue, apply it to the sidewall. If there is no such luxury in the household, take glue, which is in a larger tube, such as "liquid nails". It is easier to work with a mounting gun. Apply the strip on the sidewall, glue the hemp rope. Yes, all the way to the top.

Using the same technology, we decorate the cover of the table (ottoman). You need to start laying from the middle: apply glue, lay the rope.

Finishing work - applying varnish. We do slowly, soaking well. Here is what should be the result. If you made a table, you can put glass on top - a rope, even varnished, is not the best cover for a table, although it is beautiful ...

Variety can be achieved through a cover. It can be sewn from a vending dense material.

Cute puff…
You can knit - large knitting looks interesting.

Large knitted knitted cover - looks interesting
If you don’t feel like sewing and knitting, you can use old knitwear cut into strips. They are cut into long strips 3-5 cm thick, wound into balls and then wrapped around an ottoman. It turns out interesting, especially if several colors are combined.


If you need a taller ottoman, twist the two tires together with self-tapping screws, and work on them in this form.


See the video for another option.