How to cut tiles with improvised means. How to cut tiles at home: the best ways
In the production of various construction works on their own, there is often a need to cut ceramic tiles at home. To do this, it is not at all necessary to have a professional tool - a tile cutter. Let's make a reservation right away: We are not talking about constant work and large volumes, but about small batches or generally piece products. In such cases, it does not make sense to buy an expensive tool; it is quite possible to get by with improvised means.
- Cut in a straight line. In this case, you need to distinguish where the cut is. If less than 2 cm remains to the edge from the cut line, then such a cut can be attributed to a curly one;
- Round holes in tiles of various diameters;
- Figured clippings;
- Mosaic elements. If there are requirements for precise geometric shapes, then this view also applies to curly cutouts. Otherwise, it is actually crushing the tile into pieces. Products are placed in a bag and with the help of a heavy tool (hammer, sledgehammer) are crushed to the desired proportions. An exception may be non-ceramic tiles.
Tile cutting methods
These methods are mainly suitable for cutting tiles at home. But also applicable or limited applicable to other types of tiles. You can cut tiles without a tile cutter in the following ways:
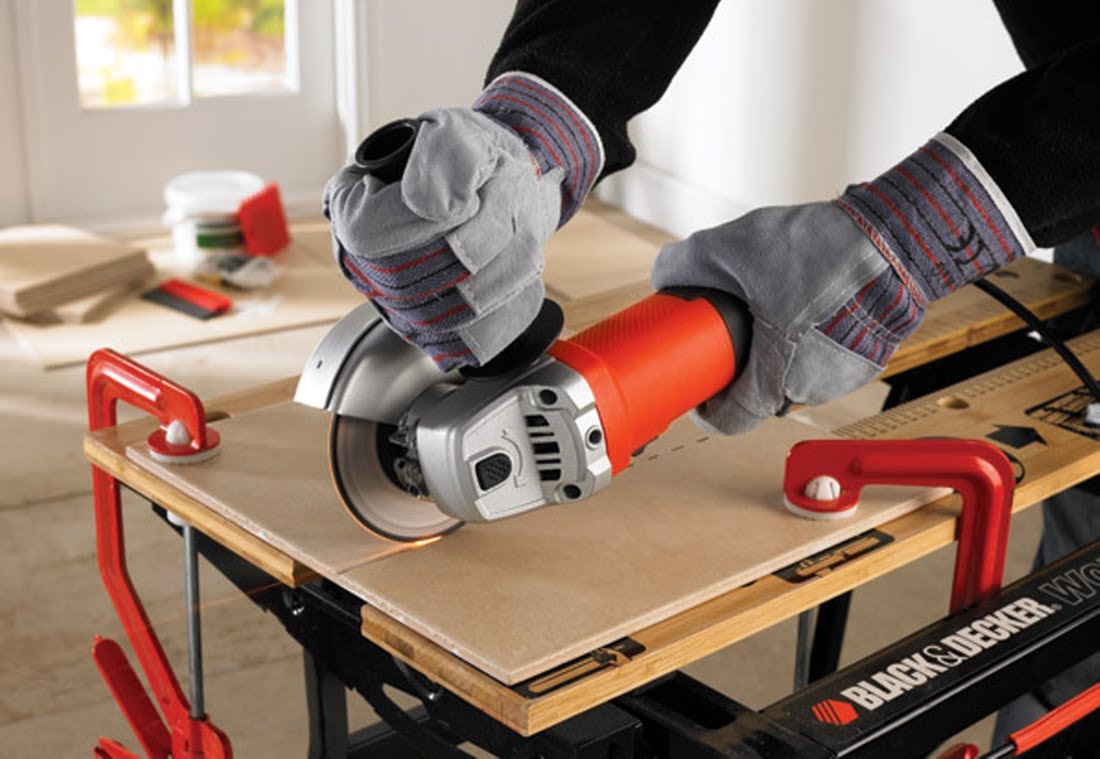
Angle grinder (Bulgarian)
Generally speaking, it is a versatile tool. As before, masters could cut down a house with one ax, and now with the help of one grinder they can cut anything. The author witnessed how an even round hole with a diameter of 5 cm was cut out.
Note! The method is suitable for straight, figured views and with minimal skills in handling a curved line tool of any configuration.
For cutting you will need:
- Bulgarian. Any power and any type;
- Cutting wheel (for stone or diamond);
- Safety helmet or goggles (required);
- Protective fully enclosed suit and gloves (recommended);
- Respirator (recommended);
- Clamp. Additionally in some cases (clamp or vise).
Pre-mark the tile, preferably with a line scratched with any sharp tool. In extreme cases, drawing a line with a construction marker is allowed. During operation, a lot of dust is generated and the marked lines can be erased when it is removed.
Straight small cuts along the edges of the tile can be made by laying the tile on a flat surface on a table or on the floor. First cut the surface by a few millimeters. With such an operation, the own gravity of the tile and the friction force are enough to keep the product in place. With deeper passages, you can additionally step on the edge or hold the assistant. For curly cuts, it is better to attach the product with a clamp to the countertop or fix it in a vise, after placing pieces of cardboard or thick fabric under the sponges.
Advice! Place a piece of plywood under the product to avoid damage to the surface of the table or floor.
The cut is carried out in several ways:

It is recommended to apply at difficult cuts: on edges or curvilinear. The fact is that with this method there is a lot of dust, consumption of the cutting blade, time costs and labor costs. An ordinary straight line can be cut in much simpler ways.
Electric jigsaw
If there is neither a tile cutter nor a grinder, then a jigsaw may be available. An underestimated tool!
Note! Similarly, you can use a manual jigsaw with a stone file. But the cutting speed will be an order of magnitude lower.
Would need:

Sawed in the usual way. Cutting out too rounded cuts is problematic, the file gets stuck. Not a thick (wall) tile is sawn well. It is very difficult to cut floor porcelain stoneware in this way. For a little relief, it is suggested to pre-soak the material.

Glass cutter or any pointed tool
This method can only cut tiles. And only in a straight line. Another limitation is that the pieces should not be less than 2 cm wide.
Would need:

In order for the cut to turn out to be clear without chips and going to the side, the scratch must be applied carefully. It is enough to scratch the top, glossy layer.
Advice! When applying the risk, pay attention to the beginning and end of the scratch. Often, at the very beginning and at the very end, the scratch is not deep enough. This is due to insufficient pressure and psychology. At the very beginning, we only try on and the pressure is weakened. At the very end, acceleration occurs and the risk is “lubricated”. This can lead to the fact that the fault in these places will go to the side.

When applying risks with a knife, several passes are made to get a deep scratch.
Scratching depends on the hardness and sharpness of the tool used. If the tool is hard enough and sharpened (glass cutter with a sharp roller, spear-shaped sharpened pobedit drill, etc.), then one pass with good effort is enough. If the tool is blunt or made of soft material (household knife), then several passes will be required. Ultimately, the furrow should deepen below the glossy layer.
Multiple split methods:

round holes
Depending on the diameter of the holes, the tool and nozzles are selected. For making holes in tiles, any tools with a rotating tip (drills, screwdrivers, perforators, hand rotators, etc.) are most suitable.
Note! The power of the tool does not matter, the speed of rotation is more important. It is desirable that you can set a small rotation speed. Above 500 rpm only to the detriment of the cutting tool. Although the hole is made faster, the cutter gets very hot and fails faster. In addition, a high rotation speed increases the likelihood of chipping at the edges of the hole.

Various nozzles for drilling holes in tiles.
Nozzles for small diameter (up to 15 - 30 mm):
- Special drills with one-sided sharp-angled sharpening. The best option, but quite expensive. Enough for a long time, drill almost any solid tiled surface;
- Spear-shaped drill bits for tiles. Cheap drills, for one-time work the best option. When used on a simple tile, they are enough for several dozen holes;
- Drills with hard-alloy soldering (for concrete, stone, for perforators, etc.). Not the best option, but if necessary, a couple of holes can be made with them.
Nozzles for large diameter:
- Crowns with various materials (diamond, corundum, tungsten carbide). They are professional tools and are expensive;
- "Ballerina". In the center there is a spear-shaped drill, the location of the second cutter is adjusted by moving the rod fixed to the central leg with a bolt. A cheap option that will allow you to cut several holes of different diameters.
Starting from a diameter of 50 mm, holes can be cut with a grinder. All work is recommended to be carried out in a protective mask or glasses.
Figured breaking out
Sometimes you need to make curved lines. Lines can be not only straight, but also semicircular. More problematic are such breaks when they do not start from the edge. In such cases, you will first have to make a hole and then break it out of it.

Figured breaking out of a tile.
For breaking out there is a special tool - tongs with a wheel. But for one-time work, it is not advisable to purchase a special tool. Therefore, you can do with ordinary pliers.
The breaking technology is very simple. Pliers (or tongs) are strongly compressed, the material crumbles, or compressed and sharply turned (only away from the fault line, at least 5 mm). Small pieces break off. If you try to break off a large piece at once, you can spoil the whole work. Part may break off behind the risk line.
Long, straight, narrow pieces through the entire tile are broken off by a sharp turn of the pliers to the side. Having previously clamped them along the risk line (a scratch, of course, must be applied). At the same time, the tile may not break off for the entire length and the procedure will have to be repeated on the remaining part. Then they also carefully break the remaining sharp protrusions.
The easiest way is to apply risks and hit an acute angle. In this way, you can easily and quickly prepare most of the elements.
Sawing is used if you want to cut a piece not through the entire length. In this case, several sides are cut, and one is broken off along a solid rod or through clamps.
Advice! If you need repairmen, there is a very convenient service for their selection. Just send in the form below a detailed description of the work that needs to be done and you will receive offers with prices from construction teams and firms by e-mail. You can see reviews of each of them and photos with examples of work. It's FREE and there's no obligation.
Self-laying tiles is possible, but on condition that there are at least some basic skills. And if a non-professional tiler decides to lay the tile on his own, during the installation process he will face the problem of cutting or drilling it.
This procedure is not particularly complicated, if we are not talking about industrial scale. Accordingly, knowing how to cut ceramic tiles, as well as strictly adhering to technology, even an amateur will be able to cope with the task.
When choosing how to cut tile elements, it must be taken into account that, for example, a glass cutter and a tile cutter do not work with a thick surface. That is, they are optimal for wall decoration.
But then how and how to cut floor tiles for a home master? If you need to cut only a few elements, they are quite suitable, you just need to duplicate the cut line from both the front and the wrong side. For more voluminous work, you will need at least a jigsaw with diamond wire or a grinder.
Tile cutting tools
So, how do they cut tiles, what equipment and fixtures do you need to have in order to cut it yourself? Would need:
- Marker.
- Ruler.
- Square.
- Cutting tool.
- Basin or other suitable container.
Let's consider their application. Since ceramic tiles are not recommended to be cut dry, it must first be soaked in water poured into a bath or basin.
In order to draw the boundaries of the future cut on the front tiled surface, you will need a square with a ruler and a marker.
And directly cutting tiles is carried out using the most important “tool” in the set - cutting.
The main types of cutting tools
In the construction market, you can find cutting tools of various price categories and all kinds of types. Among them are:
- Roller-type glass cutter - refers to the cheapest devices, with its help you can perform a relatively small amount of work.
- A manual tile cutter is a more advanced model of a glass cutter, which increases labor productivity due to a significant depth of cut.
- An angle grinder, also called a grinder, is equipped with a disc that can cut ceramic tiles.
A more sophisticated tool for cutting ceramic tiles, with which you can do waterjet and laser cutting, as a rule, is not used at home.
The best choice for cutting tiles at home is a manual tile cutter. It is easy to use, does not require special precision of movements, as when working with a glass cutter, and has an average price category, which cannot be said about the angle grinder.
Rules for working with a tile cutter
Before you start cutting ceramic tiles at home, you need to soak it in water for 30-40 minutes, then draw a cut border with a marker.
The prepared tile is laid on the base of the plicorecutter in such a way that its front surface is strictly on top. Using guides, the line along which the cut will be made should be brought under the cutting roller.
The cutting roller is pressed against the tiled surface, for this you need to pull the upper lever of the tile cutter towards you. The movement of the roller is carried out exclusively along the guides, which does not require precision movements, but only involves the use of certain efforts by the operator.
After the cutting process is completed, the roller must be pressed strongly, as a result of which the tile will break along the cut line.
Working with a glass cutter or angle grinder requires skill and experience with this equipment. Their cutting elements should be drawn without deviation along the line of the planned cut.
The fracture of the cut ceramic tiles also causes complexity - it is carried out manually. To do this, a dense object is laid below the cut line and the tiled element is broken by pressing on its edges.
How to drill holes in tiles?
Having figured out how to cut ceramic tiles, let's move on to drilling it. Required fixtures and tools:
- A hammer,
- Chisel,
- Water,
- A drill corresponding to the size of the future hole.
Pre-tiled elements are also soaked in water for the same time as for cutting. Then, with the help of a chisel and a hammer, the top layer of glaze is damaged in the marked area.
Tile drilling steps:
- Lay the pre-moistened tiles on a smooth surface.
- Chip off the top layer of glaze where the hole will be drilled.
- Using a carbide-tipped drill, drill through.
For elements of a tiled finish already laid on the wall, all manipulations are performed in the same order, excluding the soaking process.
Many of us today are trying to master some repair technologies on our own. Such zeal helps to save significant amounts on the implementation of goals. But in such circumstances, certain difficulties almost always arise, which are not always possible to solve on their own. This article will talk about how to cut tiles at home.
Before cutting tiles, it is important to choose a tile laying method and make the correct markup. Experts advise beginners to make sure to lay out the modules and see how much work remains to be done. If you need to cut several tiles, there is no need to use a professional cutting tool for this purpose. In this case, a regular glass cutter, jigsaw or grinder will fit. If the tile is laid in a complicated way (diagonal, for example), there is no way to do without a tile cutter.
Working with each tool has its own characteristics, so it’s worth talking in more detail about how tiles can be cut at home.
In addition to the amount of work to be done, it is also important to consider the type of cut. For the implementation of a figured cut, a grinder and a jigsaw are best suited. They provide the speed of the operation, but you need to work with them very carefully. There is a high risk of injury.

Hand tools, such as a glass cutter, take up little space, you do not need to master certain skills to work with them, the sawing process is dust-free, and hands are not endangered during work.
Note! The choice of instrument must be made taking into account the above factors.
Highlights of upcoming work
Experts, talking about how to cut tiles, pay attention to the need to use eye and respiratory protection. Since a lot of dust is generated during cutting, and small fragments of the ceramic body often fly around the room, it is important to put on construction goggles for the eyes, and a construction respirator for the nose and mouth.
There are basic rules that explain how to properly carry out the described operation.
- Before starting work, the floor or wall is marked.
- If you pre-soak the tiles in water, cutting ceramic tiles will be much easier. Water softens the modules and reduces the amount of dust.
- Both wall and floor tiles must be cut from the front side.
- When working, it is important to achieve moderate pressure on the material, to produce confident smooth movements.
- It is impossible to break a tile using excessive force.
- If you want to remove notches from the line and cut, you can use sandpaper.

How to use a glass cutter
It is clear that, when solving the problem of what and how to cut tiles at home, not many people are in a hurry to purchase expensive professional tools. The implementation of short-term goals is possible with the use of a manual glass cutter.
Note! Such a cutting tool is only suitable for working with wall tiles; it will not be possible to cut floor tiles with it. And all because it has a greater thickness and greater margin of safety.
So how to cut tiles with a glass cutter?
- First, it is better to soften the tile by soaking it in water. Only in this way it will be possible to significantly reduce the degree of effort that may be needed to carry out the described operation.
- On the front side, the fault line is marked with a ruler and a pencil.
- The glass cutter is taken in the working (right) hand. With the left hand, the tile is pressed against the work surface.
- With one pass, a clear cut line is made. To do this, you need to press hard on the tile with a glass cutter, so that a deep groove forms on it.
- The next step is to knock on the tile with the back of the glass cutter handle along the furrow and from the front and back sides.
- It remains to move the tile to the edge of the table and apply hand pressure on the smaller part of the cutting module. The tile should break easily.
- If, after cutting on the tile, the edge turned out with chipped teeth, you can get rid of them with sandpaper.

Working with a grinder
The story about how and how to cut ceramic tiles at home, how you can perform such an operation, you must continue with a description of working with a grinder. This tool is always at hand for someone who likes to repair his apartment on his own or just do something with his own hands. The main rule for the use of such a tool for the indicated purposes is the use of a diamond disc that has a suitable grain size. Working with a grinder is easy.
- First of all, we replace the disc, choose the one that is designed for dry cutting. Be sure to check the quality of the connection before work.
- On the tile on the front side, we draw a cut line.
- The tile is fixed on the work surface. It is important to place it so that during operation it does not move from its place, while leaving access for cutting.
- It is important to start working as a grinder on your own. With one hand, you need to hold the tile and drive the disc away (just a little bit) from the marking line.
Note! With the help of a grinder, you can make not only straight cuts, but also cut L-shaped cutouts, complex curly cuts.

tile cutter
There are commercially available special professional tools designed for cutting tiles. They are presented in two versions: experienced craftsmen, those who constantly perform a large amount of work, prefer to purchase electric models. In repair teams specializing in performing any type of work, you can often see manual tile cutters among the working tools. Are there any differences in working with each type of the described tool? Of course have. And it is worth talking about them in more detail.
How to work with a hand model?
The principle of operation of a manual tile cutter is extremely simple. The cutting element is attached to the body and moves with the help of a carriage. But before work, the tile must be soaked in water for a couple of hours. The tile will become a little “softer” from this. A notch line is applied to the tile.
Note! Experienced craftsmen must lubricate the incision line with any oil before cutting.
The tile is laid out on the body of the tile cutter. The handle goes down. It sets in motion a device that fixes the position of the tile and starts the device on which the cutting element is fixed. The cutting part is pressed quite tightly.

This operation ensures the formation of a sufficiently deep groove, while maintaining the integrity of the facing element. At this stage, it is necessary to lower the second handle and activate the cutter itself, which moves along the carriage with the help of rollers. It remains just to press on the tile and split the tile along the line of the furrow made.
How to work with electric model?
The principle of operation of the electric model is about the same.
- Markup is being done.
- Many models have a tray that must first be filled with water. The water supply prevents overheating of the tile, and also levels the process of dust formation.
- The tile is attached to the working surface of the tool.
- Pressing the button starts the cutting process.
- The tile moves smoothly by hand towards the cutting disc.
- In order for the cut to turn out strictly along the intended line, it is necessary to hold the tile on both sides with your hands.
- When the cutting disc comes to the edge of the processed module, we reset the rotation speed and make a smooth cut of the remaining part. If this is not done, the cut will be rough.

If necessary, to perform a figured cut, it is best to use an electric jigsaw. It is easy to work with him. The algorithm of actions is also extremely simple:
- Work in this case also begins with the markup. It is made from the front side of the tile.
- The material is pre-wetted in water, and then wiped dry with a rag.
- A diamond-coated blade is installed on the jigsaw.
- The tool is turned on and the saw blade is inserted into the tile structure at low speed.
- After that, you can direct the cutting tool in any direction. Movements are made without strong pressure. Do not move the jigsaw forward if the furrow is not yet completely cut. Otherwise, there is a risk of breakage of the diamond file.
- The most difficult thing is to bring the tool to the edge of the tile. In the hands of an inexperienced craftsman, a cutting tool can easily go sideways. Therefore, it is important to process the edge with special care and attention.

Other tools
When deciding how and how to cut tiles at home, you must always remember about other methods of processing tiles. Experienced tilers can even cut tiles with a rusty nail, if the end is sharp and large. In fact, the process of cutting with a nail is not much different from the process of cutting with a conventional glass cutter. Only in our case, the furrow is formed by pressing the tile with the tip of the nail. If such an operation is performed clearly and confidently, the cut will turn out to be quite neat.
Generalization on the topic
Whatever cutting method is chosen, it is important to remember that getting a high-quality cut becomes possible only with a certain amount of experience. The force of pressure, the depth of the cut is developed, therefore, it is useful for all those who only dream of experimenting in a similar direction, pick up the chosen tool and train on a crowbar, which is always present when transporting tiles.
When performing finishing work with ceramic tiles, it is rarely possible to avoid cutting it. Especially in those cases when the tiles we have chosen are large, and even if there are communications. But there are no hopeless situations. Now let's figure out how to cut tiles of any thickness, in any configuration using a special tool, and most importantly - without it.
What and how to cut tiles
The most common tool for cutting tiles is a manual tile cutter. An electric tool is widely used for large volumes of work, so it does not make sense for a private trader to buy it. Yes, and a manual tile cutter, the most inexpensive, will cost no less than 1000-1200 rubles, which also do not lie on the road, but if it is possible to take such a tool for a while, then why not take the opportunity to quickly fit the tiles in place without any extra tricks .
Ceramic tiles consist of a base (fired clay) on which a glaze is applied. This is the most common type of tile, although there are more difficult options to process. The main task when cutting is to cut exactly the glazed layer evenly and clearly, without chips and breaks. There are two ways to cut the tile completely - either make a deep cut on the glazed surface and break the material along the cut line, or cut it completely with a diamond tool.
If we make an incision and break the tile, then the clay base may have some curvature, which is not too critical if it is supposed to process the joints with grout or other mortar. The edge is perfect if you cut the tile with a diamond wheel, but it is quite difficult to clearly maintain the cut line without experience.
Tile cutters and how to use them
Manual tile cutter can be of two types: tile cutter machine and tile cutter tongs. The principle of operation of both tools is the same - the cutting wheel, by analogy with a glass cutter, but larger in diameter, cuts a deep groove in the glaze and parts of the base, after which the tile breaks exactly along the line without any problems. Strong guides will help to draw this line accurately and quickly on a manual tile cutter. Most tile cutters are equipped with rulers for precise marking of tiles, so you can cut even thin strips of tiles.
Tiles are not laid so often, so there may not be a tile cutter at home. Before cutting ceramic tiles at home with improvised means, remember that most likely we have an ordinary grinder. It will allow you to cut quickly and efficiently, the main thing is to choose the right cutting wheel. For ceramic tiles, diamond-coated wheels are used, but there are cutters for both dry cutting and wet cutting, so if the tile is wet during operation, this point must be taken into account.
We work as a grinder
Yes, to cut with a grinder, you need a certain skill, otherwise one wrong move can derail all the work. When cutting tiles in this way, it is desirable to fix the tiles on the plane and have easy access to the tiles from all sides. Any grinder is suitable for work, and the smaller it is, the more convenient it will be to adapt to the features of cutting ceramics:
the grinder tile is cut towards itself;
the cutting line must be clearly visible;
the cutting disc should not rest against anything after passing through the body of the tile;
the grinder is held strictly perpendicular to the plane of the tile.
And don't forget your mask and goggles.
Cutting tiles with a glass cutter
If there was no grinder at home, then an ordinary glass cutter will come to the rescue. Of course, there is no guarantee of the quality of the cut, but if the task is to cut only a few tiles, then this method is also suitable. In principle, it is no different from cutting on a manual machine, the only thing you have to use is a metal guide - a ruler or other flat metal object. When working with tiles with a glass cutter, you need to remember the following rules:
the line drawn by the glass cutter should be one and only;
the glass cutter is pressed as strongly as possible with a roller to the surface of the tile and a stroke is applied in one movement, and the quality of the break depends on its depth;
after cutting the line along its length, it is tapped with a glass cutter several times so that the tile starts a directional crack;
a nail or the glass cutter is placed exactly under the cut line, after which they are sharply pressed on both ends of the tile.
Similarly, instead of a glass cutter, you can use a sharpened drill or a sharp clerical knife.
How to cut uneven tiles
In order to make a figured cut, you can use an electric drill and diamond crowns of different diameters, with which you can also make holes for communications. Sometimes they do it differently - they draw the necessary curve on the glaze with a marker, and then scratch along the line with a sharpened drill. Uneven sections are broken off with transverse wire cutters (carbide clamp) or thin pliers, after which the edge is cleaned with coarse sandpaper.
In such simple ways, you can cut ceramic tiles at home. Successful work to all!
When laying the tile, it is necessary to cut it, adjusting the cladding to the geometry of the surface to be trimmed. There are several devices, different in design complexity and ease of use, with which ceramic tiles are cut.
Ways to cut tiles yourself
Sometimes home masters, pursuing various goals (saving money or testing their own capabilities), decide to tile this or that surface on their own. Having calculated the symmetry, having learned to guess the level and direction, the craftsman reaches the corner on the wall or the edge of the floor, and here the problem arises - how to cut ceramic tiles at home, when there are tools at hand and no more. Buy a special device, or do with the existing arsenal? Let's consider how to cut tiles.
cutting grinder
Probably every owner of a household or apartment has this power tool. The thing is indispensable in many situations - by changing the nozzles (circles), you can sharpen, cut, grind something. There will be no problems with cutting tiles. It does not matter what power tool, under what diameter of the working disk is designed. It is easier and more convenient to use a small angle grinder, but a powerful grinder with a large circle for linear cutting is quite suitable. It remains to choose the right replacement nozzle.
Ceramic tiles, including porcelain stoneware, so popular for flooring, are cut with discs according to:
- concrete;
- brick;
- ceramic tiles.
But a neat cut with a small number of chips will only be provided by a special circle for tiles, which is distinguished by a solid surface (without slots on the disc) with diamond coating on the working surface. It will cost a little more when buying, but a small overpayment is worth it. The tile disc will provide low vibration when cutting ceramics, therefore, a smooth cutting edge with minimal damage to the decorative coating.
If the cutting edge of the tile is hidden, and the quality of the cutting edge does not play a big role, a circle on concrete is quite applicable. Other nozzles (for wood or metal) cannot be used. This is not only ineffective, but also fraught with serious injuries. Also, you can not remove the protective cover from the angle grinder, which protects the master from small ceramic fragments formed when cutting tiles. It will not be superfluous to protect your eyes with a special screen or glasses that come with most angle grinders sold.
How to cut tiles at home with an angle grinder? Everything is simple.
- We mark the cut line (for glazed tiles or polished porcelain stoneware, use a permanent marker - a pencil on a sliding surface does not work).
- We lay the tiles on a flat base, inferior in hardness to ceramics (a board, a piece of drywall or OSB will do) “face up”.
- Lightly fix the tile so that it does not move when cutting.
- We cut through the front layer (done without pressure on the tool) on the side of the drawn line with an offset away from the desired fragment.
Then there are two ways. Cut the tile with a grinder to the full thickness, or break off an unnecessary fragment by laying the trimmed tile on the edge of a table, workbench or similar improvised item. In the first case, the cutting edge will be even throughout the entire thickness of the tile body, but there will be a lot of dust when cutting. The second method is practically dust-free, but you will have to additionally trim the “teeth” that form when the tile breaks. This is done with the same grinder or file (if you want to bring the quality of the cutting edge as close as possible to the factory one).
Cutting with a manual tile cutter
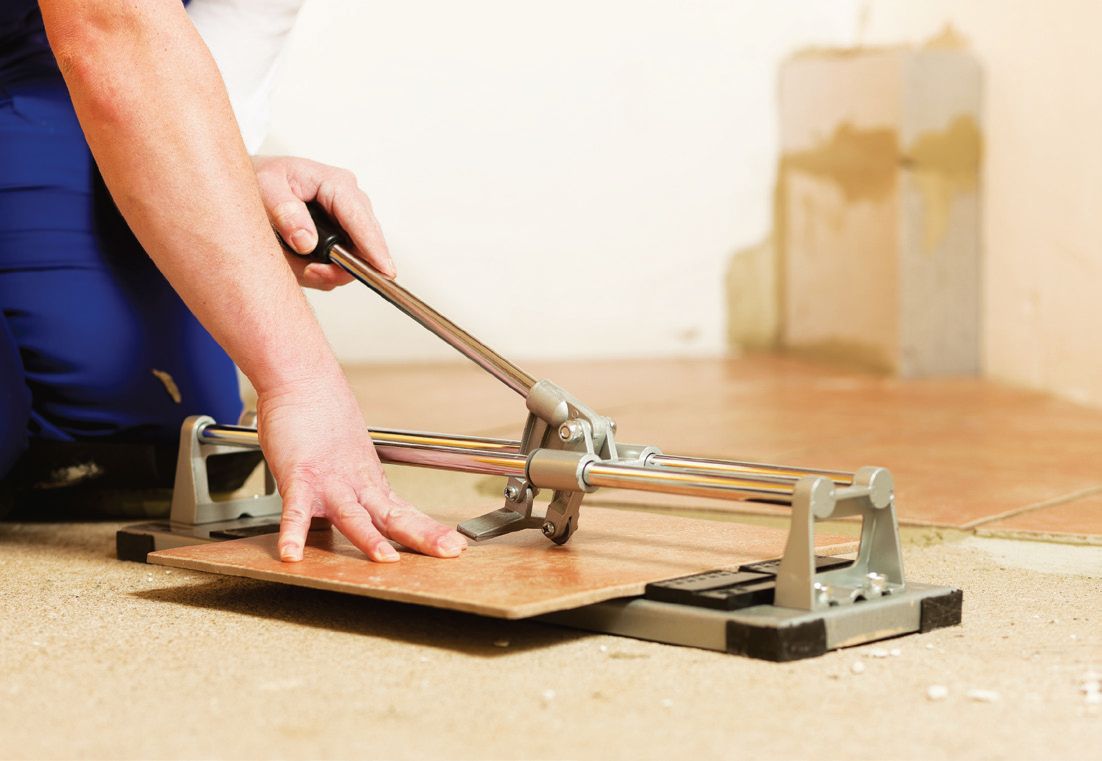
A bed with a cutting roller driven manually by a lever is a manual tile cutter. In addition to the listed parts, the fixture has a metal protruding strip, two guides along which a lever with a “knife” slides, and a double-sided “foot” that breaks two parts of the notched tile. The device is simple, but effective - a manual tile cutter will divide tiles up to 10 mm thick without problems. Chips are minimal, the accuracy of the cut depends on the quality of the tool.
Having purchased a tile cutter for $ 10, you should not hope for the ideal geometry of the cutting edge. Over time, as the tool wears out, the tool becomes worse, making the cutting edge further from the ideal. But such a device for cutting tiles is suitable for one-time work on a small amount of cladding with your own hands.
For long-term use, a manual tile cutter is purchased, the price of which exceeds $ 50. There are high-quality guides, minimal play of the cutting roller and decent operational durability. When working with tiles, the tool is effective, it can cope with floor tiles, but porcelain tiles are too tough for a tile cutter. The device will not overcome decorative tiles, frieze, having a structured front surface. Now about how to cut ceramic tiles with a manual tile cutter.
- We carry out the necessary measurements, draw a line on the front surface of the tile.
- We lay the tile on the bed of the tile cutter so that the line coincides with the metal ledge (there are additional indicative marks on the tool).
- Using the lever, with one movement of the cutting roller, we make a cut in the decorative layer of the tile.
- We break the tile by pressing a double-sided foot.
From the first time, not everyone succeeds in cutting tiles with a manual tile cutter. To adapt to the tool, it is better to "sacrifice" one facing element and practice on it, cutting it into several parts.
In the video, an experienced master tiler demonstrates how to cut tiles with a manual tile cutter, the possibilities of a device for cutting ceramics, and the rules for caring for a tool:
Tile cutter

This tool is suitable for straight line cutting of ceramic tiles if the volume of the cladding is small. With large-scale finishing work, more advanced devices are used. Tile tongs is an improved roller glass cutter, additionally equipped with a double-sided foot that breaks the notched tile (as in a manual tile cutter). In another way, this device can be called a primitive manual tile cutter, where there is no frame. Trim the excess with tongs in the following sequence:
- we draw an indicative line on the "face" of the tile;
- we compare the construction ruler with the marked segment;
- along the ruler with uniform pressure we draw with a roller, which is equipped with tongs;
- we put a tile with a glazed layer cut between the working levers of the tool so that the groove on the tile is between the legs of the tongs, with force, but smoothly, we close the handles
Advice. So that when the tile is broken with tongs, the edge comes out even, place the cutting groove strictly in the middle of the tool legs and perpendicular to them.
diamond glass cutter

The simplest cutting of ceramic tiles at home is done with a glass cutter. If there is no tool with a diamond working part, a roller glass cutter will do. Cutting a tile along a curved line with a diamond or a roller will not work, it will be tedious to work with such a tool with large volumes of cladding. But for slow laying in small areas, a glass cutter is quite suitable. The advantage of this tool is its affordability (2-3 dollars), - the purchase of a glass cutter will not shake even a modest family budget. If the question arose about how to cut ceramic tiles at no extra cost, a glass-cutting diamond is exactly that.
Cutting tiles with a glass cutter is easy. The process is similar to working with tile tongs, with the difference that the tile is broken at the edge of the table (as described in the section on cutting tiles with a grinder).
With a firm hand, a diamond glass cutter can be replaced with a conventional concrete drill for a drill or puncher with a victorious tip.
Hacksaw for metal

From this tool for cutting tiles, you only need a frame. The usual canvas is detached, instead of it a string with a diamond or victorious coating is attached, which is designed to cut off fragments of the tile. Cutting porcelain stoneware, especially floor tiles, in this way is long and painful, but ordinary ceramics can be cut without much difficulty. The advantage of a diamond string is the possibility of precise curvilinear cutting of tiles, although special tile files for electric jigsaws are now being produced for this purpose.
To cut the tile along the reference line, the tile is placed on the edge of the desktop and the ceramic is cut with a hacksaw like any other material. The process of removing an excess fragment is lengthy when compared with a manual tile cutter or grinder, but the cutting edge comes out much better, without chipping the glazed layer. A hacksaw with a string sprayed with victorious crumbs is often used by professionals when you need the most even cut, but there is no “wet” electric tile cutter at hand.
Electric tile cutter

The most professional tool for cutting ceramic tiles is an electric tile cutter. There are several types of such devices. The simplest mobile electric tile cutter is similar to an ordinary angle grinder with a modified shape, making it convenient to hold the tool with one hand (equipped with an ergonomic handle). Additional options for this device are a dust collector (or a sleeve for removing dust), water supply to the surface being cut. Mobile electric tile cutters can cut tiles, natural stone tiles, wall, floor and technical porcelain tiles into parts. But, nevertheless, the quality of the resulting straight cutting edge when using this tool is not comparable to the factory one.
To completely close the question of how to cut tiles, the purchase of a stationary electric tile cutter will help. The tool is equipped with a bed on which the ceramic tile that needs to be cut is placed. The cutting element is a steel abrasive wheel with a diamond coating, similar to those used in angle grinders. The cut is made from above or below (similar to a woodworking "circular"). A mandatory functional feature of such electric cutters is the supply of water to the cutting element. During the top cutting, the coolant is supplied to the cutting disc through the supply pipes. Tile cutters, like circular saws, are simpler - the water pan is under the bed, and the cutting wheel itself scoops up water from the tank when it rotates.