How to level the floor under the laminate with plywood? Plywood for laminate flooring is an ideal way to level the floor Leveling with a self-levelling mixture.
During the repair of wooden floors, situations often arise when it is much more rational not to restore the worn coating, but to put a laminate on it. There may be several reasons: the boards are too worn out, the floor has critical deflection values, there is a desire to make floors from the most modern materials.
Several types of materials can be used to level wooden floors.
| floor leveling material | Brief technical parameters and performance characteristics |
|---|---|
| Depending on the loads, the thickness can be up to 20 mm, it is characterized by increased bending strength. Due to the high strength indicators, the leveling of the wooden floor can be carried out in one layer. |
| Most often you need to use two layers, at a price slightly higher than the cost of OSB. Due to the two layers, the risks of deflection are eliminated, the laminate can be laid without a substrate. |
| The fastest leveling method, the final results meet the requirements for laminate flooring. The final coating is laid on special substrates, waterproofing is necessarily done. |


For floor coverings, only moisture-resistant OSB boards and plywood should be used.
- Determination of the condition of the wooden floor. The strength of old elements is checked, only healthy coatings can be leveled. If the lumber shows signs of rot, then they must be replaced.
- Measurement of height differences. To do this, you need to use a laser or water level, measurements are taken along the perimeter of the room and at several points in the middle. The choice of a specific alignment technology largely depends on the magnitude of the differences.
- Calculation of the quantity and selection of the nomenclature of building materials, preparation of special tools.
- Performance of work, checking the final quality of the wooden floor after leveling.

In the article we will consider three methods of leveling, each of them is advisable to use for different slope indicators.
Leveling the floor with a plaster screed
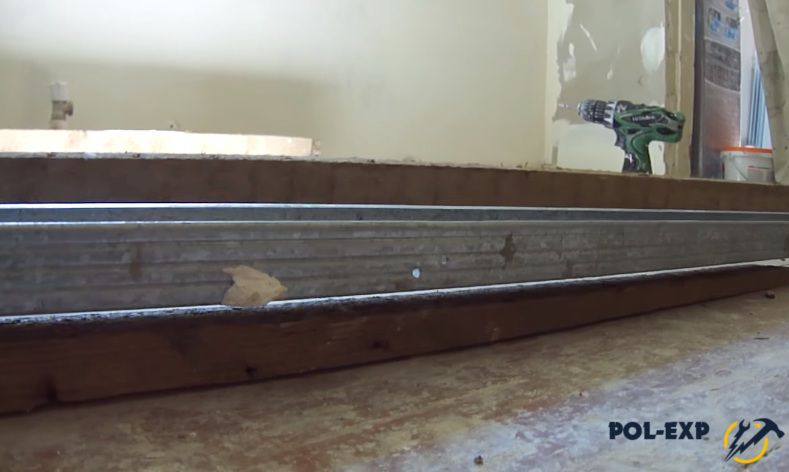
This method is suitable for floor curvature up to one centimeter, it is quick and easy to work with. In addition, after leveling, the sheet support area increases significantly, and this allows the use of thin material and only in one layer - saving time and money. For leveling, you must have OSB boards, gypsum putty and a drill with a metal emery wheel.

Irregularities on the floor were formed due to the use of wet boards. During drying, they warped, the maximum difference in height is up to a centimeter.

Step 1. Remove the protrusions with an emery wheel.

You do not need to completely align them, it is enough to remove the largest irregularities. Due to partial alignment, it will be possible to:
- increase the sheet support area. OSB has good strength indicators, but in places of point concentrations of loads along protruding lines, dents may appear over time. As a result, slight wobbles will appear, the laminate will begin to creak when walking. This is an extremely unpleasant phenomenon, it can be eliminated only after the complete dismantling of the laminate and re-fixing the OSB boards;
- reduce the amount of gypsum putty. Even if the magnitude of the height difference is reduced by a few millimeters, taking into account the area of the room, a significant decrease in the volume of material is obtained.
Practical advice. When sanding the joints of the boards, pay attention to the size of the gaps. Large ones need to be repaired, use any improvised materials for this.

Check the condition of the surface with a rule or a long level, once again remove the largest protrusions.
Step 2 Remove dust and construction debris from the floor, correct the plane if necessary. Make sure the sheets are in a horizontal plane.

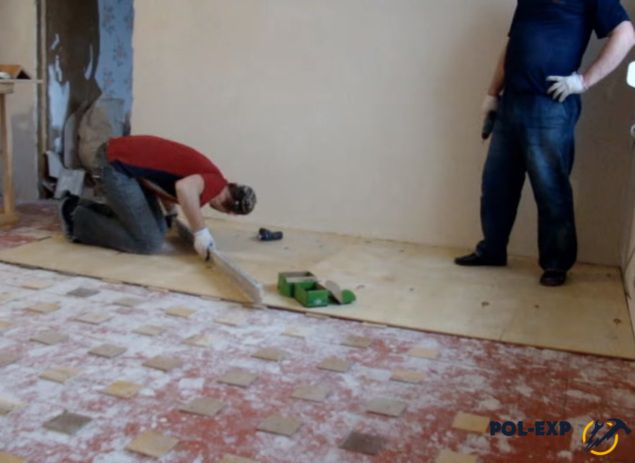
Step 3 First lay out the sheets on the floor, mark the location of each of them. Immediately cut out small pieces to completely cover the floor against the walls. The fact is that later you will not have time to fit each sheet, gypsum putty sets very quickly. In addition, it is impossible to walk on the sheets until the material has completely solidified.
Step 4 Prepare gypsum mortar. The brand does not matter, the material will be used in gentle conditions. To prepare gypsum, you need to have a special container and a mixer for a drill. Water is always poured into the container first, and only then dry gypsum is poured. The proportions of water are indicated by the manufacturer on the package, but you need more. The finished solution should resemble cream in consistency and spread freely over the floor.

Important. Keep in mind that you need to use the solution within 15-20 minutes, then it will begin to harden and become unsuitable for further use. Adding water to setting gypsum is useless. Cook as much as you can work out before setting begins. The volume depends not only on your productivity, but also on the size of the unevenness of the wooden floor.
To increase the strength and increase the setting time of gypsum, it is recommended to add cement to the mortar in a ratio of approximately 1:5.
Step 5 Pour the prepared mortar over a section of the floor, its area should correspond to the parameters of the OSB board. Try to spread the solution evenly over the entire area. The amount of material is determined empirically. First, pour out about half the mass, and then, as necessary, add.

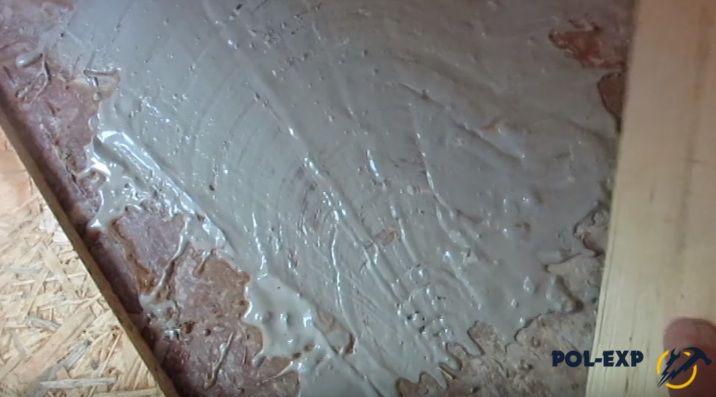
Step 6 Carefully lay the first slab on the prepared floor, it will squeeze out the excess gypsum. Over time, you will gain experience, the plate will not squeeze out any excess, this will speed up the work and reduce material consumption.
Step 7 Prepare for laying the second sheet. To facilitate the work, you need to do this in the following sequence:
- Lay the sheet on the floor and slowly move it until it stops with the first one already set on the plaster.
- Carefully lift the slab at one end and place a support. The height of the support must provide access to the entire area of the leveled floor under the sheet.
- Pour the solution under the OSB plate with a ladle, constantly control its amount.
- Remove the support and slowly lower the slab to the floor. Correct its position, for better removal of excess solution, tap a little on the surface.
This technology allows you to level the floor without the involvement of assistants. Moreover, the speed and quality of work do not suffer.
Step 8 After the solution has completely hardened, proceed to screw the OSB sheets to the wooden floor with self-tapping screws. The distance between them is about 30 cm, hardware can be fixed anywhere. There is no need to look for the points of support of the plate on the wooden boards, this greatly speeds up the fastening process.

If all the work is done correctly, then the flatness indicators of the slab will fully satisfy the requirements for laminate floors. The advantages of the method are speed, low cost, reliability and excellent quality.

Floor leveling with underlays
The method is used when the slope of the wooden floor is up to 2-3 cm, it takes more time and effort. Often, experienced builders advise laying not one layer of a thick slab, but two of thin ones. It must be remembered that the bending resistance of one plate 2 cm thick is much less than two one centimeter each. This dependence is described by the formulas of the resistance of materials, you do not need to know them. The main thing is to always remember such a physical feature.
For example, we will describe the technology of leveling the floor with two layers of plywood slabs 8 mm and 10 mm thick using underlays. As a result, the coating will be not only even, but also very durable, no deformations will appear during operation. Before starting work, you need to find the highest point, and, taking into account its location, determine the difference in height.


Step 1. On the wall, mark the location of the substrates. It is recommended to install them in such a way that the second layer of plywood along the edges is located above the substrates. For a sheet of dimensions 1.5 × 1.5 m, the step for the substrates is 25 cm. You need to start work from the very top corner of the room. Make marks on the wall under the ruler.
Step 2 Calculate the approximate amount and prepare the substrates. The dimensions of each are approximately 10 × 10 cm. Any materials of various thicknesses can be used: pieces of plywood, OSB, chipboard, fiberboard, laminate, boards, etc. The wider the choice in thickness, the easier it will be to select the necessary kits. For approximate control, you can pre-count the number of substrates, but this is not necessary. Firstly, you will have to put several pieces in one place. Secondly, you will never know exactly how many and how thick substrates may be needed.


Step 3 According to the marks made on the wall, draw lines on the floor. You can do this with a long metal profile and a pencil or with a special blued chopping rope. The second option is much faster.

Step 4 By level, install two substrates at the extreme walls and one or more in the middle. The distance between them should not exceed the length of the rule; it controls the position of all intermediate substrates.
Practical advice. If the floors are too raised in a small area, then it is much more profitable to lay one layer of plywood in this place, rather than raising the entire plane. Cut the first layer of plywood around this place, and mount the second immediately on stands of the appropriate height. They are set according to the level of the first layer of plywood; to increase stability, it is recommended to reduce the distance between the linings. This can only be done if the dimensions of the very uneven part of the floor are insignificant.
Step 5 Fasten the elements along the drawn lines, constantly check the correct position, do not allow the substrates to be horizontal. They are fastened with screws, to facilitate screwing in, you can pre-drill holes, the diameter of which depends on the size of the screws.


Step 6 After all the substrates are fixed, lay the first sheet of plywood on them, check its stability. It shouldn't wobble or bend. Everything is fine - lay the rest of the sheets, do not forget to leave a gap of about 2 mm between them, to control the distances, you can use pieces of fiberboard of the appropriate thickness.

Step 7 According to the marks made on the wall, draw lines on the plywood, they indicate the center of the substrates.

Practical advice. If there is no desire to draw many lines over the entire area of the sheets, then they should be fixed in turn, and the placement of the substrates should be determined by eye. The elements are of sufficient size so that the self-tapping screw does not miss. If, nevertheless, any of them did not hit the substrate, then there are no big problems. The task of the self-tapping screw is to pull the plywood sheet to the stop, but it is necessary that it reaches the wooden floor in length. If you doubt reliability - unscrew the screw and fix it again, taking into account the offset.
Step 8 Lay the first sheet of the second layer of plywood exactly at the intersection of the lines on the first layer. This will ensure that everyone else is in the correct position.
Important. Make sure that the veneer fibers on the sheets of the second layer are perpendicular to the first. This cross arrangement method significantly increases the bending strength.
Step 9 Lay out all the sheets, check the position, start fastening with screws along the cells drawn with a pencil.


If all operations are performed carefully and responsibly, then the structure will turn out to be even and rigid, no additional measures will have to be performed before laying the laminate. As practice shows, two people can level the floor of a medium-sized room in two days. This is much longer than in the first described case, but the curvature of the floor was also much greater.

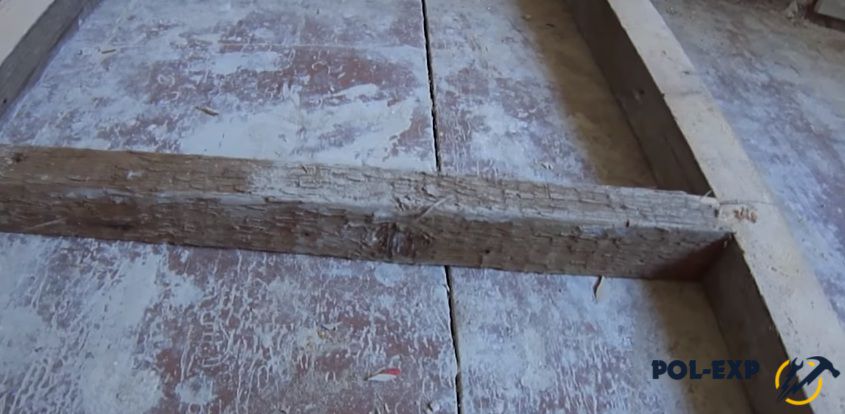
Leveling the floor with wedge-shaped logs
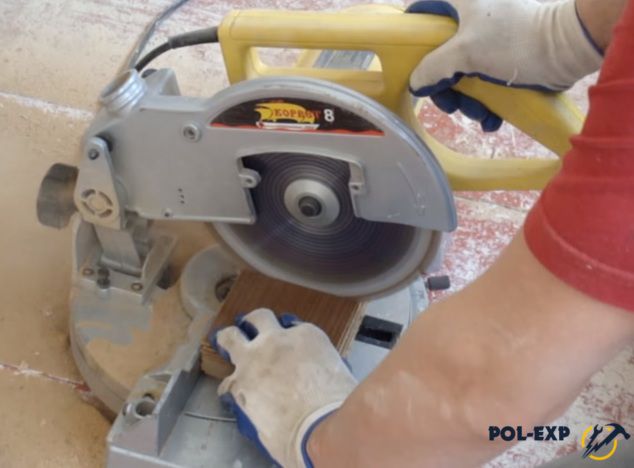
The most difficult option for leveling wooden floors is used with a slope of 5–7 cm. To perform the work, you will need not only plates, but also slats several millimeters thick exceeding the maximum height difference. Another condition is that you must have an accurate circular saw with a support platform adjustable at various angles, you need to cut precise wedges on it.

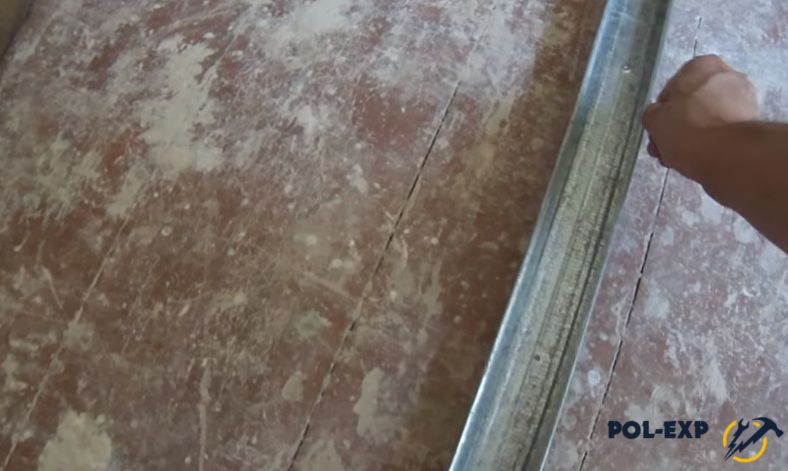
Before starting work, as always, you should carefully examine the surface of the old wooden coating. Place a long straight rail or metal profile on the base, put a level on top, raise the rail until the bubble is on the horizontal mark. The gap between the floor and the second end of the metal profile indicates the slope.

Important. Large slopes on the floor often appear due to rotting logs or linings under them. Check their actual standing, never level unsuitable structures, this is a waste of time and significant financial resources. Logs or boards are rotten - make a new floor.
Step 1. Attach a metal profile to two opposite walls of the room. You can fix it with dowels or self-tapping screws, depending on the material for making the walls of the house or interior partitions. Choose a wide profile, otherwise it will sag under its own weight, which can distort measurements during the manufacture of the log. Using an ordinary bubble level, check the position of the profiles.

Step 2 Prepare a third profile, its length should be equal to the width of the room. This element will be inserted into the fixed profiles and serve as a template for measuring the slope of the wedge-shaped logs under the plywood sheets.
Step 3 Make marks on the wall depending on the length of the sheet. Install a perpendicular floating metal profile over them. Its edges should be located exactly along the end of the sheet. Draw a line on the floor, a lag should be located on it.
Step 4 Slightly move the profile to the side and place the log blank on the drawn lines. It can be not only a new bar, but also any used lumber that is suitable in size and quality.

Beam - lag
Step 5 Move a movable metal profile towards it and draw a line along the lower edge on the log. Do it as carefully as possible, do not rush. The horizontal position of the plywood sheets depends on how accurately the line is drawn.
Remove the workpiece and cut the log at the desired angle on a circular saw.

Step 6 Lay the log on its side, draw a line parallel to the base at the bottom. The width of the mark should be equal to the thickness of the sheet plywood.

Step 7 Saw off the log on the wedge, place it under the guide and check the correct dimensions. Correct the errors if necessary.
Important. When working on a circular saw, strictly follow the safety requirements. Remember that it is this machine that causes very serious injuries.
Step 8 All the remaining logs are made using the same technology, the distance between them depends on the thickness of the plywood. For a material of 10 mm, the distance should be within 50–60 cm. Measure each workpiece separately, after sawing, check the accuracy and put it in its place. Remember that the slope of the floor may vary slightly along the length and width of the room, you should level the plane very carefully.
It is desirable that the extreme lags are somewhat wider than usual. The fact is that the edges of two sheets of plywood will be fixed to them, and the screws should be located at a distance of at least two centimeters from the end. If the lag is very narrow, then a problem will arise when screwing in the hardware.

Step 9 Install all the lags in the right place, check their horizontal level and flatness. Minor deviations can be eliminated by using substrates of various thicknesses. If the deviations are large, then it is much better to make a new wedge-shaped log. In this case, past mistakes should be taken into account.
Practical advice. If there are doubts about the professionalism of work on the machines, then it is recommended to cut off the log a little narrower than necessary, and then substitute the lining to level it. Too high a workpiece will have to be hewn with an ax, removed with a planer or redone again, this is long and difficult.
To control the distance between the lags, you can make a template out of cutting the board - the alignment process will be much faster, while excellent quality is guaranteed.
Step 10. If there are doubts about strength, then put slats between the lags, their height must be adjusted to the size of the lag. The distance between them is selected taking into account the strength of the plates. Checking the score is easy. Put the plywood on the logs and walk on it. There are the slightest signs of deflection - you need to install support rails. They are adjusted individually, depending on the size, the excess is cut off with a saw, removed with a plane or an ax. Reiki are screwed to the lags at the end with long self-tapping screws. To prevent chipping, it is recommended to pre-drill holes.

Step 11 Dismantle the metal profiles installed on the walls, once again check the position of the wedge-shaped logs and the jumpers between them. Use a long bubble level. Pay attention not only to the horizontal lag, but also to the presence of a gap between them.
Practical advice. When leveling wooden floors in old houses, be sure to treat all lumber with antiseptics. The fact is that earlier there were no such requirements, and over a long period of operation, with a high degree of probability, pests started up in the structures. It is necessary to process not only new logs and jumpers between them, but also a wooden floor. If there are gaps in it, try to ensure that the antiseptic soaks the ends of the floorboards well.
Step 12 Take turns nailing or screwing with self-tapping screws, periodically check their position. For minor errors in the location of the lag, screw the screws along the edges of the sheets at an angle. If the lag is completely incorrectly nailed, then an additional one will have to be installed next to it. It should be exactly the same size.

Always tighten self-tapping screws in with a strong clamping force. When this is not done, they can slightly raise the plane of the sheet, this happens during a slight rotation of the hardware in plywood until it enters the log. As soon as you feel that the plate has twitched a little, unscrew the screw and screw it in again with increased pressing force.


Prices for laminate "Tarkett"
tarkett laminate
Video - Leveling the floor under the laminate with OSB boards
Starting a major overhaul or just deciding to change the old flooring, you will have to take the preparatory work seriously. If you are going to lay linoleum or laminate, the subfloor must be perfectly flat. However, concrete screed is not always the best option. If you value your time, you can level the floor with plywood. This method has some advantages.
The presented material has the following advantages:
- The sheets are natural, so they do not emit toxic substances and, accordingly, are considered environmentally friendly.
- Plywood bends wonderfully, while cracks do not appear on it.
- The material is characterized by equally good strength in all directions. Therefore, the floor after leveling can withstand heavy loads.
- Good hardness of the material allows you to create a perfectly flat surface to mount a laminate or linoleum.
- Leveling the floor with plywood is done quickly, as the sheets are large. With one plate, you can close a significant section of the base.
- Plywood is well transported.
- The material does not emit foreign odors.
- The small mass of the product makes it possible to reduce the load on the floor slabs.
As you can see, plywood is ideal for leveling the base. It will allow you to mount a laminate or linoleum quickly, which will significantly reduce the repair time.
How to correctly determine the height of the level differences?
This procedure must be performed to determine the zero level of the base. It is best to use a laser level for this purpose. However, if it is not there, then you can use the usual building level.
To begin with, in the center of the walls at the same height, mark the points that you connect with one line. So you define the "horizon line". On it you will determine the zero level. After that, the smallest and largest deviation in the horizontal level is determined on the basis. Video:
Naturally, the subfloor must be prepared for. If the boards have already been laid on the base, and they are in good condition, then you can leave everything as it is. Damaged and rotten elements must be removed. If necessary, it is necessary to eliminate the squeaks of the floorboards, it is better to fix the fasteners, check the heating systems (if any).
What tools are needed for the job?
To level the floor with plywood, it is necessary to assemble all those devices, without which the work cannot be carried out:
- Electric jigsaw with the appropriate blade. It is useful for cutting plywood, as well as laminate.
- Tape measure and pencil for marking.
- Building level
- Screwdriver.
- Self-tapping screws.
Which alignment method to choose?
Leveling a wooden floor with plywood can be done in several ways. However, the quality of the future foundation also depends on the correct choice. You can define alignment like this:
- If the vertical difference does not exceed 2 mm per 1 m2, then the subfloor can not be leveled, even if you lay.
- With correctly laid floorboards and a uniform level difference, the height of which is not more than 5 mm, plywood can be fastened directly to the boards. This does not require additional elements. Please note that correct installation is the alternation of floorboards, which is carried out in accordance with the requirements of the standard.
- Height differences that are in the range of 1-8 cm can be eliminated with plywood mounted on tape or point supports. That is, you will have to build a special crate or attach the material to the laid logs. In the first case, a wooden beam is used. Please note that all wood materials must be pre-treated with a special antiseptic impregnation.
With large level differences, you will have to completely remove the floor covering. If it was fixed on the logs, then they should be carefully examined. When choosing a leveling method, it is also necessary to take into account how much the procedure will reduce the height of the ceilings.
Features of mounting plywood without lag

Before using the presented material, it must be left in the repaired room for several days. Plywood must "get used" to the conditions in which it will be used. In this case, it is not necessary to lay the support beam. Instead, evenly protruding tubercles of the floorboards can be used.
In addition to plywood, this leveling method involves the use of either GVL. You should also decide on the thickness of the sheets. For example, if the differences are small, and the width of the boards on the base is 20 cm, then it is necessary to take plywood, the thickness of which will vary between 8-10 mm. In other cases, plates with a thickness of 1.8-2 cm may be needed.
The laying of the material is done as follows:
- Install the bosses around the entire perimeter of the room, observing a small indent from the walls (2 cm).
- Plywood should be mounted with a gap between the sheets so that it does not bulge when expanding and contracting. A distance of 3-5 mm is enough. Please note that the sheets must be laid according to the principle of brickwork. The joints do not have to match.
- Now you can fix the material on the "ridges" of the base. Please note that the holes for the screws must be drilled in advance. This will make it possible to drown the fasteners. In addition, a metal corner can be used during screwing.
If the plywood sheets have a rough surface on one side, then the non-sanded side should look up. This will improve adhesion with the adhesive composition, on which the linoleum may be laid.
Features of leveling the base using a tape support

Here you can’t do without crates or lags. If you will fasten, then the supports should be located at a distance of 3 cm from the walls. The step between them is 40-50 cm. The laying technology is as follows:
- Sample sheets. This is done without fastening. You just need to lay out the sheets on the supports, taking into account all the necessary gaps. If necessary, plywood should be cut. It is also advisable to number the sheets.
- Now you should install logs against the walls. If raising the level is highly undesirable, then second-rate boards can be used instead of timber.
- Installation of crossbars. They should be attached to the lags with self-tapping screws. In this case, the use of metal corners is desirable.
- Setting the vertical level of the resulting structure. If the height of the lag in some places is not enough, you can raise them with sand or roofing material.
- Final fixation of support bars, plywood flooring.
Please note that the space between the lags can be filled with insulation: expanded clay, mineral wool.
Features of alignment in other ways
Leveling a wooden floor with plywood can also be done with the help of small logs or pillars. In the first case, the difference in the vertical level should not exceed 8 cm. To create a single system of supports, short bars and slats are used. However, this method is very complicated, since it requires a lot of work to calculate the structure. It should be as accurate as possible, because you will install each support separately. If you want to lay linoleum in a large room, then it is better to abandon this leveling method.
For arranging the crate, cobs from an ordinary wooden board, slats and plywood () are suitable. As a result, you should get a kind of wooden grid, the size of the squares in which will be 30x30 cm.
Please note that when using any of these leveling methods, one must not forget about underground ventilation. Otherwise, the wooden elements may begin to rot. After the base is ready, you can begin to mount the linoleum or other coating.
0
In a wooden house, a bathhouse, multi-storey microdistricts, a flat surface is necessary for laying floor coverings. If the base is a wooden floor, then plywood spreads on them. Leveling a wooden covering with plywood is the topic of our conversation about finishing materials. In it, we will share the experience of laying it on wooden floors.
Leveling a wooden floor under plywood
First you need to determine the condition of the wooden floors, whether there are large differences in height between the boards.
If the floors creak, then you need to pour graphite powder with talc into the cracks or hammer wooden wedges into them.
If this does not help, then fix the defective boards with self-tapping screws or dowels with screws.
If you cannot even out significant differences in heights with your own hands, then you need to disassemble the rotten structure, replacing the destroyed boards with freshly planed ones.
Do-it-yourself leveling of a wooden floor with plywood
First of all, we lay out plywood sheets on a wooden base in a checkerboard pattern to try on and determine the lag guides. Let's circle these lines.
We already have an outline of the location of the horizontal bars.
Number the plywood sheets and the floor so as not to be confused during installation.
 Logs are square bars with a long side of 40-60 cm. Instead of bars, you can use boards or sheets of plywood cut into strips.
Transverse strips are attached to the lags in approximately 40-50 cm increments. Metal corners make the connection of the longitudinal and transverse strips strong and reliable.
Using a level gauge, we align the lattice base. To keep the logs on the same level, we put wooden gaskets under them. And then, using metal corners and self-tapping screws, we attach the logs to the plank floor. You can also use dowels as fasteners, 3 times the thickness of the lag.
 Between the lags, we fill the free surface with sand or a home-made mixture consisting of sawdust and PVA glue.
We lay it out in two layers and leave it to harden the leveling compound.
If the logs are low or in the form of slats, then we use roofing felt or roofing felt. Only after that we begin to fix the plywood.
Installation of plywood on mini-lags
 Another method of leveling the floor with plywood in a wooden house is to use a mini-lag.
This method is very accurate. It is carried out only by masters of their craft and engineers. The slightest inaccuracy in the calculations will make the design unreliable. Each element of the building is calculated separately using special devices.
Mini-lags (slats) are laid along and across in the form of a lattice. This method is used with a large slope of the floors and significant height differences, up to 8 cm. First, sheets of plywood are laid out for fitting to make markings. The thickness of the supports, the angle of inclination is calculated using formulas and programs.
Installation of plywood on the crate of point supports
The fourth way of laying plywood sheets is the lathing of point supports. Cobs are cut from boards or plywood and stacked in a grid. The step between them is much smaller than with strip supports. This method is less accurate than using lag.
Leveling a wooden covering with plywood under linoleum
Linoleum is a capricious coating, all the roughness and irregularities, debris will be visible on it. Over time, due to its elasticity, it will take the form of a base, enveloping the protrusions and recesses. Therefore, a perfectly flat surface is required for linoleum flooring.
 Getting the wood flooring ready. Best to spend wood floor scraping.
To protect yourself from dust, you need to wear a respirator, from noise, headphones.
You need to work with a cycler, starting from the corner of the room, moving like a snake to the other end of the room. Corners are processed manually.
 Putty is needed for the treatment of cracks and cracks in the wooden floor. When the mixture dries, the sanding should be repeated.
Collect dust after the process with a vacuum cleaner.
The wooden coating is treated with antiseptic agents. The top is varnished.
You can also cycle floors with a planer. But this is a more complex process. Floor scraping is carried out if the height differences are insignificant. In this case, plywood is not needed. It is also not needed when leveling a wooden floor with dry mixes, which is applied to a polished floor.
If the floors are sloping, plywood boards are needed.
 We take self-tapping screws and screw them into the wooden floor at a distance of 20-30 cm from each other. These are our lighthouses, on which logs and plywood sheets will be placed. The caps of the screws must be at the same level.
We cut plywood sheets into squares with a side of 60 cm. It is very important to check the sheets so that there are no cracks or chips.
We lay out beams of plywood 3-4 cm wide. These are logs. They serve as a support for plywood shields. If there is a gap between the lags and the floor, then you can put a thin piece of plywood. Attach the logs to the floor with wood glue or self-tapping screws. Expanded clay can be poured between the lags. It will be a kind of insulation for the floors.
 We begin the installation of plywood sheets. We lay out the plywood in a checkerboard pattern with an offset. We strengthen with screws inserted into the dowels. To keep the coating neat, it would be a good idea to drill holes for the dowels before laying the plywood boards.
When laying plywood, the screws are simply screwed into the dowels. Plywood sheets are fixed on the logs. It is very important to step back from the wall by 2 cm and leave a gap between the plywood panels. Then close the seams with putty or mastic. When laying plywood, you need to remember that only three edges of plywood sheets can converge at one point, no more. After leveling the floor with plywood, you need to sand the floor and varnish it. You can also lay a substrate, and linoleum on top.
Leveling wood flooring with plywood for laminate flooring
Leveling a wooden floor with plywood under a laminate is almost the same as under linoleum.
First you need to remove the wooden baseboards with a nail puller. Tidy up the room, sweep, mop the floors. We make 2-3 holes in the floor in different places in the room to determine the height of the base of the screw. We make beacons in the form of self-tapping screws. The thicker the plywood, the greater the distance between them. The height of the lag is 30-50 mm. We fasten the plywood with self-tapping screws to the logs.
 Often, experts advise leveling a wooden floor with two sheets of plywood. The main thing is that the seams do not match, but fit with an offset.
We told you how to level a wooden coating with plywood. Whether you call the experts or do your own flooring, it's up to you. The main thing is that you do it correctly and accurately.
How to level a wooden floor under a laminate and, preferably, with your own hands? Our article will be especially useful for beginners in the repair business - you will learn about the easiest alignment option using plywood sheets.
If you decide to install laminate flooring, you must remember that it requires a very even base. And all because the crooked base can lead to breakage of the interlocks of the coating, which will cause cracks in the laminate. Many novice repairers who decide to do the work themselves, lay the laminate on a wooden floor without any substrate and make a very big mistake!
Laying laminate on wood without underlay
Wood is a living material that can dry out or bend under the influence of various temperatures. Therefore, the first step in leveling a laminate flooring is to inspect the floor, identify irregularities and check the level of curvature. It is imperative to replace the floorboards damaged by the fungus, and wedged the loose boards and put them on. If any knots stick out, they should be cut off to get a flat base.
Only after all the manipulations have been carried out, it is possible to measure the curvature of the floor using one of the following tools:
- Bubble level, considered the simplest tool. Its advantages include high strength, the ability to choose the appropriate tool length for a specific process, and ease of use. In addition, the bubble level is suitable for both professional builders and beginners. But among the minuses, it can be noted that it is not entirely accurate when working on large areas, so when doing a large-scale project, you better stock up on several tools of different lengths.
- Rotary laser level. Its main advantage is the ability to measure 360 degrees in three different planes. Thanks to this, you will be able to carry out all work with high accuracy of readings. Another plus is the measurement range, which reaches about 1 km for professional models. And for the convenience of performing work, the tool has a small weight. True, there is a minus, and a very important one - a rather high cost.
It should be noted right away that the installation of plywood is considered the simplest and at the same time reliable, since it ideally protects the laminate from dampness and cracking. It is very important to choose the right type of plywood:
- The best variety, of course, can be called the first one, it is the strongest and most reliable, without cracks and drops. But such material is quite expensive.
- The second grade of plywood is cheaper, but it is considered quite optimal for leveling the floor, however, in some cases, glue may appear on it, inserts and small scratches may be noticeable - a maximum of 5% of the entire surface of the canvas.
- The third grade is much worse in quality, since scratches and dents can be noticeable on it.
- The worst is plywood of the fourth grade, on which you can see a lot of defects, which is why you should not use it for leveling.

Installation of plywood under the laminate
Some properties of the material and its characteristics depend on the adhesive composition. Plywood is divided into 3 types: FK, FSB, FBF. The first version of plywood is made using carbamide glue, which makes the material moisture resistant. PSF is made using phenol-formaldehyde glue, due to which the material is also considered moisture resistant and very durable (it is used for industrial purposes).
FBA sheets are considered non-moisture resistant, since they are produced using casein glue, but they are more environmentally friendly.
How to level wooden floors under a laminate? Your first step is to prepare the plywood for laying. To ensure that nothing happens to the material, it is necessary that the moisture content in the sheets be the same as the humidity level in the room where the repair is being carried out. To achieve this, dampen both sides of the plywood with water and leave it indoors for a few days. After that, carefully inspect the plywood so that there are no bundles on the ends - if you see them, replace the sheets.

Leveling wooden floors with plywood
Stick to the following instructions:
- We install beacons, which can be taken as self-tapping screws. Just screw them all over the floor at the right height. They are installed at a distance of at least 35 cm between each other, while the thicker the sheets, the less frequently you can install fasteners.
- We proceed to the installation of the lag. In our case, their role will be played by strips of plywood about 3-5 cm thick. We attach them either with wood glue or self-tapping screws. If you find small gaps between the surface of the old floor and the joists, cover them with small pieces of plywood, smeared with glue. Clean the entire surface of dust.
- We put plywood on the logs only after the glue has dried - this can take up to two days. When installing with your own hands, make sure that the joining of the sheets takes place exclusively on the logs. Then we fix the plywood with self-tapping screws. And so that after completing the work, the caps of the fasteners do not protrude above the floor, make holes in them for self-tapping screws in advance and countersink them.
In conclusion, we put a substrate on the plywood sheets, after which you can proceed to - you can also do the work yourself, without resorting to the help of specialists.
Laminate is a fairly popular flooring. But a prerequisite for its installation is a flat floor. That is why it is leveled with plywood or other methods.
Before starting the installation of the laminate, you need to take care of the perfect evenness of the floors. The leveling process depends on the initial condition of the floor covering. If you treat this procedure with disdain, then the laminate will quickly become unusable, begin to crack, lose its attractive appearance.

In places of irregularities, the finish coating will crack and change shape. If there are elevations, the laminate will begin to swell. If the base is loosened, then the coating itself will begin to diverge. That is why it is necessary to take all necessary measures to level the floor.
If the presence of irregularities is a couple of millimeters, then it is not necessary to level the coating. It is enough to apply a thick substrate.
Laminate is quite popular among floor coverings. It is made of wood and covered with a protective layer on top, which prevents mechanical and chemical influences. It is widely used in both residential buildings and office buildings.
Benefits of laminate:
- Attractive appearance;
- Acceptable price;
- Easy installation;
- Quality.
Do-it-yourself alignment of the wooden base is real. At the same time, the pricing policy of the issue is acceptable. You don’t need a lot of tools for the procedure, only desire.
How to level an old wooden floor under a laminate: methods and techniques
The alignment procedure has several methods. Each has its own advantages and disadvantages. To determine the best option for your case, you need to familiarize yourself with each of them.
Floor leveling methods:
- Manual or mechanical scraping;
- Use of plywood from OSB, chipboard or fiberboard;
- Self-leveling compounds;
- Putty from shavings and PVA glue;
- The use of lags;
- Concrete screed.
Scraping involves the use of special grinding machines. This technique will take a sufficient amount of time and effort. You will have to deepen all the nails and screws so that their caps do not peek out. If this is not done, then the breakdown of the unit is inevitable.

If the floor has some differences, then leveling with plywood is suitable. This is a simple and effective way. Plywood raises the floor by only a couple of centimeters, which is very convenient in case of a room with a low ceiling.
For the best effect, you need to use two layers: the first of fiberboard, the second - plywood. In this case, the joints should not coincide.
For small irregularities, self-leveling compounds can be used. Before leveling, it is necessary to carry out preparatory work: replace damaged boards, putty cracks, fix loose boards, prime the floor and take care of waterproofing. You can use an additional reinforced polyethylene mesh, which should be laid on a small layer of the mixture. It is used if the self-leveling floor in height should exceed 1 cm.
Leveling with putty is the cheapest way. Preparatory work with this method includes fixing the guide bars. The interval between them should be 50-60 cm. The mixture should be applied to a clean floor treated with degreasing agents. After drying, you need to fix the plywood on top.
When the old floor has completely fallen into disrepair, it is better to use a mount on the logs. To do this, get rid of the old boards. Expanded clay is poured between the lags, then a layer of polystyrene or GVL goes and everything is covered with plywood.
Concrete screed is often used when leveling the floor. The disadvantage of this procedure is the large weight of concrete. That is why the rough wooden floor must still be strong enough to withstand the desired load.
Leveling a wooden floor: how to determine the presence of irregularities
In order to properly level the floor and ensure the durability of the floor covering, the necessary measures must be taken. This can be done in several ways. But before such a procedure, it is necessary to examine the quality of the wooden base.

Parameters for evaluating the quality of the floor:
- The presence of insects and rot. It is necessary to carefully examine the wooden coating on both sides. In the absence of traces of harmful influence, the floor does not need to be changed.
- Flatness of the floor. For this, a laser level or a visual assessment can be used. If you have the skills, you can resort to the help of the building level.
- The presence of bumps and bumps. To do this, pull two ropes and monitor the contact of the thread with the floor.
Before the procedure for determining irregularities, it is necessary to free the floor from any objects. This will help to more accurately determine the presence of defects in the flooring. You can use any of the methods to check the evenness of the floors. You can also use the mounting level or hydraulic level.
Degrees of roughness:
- Small - 5-20 mm;
- Medium - 20-60 mm;
- Large - from 60 mm.
After determining the irregularities, you can choose the leveling method. The most optimal is the laying of plywood. This is a simple option that everyone can do on their own.
The sequence of leveling the floor with plywood under the laminate
This technique does not take much effort and does not require special skills. We level the floor ourselves with our own hands. To do this, you only need a desire and a set of necessary devices and materials.
Plywood floor leveling tools:
- Middle hammer;
- Perforator;
- Screwdriver;
- Roulette;
- Level.

Fixing plywood is the most effective way to level the floor. It can be used when the base is completely unusable or has severe irregularities. But at the same time, all power components must be strong enough.
The sequence of work on leveling the floor with plywood:
- First you need to fix the lags. To do this, you need to determine the zero point to which the plywood will be attached. This point starts from the highest point of the old floor. To it you need to add the thickness of the planks themselves (lags). Next, you need to make notes around the entire perimeter of the room, indicating the height of the new floor.
- Then you need to make a stretch with a construction thread. All over the floor you need to fix the screws at the level of the cord. This will serve as a guide for future work.
- At the pointer level, you need to set lags. The interval between the centers of the planks should be no more than 60 cm. If the lag does not reach the floor, then you need to make a lining.
- After the evenness of the planks is determined using a level, you need to start fixing the plywood. The material is attached to self-tapping screws when the cap is deepened by 2-3 mm.
- After that, you need to check the evenness of the floor again.
Plywood joints should match the joists. They should not be in the air and create a gap. Otherwise, such a coating will not last long.
After leveling, you should take care of ventilation. This will increase the life of the floor. To do this, it is enough to make small holes in opposite sides of the room.
Tips: how to level a wooden floor under a laminate (video)
The process of leveling the floor when using plywood is not difficult. You need to prepare in advance and study all the nuances and features of using plywood. It is also advisable to have the necessary tools on hand.