Hydrated lime is used for whitewashing walls. Whitewashing Exterior Walls - We Bet You Didn't Know Much
Lime for whitewashing a house has been used for a long time and is one of the cheapest materials for decorating the walls of buildings. And not only at home. Lime can whiten the surface of the walls of the cellar, shed, stove, chicken coop. In addition, everyone knows that garden trees are whitewashed with slaked lime in order to protect them from temperature conditions and insect invasion. But despite the simplicity and cheapness of the material (lime), you need to know some of the nuances when using it.
Content
- Extinguishing lime.
- Surface whitewashing.
- Advantages and disadvantages.
lime slaking
Three types of lime can be purchased in stores and warehouses: slaked, unslaked and soda lime (a mixture of slaked and unslaked lime). But for whitewashing walls, it is best to use slaked lime.
Why? Because the so-called “milk of lime” is used for finishing work, which is obtained as a result of extinguishing unslaked lime. How to properly and safely carry out the quenching process itself, we will consider below:
- After acquiring lime (not slaked), it is necessary to break up too large lumps, but not to the powder stage.
- Place all this in a metal container (galvanized bucket).
- Pour into a container of clean cold water. After contact with water, the lime will begin to boil and splash, so you need to close the bucket and move away.

- After 20 minutes, you will need to mix the composition. At the same time, protect all bare parts of the body, wear goggles and rubber gloves. If, nevertheless, drops of the solution fall on the body, you need to quickly rinse this place with water.
- Complete dissolution of lime occurs after six hours.
- After that, the prepared solution is filtered through gauze (it is possible through a nylon stocking).

- The result is lime milk ready for use.
Some whitewash masters add salt and drying oil to the solution to increase strength and so that subsequently the walls do not get dirty. The proportion is as follows: for 10 liters of solution, 100 g of drying oil and the same amount of salt are mixed. It happens that the solution turned out to be too thick and in order to fix this, you need to add water to the desired viscosity. In addition, you can add a little blue, which will give lime for whitewashing the house a snow-white tint.
As you can see, quenching lime is not very difficult. However, at the same time, it is necessary not to neglect personal protective equipment so as not to burn your skin and eyes.
Surface whitewashing
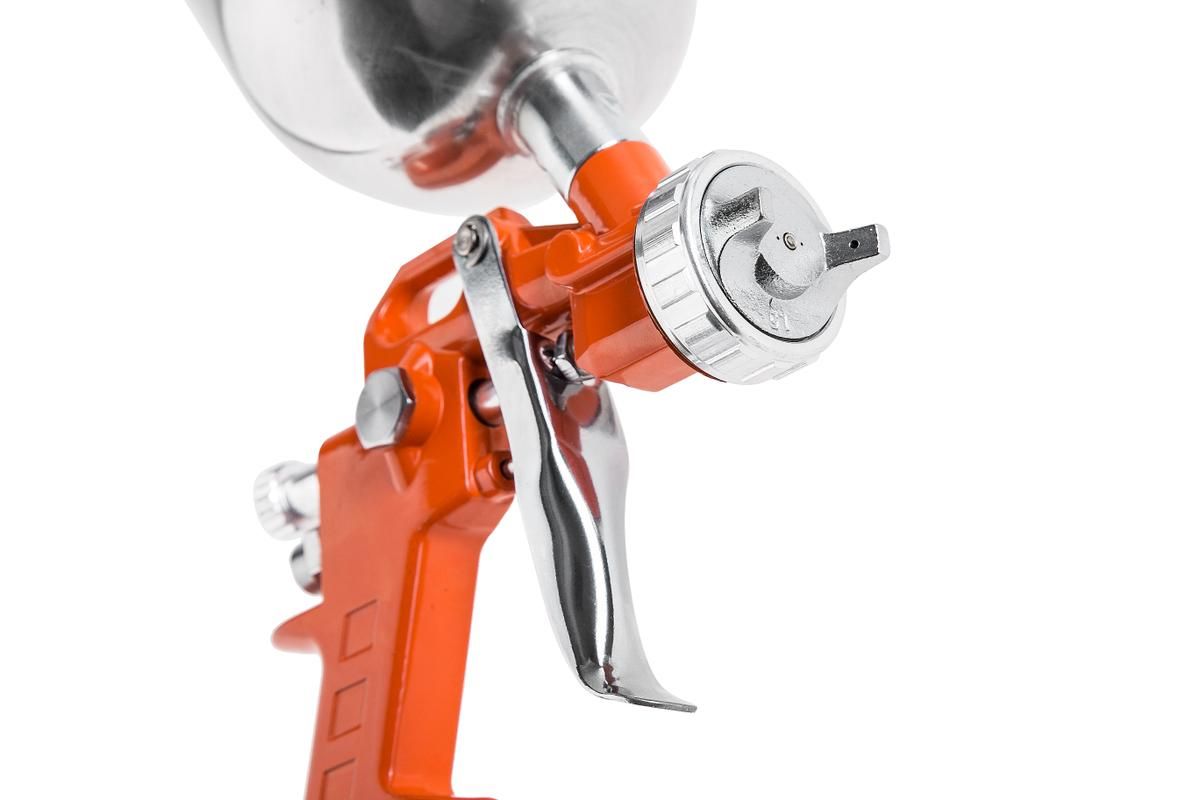
Before proceeding directly to whitewashing, you need to decide on the tool for the job. Applying milk to the surface is carried out in two ways: with a brush and with a spray gun. In the old days, whitewashing was carried out exclusively with a brush, but with the advent of modern technology, more and more often the process takes place with the help of a spray gun.

Although, if the whitewash area is small, it would be more rational to use a brush, but large areas are best treated by spraying the material. So it turns out more beautiful, more uniform and more economical.

The spray gun can be replaced with an ordinary spray gun: electric or mechanical. Since the spray gun is smaller than the spray gun, it will be easier to direct the whitewash jet to hard-to-reach places.

An equally important action will be the preparation of the surface of the walls for whitewashing. The evenness of the whitewash layer, its strength and aesthetic component depend on this. Dirt, greasy stains, rust and old paint, with which lime is in poor contact, are preliminarily removed from the surface of the walls.

All cracks are also closed, tubercles are smoothed out. Before whitewashing, all windows, doors, interior elements are protected with waterproof materials in any way possible.
Three helpful tips:
- If you whiten with a brush, it is tedious to soak it in water for a couple of hours. This will prevent the brush hairs from falling out, which can get on the wall, reducing the quality of the work.
- Lime milk will be better in contact with the surface of the wall if the latter is moistened with water.
- When whitewashing the ceiling, the first layer is applied from the window perpendicular to the light. The second layer is laid parallel to the light (sunlight). This ensures coverage and eliminates the appearance of streaks.
The lime layer does not get dirty after drying. What can not be said after whitewashing with chalk.
Advantages and disadvantages
pros
- Low material cost. Good value for money.
- Kills harmful bacteria.
- Excellent moisture resistance.
- Protects walls from the formation of fungus and mold.
- Does not crack with temperature changes.
- Environmental friendliness.
- Can be applied over old whitewash.
Minuses
- Caution is required when extinguishing.
- A thin layer of lime during hardening is very durable. Therefore, when it gets on furniture, windows, doors, it is washed with difficulty.
Whitewashing the walls with lime is a procedure well known to many ordinary people. She enjoys well-deserved confidence due to the fact that such a coating is one of the breathable and has an antiseptic effect.
You can do the work yourself, without involving specialists, and all the necessary materials do not require significant material costs. To get a high-quality coating, you need to know some of the features and subtleties of preparing the composition.
It is important to properly apply it to the prepared surface. Before you whitewash ceilings or walls, you must choose the basis for the preparation of the solution. It can be chalk or lime.
 Lime resists the development of fungus
 Despite the fact that the use of chalk is the easiest and most affordable way to prepare a composition for whitening indoor surfaces, lime is in great demand. This is due to the fact that walls and ceilings treated with lime whitewash are not susceptible to mold and mildew. The most popular composition for whitewashing walls is fluff. A white powder that has passed the quenching procedure and is ready for use after the addition of water and fixatives.
Modern manufacturers sell lime:
- Slaked, supplied to the places of sale in the form of a powder or paste (dough).
- Quicklime, sold in the form of granules or large lumps.
 After pouring lime with water, close the container with a lid
 For whitewashing, only slaked lime is used, for the preparation of which you will need:
- water and lime itself, taken in a ratio of 1: 1;
- clean metal utensils without chips and corrosion;
- cover for the container;
- wooden spatula for mixing the solution.
After quicklime is poured with cold water, it begins to boil, heating up to 130 ° C. The reaction is very violent, the liquid bubbles and splashes scatter in different directions. At this point, it is better to cover the container with a lid to avoid getting the mixture on bare skin.
It is impossible to use plastic dishes, since the solution heats up very much during the quenching process, and the composition can be mixed only after the reaction is completed. Now the container must be closed with a lid and put in a cool dark place for 20-25 days.
At the end of the specified time, the composition is thoroughly mixed.
 Achieve complete dissolution of the granules
 A thick white film should remain on the wooden spatula. The mixture necessary for whitewashing is diluted with cold clean water, achieving a homogeneous opaque composition. The approximate amount of the finished solution prepared from 1 kg of quicklime is 10 liters.
During quenching, all lumps and granules should completely dissolve in water, but before use, the contents of the container must be thoroughly mixed, and filtered through a special mesh before use.

 The tool for whitening can be selected taking into account the wishes of the layman or the characteristics of the surface to be treated:
- spray gun.
When working with an airbrush, the resulting mixture will have to be filtered through gauze to remove even the smallest remaining lumps.
How to increase the stability of the solution
 Soap will give the solution durability
 To whitewash the walls with not only a high-quality, but also a durable solution, you will need to introduce some special additives into it. You can use ordinary laundry soap or wallpaper paste. Lime for whitewashing is used for application to facade walls.
In this case, it is necessary to protect the composition from the negative effects of precipitation and rapid rinsing. You can do it by introducing drying oil into the solution, which will repel moisture and help the whitewash stay on the walls for as long as possible.
The introduction of some additives into the composition of the whitewash will avoid shedding lime from the walls.
 Surfaces whitewashed with lime tend to stain everything that touches them. This can be avoided by adding ordinary table salt to the solution.
Knowing the proportions allows you to achieve the desired effect:
- lime and salt - 1 kg per 10 liters of solution; salt will help make the surface snow-white;
- drying oil - 100 ml per bucket of whitewash;
- laundry soap, rubbed on a coarse grater, poured with hot water, and then, during the preparation of the bleach mixture, a soap solution is added instead of water.
Sometimes masters advise, instead of a small portion of PVA or wallpaper glue, to introduce carpentry glue into the solution. It is boiled in a steam bath and, before whitewashing the walls, it is added hot to the prepared lime whitewash. For more information on how to apply whitewash, see this video:
 It is convenient to apply whitewash with a roller
One of the most popular recipes for making bleach composition:
- 5 kg of slaked lime;
- 100 g of crushed and brewed laundry soap;
- 50 g of wood glue;
- 10-15 g of laundry blue powder;
- 8 liters of clean cold water.
After mixing all these ingredients, they are poured with water, mixed thoroughly and allowed to brew for 5-10 hours. It can be applied to the surface with a roller, a special bleaching brush or a wide paint brush (maklavitsa).
Before you whitewash the wall with lime, you should make sure that it is intact, that there are no cracks or cracks. A thick lime whitewash will easily hide a microcrack on a puttied surface, but larger ones must be eliminated before work begins.
Work order
 In some cases, whitewash can be sprayed onto the walls.
 Whitening does not take much time and will not take much effort from the average person if it is done in accordance with existing rules. First of all, it is worth mentioning the need for preparatory work. All walls and ceilings that are planned to be whitewashed must first be puttied by applying putty in two layers.
After complete drying (after 12 hours), you can proceed to the surface with sandpaper. In the case when wood glue or PVA was introduced into the mixture for whitewashing, priming the walls is not required. The whitewash will keep for at least 5 years, without cracking, without crumbling, without staining the hands and clothes of the residents. For more information on the quick whitewashing method, see this video:
 To paint the walls with high quality, cover them with two layers of lime
 The composition is applied in two layers with complete drying. Before proceeding with re-whitening, you need to wait at least 5 hours. Properly prepared solution does not leave noticeable transitions and traces (streaks) from a brush or brush.
When working with a spray gun, it is important to prepare a mixture of the correct consistency and not spray it from a short distance. So you can avoid streaks and achieve a uniform distribution of whitewash over the surface.
In order for all layers to be of the same quality, you will have to constantly mix the contents of the container, preventing sediment from forming.
There are many options for finishing the ceiling, but whitewash is the most popular of them. It is inexpensive and looks very good if the paint has been applied correctly. Usually the ceiling is recommended to be thoroughly cleaned of the old layer of lime or chalk before applying a new one. However you can put the next coat of paint and directly on top of the old one. The main thing is to know how to do it in order to guarantee a good result. There is nothing complicated here - having the necessary knowledge, anyone can handle it on their own, without spending a lot of time doing all the necessary work.
How to whitewash the ceiling?
- chalk;
- lime;
- water-based paint.
Each of these options has its pros and cons.
Table. Materials for whitewashing the ceiling.
| Material | Advantages | disadvantages |
|---|---|---|
| Chalk gives the ceiling an exceptional, radiant whiteness, so the room will look very good. | This material gradually crumbles, thus, additional dust appears in the room. In addition, it is not waterproof, so it is not suitable for painting the ceiling in the bathroom. |
| Lime whitewash kills the fungus, so in rooms where it is present, it is worth using it. In addition, lime is resistant to moisture and is well suited for painting the ceiling in any room, including the bathroom (and this is where the fungus can be found most often). In addition, lime whitewash hides small surface defects, sealing cracks and cracks. | Lime quite often causes allergic reactions. It cannot be perfectly white, unlike a chalky solution. |
| This type of paint has an excellent appearance, while it is the water-based emulsion that fits very well on the old coating, it adheres perfectly to the existing whitewash and does not begin to peel off over time. | Water-based paint has only one drawback - it is necessary to carry out work with its use at a temperature not lower than + 5 ° C, but this does not matter when painting the ceiling in a room. |


If you do not want to wash off the old whitewash, you need to keep in mind that lime cannot be applied to the chalk and vice versa - otherwise the paint will not lie well, dirty stains will form on the ceiling.
On top of the chalk, you can put a new layer of chalk or water-based paint, and lime can be covered with the same emulsion or lime. At the same time, it must be borne in mind that enamel and oil paint are absolutely not suitable for painting over an old layer of lime or chalk.

Instruments
There are three main ways to apply whitewash for which you can use:
- roller;
- brush;
- spray.
If do roller painting, the paint will lie in an even layer, there will be no streaks or stains. In order to get a good whitewash using this tool, the coloring composition will need to be applied in two layers. In addition to the roller itself, you will need a container for the solution, something for mixing and a paint tray. You also need a small brush to put paint on the sections of the ceiling at the junctions with the walls - it will not work with a roller to do this carefully without staining the walls.
Whitewash brush can be purchased at every building supply store. It is inexpensive. While brushing, the paint splashes heavily, so you need to carefully protect the furniture in the apartment, as well as your eyes.

With a sprayer whitewash can be easily applied in a very neat even layer. In the event that the paint will be applied by sprayer, care must be taken to ensure that it is free of lumps. Its consistency should be more liquid than that of whitewash, which is to be applied with a brush or roller.
How to choose water-based paint
If everything is more or less clear with chalk and lime, then choosing a suitable water-based emulsion is a more difficult task. There are many varieties of these paints, which differ in composition and properties.
- Polyvinyl acetate water emulsion - the most affordable.
- Paints with acrylic additives- Most Popular. They are suitable for any surface and are resistant to abrasion (although this property is not so important in the case of ceiling paint).
- Silicone water-based paint fits well over old whitewash, even without the use of a primer. It has a high vapor permeability and is perfect for painting the ceiling in the bathroom or in the kitchen. This type of coloring composition will reliably protect the surface from the appearance of a fungus on it.
- Water emulsion paints with latex have very good water resistance, they can be washed with detergents. For the price they are superior to all other water-based emulsions.

In order to make the best choice, carefully read the label before buying. It should indicate the purpose of the paint, the degree of its hiding power, the consumption per square meter and other parameters that you need to pay attention to. A correctly selected water emulsion will make it possible to make a snow-white and durable coating, it will not turn yellow over time and is guaranteed to protect the ceiling from the appearance of fungus.
Painting with water-based paint
In order to get a good finish over the lime, it is best to first coat the old layer with an acrylic primer. After that, you need to check the surface for strength by trying to scratch it. If it does not crumble, then you can apply paint.

But when painting over chalk, this is not necessary - water-based paint will bind it well and will hold on even without soil.
Before starting work, you need to prepare the room. It is necessary to take out or carefully cover with a film all objects so that they do not get dirty with paint.
If you are applying paint with a brush, lay the strokes first perpendicular to the windows, then parallel. If the last layer is laid parallel to the light source, the stripes will not be visible after drying.
Painting with a roller is a simpler and more convenient process in which you need to follow these steps:
- pour the paint into the paint tray;
- dip the roller into the bath, and then roll it along the slope, evenly distributing the paint over the surface and allowing the excess to drain;
- lay the first coat of paint perpendicular to the windows;
- wait for the composition to dry completely;
- then add a second layer, which should be parallel to the window opening;
- carefully paint over the sections of the ceiling at the junctions with the walls with a brush.

Applying paint from a spray gun is even easier - just put three even layers, you do not need to follow the direction. The main thing is not to miss a single square centimeter of the surface when applying each of them.
Chalk painting
It is not difficult to prepare a chalk solution for painting the ceiling; for this:
- for 10 liters of water you need to take 5 kg of chalk and 50 g of wood glue;
- the consistency of the solution should be such that it does not drain from the knife, but if the mixture pours from the blade, you need to add more chalk;
- you can add blue to the composition, in which case the ceiling will be snow-white, without a yellow tint.

The technology of painting with chalk is fundamentally no different from the technology of applying a water-based emulsion. First, choose one of the options - application by brush, roller or spray gun. Then, in the process of painting, do not rush and carefully make sure that the composition lays down in an even layer. In this case, the new look of your ceiling will definitely please you.
Lime mortar painting
In order to make a solution of lime for painting the ceiling, you need:
- take 2.5 kg of lime, add 100 g of salt soaked in water and a small amount of blue;
- after mixing all the components of the mixture, add water to them so that the total volume is about 10 liters.

The basic application rules are the same as for chalk and water-based paint.
Important Points
When whitewashing the ceiling, it is necessary to take into account the specifics of the room. For example, in the bathroom you need to use a special composition that will be resistant to moisture and protect the ceiling from the appearance of fungus. Otherwise, the paint will quickly lose its appearance and may even begin to crumble quite quickly.
It is also important to keep safety in mind while painting. In order to avoid getting whitewash in the eyes, on the skin and in the respiratory tract, you need to use goggles, rubber gloves and a respirator. If this is not done, the coloring composition can cause allergies or even chemical burns.
How to wash old whitewash from the ceiling
Although the ceiling can be painted over old whitewash, the best option for getting a quality paint job is to pre-clean and level the surface. Old whitewash, which does not hold well and peels off, must be washed off. If this is not done, you will not have to count on a good result. If the layer of lime or chalk that is already on the ceiling is thin, even, and holding up well, painting directly on top of it would be a good option.

In order to wash off the chalk whitewash, you must:
- take a foam sponge and moisten it in water so that it is wet, but drops do not drip;
- after that, it is necessary to run a damp sponge over the ceiling over and over again, washing off one layer after another, while it must be moistened as often as possible;
- then you need to carefully wipe the ceiling with a wet cloth - you also need to dip it in water as often as possible.
Washing off the lime layer is a little more difficult because:
- the first step is to moisten the entire ceiling; for this you can use a spray gun;
- using a spatula or scraper, it is necessary to remove the soaked layer of lime;
- and finally, you need to thoroughly wash the ceiling with a damp cloth or sponge to remove lime and dust from it.

Removal of old whitewash: a - moisten the ceiling, b - remove the soaked coating.
It is better to work in sections - while you are removing soaked lime from one of them, the other will be saturated with moisture. Thus, you can quickly go through the entire ceiling.
In order to wash off the old whitewash, you can also use special compounds.
- In the hardware store you can buy a special wash. It must be applied to the ceiling with a sprayer. When it dries, a crust will appear on the ceiling, which must be removed with a scraper. After that, the surface will simply need to be washed with a cloth.
- Another option is to add vinegar to the water (one large spoon per 5 liters will be enough) and 50 ml of bath foam, mix thoroughly and apply to the ceiling surface. After waiting 20 minutes, it can be cleaned with a scraper and then rinsed thoroughly with a wet cloth.
- Another way is to make a paste by mixing water with flour. It must be applied to the surface of the ceiling and allowed to dry, after which you can easily remove the whitewash.
Video - Removing old whitewash
Whitewashing the ceiling by the hands of professional craftsmen
Despite the fact that it is not difficult to whitewash the ceiling on your own, you should not discount such an option as contacting a professional master.
This solution is good because:
- it will help save time;
- turning to a good master, you can be sure that you will get an excellent result;
- the master will need a minimum of paint in order to whitewash the ceiling.
At the same time, as mentioned above, whitewashing actually does not take much time. Therefore, to turn to the master to save time, it makes sense first of all if you are a busy person and are used to always hiring professionals to perform certain jobs.

Due to the fact that the master uses up a minimum of paint, contacting him can cost a little more than painting the ceiling with your own hands. The main thing in this business is to find a really good specialist who, at the same time, will take a little for his work. The main thing is not to hire hacks who, working through their sleeves, can make whitewashing even worse than you would have done - such masters also come across. They take little for their work, but such savings will cost dearly in the end - you will either have to redo everything, or stay with a poorly painted ceiling.
Whitewashing a ceiling with old paint is a simple and inexpensive way to improve a room's interior. You can not always use it, but if the previous layer is thin, even and holds well, chalk, lime or water-based emulsion applied directly to the old paint will hold well. If you approach the matter correctly, your new ceiling will become really beautiful, and such a painting result will please you for more than one year.
Video - Whitewashing the ceiling with your own hands
The most popular folk method of whitewashing houses and outbuildings was lime and chalk whitewashing. Whitewashing the house on your own with lime or chalk has lost its relevance, but still many adhere to the traditions of their ancestors. Whitewashing your home with these natural materials is the cheapest way. It is believed that whitewashing a house with lime mortar is done only in a rural house, whitewashing with lime in the Country style looks very good. Whitewashing buildings, both outside and inside, has a lot of positives. Lime or chalk is an ecological material. Fungus, mold indoors are prevented due to the disinfecting properties of lime. Lime mortar creates a moisture-proof layer of decorative finishes. Lime whitewashing can be done on damp surfaces, in damp and cold rooms. Lime mortar is resistant to water and temperature changes.
Advantages of chalk whitewash:
natural origin;
color whiteness;
easy to wash off;
safety at work.
The disadvantage of chalk is its unsuitability for use in a humid environment. You can whitewash a house without experience and skills, with a minimum of tools, especially materials.

Mortar
So, lime in hardware stores is sold ready-made (slaked) and in stones, which, in advance, must be made slaked. For this, a large metal container is taken, in which lime stones are poured with water. After a couple of minutes, a chemical reaction takes place and the mixture begins to boil strongly. This is accompanied by hissing and splashing. It is necessary to work in protective clothing and be careful not to burn the lime (this is sodium alkali). To dampen the boil a little, you can add water, stir. Lime is brought to the consistency of sour cream. When whitewashing, ready-made lime is diluted with water and applied to the surface.
If desired, the lime mortar can be made colored. A dye (blue, ultramarine, birch) is added to it, diluted in water. To avoid colored spots, dots on the wall, the dye solution must be filtered before being poured into the solution.
Whitewashing at home

You can apply a solution of lime or chalk with a brush, brush, roller, sprayer or vacuum cleaner. Usually whitewashing with lime is done in two layers. The first time is whitened in the horizontal direction, and the second - in the vertical direction (from left to right and from top to bottom). The spray solution is applied to the walls at a right angle, then it evenly and economically falls on the surface. Our ancestors applied the second layer of whitewash immediately after the first, until it dried, then with a good grinding of the lime solution, they achieved a glossy surface. In order to avoid brush marks on the walls and ceiling, windows were closed during whitewashing so that there were no drafts for even drying.
Before whitewashing, the surface is well cleaned, cracks and irregularities are puttied. When the putty hardens, it is overwritten. According to modern technologies (which has not been done before), the entire surface is primed. The primer fills the pores, strengthens the surface. If the chalk or lime solution does not adhere well to the wall, it must be sprayed with water, and you can also add a little wallpaper paste.
Working with lime mortar, unlike chalk, must be done with gloves, lime burns the skin, corrodes fingers. If the solution gets into the eyes, they should be rinsed immediately with water.

A beautiful design using lime mortar can be created in a summer cottage. The house whitewashed with lime, the curbs of the alleys and, of course, the trees look good. With the addition of simple clay to the solution, whitewashed trees look good and are protected from insects, disinfected.
And, so, if you decide to whitewash your house with an environmentally friendly solution of lime or chalk, securely cover the radiators, seal baseboards, platbands, sockets, switches with special construction adhesive tape and start whitewashing from the ceiling.
We build and repair ourselves
How to quickly remove old wallpaper
Removing old wallpaper from the walls is quite laborious work that requires a lot of time and effort. How quickly and easily you can clean the surface of the walls depends ...
How to fix the lining
Wood material is noble, environmentally friendly and warm. Perhaps that is why the lining has not lost popularity for more than a dozen years. Rather, she not only does not lose it, on the contrary - with ...
Old methods of repair are gradually being replaced by modern materials that are used in finishing. And now whitewashing with lime is no longer as widespread as it used to be. But this is still a great option for those who want to save money, while getting an acceptable quality of work in finished form.
First you need to decide on the material that will serve as the basis for the manufacture of bleach solution. Chalk or lime are the most widely used options. However, every decision to whitewash the house has a list with positive and negative sides.
Lime is a type of composition for which carbonate-based rocks are burned. This is an actual solution not only for the construction industry, but also for obtaining compounds with different chemical properties. Whitening with lime should be done using a slaked type of solution. It is obtained by combining water and lime powder.
We list the positive characteristics of whitewashing with lime:
- the ability to adhere well to surfaces of any type;
- tightening small cracks during application;
- moisture resistance;
- resistance to temperature fluctuations;
- the presence of bactericidal properties;
- affordable material cost combined with low costs during painting.
There were some negative sides, although the lime mixture does not differ in a large number of them:
- the likelihood of burns in those who perform painting;
- possible appearance of defects in the form of stains and stripes on the surface.
Lime, in fact, is sodium alkali, therefore precautions are required, otherwise health cannot be secured.

But chalk is a material of natural origin, known and familiar to many. This finish has its own advantages:
- simple, safe work when painting;
- easy rinsing, removal of layers on the surface;
- deep whiteness, whitewash does not turn yellow over time;
- environmental friendliness;
- affordable price.
There are also a couple of disadvantages:
- the likelihood of defects in the subsequent coating of walls with lime;
- unsuitable for use in a humid environment.

How to extinguish lime correctly and safely
The rules for the preparation and slaking of lime are mandatory for those who, when finishing, chose this particular whitewash option. Alkali is purchased in hardware stores in slaked or quicklime form. With the first option, you can connect elements to work immediately. In the second case, before bleaching, it is assumed that the composition must be extinguished.

It is important to make sure in advance that there is no danger to health. To ensure the necessary measures are needed:
- achieve good ventilation of the room where whitening will be carried out;
- prepare a suitable bucket for the composition - lime is quenched only in metal containers;
- put on a respirator and protect your eyes with goggles of a special type;
- not to do without overalls, a headdress and rubber gloves.

The name quenching was given to the reaction during which the elements interact with each other. The result is a special powder or lime paste. The exact results are determined by the bases used. Next, we will tell you how to properly dilute lime:
1. Fluffy is obtained by mixing lime and water in proportions of 1:1. For example, one kilogram of dry material needs to be diluted with a liter of water. Lime powder is poured into a clean container, then everything is poured with cold water.
2. Lime gets very hot when it reacts. Because of this, hiss and splashes appear. Before everything calms down, at least 30-40 minutes should pass.
3. A wooden stick is used to stir the composition. The powder is obtained when the moisture finally evaporates. At this stage, it is believed that it was possible to dissolve the lime for whitewashing.

For whitewashing and sealing small cracks, a thicker composition is needed. Lime dough is called a mass of plastic form, in the preparation of which alkali and water are used with a ratio of 1: 3. In the future, the process is slightly different from the first option: we take a container with lumps of lime, gradually add water to it in small portions, slowly stir everything with a brush.
Lime dough helps to strengthen cement-sand mortars, the mixture helps in the preparation of materials for plastering.

On the video: a recipe for making lime whitewash.
Secrets of uniform whitewashing
Preparatory work
Windows, furniture, doors and the floor in the house should be covered with plastic wrap, you can also use old newspapers, then cleaning the room will not be so difficult. Prepare working tools, in case of whitewashing the ceiling - a stepladder.

The surface also requires preliminary preparation. Old chalk whitewash must be completely removed, the same goes for crumbling plaster. The surface is cleaned of stains and dirt.

How to apply lime mortar
There is nothing complicated in the application process. A coloring tool (a wide brush or roller) is simply dipped into a container with whitewash. The solution is then spread over the surface only in a thin layer. It is good if it is possible to use devices with long handles. They are easy to make yourself. Then it will not be necessary to make additional efforts during processing, and the consumption of whitewash will not increase.

Application is carried out in several layers, at least 2-3. Each layer is applied perpendicular to the previous ones, then thickening and streaks will not appear, and the coating will be uniform. It is important to maintain time intervals between applying layers. For old ones, complete drying is required. If you make the layers thin, then this process ends faster.

Often in the corners there are areas without proper processing. It is recommended to simply go over them again using a whitewash brush.

The Best Alternatives to Brushes
Using brushes used to be the only solution available for whitewashing walls. But thanks to modern technology, repair costs are significantly reduced, large spaces can be whitewashed. Brushes remained relevant only for rooms with a small area.
The following devices greatly facilitate the work of whitewashing the wall:
- Spray guns for whitening. You can use the same tools as for plants, such as a sprayer. The main thing is the presence of a container with a volume of 5 to 15 liters.

- Special apparatus for whitewashing with lime. It is useful when large areas are being processed. The principle of operation has much in common with the spray gun.

- Thanks to this tool, lime is easily distributed over the surface.
Several types of spray guns are produced: pneumatic, electric, manual. The latter are the best option when processing small areas. Devices of different types work in a similar way. Electric ones cost more than manual ones. But they distribute lime better.
Uniformity of layers per 1 m2 and simplification of work are the main advantages that distinguish any such devices. The complexity of the process becomes minimal, and the whitewashed ceiling does not have divorces and other defects.

The process of whitewashing with a spray gun
Follow these whitewashing tips:
- For work, the lime composition is additionally diluted and filtered if the work is carried out using spray guns or sprayers.
- The solution with lime whitewash is mixed before adding each new portion.
- The surface must be slightly moistened before applying the material.
- Whitewashing from limestone is poured into the spray gun, air is also injected there. The spray nozzle is adjustable so that the material is evenly distributed.
- If you are having trouble spraying, the material is too thick. You need to add water to dilute even more if necessary.
- The distance between the surface and the sprayer should not exceed 15-20 centimeters.
- Application requires circular and smooth movements.
- New layers should be applied at intervals of one and a half to two hours.

Use of special additives
There are additional components, the use of which improves the properties of the original composition. Grinding is the first problem that such materials solve. To resolve the issue, you can add:
- salt;
- drying oil;
- acrylic primer;
- wallpaper glue or PVA;
- grated laundry soap.
Thanks to such additives, swelling with bubbling is eliminated, effects such as maximum adhesion to any type of surface are enhanced. The listed components allow you to cope with the rapid washing off of lime with water.
White is not the only option
The addition of common blue will help to cope with the situation where the lime coating becomes yellowish after application. It will be enough 10-20 grams of material per liter of composition. After that, the whitewashed ceilings become snow-white.

Sometimes you need to get other colors. Not every dye is suitable in this case, and the name of the whitewash will not be suitable for the technology. It is required to use pigments with maximum alkali resistance. Lime paints are combined with the following pigments:
- ultramarine for blue;
- lithopone for white;
- titanium dioxide for white;
- chromium oxide for green;
- mummy for red-brown;
- minium for orange;
- umber for greenish brown;
- ocher for yellow.

It is recommended to refuse to add pigments in their original form, with the powder form. First, it is worth diluting everything with water until a paste appears. Then the dye is given time to infuse for 24 hours, only after that the pigment can be added to the lime mortar.
Lime painting and plastering
It is unlikely that the quality of the repair will be satisfactory if the materials are applied one after the other immediately. Paint usually quickly adheres to whitewash and rolls along with it. After everything dries, there is a high probability of air bubbles appearing, painting the walls does not give the right result.
To avoid such results, first wash the surface with soap and water. Then additional processing is carried out with a stiff brush. This is done to avoid additional defects.

Putty helps to level the base when repairs are being made. The removal of old layers of finish is mandatory if puttying is carried out on walls covered with lime. You can use a scraper to remove all swollen spots, and then apply a primer, after which the original base is removed without problems.
