Making a wooden table with your own hands for a summer residence. Table for a summer residence (35 photos): choice of material and self-assembly
If you have your own land plot, then it can be furnished with beautiful furniture so that it is convenient not only for gardening, but also for relaxing with the whole family or a large company. High-quality country accessories can be quite expensive. Zealous owners would like to offer a scheme according to which it is quite possible to independently make a garden table with your own hands in order to end up with strong and reliable furniture. Please read the information below carefully. It will help you understand how to make a table in the country with your own hands.
1
2
3
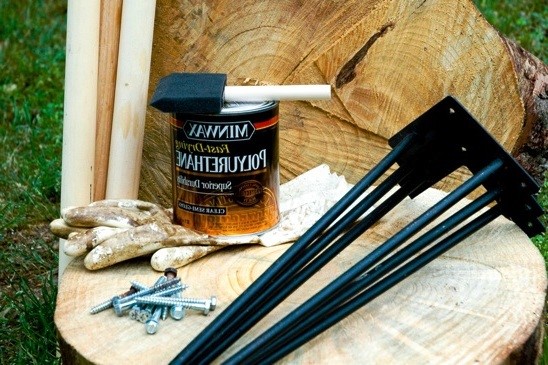
To design a country table with your own hands, you need to take the minimum amount of materials and tools, moreover, most of them are quite affordable, and there are in almost every home. So, what should be prepared in advance:
- material to be used as the base. Many modern masters prefer wood. The main advantage of wooden benches is that they are completely environmentally friendly. In addition, their appearance is very aesthetic. To make it easier for yourself, you can take new boards. When buying lumber, make sure that they are dry enough; wet wood is completely unacceptable to use for work. It is necessary to withstand it for several months in a room that is well ventilated, and only then begin work. If you follow this advice, then a do-it-yourself wooden table made and installed will serve for a long time. Of course, you can make a table of stone or metal, but this will require a lot of investment and effort, time and money. Stone, as the main material, is durable and reliable, however, it is much more difficult to process it;
- fasteners (nails and screws);
- drawings of garden benches and a table for giving with the indicated proportions. You can find ready-made options or create furniture schemes yourself. Choose a project or make an original layout based on the options presented on our website. If you plan to create a high-quality and aesthetic table in the country with your own hands, then the drawings will definitely come in handy;
1
2
3
4
5
6
- sandpaper. If you have a grinder, this will significantly speed up the work process and help make the garden table perfectly flat;
- varnishes and antiseptics for wood processing. They are needed so that a table made of boards can be used for a long time. If you use these products according to the instructions, you will get a wooden outdoor piece of furniture that will not lose its functionality due to moisture or insects.
How to make a table for giving?
1
2
3
4
If you are planning to design a wooden table for giving with your own hands, then you can offer the following scheme of actions:
- Cut boards 140 cm long, make a frame out of them, fastening individual elements with self-tapping screws. Make sure that the boards are at right angles to each other. In order to check the correctness, measure the diagonals: if there was no error, then they must be completely identical. The finished frame is then needed to ensure the strength and reliability of the entire structure.
- If you are planning to create a round table, then make the legs. To do this, cut 4 boards 80 cm long, process them with a grinder to give an aesthetic look. Knock off the edges of the chamfers using a suitable tool for this. Attach the blanks to the frame from the inside. Select 4 fasteners for each leg to ensure the most reliable connection.
- Fasten the crossbars in the middle of the legs. They will play the role of a frame for a shelf, which can be used for its intended purpose for arranging any things or utensils. On the other hand, this detail will make the furniture more rigid. Fix the crossbars at an angle of 90º. In order not to make a mistake, check the accuracy with a square.
- Put the base on a flat surface, check how stable it is. If the structure does not wobble and you have no doubts about its reliability, bring the surfaces into proper condition by grinding. For this type of work, it is recommended to use sandpaper or a special machine. The use of the device will help to simplify the task and cope with the task faster.
- Assemble the tabletop. To create it, it is recommended to use boards of various types of wood. If you plan to design a round table, then you will need to saw the tabletop to the appropriate size from a solid wood plate. This will allow you to form a table with your own hands, which will look stylish and non-standard. Treat the material with a stain in advance. Fix the boards with nails, and fix the shelf with self-tapping screws. Level the surface with a special machine, and apply paint on it (as an option, you can use a transparent varnish). You can significantly simplify the work if you purchase or order ready-made wooden stands. You don't have to spend any time or effort to process it.
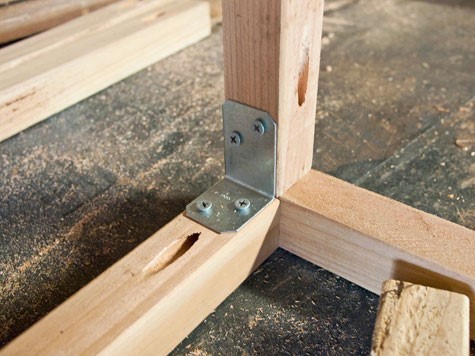
- Install the prepared tabletop on the frame, fasten the individual elements. A metal corner for these purposes is best suited. This completes the assembly process.
- Once the country table has been built, cover its surface with several layers of a substance with antiseptic properties, and after it is completely absorbed into the surface, with two layers of varnish. Due to these simple manipulations, you can make the garden table more resistant to the effects of the external environment. As a result, you will get economical country accessories that will serve for many years without losing all presentability. You can arrange them in the garden without worrying about the wooden table cracking after the first rain.
If you have some material left, then you can use it to design wooden benches with your own hands.
Outside of use, they can be placed under a table or under a canopy to prolong their service life. You can design finished furniture, based on your wishes and skills. You can decorate a carved table for a dacha made by yourself (the photos on our website will help you catch inspiration).
How to make a table out of logs?
1
2
3
If you wish, you can make a table for giving with your own hands, using a different type of material - logs. It is also environmentally friendly and easy to process. With its use, a street table for a summer residence will be created according to the following scheme:
- Prepare the log house for further work: plan the surface of the logs with a planer, cut into separate parts, sandpaper to remove all burrs. Make the joints perfectly even, make holes, making sure that their diameter matches the diameter of the reinforcement. It is important that the individual holes are located at a distance of 30 cm from each other.
- Assemble the elements that form the log table. When connecting parts “into a bowl”, cutting should begin with filing in the center. Make sure that the cut exactly corresponds to the specified depth. To perform this work, it is more convenient to use a chisel or an ax.
- There is another option for fastening parts: in places where one part is connected to another, holes are made, and reinforcement is inserted into it. To make the do-it-yourself table for giving more durable and reliable, epoxy glue is used. All parts are folded according to the drawing. If the armature is too long, then it is shortened. As a result, it turns out to create a detachable table made of logs with your own hands, which is very convenient to use.
Specialists make high-quality objects with their own hands from wood, connecting individual parts with self-tapping screws. This option is also acceptable, if you are going to make a wooden table for giving, take note of it. Benches can also be crafted from logs when you have some lumber left.
In conclusion, I would like to note: in order for garden tables not to lose their attractiveness over the years, they need to be properly looked after, in particular, protected from rain and hidden under a canopy.
By the way, it is quite simple to equip the canopy itself, it is enough to use the most primitive means at hand, for example, shower curtains. They need to be fastened together so that they form a dense canopy, under which precipitation does not penetrate. If it is not possible to equip a canopy, it is better to move the furniture into the house.
Many of the people, coming with their families to their summer cottage, first of all want to get together at a large table to relax and have lunch. Meals in the country, whether breakfast, lunch or dinner, usually take place outdoors. That is why a special place must be assigned to your garden plot, which plays the role of a kind of dining room. In order to avoid the need to take furniture out of your house every time, you can simply make do-it-yourself table for giving from improvised materials. Naturally, it is necessary to take care not only of the construction of the table, but also of the chairs. Making a table for a summer residence is not such a difficult matter, for example, an experienced summer resident, who is not the first time building structures on his site, will take no more than one or two hours. Those who are building for the first time will have to make some efforts.
Benefits of making your own furniture
Choosing the right furniture for a summer residence is not so difficult, because manufacturers offer a fairly wide range of products for every taste and budget. Nevertheless, independent production of country furniture is becoming more and more popular, which is not at all surprising. Thanks to this solution to the issue of arranging a dacha, you can not only save a significant part of the budget, but also get a lot of new impressions in the process of work, giving vent to your creative powers. The result of the work will be a thing that will not only ideally fit the interior, but will also become the highlight of the whole house, attracting the eyes of guests.

Required Tools
To build a table for a summer residence, you will need the following tools:
- hacksaw or circular saw;
- drill and a set of drills from 1 to 10 millimeters;
- a hammer;
- ring wrench (12 and 14);
- corner;
- measuring tape.
Building materials needed in construction:
- boards in the amount of 11 pieces (board length 4 meters, width 100 millimeters, thickness 50 millimeters);
- boards in the amount of 8 pieces (board length 6 meters, width 100 millimeters, thickness 50 millimeters);
- galvanized furniture bolts for fastening in the amount of 20 pieces;
- galvanized nails in the amount of 100-150 pieces (3.5 by 90).
Drawing
Before starting construction work, special attention must be paid to drawing up a drawing of the future table. The following is a brief discussion of one such example:
- table legs, 4 pieces. The length of the legs is 830 millimeters;
- seat support elements in the amount of 2 pieces. The length of the elements is 1600 millimeters;
- tabletop support elements in the amount of 2 pieces. The length of the elements is 80 millimeters;
- boards in the amount of 14 pieces. Length 2 meters. These elements are necessary for the table and seats;
- amplifier board. Board length 800 millimeters;
- cross boards in the amount of 2 pieces. Needed to reinforce the seats;
- elements of the amplifier structure of the table. The length of the elements is 960 millimeters.
Attention ! It is necessary to strictly follow the dimensions listed below only if the work on the table is made from dried and planed wood.
Manufacturing technology
Sawing out elements of the future design
To do this, you will need a hacksaw or a circular saw. Cutting out the parts is as follows: using a hacksaw or a circular saw, make the required number of parts for the table from boards 4 meters and 6 in size. Based on the above drawing, it is necessary to cut boards 2 meters long, which will be used for table flooring and seating.

Attention ! In order to avoid mistakes when cutting out elements for the sidewalls, it is best to cut them out according to a template that must be made in advance from strong cardboard.
Assembly
After cutting all the structural elements, it is necessary to proceed with their assembly:
- first you need to install the side parts (sidewalls). In order to mount the parts evenly, it is recommended to use a measuring angle;
Attention ! The assembly of the table must be carried out on a perfectly flat surface. This will help prevent distortion of parts.
- after the installation of the sidewalls is completed, you can proceed with the installation of the table legs. To do this, we place the legs at the required angle and lay them on the transverse elements, grabbing the parts with the help of nails. Then, using a pencil or marker, mark the surface in the places where the bolts will be installed. After marking with a drill, it is necessary to drill holes and fix all the parts with bolts;
- then you need to start connecting the side parts and the countertop. This assembly step is best done with an assistant. Have a helper hold the first sidewall before it is secured. You hold the second sidewall yourself. On the upper part of the sidewalls, it is necessary to hoist one of the boards intended for flooring the table and seats. We fix the board with nails. We repeat the same moment of assembly: on the other side of the table we set up a board and nail it;
- Next, we proceed to the installation of the countertop. Before installation, it is necessary to prepare small wedges with which you can leave the same gaps between the elements. Then start fastening the tabletop boards. After the installation of the boards is completed, the wedges can be removed;
- The last step in assembling the table is mounting the amplifiers. We turn the structure upside down and install transverse amplifiers. According to the drawing according to which the assembly was carried out, the amplifiers are installed in the middle of the table top and bench, after which they are nailed. In order for the design to be safe for health, the saw cuts must be sanded. Then it is necessary to install amplifiers that have a figured cutout and repeat the transverse part of the tabletop. Nail them to the countertop and sidewalls.

Treatment
After the assembly of the table is completed, it is necessary to process it using special tools. It is recommended to carry out processing before the start of the assembly process, which will make it possible to more thoroughly coat all elements and protect them.
To give a more attractive appearance to the country table, you can use color or varnish. Lacquer will become an additional means of protecting furniture and increase its service life.
Tables for giving from improvised materials
In addition, you can make a table for a summer residence with your own hands, using simple improvised materials.
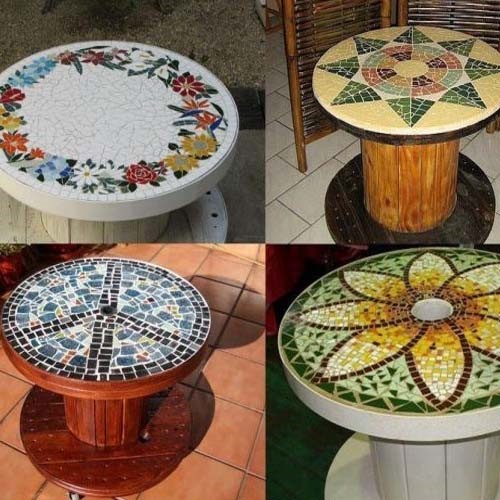
For example, what can be done with an ordinary stump? From it you can easily make an original table that will decorate your garden plot. Stumps can be decorated with mosaics, tiles, or other decorative items. It all depends on the creative imagination. You can also make stools for sitting (also from hemp), after decorating them with a mosaic.
If you find an old table in the country, then do not rush to throw it away, because you can give it a second life. Remove old paint from it, decorate the countertop with mosaics, and repaint the legs. Such a table will last for many years and will please the eye.
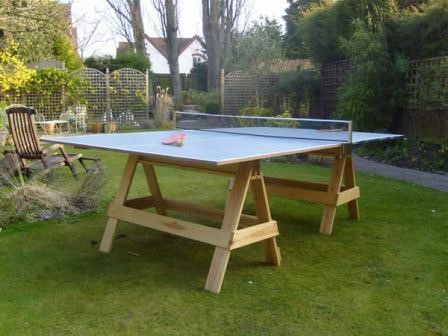
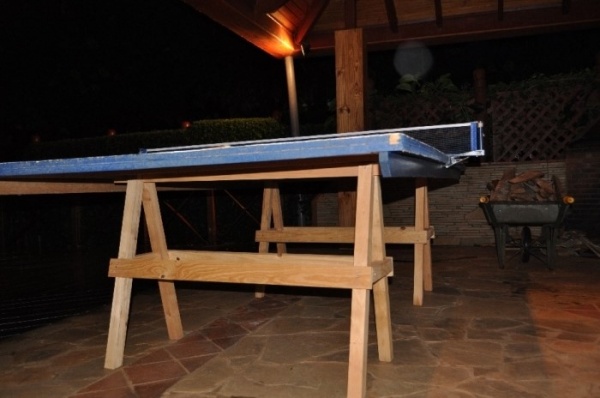
Tennis table for a summer residence
So that in the country you can occupy yourself with some kind of active sports, you can build a tennis table. Making it is quite simple, you just need to buy the necessary materials and prepare the tools.
Necessary materials:
- 2 sheets of plywood 20 mm thick;
- planed boards in the amount of 2 pieces (3 mm thick and 3 meters long);
- for racks you will need construction goats with supports in the upper part.
The dimensions of the table should be 76 centimeters high, 152 centimeters wide, 274 centimeters long.

Then you need to choose a place to place the table 7 by 5 meters.
Mounting process:
- construction goats must be installed horizontally at the same level;
- after installing the construction goats, it is necessary to lay two boards along the edges of the supports 3 mm thick (the boards are laid along the length of the tennis table). Boards are screwed with self-tapping screws;
- then plywood sheets are laid, which are subsequently fixed with battens.
After that, the countertop must be sanded and coated with several layers of antiseptic.
For those who live in big cities, a summer cottage is a kind of paradise. Fragrant herbs, clean air, the smell of a fire and, of course, a wonderful home that is comfortable and homely. A special coziness to a country house and an outdoor area is given by furniture made by one's own to one's own taste, which can enliven the space. In this article we will tell you how to make a table for giving with your own hands.
Agree, it's still easier than making a sofa or wardrobe. To implement your plan, you do not need to specially study or invite specialists. To work, you need inspiration, and prepare the necessary materials.
preliminary stage
The appearance of the finished product is important. When you make a table for the dacha with your own hands, do not neglect it.
It will be nice to observe the admiration and surprise of the guests to whom you declare that you made it yourself.

- Its main base is a wooden tabletop. As a rule, ready-made shields or wide boards are used for this.
- An important factor is also the selected type of wood from which you decide to make a table:
| Conifers |
|
| Deciduous |
|
- In addition to the tabletop, the table must have legs. You can make them from a wooden shield or buy ready-made ones.
Tip: if you didn’t find them in the store, look at the shelves where they sell auxiliary materials for making stairs - 4 pieces of metal or wood balusters can be quite useful to you.
Factory blanks will add some gloss and chic to your table.

Training
First you need to determine where you will install the furniture, whether you plan to take it out of the house. For example, a narrow and long table would be a good solution for a country house, which will ensure the freedom of movement of people around the room.

Materials and tools
- The boards are tongue-and-groove. They will create a tight connection and help protect the table from liquid getting into the slots. You can also use a pair of ready-made wooden shields, 2000x300 mm in size.
Tip: to ensure the stability of the table to loads, select the thickness of the boards at about 30 mm.
When choosing a material, make sure that the boards or boards are even, they must fit exactly to each other, this will save time on individual measurements and cutting.
- Rails for fasteners - 3 pieces. They are needed for the stability of the structure. The most suitable size is 2000x100 mm with a thickness of 28 mm.
- Table legs (finished) or balusters, their price depends on the quality of the material.
- Hacksaw.
- Self-tapping screws.
- Electric drill. Please note that this tool must be available. You will definitely need it, so if you don’t have your own, then rent it or ask for temporary use.
Tip: if there are power outages in your area, renting a diesel generator for a summer residence will help solve the problem.
- Polyurethane varnish. You can choose between glossy and matte. The second shows the structure of the tree well. Instead, you can use natural oils that will protect the wood from external factors.

In the photo - country diesel generator
- Good quality brushes.
- Sanding machine. Its absence will greatly complicate the work.
- Sandpaper with fine and coarse fraction. This will make it possible to provide the table with the desired smoothness.
Process
Below is a step by step guide:
- Connect the boards or boards and lay them with the outer side down. At this stage, it is necessary to monitor the docking so that the country table is even.
- Attach shields or boards. Position the slats along the long sides. This will allow them to be strengthened and fixed along short boards. To ensure the stability of the table, additionally fix the boards (or shields) with the help of rails in the center in one or two places.
- Be careful when fixing rails. Screw the screws slowly, without changing the degree of pressure, angle and intensity. Otherwise, the shield or rail will break, which will affect the quality of the product.
- Fasten the table legs at a distance of 50-70 mm from the edge. With the help of an additional rail, strengthen the attachment point so that the support does not deform after a while. This will allow the table to look perfect for a long time. Fasten the legs also slowly.
- Turn the table over and remove debris and sawdust, sand all the roughness with sandpaper and a grinder. Dry the table thoroughly with a dry cloth.
decoration
Building a country table yourself is not all.
Now you need to start finishing, and, if you want, decorating.
- Cover the entire surface of the table with polyurethane varnish. (See also the article.)
- Then you need to let it dry for a day.
- Carefully inspect the surface of the table, sand it again with sandpaper and varnish it a second time.
- If you wish, then you can paint the table, for example, with acrylic paint.
- Once the surface is completely dry, the product can be used for its intended purpose.
Conclusion
In this article, it was described in detail about one of the ways to independently manufacture a country table made of wood. Although at first glance the work seems difficult, in fact the process is quite exciting, which will make it possible to make good, solid furniture for little money. The video in this article will help you find more information on this topic.

OLYMPUS DIGITAL CAMERA 

Even if furniture production is far from your area, making a country table with your own hands to gather with family and friends on warm summer evenings is quite a feasible task.
Its main advantage, in contrast to the purchased one, is undoubted savings. It is not necessary to make a table from scratch: simply by assembling purchased parts, you will save 30-50% of the cost. If it is possible to use materials left over from construction or repair, the costs will be limited to the purchase of fittings.
To choose a design, you need to decide where the product will be used.
Using cheap non-standard boards for a country or kitchen table - substandard - you will get advantages that are not available for mass production. Sounds doubtful? But this is true: knots, due to which the boards are rejected, have interesting decorative properties. If you succeed in emphasizing them successfully, you will become the author of a completely unique design product, which is a pity to leave in the garden in the rain.

Making a country table with your own hands to gather with family and friends on warm summer evenings is quite a feasible task.
To choose a design, you need to decide where the product will be used: on a grassy lawn under a tree, to complement an arbor, to stand in a workshop or in a house.
The simplest country table can be assembled in a few hours with a minimum of materials, but it will not last long either. To get a product that will be really pleasant to use, you need to carefully prepare the boards and perform all technical operations at each stage with high quality.

Its main advantage, in contrast to the purchased one, is undoubted savings.
If you find a large stump in the woods, it can make an easy-to-make garden table. It is only required to remove the bark from the stump, make an even cut along the top, sand it, treat it with an antiseptic and varnish it. It is enough to nail or screw a finished furniture board to the "leg" from the stump - and you're done.
Worktops made of boards fastened at the bottom with transverse slats look good. If you prefer a glued worktop, you can do it yourself, but this will require a lot of effort.

If you succeed in emphasizing them successfully, you will become the author of a completely unique design product, which is a pity to leave in the garden in the rain.
It is difficult for a novice master to fix the legs securely, so try to choose a design by correctly evaluating your skills and taking into account the cost of labor and time. The easiest way to make cruciform and L-shaped legs. To attach straight legs - you need to carefully connect the parts.
One of the coziest options for a garden is a collapsible table with benches that can be installed in a gazebo or on a veranda. It is not difficult to perform it, the main thing is to choose high-quality materials and properly prepare them for work.

The simplest country table can be assembled in a few hours with a minimum of materials, but it will not last long either.
How to choose a tree?
For a garden or kitchen table, wood of many species is suitable, both soft (pine, spruce, cedar, fir) and hard (oak, birch, ash, walnut, maple, apple, pear, acacia, etc.). The exception is too soft woods wood (poplar, alder, aspen, willow).
One of the main parameters of the suitability of wood for making furniture is resistance to decay: the species listed above meet this requirement.
If you do not plan to engage in furniture work all the time or are just starting to practice, give preference to the most common types of wood - pine and birch.

Worktops made of boards fastened at the bottom with transverse slats look good.
It is possible to use wood of different species for the table top, frame and legs. At the assembly stage, you will need dowels: they are usually made from acacia or boxwood. Birch wood has an inexpressive pattern and can be significantly warped due to spilled liquid - it is better not to use it as a countertop material, but due to the hardness of this breed, legs can be made from it.
The countertop is best made of oak or pine. If you know how to brush wood, the surface of the kitchen table can become a real work of art. Brushing lends itself to soft wood: the wood is burned with a gas burner, and the soft fibers are removed with an iron brush. Work is best done in the yard due to the large amount of dust. If you managed to burn the wood evenly, the result will please you. The brush can be tinted with stains, stains, artistic acrylic paint diluted with water. Of course, wood brushing is not required: it is only a finishing option.

If you prefer a glued worktop, you can do it yourself, but this will require a lot of effort.
The choice of paints and varnishes and glue
Before proceeding with the installation, the boards must be protected from decay. The tree must be impregnated with a water-polymer emulsion (WPE): the treatment is carried out twice with an interval of 3-5 days. This is enough for the product to last a long time.
Some models require glue. Along with special carpentry adhesives (BF-2, etc.), building PVA can be used: it is applied to both surfaces to be glued, dried to a “tack”, then the parts are connected and kept under pressure for up to three days.

It is difficult for a novice master to fix the legs securely, so try to choose a design by correctly evaluating your skills and taking into account the cost of labor and time.
The choice of paint and varnish materials is determined by where the product is planned to be used: in the yard or indoors. For a garden table that is inevitably exposed to precipitation, alkyd, alkyd-urethane, nitrocellulose varnishes and oil paints are suitable. For the kitchen table, as well as for any furniture that is constantly in the room, it is better to use acrylic paints and varnishes: they are more environmentally friendly and do not have a strong smell. Lacquers marked with the "blue angel" mark are recommended for children's furniture and toys.
If you decide to cover the wood with stain, paint or just tinted varnish, this must be done before assembly. Material compatibility must be considered. The lacquer is tinted with a paint of a suitable composition: if the lacquer is alkyd, the paint should be oily, if you use acrylic lacquer, it can only be tinted with acrylic paint. First, a small amount of varnish is thoroughly mixed in a separate container with paint, and then the resulting mixture is added to a larger volume of varnish.

One of the coziest options for a garden is a collapsible table with benches that can be installed in a gazebo or on a veranda.
What tools are needed
For work you will need:
- hacksaw,
- circular saw or jigsaw;
- drill;
- screwdriver;
- hammer (if you decide to use nails).

For a garden or kitchen table, wood of many species is suitable.
This list includes only the most necessary tools, but in order to make the work more comfortable and the finished product look aesthetically pleasing, it is advisable to buy or rent a rotary miter box, an eccentric grinder and a milling machine.
The rotary miter box makes it possible to make cuts exactly at the right angle. An eccentric sander will allow you to prepare parts simply, quickly and efficiently: you will sand the boards in an hour, instead of doing it all day manually with sandpaper. For high-quality processing of the ends, a belt grinder is useful, and a milling machine allows you to select a tree for the necessary grooves and process the edges.

If you do not plan to engage in furniture work all the time or are just starting to practice.
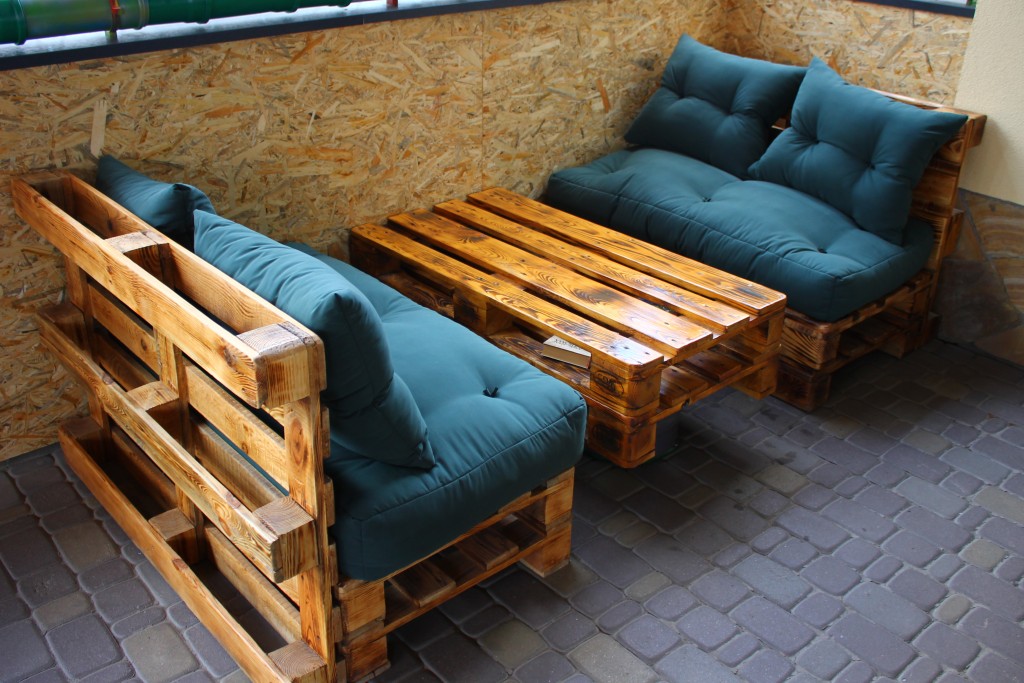
Homemade pallet table
A spectacular rustic table can be constructed from pallets (wooden pallets). If you are a happy owner of such a container, especially a double-deck pallet, just disassemble it: there is no problem in purchasing boards!
Think it's always better to buy new boards? You probably have not worked with wood before: raw wood cannot be used (the product deforms after a few months), and dry boards are much more expensive. To dry raw wood boards, they are stacked in a well-ventilated area: this necessary process will delay your project by 4-6 months! A good option for the kitchen table can be the already mentioned rejected boards, also dry.

It is possible to use wood of different species for the table top, frame and legs.
Let's go back to the pallets: they are dismantled. Now at your disposal are strong boards with different patterns and colors, it is possible that from trees of different species. These features should not be considered as disadvantages: they will give the product a zest: you just need to create an interesting composition from them, alternating boards of a similar shade.
The sides of the pallet will make an excellent frame, and the remaining planks will be used to assemble the countertop.

Work is best done in the yard due to the large amount of dust.
To make the legs, you will need a bar with a thickness of at least 5 cm. All the details must be prepared: sanding strictly along the fibers with sandpaper, first coarse (No120-150), then finer grit (No400-600), carefully removing dust.
Some boards can be painted with acrylic or oil paint. Loft style fans can use stencils in the form of numbers or simple graphic symbols. Boards with a beautiful natural pattern “morim” or simply varnished. After staining or the first layer of acrylic lacquer, the soft fibers rise; they need to be sanded with medium grit sandpaper and a new coat of varnish applied.

A spectacular rustic table can be constructed from pallets (wooden pallets).
If a non-aqueous varnish is used, it is enough to apply 2-3 layers, and if acrylic, the number of layers can reach up to ten.
A good option for the kitchen table can be rejected boards, also dry.
We fasten the tabletop boards with planks, which we place at the joints of the boards. Using a drill, a screwdriver and self-tapping screws, we fasten the boards to the planks (at the joints we use two self-tapping screws, on solid boards - one). The use of a drill is necessary so that when screwing in the screws, the wood does not crack. We assemble the frame from the prepared sidewalls of the pallets. Using a drill bit suitable for self-tapping screws, we drill holes at the joints. We coat the joints with glue and fix with self-tapping screws. We install the legs: simply fasten the boards to the frame, screwing in the screws diagonally. To strengthen the structure, we make jumpers at the bottom in a similar way.

To make the legs, you need a bar with a thickness of at least 5 cm.
Wooden table with glued top
For a glued worktop, you need to choose boards of the same width. If the table is intended for a workshop and its appearance is not of great importance, you can use old floorboards: there are already grooves there. To make the grooves yourself, you need a milling machine.
To assemble the countertop, a flat surface is required. We simply coat the sidewalls with glue, join the boards without gaps and tighten the resulting structure with clamps. Depending on the glue used, the countertop should dry from 1 to 3 days. If everything is done correctly, you will get a countertop with a completely flat surface without cracks. It remains to work out the ends - first trim with a jigsaw, and then sand. In the absence of a belt grinder, this must be done manually - with sandpaper, first large, then medium grit.

After varnishing the parts, you can proceed to the installation, which consists of several stages.
If you don’t want to mess around with glue and clamps, you can use a ready-made furniture board from a hardware store. Then the countertop remains covered with a transparent or tinted varnish.
For a good result, you need to apply 5-7 (for acrylic varnish up to 10) layers. After each third layer, the working surface of the countertop must be sanded with fine-grained sandpaper, carefully removing dust with a damp cloth. At the varnishing stage, it is important not to rush: each layer of varnish should dry well.
It remains to make the legs of a garden or kitchen table: let's focus on the option with L-shaped legs. You will need boards with a thickness of at least 22-25 mm.

For a glued worktop, you need to choose boards of the same width.
L-shaped legs consist of two parts connected at an angle of 90. On the boards to be joined, it is necessary to make a selection, coat the joint with wood glue, and then install self-tapping screws.
When the glue dries, cover the legs with varnish and after drying, simply fasten them to the countertop with screws.

The connection of the legs with the tabletop has several options.
Table with straight legs
To make straight legs, it is enough to file a thick beam into pieces of the same length. The connection of such legs with the tabletop has several options.
In order for the straight legs to be installed securely, at home, you can use the connection on the dowels. You can make them yourself from acacia wood or buy ready-made ones. To assemble dowel joints, you need quick-drying wood glue (BF-2).

To make straight legs, it is enough to file a thick beam into pieces of the same length.
Table with X-shaped legs
Sequence of work.
- On the inside of the tabletop, we fasten two strips on each side with self-tapping screws.
- To make the table look good, the edges of the planks must first be cut at an angle of 52.
- We fasten the paired planks so that the legs fit, we make laps of 2-3 mm on each side.
- We lay the boards on a flat surface, crossing them at the right angle. We measure the distance between the ends of the boards: it should correspond to the width of the table.
- We circle the intersection with chalk: here it is necessary to choose half the thickness of the boards so that after assembly they lie in the same plane.
- We coat the recesses with glue and place the parts under the press for 1-3 days. For greater reliability, the connection can be strengthened with self-tapping screws.
- We varnish the legs.
- It remains to attach them to the table top, placing them in the grooves formed by the slats - and the table for giving with your own hands is ready.

X-shaped legs are made of bars or boards with a thickness of at least 50 mm.
Table with benches
The best solution for a gazebo is a dining table with benches attached to it. It is better to make such a design collapsible in order to clean it indoors for the winter.
The table will require thick boards (from 32 mm), which must be cut into pieces according to the drawing. In this version, two benches are attached to the table. When all the parts are cut, they must be sanded, paying special attention to the ends. We varnish each board separately.

The best solution for a gazebo is a dining table with benches attached to it.
To connect the parts of the structure, we will prepare the studs (length 160 mm), nuts and washers - 24 pcs each. For other connections, use self-tapping screws or nails of a suitable length. Using a drill, it is necessary to prepare all the holes for the fasteners.
According to the drawing, we assemble the countertop and the upper parts of the benches. We cut the cross rails along the edges, the angle should be 45. This is convenient to do with the help of a rotary miter box.
We make and fasten all the legs to the screws. We fasten the parts cut at an angle.

We varnish each board separately.
We tighten the product with studs with bolts. The holes for the studs must be pre-drilled with a drill. When installing the stud, you need to put washers on both sides and tighten the nuts using a wrench.

We tighten the product with studs with bolts.
Seat boards are fixed with gaps of 5 mm. When the seats are connected to the sawn supports, we attach them to the assembled base with 160 cm boards: you will need 4 boards.
We install the remaining studs and enjoy the result.

Using a drill, it is necessary to prepare all the holes for the fasteners.
VIDEO: Do-it-yourself wooden table in the gazebo
50 photo ideas: how to make this table with your own hands


How to make a country table
Landscaping is an ongoing process. You build something, you improve it. Moreover, furniture is constantly required and tables are most in demand in the country. And put in the garden, and near the house, and also in the gazebo. How to make a table for a summer residence with your own hands we will tell in this article using the example of finished projects.
Homemade table from boards from pallets
Dismantled pallets served as the material for this table. Naturally, you can use new boards. Only one condition - they must be dry. You can buy dry ones (it costs more) or buy ordinary ones, put them somewhere in ventilated piles and soak for at least 4 months, or better - six months. In general, any furniture, including garden benches. made from dry wood.
We assemble the table for the street - put it in the gazebo, therefore we will not glue the tabletop boards, but we will fasten them from below, with the help of planks. This is a very simple country table and very cheap.
Having dismantled the pallets, we get boards with an individual color and pattern. Having conjured a little, shifting them several dozen times in different manners, we achieve the desired result. It turns out quite a nice table.
From the boards we assemble the countertop
We take the side parts of the pallet. We use them for the frame of the table. We grind them first with coarse sandpaper, then finely bring them to the required smoothness (grain 120 and 220).

Side rails will go to the side of the table
We take the strips that remained unused, with their help we fasten the countertop. We place them in the place where the joints of the boards are located. We use two self-tapping screws for fastening each board with a joint, one for a solid one.
From the processed sidewalls and two boards (also sanded), we assemble the table frame. We fix its parts with self-tapping screws at the end (two for each joint). The frame can be glued or also “planted” on self-tapping screws. Only their length is large. Under each, we pre-drill holes with a drill, the diameter of which is slightly smaller than the diameter of the self-tapping screws.

Tabletop almost ready
We turn the assembled countertop over and grind it. The order is the same - first with sandpaper with a large grain, then with a fine one.
Next is the installation of the legs. We select four boards of the same size, check their length, adjust if necessary. Then - again grinding. It's easier than sanding already screwed legs. We fasten the sanded boards to the frame. These will be the legs. For each - two self-tapping screws fixed in a diagonal (look at the photo). For greater stability, we install jumpers at the bottom. About 10 cm can be left from the floor to the lintels. We connect everything with self-tapping screws so that the boards do not crack, we pre-drill holes.


The do-it-yourself table is almost ready. It remains to cover it with varnish
After removing the dust, varnish again. In theory, the varnish should lie flat, but depends on the wood, so another sanding / painting cycle may be necessary. As a result, we get such a homemade country table.

DIY garden table ready to use
If you do not like motley boards and traces of old nails, you can make their boards the same design. This table can be rectangular, maybe square. All sizes are optional - see available space.
Country table from the remnants of the boards
This do-it-yourself table for giving is assembled from the remains of boards of different breeds and sizes. Pine boards 25 mm thick and 50 mm wide went to the frame of the tabletop, the remains of 15 * 50 mm were left on the legs. We make the frame according to the dimensions you need. This table will stand on the veranda, and it has a small width. So let's make it not wide - 60 cm, and the length is 140 cm. The height of the legs is 80 cm (everyone in the family is tall).

We collect the frame, attach the legs to it
We immediately cut off two long boards of 140 cm each. To make the tabletop width 60 cm, subtract twice the thickness of the board used - this is 5 cm. Short bars should be 60 cm - 5 cm = 55 cm. We fold the frame, following right angles, twist with self-tapping screws. We check whether the bars are folded correctly - we measure the diagonals, they should be the same.
We cut off the boards four boards of 80 cm each, fasten them from the inside to the assembled frame. You can use 4 screws for each leg.

We make jumpers under the shelf
Approximately at the middle of the height of the legs we fasten the crossbars. This is a shelf frame. The shelf can be used for its intended purpose, and it also increases the rigidity of the structure. We fasten strictly at right angles, checking with a large square.

We put the frame on the floor, check whether it staggers or not. If everything is done correctly, it should stand rigidly. Next, take sandpaper or a grinder and grind.
Let's start assembling the countertop. From the finishing work there were boards of different types of wood, some of which were stained. We alternate boards of different colors.

We fasten the tabletop boards with finishing nails, carefully finishing them with a finisher. On the shelf can be fixed with ordinary nails or self-tapping screws. Then smooth with a grinder. The last step is painting. Very unlucky with the choice of varnish. Bought too dark, did not like the look. Will have to sand again and paint a different color.

Homemade table for a summer residence is ready
Wooden table with glued top
This design features L-shaped legs. They are assembled from boards of the same thickness. In this case, 20 mm. To keep them well, 5 self-tapping screws are needed. Pre-drill holes with a drill with a diameter of 1-2 mm less than the diameter of the self-tapping screws. Then, with a larger diameter drill, we drill recesses for the hats. The diameter can be matched to furniture plugs of a suitable color or made from a wooden rod. Another option is to use wood putty, to which you add wood dust that remains after sanding. After drying and sanding, traces will be difficult to find.

Legs with markings for fasteners
When assembling the legs, make sure that the angle is exactly 90°. As a pattern, you can choose a bar. First, we coat the joint of the two parts of the leg with carpentry glue, then install the screws in the following sequence: first the two extreme ones, then the middle one, and only then the other two. After the glue dries, sand the legs, varnish and dry.

Table legs ready
It's time to make the tabletop. It is assembled from boards of the same thickness. Pick up the size you need. You can use fragments of different widths. It is only important that everything looks organic, and the sidewalls of the boards are even and docked without gaps.
We coat the sides of the boards selected for the table top with glue, lay them on a flat surface (some kind of table) and tighten them with clamps. In this case, they managed one, but preferably at least three. We tighten so that there are no gaps in the resulting shield. We leave for a day. Having removed the clamps, we get an almost finished countertop. It still needs to be trimmed - to align the edges, and then sand it. You can trim with a jigsaw or a regular hand saw. Using a grinder is difficult to get a straight line, but you can try. After grinding, we get a beautiful countertop.

We glue the tabletop from the boards
Using the same technique, you can make an oval or round countertop. It will only be necessary to draw the appropriate line and cut the glued boards along it.
To make the table look more attractive, we will make a frame. We take a thin bar, process it with sandpaper and fasten it around the perimeter of the countertop. Finishing nails can also be used. Only the planks are also pre-lubricated with carpentry glue, and then with nails.

We fasten the bar around the perimeter
After the glue dries, we again process the junction with sandpaper.

This is the finished tabletop.
Now you can attach the table legs. We assemble a table frame from four boards (there is no photo, but you can do it as in the previous paragraph). We fasten it to the back of the countertop with glue, then install furniture confirmations through the countertop. Under the confirmations, a preliminary hole is drilled with an extension for the cap. Holes for fasteners are masked in the same way as on the legs.
We attach the legs to the fixed frame. We put them inside the frame. You can attach with ordinary screws. That's it, we made a table for giving with our own hands.

Board table ready
How to make a wooden garden table with benches
For this table, boards of 38 * 89 mm were used (they dissolved them themselves), but you can take standard sizes. The difference in millimeters will not really affect the results. In the photo below you can see what should happen.

To connect the parts, studs 16 cm long with washers and nuts (24 pieces) were used. All other connections are made with nails 80 mm long.

We connect the parts of the table with each other with studs with washers and nuts
The parts are installed in place, a through hole is drilled with a drill. A stud is installed in it, washers are put on both sides and nuts are tightened. Everything is tightened with a wrench. How convenient is this option? For the winter, you can disassemble and take it to a barn or garage.
Making seats

Bench drawing with dimensions
According to the drawing, we cut the boards of the required size. Everything is necessary in double quantity - for two seats. We grind the boards, pay special attention to the ends.
We cut the short segments with which we fasten the three seat boards along the edges at an angle of 45 °. First, we assemble a structure that is attached to the seat from below. We take a board about 160 cm long, at the end we attach two short boards cut at an angle to it. Attach it so that this board is in the middle.

Bottom seat support assembly
Then we attach the legs to the resulting structure (you can use nails). Then we add more boards cut at an angle and tighten everything with studs and bolts.
We attach the seat boards to the resulting structure. Since this is a table for the street, it is not necessary to knock them down close. Leave a gap between two adjacent at least 5 mm. We nail to the supports (which are cut down), two for each board.

Fastening the seats together
We fix the finished seats with four boards 160 cm long. We fasten each leg with studs (if you walk, you can put two studs by setting them diagonally or one above the other).

We connect the legs to the boards with studs
Putting together a table
The table is assembled in a different way. Please note that for the countertop, the transverse boards are sawn along the edges at 52 °. We fasten them at such a distance that the legs enter. Each board has 2 nails. You can finish, with small hats, or you can hammer deep, and then mask the holes with putty.

How to make an outdoor table out of wood
Now we need to assemble the legs-crosses. We take two boards, cross them so that the distance between their ends is 64.5 cm. We circle the intersection with a pencil. At this point, it will be necessary to remove the wood by half the thickness of the board.

This will need to be cut
We make the same notch on the second board. If you add them together, they are in the same plane. We connect with four nails.

How to make X-shaped legs for a garden table
Similarly, we make the second leg for the table. While the table is not collected.
Installing the table
Now you need to fix the legs to the structure on which the benches are installed. We put them at an equal distance from the benches, fasten them with hairpins.


Table leg mount
Now install the table top. We also fasten it with studs. The last step is painting. Here everyone does as he pleases.
Outdoor table for giving with benches
Variations on a theme
According to this drawing, you can make benches and a table separately for giving, garden. The design is reliable and easy to implement.

Separate benches and a table for the garden according to the same drawing

You can make the appearance more decorative by slightly changing the design of the seats and table top.

Another option with separate benches

Painted white
Do-it-yourself table for giving: drawings

Sustainable country table

Simple table with X-shaped legs

Wooden garden table

Homemade wooden table with a cross bar at the bottom
http://stroychik.ru