We build a house from a bar ourselves. Building a house from a bar: types of building timber, design features, stages of building a building
Wooden houses are popular among private developers who are planning to build a cozy home for their family. Recently, such structures are increasingly being built from timber. The technology of their construction is simple and clear.
Beam - we will equip a comfortable family nest ourselves!
A wooden beam is ideal for self-construction of private low-rise buildings. This material has a beautiful appearance, excellent performance, it provides a favorable microclimate for a person in a dwelling under construction. A beam is understood as a log that is hemmed in on four sides. The result is a user-friendly wood product that can have a different cross section.
In most cases, private developers use rectangular or square bars. With the help of such hewn logs, it is easy to obtain perfectly even wall and floor surfaces with the same thickness without additional tricks. Subsequently, such bases are easily faced from the outside and from the inside, which allows you to create the most unusual and striking projects of wooden residential buildings.
The log house is being built in a short time. All work is carried out by 2-3 people without construction experience and special knowledge. For the construction of the structure of interest to us, it is allowed to use a beam made of various types of wood. Pine products delight with their beautiful texture and a wide selection of color shades. Spruce beams are optimal for the formation of visually flawless surfaces. This is due to their uniform texture and color. It is better not to use hewn fir logs for the construction of a private house. They look great. But the durability and strength of fir products is far from ideal.
Softwood is available at a cost. Larch bars are more expensive. But such products are considered truly practical. Houses made of larch have been standing for decades, they are not afraid of moisture, they please the eye with their attractive appearance. Theoretically, residential buildings can also be built from birch beams. Their price is significantly lower than the cost of larch products. But the quality of the finished building will be much lower. This should be remembered by all home craftsmen who decide to save on the cost of building materials.
Buildings from profiled and glued beams - what's the difference?
We can build a house from a bar using profiled or glued products. The technology of their application is almost completely the same. Profiled timber is more popular. It is characterized by a minimum moisture content and the same thickness.
Such products are obtained from whole logs, which go through several stages of mechanical processing. Profiled timber is equipped with spikes and grooves. These elements provide high-quality connection of individual products with each other. Also, the spike-groove system forms a thermal lock. Due to it, even the slightest cold is not able to penetrate inside the wooden house.
Glued laminated timber is made from pre-dried lamellas - individual boards with different thicknesses and lengths. Similar products are cheaper than profiled ones. At the same time, the durability of the buildings of them is the same. True, on one condition. Drying of glued products must be carried out according to a special technology. If you do not adhere to it, the reliability of the finished house will not be the highest. The connection of glued beams is also carried out according to the principle of groove - spike. Due to this, people without experience in carrying out construction work do not have problems with installation.

A novelty of the private construction market is rounded timber. It is not used very often yet, since its price is quite high. At the same time, houses made of timber of this type are distinguished by unique durability, quality and high environmental friendliness. Rounded material is produced in the form of cylindrical products carved from logs (there can be no other section). Their length reaches 470 cm. This makes it possible to build truly durable houses, which, moreover, do not need additional insulation. Visually, the building made of rounded wood looks like a fabulous chic house. It does not even need to be specially lined with any finishing materials. He looks great as it is.
Proper arrangement of the foundation for the durability of the home
In order for a log cabin to be as reliable as possible, care should be taken to build a quality foundation for it. The type of foundation is determined by the design of the dwelling (number of floors, total area, and so on), as well as the characteristics of the soil on the site. So, for example, a country house with a modest square is usually built on a solid slab foundation. But it is better to build a large-scale structure with an underground on a strip foundation. The base on screw piles is recommended for houses that are built on loose, silty, too wet soils.
In practice, most often private developers choose a strip foundation. It is easy to equip it yourself, without using special equipment. Moreover, the finished base is very reliable, able to withstand any load. Step-by-step instructions for building such a foundation are given below:
- 1. Based on the selected project of the house, we mark it on the ground. We decide on the places where the internal load-bearing walls will be located.
- 2. Swarm according to the markup of the ditches. Important! In width, they should be 10 cm more than the thickness of the internal walls. The depth of the ditches is 0.6–0.8 m. In addition, we dig a pit for arranging the basement, focusing on the size of the latter.
- 3. We fill the bottom of the ditches with sand and gravel (the layer of each material is 10 cm). We moisten the resulting cake, we tamp it well. Pour the concrete mix onto the sand and gravel pad. Its thickness is about 5 cm.
- 4. We construct a removable formwork. We will need to assemble boards 2.5 cm thick into shields. These structures must rise 40–60 cm above the level of the ditches (the specific figure depends on the height of the foundation laid down in the construction project). From the outside, we fix the downed shields with support boards, and from the inside we install spacers. In this case, the formwork will not move when pouring concrete.

After that, we reinforce the formwork structure. The operation is performed using metal bars with a cross section of 1–1.2 cm. We lay them in two layers along and across the formwork. We fix the intersection points of the reinforcement with a knitting wire. Note! Metal products should not touch the formwork. Between them, be sure to leave a free space of 5-6 cm.
Now we prepare the concrete mixture for pouring. An ordinary mortar will do - 3 parts of sand to 1 part of M400 cement. You can make a batch with special additives (gravel, crushed stone). In this case, sand and additional components must be taken in 4 parts, and cement 1. We load the indicated materials into the concrete mixer, we get the required composition, we feed it into the formwork. Here you need to ensure that air bubbles do not appear in the foundation. The problem is solved by using a deep vibrating machine for cement. We leave the poured base for 3-4 weeks. Formwork can be removed after 20 days.
Building a house - we strictly adhere to technology!
After the foundation has hardened, we proceed directly to the construction of the house with our own hands. We install the first crown of the log house on the insulation, which we lay on the base in this order:
- bitumen heated to a liquid consistency;
- a layer of roofing material;
- bitumen again;
- another layer of ruberoid.
The insulation should be wider than the base by about 0.3 m. And the timber used must be treated with an antiseptic solution without fail. The special composition protects the wood from pests and moisture, significantly increasing the service life of the timber. Some craftsmen apply an antiseptic to already erected buildings. You can't do that. We impregnate each product separately and only after that we build a house. Then we are guaranteed to achieve the penetration of the composition into all hard-to-reach places (for example, at the joints of individual logs). It is also desirable to additionally treat wood materials with a fire retardant. It will keep the wood from burning.

After laying the waterproofing and processing the wood, we firmly fix the lining board on the foundation. It is advisable to use a larch product 5–6 cm thick. We fasten the board to the base of the building with anchors directly through the insulating cake. We immediately nail the ebb to the installed lining. He will divert water from the building during rain.
Sometimes you can hear the opinion that it is not necessary to mount the lining board. Here it is necessary to understand an important thing: the board acts as a buffer between the crown of the structure and its foundation. During the operation of the house, sooner or later we will have to carry out repairs to its lower part. Here we will find out why the board is needed. For repairs, it will be enough for us to replace only it, without touching the crown. The benefit, you see, is obvious.
By the way, the repair of the lower part of the wooden housing construction will not be needed soon if slats 1 cm thick are laid on the lining board. We fasten them to the lining across the base, maintaining a distance between the individual elements at the level of 0.3 m. As a result, we get an effective ventilation gap. We mount the first crown on it (bars measuring 9x14, 14x14, 15x15 cm). The front sides of the products used can be convex or flat. It does not matter. Corner connections of the first circuit are made in half a tree. We cut logs into this crown for arranging the floor.
Assembling the log house - now everything will go like clockwork!
After laying the first crown, we proceed to the installation of the next circuit. It should be installed on a jute gasket. It eliminates the risk of mold formation between the wooden elements of the log house and condensation of its facade. We buy jute in any construction store. It is best to use pads in the form of needle-punched tapes. They are available in different thicknesses. Finding the right material is easy. We fix the lining with a construction stapler. Do not use linen or tow instead of jute. It is unrealistic to lay them evenly, which means that in any case, small gaps will remain in the log house.
We connect the bars to each other according to the spike-groove system, getting a truly rigid and reliable fastening. In cases where it is made from products of natural moisture (not subjected to drying in special chambers), it is necessary to additionally fasten the crowns together with wooden dowels. We put them in a checkerboard pattern every two contours, maintaining a distance between the fasteners of 100 cm. We install the dowels to a depth of about 30 cm.

We collect the rest of the crowns in the same way. In places where doors and windows will be located, we leave part of the bars along the length of the wall. We will get a kind of lattice. It is not necessary to pre-cut all products for the parameters of the openings. In this case, the lumber will begin to bend during shrinkage. This will cause a change in the geometry of the house being built. We will cut out the extra pieces with a chainsaw only after the building has completely shrunk.
If the timber has a length less than the walls, you will have to correctly lengthen the lumber.
We need to connect individual products to each other. The procedure is performed by the method of dressing. We shift the seam (vertical) of each next crown in relation to the previous one. For high-quality articulation of joints, we make along the beam washed down into half a tree. It is also desirable to strengthen the connection made with dowels. The roof of a timber dwelling can be any. The easiest way is to cover the built house with a roof with two slopes. Such roofs are built quickly and have excellent performance characteristics. More on this later.
Gable roof - how to build an aesthetic and practical roof?
We construct Mauerlat from a bar 15x15 cm. We fix it to the crown with anchor bolts, dowels, brackets. The rafters will rest on the Mauerlat. It is desirable to connect them with each other using a sled. They are a special steel mount, consisting of two parts. In the process of shrinkage of the log house, the sled allows the rafters to change the angle. An important point. When using other fastening options (for example, a triangular cut made on the Mauerlat to engage the rafters), the probability of structural deformation during shrinkage increases significantly.

The truss system itself is made in the form of a frame that determines the configuration of the roof. The latter is indicated in the project according to which we are building a house. The length of the rafters, the step of their installation and the angle of inclination are also set there. Most often, the truss system is constructed from a beam 5–7 cm thick, 16–18 cm wide. These elements are connected to each other with metal plates and according to the spike-groove scheme.
We cover the constructed truss structure with a layer of vapor barrier, and on top we make a crate and a counter-crate of wooden slats 20 mm thick. We take into account the following. If we install slate sheets or profiled products on the roof, the crate is mounted in increments of 0.3 m. And for laying tiles, the frame should be made solid. Installation of the crate is carried out across the rafters. We use nails for fastening. We fill the counter-lattice along the rafters.
We insulate the gable roof with mineral wool. We use for these purposes a heat insulator in the form of mats. We place them between the rafters, and then close them with the chosen lining - drywall, clapboard. Warming is always done if the attic is planned to be made residential. In other cases, thermal insulation is not required.
Final work - making the house perfect
At the assembly stage of the construction, we equip the floors in the form of draft flooring, laid on beams or logs. After completion of construction, we make a final and rough foundation. Be sure to insulate the floors in the attic and basement level (mineral wool will do). We finish the bases with laminate or other materials.

Insulation and cladding of a residential building from a bar is produced after its shrinkage. The period required for this varies widely. Structures made of glued laminated timber can be finished 3-4 months after their construction, from profiled timber - after 5-6. If wet material was used, it will take a year and a half to shrink at home. Will have to wait.
After shrinkage, you need to caulk the timber. The operation is long, laborious and unpleasant. We will need to manually fill in all the gaps and microscopic cracks found outside and inside the house. For caulking, we use pieces of jute fiber. The ceiling in a timber dwelling is recommended to be sheathed with wooden clapboard. You can use other materials. We finish the ceiling surface strictly after caulking all the cracks.
Often, the external and internal decoration of log cabins made of wood is performed as simply as possible - the bases are painted. Nuance. We choose compositions for painting that not only satisfy individual aesthetic needs, but are also able to protect the timber from the negative effects of ultraviolet radiation and moisture.
Choose a suitable log house project from profiled or glued beams. And build your dream home!
Everyone dreams of their own home. However, often, when buying a ready-made house, you can purchase several unpleasant “surprises” with it, and it’s already difficult to remake it at your own discretion.
It is a completely different matter when a house is built from the very beginning to the end independently according to a personal project. The construction of a bath from a bar with your own hands is carried out in stages, just like at home, so you can consider it in the general case for these two buildings.
Construction stages
The whole process of building a bathhouse or a house from a bar or log consists of several successive stages:
- project preparation;
- preparation of terrain, materials and tools;
- building a foundation;
- floor erection;
- walling;
- floor and roof installation;
- windows, doors;
- interior and exterior decoration.
Preparation of the project, preparation of the site and materials
We can safely say that the preparation does not obey any standards. In this case, everyone is his own master, so there is no need to talk about some kind of technology or rules.
As for materials and tools, then on the contrary, everything is according to the standard. For each hotel item, the necessary materials will be considered separately. The same applies to tools.
Do-it-yourself timber house is gradually being built on a flat and prepared site. But it is necessary not only to level the site, but also to remove all unnecessary.
In rare cases, the preparation includes a very laborious process - replacing the soil layer. This is only necessary in cases where the soil has a very low coefficient of resistance.
Foundation construction
Three types of foundations are now known:
- columnar;
- tape;
- slab.
For a private house, a strip foundation is best suited.
It is more time consuming and expensive, but it has its advantages:
- has a huge bearing capacity, which allows not to make appropriate calculations;
- quite simple in its execution;

These two advantages allow you to get rid of many of the difficulties that a columnar foundation involves.
We will consider the technology of erecting a strip foundation.
To calculate the materials for the strip foundation, you can use the calculator:
This will require the following tool:
- shovel:
- a hammer;
- wood saw;
- a welding machine or a hook for knitting with steel wire, or a special knitting machine;
- containers for mixing cement mortar, as well as containers for clean water.
- So, it all starts with marking on the ground. You can carry it out with the help of a rope and pegs, or simply by drawing lines on the ground. You can check the correctness of the markup using a tape measure.
- It is only necessary to measure both diagonals in a rectangle - they must be the same. This will mean that the foundation is even.

- Next, you need to dig a pit. He digs to the depth of laying the foundation, plus another 20-30 cm. The width should be 5-7 cm more than necessary.
- I must say that if it is planned not to arrange the formwork for the foundation, then the width of the pit can be as wide as the casting part of the foundation itself should be.
Advice!
If a bathhouse is being built from a bar with your own hands in stages, then you can not do the formwork for the foundation, since it is being erected in order to give the tape an even shape, but in this case this is not required.

- Only in the case when the tape rises above the ground, it is simply impossible to do without formwork.
- So, the casting part of the foundation should have a width that will allow you to easily lay a beam or log on it. Often, only 15 cm is enough for this, but such a foundation can simply crack.
- The minimum width of the casting part should be 25-30 cm.
- After the trench is dug, a layer of crushed stone or gravel is poured on its bottom. The layer thickness is about 10-15 cm. Then the same layer of sand is poured. In this case, this layer is carefully compacted. Sand can be compacted with water.
- Next, you can pour the foundation. For a bath, part of the trench can be filled with construction scrap, that is, pieces of broken slate, broken bricks, glass, and so on. Every 30-40 cm of such a layer is shed with a liquid solution.

- The last approximately 50 cm are poured with clean concrete.
- If the foundation is being built for the house, then it is better not only to make it completely from monolithic concrete, but also to reinforce it. For reinforcement, steel reinforcement with a diameter of 10-12 mm is used. Belts are made of wire, and a frame is made of belts.
Concrete is prepared according to the proportion:
- 1 part cement;
- 3 parts sand;
- 2 parts of crushed stone or gravel;
- water.
This ratio is only suitable for cement grade M500 and above.
If the formwork has not been erected, then after the trench is completely filled, it should be allowed to dry. This may take from a few days to 2-3 weeks.
After that, in any case, it is required to build a base. It can be made from red brick.
Smooth masonry can be easily done with your own hands using a plumb line or water level.
After the foundation has completely dried, a layer of waterproofing is laid on top. It can be represented by a layer of roofing material.
If the formwork was erected, then it is removed only after 3-4 days in normal weather, however, the foundation should not be exposed yet, since it will not have time to gain the required percentage of strength.
Floor erection
For this work, you will need the following materials:
- timber with a section of 100 by 50 mm;
- board with a thickness of about 25 mm;
- wood screws;
- dowels for beams;
- tow or moss.
It all starts with the erection of the first crown.

Advice!
The first crown must be laid as evenly as possible, since it is on it that all subsequent crowns will be laid.
In addition, the first crown must be impregnated with an anseptic, since it is most exposed to moisture from the soil.
Beams for walls should have a section of 150 by 150 mm. For logs and internal walls - 100 by 50 mm.
To make the junction of the beams, that is, the lag, you can use two methods of attaching the logs:
- in half a log;
- "dovetail" or "frying pan".
Fastening in the second way implies hitching in such a way that both beams are in the same horizontal plane.
This type of connection is shown in the following photo.

Connection "frying pan"
This method is the most optimal, although more laborious. To connect two beams together, you can use the "thorn" method. To do this, a spike is cut at the end of one beam, and a groove of the same size is cut at the end of the second beam.
Since sometimes the length of the lag is quite large, it is necessary to erect pillars under it. They can be made from brick and cement mortar.
It is worth saying that it is better to lay the beams for the log on the edge. Logs should be placed in increments of 40 to 100 cm, depending on the expected load.
After laying the logs, subfloor boards are stuffed on them. From below, on the logs, you can make a crate, and lay a heat insulator on it. For the subfloor, boards with a thickness of 25 mm are used.
After that, you can immediately lay a finishing coating on this subfloor, for example, grooved boards 28 by 36 mm.
Walling
The phased construction of a house from a bar with your own hands, the next step involves the construction of walls. This is done by successively erecting crowns of beams.

All beams can be fastened at the corners in the way “in half a log”, or “in a spike”, which were discussed a little higher.
It is worth saying a little about the profiled timber. It differs from the usual one in that it has ready-made grooves. Therefore, the stages of building a house from a profiled beam, and specifically, the process of building walls, are slightly different from the same work from a regular beam.
The difference is that a regular beam needs to be fastened every 2-3 crowns. This is done using . For them, a hole is drilled in the beams, which passes through several beams, for example, through two. A dowel is hammered into this hole, which can be either wooden or metal.
Otherwise, the stages of building a log house from profiled and ordinary timber are no different.
As for the internal walls, they should be erected simultaneously with the construction of the main walls.
Each subsequent crown should be laid on a layer of moss or tow.
Cover and roof
The ceiling is made of the same materials as the floor, that is, beams 100 by 50 mm are used as beams. The beams are laid in the same way as the logs.
They are sewn on top and bottom. A vapor barrier film is placed on the boards of the lower skin, and a heat insulator is laid on top. From above, the beams can also be sheathed with boards.

The rafter system is also made of 100 by 50 mm beams. Rafters are installed with the same frequency as the beams. The rafters must be attached to the beams.
From above, the truss system is sheathed with boards, which will act as a crate. Next, a layer of waterproofing is laid, and roofing material is upstairs.
A demanded phenomenon in suburban areas is the construction of wooden houses. Because the timber house is of high quality and comfortable. Moreover, it looks quite chic from the outside, you can see this by looking at photos of wooden houses. The construction of such a house can afford not only the elite. The ability to work with a chainsaw or an electric saw makes it possible to build a reliable house from a bar with your own hands.
Timber house construction technology
The beam is considered a universal building material, and it is quite simple to operate. The huge demand for wood is due to its economy and environmental friendliness. The simple technology of building log houses does not portend a large investment of time. You should catch all the nuances of the work presented in the video lessons and photos, as well as in the articles, and even inexperienced builders will have a chance to build a house from a bar with their own hands.
In the construction of a house, everything has to be done in stages, then the speed and productivity of construction is guaranteed, and a certain period of time must be maintained between some stages.
Step-by-step instructions for building a house from a bar
Material selection
The duration of construction and its technology proportionally depends on the type of timber. It is faster to build a house from dried wood, but given the material costs, the construction will cost much more. It is cheaper to build a building from raw timber, but construction in this case takes more time.
For the construction of housing, the following types of wood are used:
1. Profiled timber.
2. Whole bar.
Benefits of profiled timber:
— resistance to deformations;
- minimum construction costs;
- the risk of decay is excluded;
- excellent thermal insulation;
- high-quality armor from blowing;
- no additional wall cladding is required;
- simple assembly ensures the speed of construction;
- impressive appearance.

Disadvantages:
- high flammability;
- needs to be impregnated with means to increase biosecurity and fire protection;
- formation of cracks at elevated temperatures;
- need additional insulation of the walls;
- it is impossible to carry out redevelopment of the erected log house;
- dependent on weather conditions.
Advantages of a solid bar:
- does not require the use of special equipment;
- there are no problems with the acquisition, since such a beam is widespread;
- low price, makes the timber affordable for everyone.

Disadvantages:
- finishing costs;
— low protection against blowing;
- decent cracking of the timber;
- such a construction needs double-sided cladding;
- need careful selection: compliance with GOST, the absence of fungus;
- in the presence of a fungus, the timber needs to be treated with antiseptic agents.
When choosing, you should bet on the wear resistance of wood. Accuracy in the choice of timber, as well as adherence to technology, are a guarantee of the quality of the house.
Preparation of materials
All the necessary volume of material should be collected before construction begins. The purchase of materials provides for two development options:
- purchase of finished timber. When ordering a material, the customer indicates all the necessary measurements and purchases a finished beam with grooves, which can be used immediately;
- purchase of wood, which you need to prepare with your own hands. In this case, you have to cut the bars yourself, after which it should be treated with an antiseptic. Only then will construction begin.
When buying wood, you should pay attention to the following factors:
- the quality of the tree;
- did the beetles feed on this timber and whether they live in it;
- are there any through cracks in the tree;
- Is the beam affected by a fungus?
Project development
Drawing up a diagram of a log house requires attentiveness and accuracy of calculations. It is quite possible to draw a project with your own hands.

Creating a plan consists of several steps, which include their own nuances:
1. Determining the size of the house and directly its scheme.
At this stage, it is important to take into account the features of the purpose of the premises and the functions that they will perform, as well as all the necessary systems (ventilation, heating, etc.). It is important that rooms with high humidity (kitchen, toilet, bathroom) are located next to each other.
2. Calculation of the amount of materials.
When calculating the consumption of material, you need to take into account the thickness of the tree, as well as its length. An ordinary beam is six meters high, so if the walls of the house are planned to be longer, they are joined along the length.
Many construction companies create projects for timber houses on order. When drawing up drawings, all rules are observed. A house built according to such schemes will be geometrically correct and earthquake resistant. Also on the Internet you can find many photos with examples of ready-made schemes for timber houses.
Foundation laying
The foundation for a wooden house must be very strong. When choosing the type of foundation, the following circumstances should be considered:
— soil characteristics;
- features of the design of the house;
- the magnitude of the load of the structure.
By the volume of lumber designed for the construction of a house, it is easy to calculate the load of the future structure.
Foundation options:
1. Shallowly recessed tape.
2. Deep recessed tape.
3. Columnar.
4. Pile.
Pile, as well as shallow foundations are considered more economical. But more popular is a shallowly buried strip foundation.

The foundation of such a foundation should be laid to a depth of 50 to 70 cm.
Laying the first crown
So that high humidity does not disable the first crown, a buffer element should be created between it and the foundation. Such an element is a lining board impregnated with an antiseptic (50 mm thick), which is usually made of larch.

Before laying the board, the side of the base adjacent to it is covered with two layers of roofing material. A layer of waterproofing will provide a cut-off of moisture.
Wall mounting
Step-by-step laying out rows of timber is the construction of walls. Pins are used to prevent displacement. Rows of wood are attached to them. Tight corner connection is provided due to the presence of grooves and spikes.

They should be additionally insulated with tow or other sealant. Laying out the phalanges of the beam, the spikes and grooves alternate.
There are several methods for connecting beams at the corners:
- connection in a warm corner;
- connections in the bowl;
- connection in the paw.
On the video on the Internet, you can find and watch a detailed briefing on the corner connection of the beam.
In places where the installation of doors and windows is planned, the size of the beam is calculated, taking into account the size of the opening. All openings are weak points for walls. To make the wall stronger, some bars are laid clearly according to its size. When the assembly of the log house is completed and it settles, the excess material is cut out.

To increase strength and fire resistance, the walls are treated with special substances. To increase wind protection, all seams should be caulked (plugged). Many builders of their wooden cottages post a video on the Internet in which they step by step present the installation of a log house.
roof construction
The high probability of repairing the roof after the construction of the house is guaranteed by its complex geometry. Therefore, the roof construction technology should be simpler. Therefore, it is better to build a gable roof.

After the construction of the walls, ceiling logs are placed on them so that they protrude 50 cm beyond the wall. The gap between them should be equal to the width of the insulation used 60 cm or 90 cm.
Next comes the assembly of the truss system. To strengthen the rafters, crossbars and racks are used. Then the fronts are sewn up. The lathing is carried out with a maximum step of 400 mm, and is attached to the rafters.
Finishing work
You can look at the video how houses made of timber look like, and how they are finished with all the nuances.
Floor arrangement
During the installation of log cabins, along the floor beams, a preliminary floor covering is created. The floor itself is installed in two steps:
1. Laying the floorboard.
2. Laying the subfloor.
The floor needs to be insulated; for this, mineral wool or other heat-insulating material is placed between the boards of the subfloor.

For flooring, in addition to the floorboard, you can also use laminate, as well as other materials.
Ceiling arrangement.
To reduce heat loss at home, the ceiling must be insulated with at least 200 cm of insulation. It is placed between the ceiling beams and protected with special vapor barrier and moisture barrier films. The ceiling of wooden houses is sheathed with clapboard. Large beams, if desired, can not be sheathed, they will serve as decorative elements.
Interior and exterior decoration
Sometimes just painting the house is enough. This applies to those cases when a profiled beam was used.
While the house is being built with their own hands, a long time passes, and the quality of the wood surface changes characteristically. Therefore, the timber should be re-sanded before painting.
Communication networks are laid inside. In the photo on the Internet, you can see the result of finishing work in wooden houses with a variety of design styles.
Window installation
In the places intended for windows, special openings (pigtail) are created. To do this, grooves are cut out, a bar is placed in them, preferably not back to back. It should be smaller in length, so that when the walls shrink, it is possible for the beam to fall. Thanks to this, the shrinkage goes smoothly, and at its end, windows are mounted.

It is not necessary to install wooden windows, you can also plastic ones.
Installation of doors and partitions
Doors are installed using the same technology as windows.
Install partitions, only after assembling the log house. If a two-story house with an area of more than 60m2 is being built, then the first floor, which is not equipped with partitions, makes the building structure dangerous. For safety and strength, at least one partition is required.
In principle, building a house from a bar with your own hands is not at all difficult. You can watch video tutorials in which all the nuances of construction are considered step by step. The very technology of building a house is simple and if you follow it, then the built house will be durable for many years.
Video. A detailed film about the construction of houses from timber
The choice of material is the primary problem that everyone who decides to build a small, reliable and comfortable house on their site with their own hands faces. The modern building materials market can safely boast of a huge range of raw materials for every taste and budget. Most people prefer wood. And it is not surprising, because a wooden beam is an environmentally friendly and inexpensive material.
This material is presented in several variations, but in the article we will talk about how to build a house with our own hands from profiled timber, since it is he who is the most common and has the simplest installation technology. It is very malleable for processing, which means that you can easily carry out electrical wiring, plumbing and sewerage.
Drawing up a plan, preparing materials and tools
It is simply unrealistic to build a house without a good project, so it is very important to take this stage extremely seriously, especially since it is on it that you can clearly understand what you can save on.
Ideally, you can seek help from special design agencies. For a fee, they will individually draw up a complete layout of the future home, taking into account the size and shape of your territory, soil composition, financial capabilities, and most importantly, personal preferences.

If you do not have a need for some miracle of design ideas, then you can build a building using standard options. To do this, all the necessary documentation can be found on free Internet resources or you can use one of several 3D editor programs, including FloorPlan3D, CyberMotion 3D-Designer, SEMA and many others. The latter, by the way, is designed just for the planning of houses from a bar. SEMA will help you carry out all the necessary statistical calculations, choose the type of truss system and much more.
Everything should be indicated on the drawing, from the overall dimensions of the building and the number of floors to the location of door and window openings, furniture, all communications (light, water, heat).
As soon as the plan is in your hands, you can proceed to the calculation, if this has not already been done, and the choice of the required materials and tools, including:
- Beam as the main building material.
You can buy ready-made beams with the necessary cut grooves and spikes - bring it, install it - use it, also thanks to the perfectly flat and smooth surface of the edges there is no need for additional finishing work, or you can buy wooden blanks, and make the cuts yourself, there is nothing complicated in this, and you can save a lot.

Experts recommend taking a bar with a section of 150x150 mm during construction. But since you have to work alone or with an unskilled assistant, it is better to use material with a section of 150x100 mm. Such a beam is much lighter, and the missing volume can be restored in the future by insulating the facade outside the building.
- Insulation.
To further save money, as a heater, you can use materials that, so to speak, are “at hand”. The best among these is considered moss. It is not difficult to find and process, and in terms of its technical characteristics it is identical to its artificial counterparts.

- Nails, self-tapping screws and other fastening structures (metal corners, wooden dowels, and so on).
- Waterproofing material (for example, roofing material).
- Ready-made concrete mortar or components necessary for its preparation (water, sand, crushed stone, cement).
- Reinforcement (if a strip foundation is planned).
- Saw.
- Electric jigsaw.
- Screwdriver.
- A hammer.
- Construction rubber hammer.
- Roulette.
- Building level.
- Plumb.
- Circular Saw.
- Pipes for water supply and sewerage.
- Cable for wiring electricity, TV.
- Master OK.
- Caulker.
- Other tools for small and decorative work.
Harvesting wood and moss for construction
In order to build a warm and cozy house from a bar, in addition to knowing the technology of laying crowns, it is important to understand which type of wood is best suited for this purpose.
Each species, of course, has its own advantages and disadvantages, but the main thing that you need to pay attention to when choosing lumber is strength, density, moisture resistance and degree of drying. So, if the tree is fragile, then your house may simply fall apart very soon, if the density is low, then such material can shrink up to 20 or even more percent. If a lot of moisture accumulates in the wood fibers, then such a house will never be warm, but if the raw material is under-dried, then it will be simply impossible to work with it, over-dried - the material will become too unreliable.

Very serious requirements are imposed on the walls of the house, as they must provide warmth, comfort and low noise levels in the premises, especially since wood is a rather fire hazardous material that can deform due to precipitation. That is why experts recommend purchasing timber from conifers, such as spruce, cedar, fir, larch and some others. Due to the high content of resinous substances, conifers are resistant to decay, cracking and other deformations. Also, the trees of this breed are very durable, light, so they do not create too much load on the foundation.
By choosing a softwood timber, you can save money by building a foundation using a simplified system.
If you decide to harvest the wood yourself, then you should know that the humidity coefficient should not exceed 20%, otherwise cracks will soon appear in the walls, which will require additional processing, and this is an extra cost of effort, time and budget.
When harvesting, take into account the fact that it is better to do this in the winter period of the year (from January to March), since in winter the process of photosynthesis slows down and the speed of movement of juices along the tree trunk becomes minimal.
Cut the lumber to the desired shape and size, treat with an antiseptic and leave to be stored in a dry place inaccessible to sunlight. The bars must be stored compactly in special stacks, at a height of at least half a meter from the ground. There should be a gap of 4-5 and 10-15 cm between the crowns and rows. To do this, several transverse beams are inserted between them. After lying like this for 5-6 months, the tree is ready for further processing and installation.

In order to keep your house warm in inclement weather, you should think about choosing an interventional insulation. Professional builders use modern tape materials, but the price for such a pleasure is quite high, so we recommend paying attention to moss.
There are more than 300 species of this plant in the world, but only a few varieties are used for construction purposes, among them: sphagnum, cuckoo moss, red and peat. All of them have excellent bactericidal properties and are excellent natural antiseptics. Among the minuses is a high flammability, since after drying the moss becomes dry and brittle, for example, at high temperatures it can spontaneously ignite, to prevent this it is treated with special means.
Moss must be collected, you can find it in marshy areas - these are long, up to 30 cm, stems with small leaves, dry and store in a dry place for about two weeks. Plastic bags can be used as bags, but then the moss will be a little wet. There is nothing wrong with this.
Foundation construction
A high-quality foundation is the key to a reliable, stable and durable home. Since it is he who is the main supporting structure, which must withstand the total weight of the building, such high requirements are placed on him.

When building a house from a bar, three main types of foundation are used:
- Pile-screw.
- Nest.
- Tape.
The choice of the type of foundation depends mainly on the soil on which the construction of the house is planned. This issue needs to be resolved at the planning stage. You should conduct a soil analysis, you can also ask your neighbors what foundation their houses stand on, or look for information in documents on the purchase of a plot or other reference literature.
If the soil is heaving or watery, and also if you plan to use the house only seasonally, and not live there permanently, then one of the first two options is used. If it contains a large amount of sand or clay, then a strip foundation is suitable.
The first thing to start with is cleaning the area from debris, thickets, bushes and other objects that may interfere. Immediately before digging, it is necessary to mark up. To do this, use ordinary wooden pegs, which are placed at the corners of the site, as well as along the bearing walls, and the thread that is pulled between them is simple. The next steps depend on the selected type of foundation.
Pile screw foundation
After the territory is cleared and ready for further manipulations, we proceed to earthworks. It is better to pre-purchase metal piles in a specialized store, since it is quite difficult to build such structures manually. Choose supports of the same size and be sure to have drills already welded on one end.

Due to the special design, the piles are easy to install on their own, while keeping an eye on the angle of inclination. A building magnetic level can help you with this. Also, if there was no cap on the screws, you need to install it yourself. To do this, use a processed sheet of metal 25x25 cm and 5-6 mm thick.
Nest foundation
The nest foundation differs only in that instead of metal piles, either monolithic concrete supports or hollow pipes with a diameter of 250-300 mm are used, into which cement mortar is poured after installation.
As soon as the marking of the territory has been carried out, at selected points along the perimeter it is necessary to dig holes with a depth of 2/3 of the height of the support. A layer of sand is poured to the bottom, moistened and tightly packed. After that, support structures are inserted into them at a right angle, if necessary, a solution is poured inside and into the space around them at the bottom. The remaining gaps between the supports and the ground are covered with a mixture of sand and gravel.

There is also an option to install formwork in dug pits and pour concrete mortar to the ground level, we recommend using M400 cement in a ratio of 1: 3 with sand. After the cement has completely dried, the formwork is removed and aerated concrete or foam blocks 20x20x40 cm are laid on top.
Strip foundation
The strip foundation is the most common, as it can be used in the vast majority of cases, for example, if you are planning to build a heavy two- or more-story house.
The first step is to dig a trench with a width of 10-15 centimeters more than the thickness of the walls and a depth of 50-70 cm. It should be located at a height of at least a meter from the groundwater level.

There are several options for the strip foundation, among them:
- Brick.
- Concrete.
- Stone.
For any of them it is necessary to prepare the basis. A layer (10 cm) of sand is laid at the bottom of the trench, moistened with a small amount of water and carefully compacted; if necessary, sand can be poured in two layers. A layer (15-20 cm) of rubble, broken bricks or small stones is poured over it.
By the way, geotextiles can be pre-laid at the bottom of the trench, and heat-insulating material can be installed along the outer edge - this will help prevent freezing of a shallow foundation.
On the resulting pillow, if it is planned to build a brick or stone base, a little before reaching the top of the foundation, you can install the formwork. Inside, it is necessary to pour a layer of mortar to the level of the ground surface and tamp. To increase stability, we recommend creating a reinforcing frame from metal rods with a diameter of 1.2-1.5 mm.

Already on top, after the solution has completely solidified, bricks or stones are laid, which can be ordered, or used independently found near any reservoir. On top of the masonry, another reinforcement belt is installed and concreted (height 5-10 cm) and leveled.
If a concrete base is planned, then the height of the formwork should reach 30-50 cm, the thickness is 2-3 cm. If the formwork is planned from wood, then the material should be free of cracks, chips, bumps and other defects.
The reinforcement is installed in increments of 10-20 cm. The distance between rows is 5-10 cm. The result should be a grid with cells of 15-20 sq. cm. prepare personally. We recommend spending money on a concrete mixer - this will save you time and nerves, since mixing cement manually is quite long and difficult. Pre-formwork must be moistened with water or wrapped with a layer of plastic film.

It is very important to prevent the appearance of bubbles before the solution solidifies. A vibrating hammer will help with this, or you can simply punch holes in several places, later they will need to be filled with mortar.
The foundation is left to dry for 3-4 weeks. The formwork can be removed after 5-7 days, during which and a few more days, the solution must be sprayed with water in order to prevent cracking of the foundation. Don't forget to make holes for wiring.
Construction and insulation of walls and floors
The crowns of the first row are connected to each other traditionally, regardless of the method of connecting the subsequent rows, the “half-tree” is a fairly reliable and simple type of end cuts, and they are not laid directly on the foundation, but on a lining of small slats located transversely to the beam itself , at a distance of 5-10 cm from each other. The gaps between the rails can be filled with mounting foam. To cut the end cut, you can use a hacksaw, in order to remove excess material, go through the chisel.

So, if the slats rot, they will be easier to replace than a whole row of timber. The boards also need to be treated with an antiseptic or ground to prevent the development of fungus and various microorganisms, and laid out on a foundation covered in two layers with waterproofing material, such as roofing material.
The beam of the first row should be slightly larger than the crowns of the other rows, for example, if material with a section of 150x150 mm is used for walls, then for the first row use the option with a section of 200x200 mm.
It will be possible to mount logs for the subfloor on the lining of the boards using steel corners and nails or self-tapping screws. It is necessary to attach to them, the so-called cranial beam, on which the edged board for the subfloor will be laid in the future. A layer of waterproofing should be laid on top of the draft, and on top of it, insulation boards, such as mineral wool, polystyrene foam, or any other modern analogue. The next layer is a vapor barrier, and after - a finishing floor.

All subsequent rows are stacked identically to each other. There are two main ways to fasten bars:
- "With the remainder" is when a small part of the timber sticks out from its two ends.
- "Without a remainder."
The picture below shows different types of end cuts.

This manipulation can be done using a circular saw or a jigsaw. Options "A" and "D" ("no residue") are the most reliable for residential buildings, but also the most difficult to install. Recommended for areas where annual precipitation does not exceed 300 mm. Option "Z" is used to connect internal load-bearing walls. Also note that the tenon-groove joints must be left with a gap of half a centimeter for the insulation.
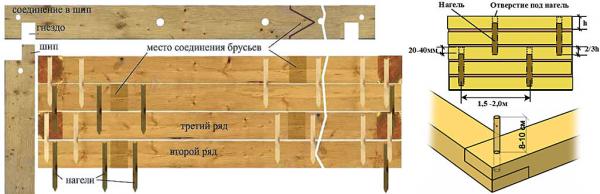
Between themselves, the rows are fastened with wooden or metal dowels. We recommend using the second ones, since the lumber will not crack during drying, which will ensure the durability of your building.
Using pins for fasteners, it is necessary to drill holes with a diameter of 30-40 mm. It is necessary to drill so that the beam of one row of dowels passes through, and the beam of the lower row is only partially, or you can use short dowels, for this, holes are cut from two opposite sides, a dowel is driven into one with a hammer, and simply inserted into the next. Remember that pins should not be located on top of each other. In order for the design to be as stable as possible, arrange them in a checkerboard pattern, as shown in the figure below.
If the walls of your house turned out to be longer than the timber - it does not matter. In this case, it is necessary to cut a rectangular hole at the end of one beam, and a rectangular protrusion right in the center at the end of the second, so you get a tenon-groove connection.
The space between the crowns can be insulated with pre-collected and dried moss and tow. The tow is laid across the beams, while the moss is simply thrown over the top. Thus, when installing the upper crown, part of the insulation will stick out - this is not scary, since work on caulking is planned in the future, and it, in turn, will provide maximum thermal insulation.
In order for the bars of one row to be at the same height, we use a rubber mallet, tapping it along the walls after installing each bar. The planer is used at the end, only after you have noticed that due to the unevenness of the bottom row, it is impossible to install the timber of the upper row.
*Important! Don't forget to alternate corner joints.
The last two rows of crowns are not attached, since in the future, after shrinkage, a rafter system will be installed. To do this, you will have to temporarily dismantle these two rows.

To design door and window openings, you can use two methods: either lay out all the rows, and then, after making a mark, cut out the necessary holes with an electric jigsaw, or use beams of this length in advance so that they later form windows and doors. Remember that the size of the openings must exceed the size of the door itself or the window, as there is still room for the installation of window and door frames. It is also necessary to leave a gap of 10-15 cm above the windows and doors. This is necessary so that in the future, when the timber shrinks, not to damage the construction of windows and doors. It will need to be filled with liquid insulation.
Roofing roof
After the last row of crowns has been erected, the building must be covered with roofing felt or slate and allowed to settle. The shrinkage period on average takes up to 6 months, only after that you can proceed to the installation of the roof and facing work.
There are a huge number of variations of roofs. The most reliable and stable is considered to be a four-pitched or hipped roof, it is used in regions with high humidity and strong winds, but since it is quite difficult to build it without the help of specialists, we recommend installing a gable roof. We will briefly describe the installation steps and the main elements.

First you need to isolate the surface of the walls from moisture, using, for example, roofing material. It needs to be applied in two layers. After the Mauerlat is attached - the base for the rafter system, in which special cutouts are made, with which the rafter legs are attached. Mauerlat will serve as the top row of crowns, pre-treated with an antiseptic.
The rafters themselves, depending on the area of \u200b\u200bthe house, must be made of timber with a section of 100x50, 150x50 or 200x50 mm. They should not protrude beyond the house by more than half a meter, if more, it is planned to install additional supports. A wooden crate of slats 5-6 cm thick and 10-20 cm wide is installed on the rafter legs in increments that depend on the roofing material (tiles - planks are laid end-to-end, if slate or corrugated board - at a distance of 30 cm from each other). Sometimes a counter-lattice is installed, on top of which the roofing material itself is mounted. Insulation, vapor and waterproofing are laid in the resulting space between the two crates.

The ceiling consists of several ceiling joists, which are fastened using the tongue-and-groove method to the top row of timber. The rest of the manipulations are identical to the floor. Between the finishing and rough ceiling, you can additionally lay insulation, insulation. In the future, this can reduce heat loss by up to 30%.
In order for the roof to be stable, strong, withstand strong winds and last for many years, you should think about additional supporting structures, such as crossbars, struts, puffs, racks and others. All of them are fastened with hardware, such as steel corners and self-tapping screws.
Do not forget to leave ventilation gaps, a hole for the chimney and an attic, if one is planned. The fronts of the roof can be sewn up with clapboard, decorative block house.
Remember! Every roof needs repair over time. Therefore, in order to reduce financial costs, experts recommend checking the coating annually for damage and various deformations, such as deflection and leakage. The first is eliminated by installing additional supports (crossbars, racks, and so on), and the leak is eliminated by replacing the rotten roofing material.
Let's summarize
The last stage of construction work is the installation of entrance and interior doors and windows. If necessary, work is carried out to insulate and decorate the walls either inside or outside the house. Conduct electricity, water, heat, connect the sewerage system.

Now that you know the main stages of building a house from a bar on your own, as well as ways to save money, you can start building a warm, cozy and reliable home that will warm and delight you for many years.
Is it possible to build a house from a bar with your own hands? Cast aside doubts - this is quite within the power of a person who knows how to handle a carpentry tool. It is very easy to use, economical and environmentally friendly. It's a pretty versatile stuff. From a bar you can build a wonderful summer house in a summer cottage, and if it is additionally insulated, then it will be possible to live in winter.
How to build a house from a bar? Like any business. Everything starts with a dream. It is necessary to make a project of the house and start construction. When developing a project, it will be better to stick to rectangular shapes.
How quickly the house will be erected largely depends on the timber that you purchase for construction. If everything is in order with finances, you can buy glued or dried timber. It will take much less time to build a house from glued laminated timber. If you buy raw timber, it will take much more time. Having erected the frame, it will be necessary to let it dry. This will take approximately a year. Only when his house shrinks can construction be completed. Choosing the second option, you lose time, but save a lot of money.
Every house stands on a foundation. A log house is no exception. It is necessary to take his choice with all seriousness, taking into account the landscape of the area and the type of soil. Foundations can be tape and columnar. The tape type is considered more preferable. It is somewhat more expensive than columnar, but more reliable and durable. With this type of foundation, it is possible to build a cellar. And this is an undoubted convenience of any home.
Building walls and roof

The erection of walls from a bar is no different from the assembly of a designer. The use of profiled timber will significantly improve thermal insulation. Corner joints are made in two ways: "in the oblo" and "in the paw". The connection "in the oblo" is that the ends of the timber go beyond the plane of the walls. If in the future you are thinking of decorating the house decoratively, then you should not do the connection “in the cloud”.
The walls are based on laying out the first crown. The first crown is no less important than the foundation. It is necessary to cover the foundation with waterproofing and carefully align horizontally. It does not matter which method of corner connections you will do in the future. Always connect the first crown at the corners “in half a tree”. Then the joints are fastened with dowels, covered with a sealant, and then the rest of the crowns are laid out. Each subsequent row must be supplied, without fail, with a sealant. Moss or tow is usually used as a sealant.
Together with the first crown, the foundation of the floor is laid. It's better to make it double. A layer of insulation will make the floor warm. At the second stage of construction, after shrinkage of the house, the finishing floor is laid.
Nagels

An important role in the process of assembling walls from timber is played by dowels. Their task is to connect the bars together and prevent them from twisting. Nagels are most often made with a diameter of 3 - 4 centimeters from oak or birch wood. Instead of wooden pins, it is possible to use a metal tube, but this is quite expensive. For pins, 3 beams are drilled with a through hole in depth in a checkerboard pattern and inserted effortlessly. Instead of wooden and metal pins, it is possible to use 25-30 cm nails. In this case, it must be remembered that its hat must necessarily be recessed 3-4 centimeters deep into the timber, since shrinkage of a house built of timber is inevitable.
Roof

Often the second floor is planned in the attic, and this requires roof insulation. There are two ways here:
Install a temporary roof, for which cover it with roofing material and wait for the house to shrink for a year. After a year, build the final version of the roof of the house from a bar.
in the first year to complete its construction: having made steam and waterproofing, insulation and roofing material on the roof.
In the second option, additional costs in the form of roofing material, but an undoubted gain in time - we move into a new home.
The main mistakes during construction
It takes a lot of courage to build a house from a bar with your own hands. This is not a joke and usually a person trusts his construction company with a good reputation. If it is decided to build on its own, then it is necessary to foresee all possible errors. As in every business, there are "pitfalls" here.
Foundation savings

The foundation of any home is the foundation. At the stage of its laying, it is necessary to strictly adhere to all accepted building and technical standards. Any attempt to save money can lead to the destruction of the house. The foundation, erected with deviations from the established rules, can "revenge" by subsidence, the occurrence of micro and macro cracks and the destruction of walls. Subsequent repairs will negate all your savings.
Therefore, contact an experienced designer. He will make a project and make all technical calculations. Only in this case, you can be sure that the house will stand and delight your family.
Design errors

With self-calculation of the project, there is a threat of unprofessional design. For the same reason, one should not strongly demand significant savings in construction from the developer of the project. Based on repeated experience, it has been established that the attic gives a large increase in living space, but at the same time does not lead to a significant increase in the cost of construction.
Including a basement in a house construction project, you do not significantly increase its cost, but significantly improve the quality of life in this dwelling. Try to make the house proportional. The abundance of small rooms in a large house and vice versa will make living in it not very comfortable. Consider zoning in advance. You, most likely, will not like it very much when smells from the kitchen soar in the bedroom.
Other errors

The choice of roofing materials for the roof. In this matter, it is necessary to combine our desires with the compatibility of all other types of building materials. The design of the roof itself and the climatic conditions of the building site are taken into account without fail.
Errors in the engineering equipment of the house and its electrification. Before installing various installations that ensure comfort in the house, contact the energy supervision organization. They will tell you the maximum power consumption of electricity in the house. By violating this point of construction, you endanger the lives of your loved ones.
Landscape design. It is not necessary to consider the landscape of the site as something secondary. Thinking through it must be done simultaneously with the design of all buildings located on the site. This will create a single ensemble of home and nature. It will help to foresee the lighting of rooms in advance and accurately fulfill all land standards.
Mistakes in choosing stairs. Not an unimportant moment in the arrangement of a house with an attic is the choice of stairs. For a private house, you should not choose a ladder with a width of less than 35 cm. An angle of more than 30 degrees is not convenient for the elderly members of your family. Consider also the fact that it is desirable to make the dimensions of the stairwell large. This will make it easier to lift things to the second floor of the house. Think carefully about the installation location of the ladder itself. If you make a mistake with his choice, then in the future it will be problematic to do this.
Poor quality treatment with antipyretics and antiseptics. It rains on your house, the sun dries it, various molds, fungi and microorganisms attack your home day and night. All this harms the house from a bar. Take care of him. Do not forget to carry out a comprehensive and high-quality treatment of all lumber with antipyretic and antiseptic solutions. This work will need to be carried out every year. Carefully treat all areas of the house where wood comes into contact with concrete or is exposed to precipitation.
Take your time with the installation of doors, windows, interior decoration. Keep in mind that in a wooden house, the installation of doors and windows is carried out in a special way. For this, a special installation method has been developed that prevents breakage and distortions of windows and doors. It is somewhat different from the usual way of producing such works. For houses, during the construction of which a bar of natural moisture was used, before starting the interior decoration of the premises of the house and installing doors and windows, it is necessary to wait for the bar to dry and the house to shrink. This process usually takes 9 to 12 months.
Video How to build a house from a bar with your own hands