Handmade wooden medallions. Beautiful do-it-yourself wooden medallion
Beautiful handmade pendants are a task that everyone can handle. We will talk about unique jewelry that you can make yourself from practically improvised materials. They are easy to find at home or in the nearest store.
Pendant made of beads and beads
For beginners, it is better to practice on plastic or wooden beads. The latter, if desired, are painted in any suitable color, if they have not yet been varnished. In the future - artificial or ornamental stones (for example, pearls, agate), solid wood.

It depends on the manufacturer how even each bead in the package will be. In cheap Chinese, beads often come across curved, beveled or too narrow for a needle.

It is suitable for training and monochromatic "filling", creating the effect of "negligence" in the boho style, etc., but the multi-colored ornament can go astray. Therefore, patterns of two or more shades are best made from high-quality Czech, Japanese or similar beads.


Wire pendant
The most common in three variations: steel, golden and aged bronze. More expensive and difficult to process - copper and semi- and precious metals. It occurs in different thicknesses, ranging from about 0.02-0.04 mm.

For a multi-layer decoration with a large number of elements, it is better to have several wires of the same color of different thickness at once.

To work with the material, you will need tools that can be borrowed from men: pliers and round nose pliers, wire cutters. As well as a ruler along with a sketch of the pendant.

Pendant made of polymer clay
It will appeal to everyone who once loved to sculpt and did not lose their skills. Those who have already forgotten or want to improve their skills will be saved and delighted by a huge number of instructions on how to make a pendant with your own hands on the Internet - on video or from a photo. You can achieve very beautiful layered or gradient transitions by correctly folding or crushing pieces of clay.

The uniqueness of the material lies in the fact that it can be molded into incredibly realistic fruits, berries, desserts, flowers, any figures and even landmark buildings that will look great in the form of beads for earrings, pendants, bracelets and brooches. To do this, the mount is carefully stuck into the finished products, later everything is baked in the oven according to the instructions.

You should carefully monitor the expiration date and observe the storage conditions, if the polymer clay is stale, it will become poorly wrinkled and will crumble after heating.

Cold porcelain pendant
Easy to prepare at home, so it is one of the cheapest materials for creativity. Unlike polymer clay, it is more plastic and homogeneous, hardens at room temperature for several days.


Cold porcelain is easy to paint when cooking with food coloring or after hardening - with acrylic paints. Very delicate and realistic flowers are obtained from it, especially if you use forms taken from real plants.

Epoxy resin pendant
Often sold as two components: resin and hardener. They are mixed in strict proportions and poured into silicone and plastic molds or bases for pendants. After about 1-2 days, the coating finally hardens and becomes transparent.

Pin pendant
Ideal for brutal military-style accessories, but can look bright and unusual if decorated (beads, bright yarn, etc.).

Pendant made of chains, braids, lace
Useful for hanging the pendant around the neck, adjusting the desired length, and for the design of the pendant itself.

In addition to the materials listed, the options and ideas on how to make a pendant can be very different, even old forks, shells, keys or glass turned by waves will do if you make an effort and imagination.

Note! 
Master class how to make a beautiful pendant
- Put glass balls on a baking sheet and put in an oven preheated to 260 degrees for 20 minutes.
- Pour the balls into cold water with ice, inside they will crack beautifully. The beads are ready.
- Insert the pin into the hugger, cut off the excess end with wire cutters, leaving 3-5 mm from the edge.
- Bend the tip from the inside of the hugger with thin-nosed pliers. Thickly anoint with transparent super glue.
- Firmly press the ball to the glue. Wait until the materials set and leave to dry.
- Insert a ring into the loop of the pin and pass a cord or chain through it.

The photo of how to make a pendant shows the steps of a simple manufacturing process, which will be interesting to do with younger students. When everything works out, take on more complex and interesting products. Good luck!

DIY pendant photo


Note! 


Note! 


Having a good selection of jewelry in stock so that you can really choose them according to your mood and any wardrobe is the dream of any girl and woman. You can make one unique option with your own hands - for yourself or as a gift.
To you will be required:
- 2 wooden boards (10x10 cm, 0.32 cm thick; birch and hazel are used here);
- outlines of small images that you want to cut out in medallions;
- glue for wood;
- drill and thin drill;
- vice;
- mechanical or conventional jigsaw;
- wax coating for wood;
- sandpaper;
- round rasp;
- pointed pliers;
- strong wire - silver or any other;
- a non-standard chain, for example, made up of metal balls (such a simple, but at the same time unusual and elegant medallion will look bad on an ordinary, even wide, chain) - can be replaced, for example, with a leather cord.

1. Design an image or search online. Reduce on the computer and print the image design for the pendant. Cut it out and stick the paper on one of the two wooden planks. You can dilute the glue with a little water - it will be easier to remove the paper from the pendant later. Let the glue dry.


3. Prepare a mechanical or conventional jigsaw. Insert the blade into the drilled hole and cut out the outline of the design. Take your time and work carefully: a neat image is the key to this design.


4. Remove the entire paper with the image from the tree. With a rasp, process the edges of the sawn contours from the inside so that they become smoother.

5. Paint the second - still untouched - plank dark or stain. Let the coating dry.
6. Take wood glue and glue the sawn board together with the dark one. Use a vise to squeeze the boards together. Lay a dense material like felt, felt or baize (a baize in several layers) between the vise and planks at the top and bottom so that the metal does not leave marks on the tree. Let the glue dry.

7. Saw out the outer contours of the pendant from the glued boards. Circle, rectangle, heart, star, etc. It is convenient to use a school ruler to outline a circle.

8. Drill a hole in the top of the pendant for the connecting ring.
9. Sand the outer borders and the surface of the pendant until completely smooth. For rectangles, it is better to first round the corners with a medium-grained sandpaper.
10. Coat the pendant with wax. Let the compound dry.

11. With thin-nose pliers, make a ring of suitable size from the selected wire. Or take it ready. Insert the ring into the top hole of the pendant, hook onto the chain, close the ring. Ready!

.jpg)
Wood is a natural and easy-to-work material, so it is often used by craftsmen in their crafts. For pendants made of wood, they try to choose unusual species with a beautiful pattern of annual rings and structure. Walnut and boxwood, mahogany and cherry are in demand, although a lot of work is also done from oak. It is better to choose solid wood for crafts, so that when wearing the pendant, you do not accidentally beat off a piece.
In the article, we will consider how you can make a wooden pendant yourself at home. You will learn what tools the craftsmen use, how to clean the surface so that the pendant is smooth and shiny, what varnish is recommended for coating so that the jewelry remains beautiful for a long time.
You will also learn how to make a pendant out of wood and epoxy resin. These are crafts of incredible beauty that can be supplemented with natural materials or polymer clay figurines. Such a resin is very toxic, so be sure to wear a protective mask and ventilate the room well before working with such material. It is advisable to do the pouring into the mold not in the room, but on the balcony or in the garage.
heart
The easiest way is to cut a certain figure out of beautiful wood, in our sample it is a small heart. The necessary shape is cut out of a thin plank with a jigsaw along the drawn contours. Then the edges are rounded off with an emery stone. Further, the wooden pendant is processed manually with sandpaper. First take No. 100, and then grind No. 80.
A hole with a diameter of 2 or 3 mm is drilled from above with a drill for threading the lace. You can cover the product with acrylic varnish. If he raises the pile, then go over the surface with fine sandpaper again. It remains to finally open with varnish and after drying can be worn around the neck. Some craftsmen do not use varnish, but simply rub the wooden pendant with wax.
Stacked pendant
The decoration assembled from several types of wood with a bright contrasting combination of colors looks beautiful. Small pieces of wood are glued together with D-3 carpentry glue and the workpiece is clamped in a clamp. After a while, they take it out and cut out any shape.

Further, the craft is processed in exactly the same way as in the first described version. In the photo above, the master went the simpler way and made a pendant from three identical bars of different lengths and colors. If you do not have the remains of different woods, then you can paint one in different colors using stains.
Pendant "Tree of life"
To carve a pattern on wood, sharp chisels, both simple and triangular, are required. The "Tree of Life" is considered an ancient Slavic amulet, a symbol of wisdom and immortality, which is why even today many people wear such jewelry, although they do not put any sacred meaning into it.

Any person can cut the contours of the trunk and branched crown. The craft made on the saw cut of a large branch looks beautiful. Leave the bark in place, it gives the pendant a natural naturalness and a finished look. You can process the notches with a small cutter using a hand drill.
Combination of wood and epoxy resin
In order to create a unique wood and epoxy pendant, you will need a plexiglass container, a piece of wood with bark, or a broken lamella that has sharp edges. The more natural the shape looks, the better the pendant will look when finished.
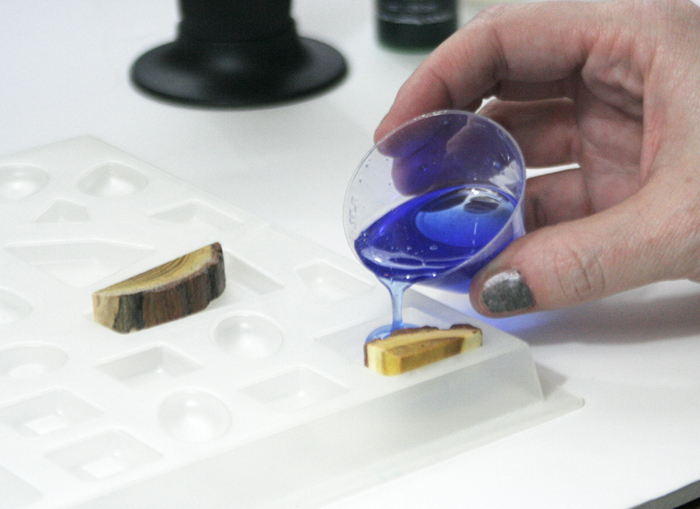
In a separate container, mix the epoxy with the dye to get a rich blue tint. Then everything is poured into a mold with a wooden piece and left to harden. It remains to grind the workpiece well and give it the necessary configuration, removing all unnecessary. You can make a hole for a chain or lace with a drill. You can finally sand the craft with a piece of felt.

If you want to complement the decoration with a Christmas tree, a snowman or a flower, then buy polymer clay of the desired color and mold the figure with your hands. Put the small craft in the oven for 15 minutes. Then lay it on a piece of wood and fill it all together with epoxy.
As you can see, it is not difficult to make a handmade pendant from wood, it is enough to have the necessary tools and a small piece of wood with a beautiful structure. The rest is a matter of technique! It is advisable to grind the craft well so that the surface is smooth and does not scratch the body of the girl to whom the gift is intended.
Having a good selection of jewelry in stock so that you can really choose them according to your mood and any wardrobe is the dream of any girl and woman. You can make one unique option with your own hands - for yourself or as a gift.
To you will be required:
- 2 wooden boards (10x10 cm, 0.32 cm thick; birch and hazel are used here);
- outlines of small images that you want to cut out in medallions;
- glue for wood;
- drill and thin drill;
- vice;
- mechanical or conventional jigsaw;
- wax coating for wood;
- sandpaper;
- round rasp;
- pointed pliers;
- strong wire - silver or any other;
- a non-standard chain, for example, made up of metal balls (such a simple, but at the same time unusual and elegant medallion will look bad on an ordinary, even wide, chain) - can be replaced, for example, with a leather cord.
1. Design an image or search online. Reduce on the computer and print the image design for the pendant. Cut it out and stick the paper on one of the two wooden planks. You can dilute the glue with a little water - it will be easier to remove the paper from the pendant later. Let the glue dry.
3. Prepare a mechanical or conventional jigsaw. Insert the blade into the drilled hole and cut out the outline of the design. Take your time and work carefully: a neat image is the key to this design.
4. Remove the entire paper with the image from the tree. With a rasp, process the edges of the sawn contours from the inside so that they become smoother.
5. Paint the second - still untouched - plank dark or stain. Let the coating dry.
6. Take wood glue and glue the sawn board together with the dark one. Use a vise to squeeze the boards together. Lay a dense material like felt, felt or baize (a baize in several layers) between the vise and planks at the top and bottom so that the metal does not leave marks on the tree. Let the glue dry.
7. Saw out the outer contours of the pendant from the glued boards. Circle, rectangle, heart, star, etc. It is convenient to use a school ruler to outline a circle.
8. Drill a hole in the top of the pendant for the connecting ring.
9. Sand the outer borders and the surface of the pendant until completely smooth. For rectangles, it is better to first round the corners with a medium-grained sandpaper.
10. Coat the pendant with wax. Let the compound dry.
11. With thin-nose pliers, make a ring of suitable size from the selected wire. Or take it ready. Insert the ring into the top hole of the pendant, hook onto the chain, close the ring. Ready!
The female half of humanity, at least most of it, loves jewelry. This is typical for ladies of any age, everyone wants to look attractive. A pendant on a chain will help to gracefully highlight the curves of the neck. Now many are fond of needlework, creating jewelry for sale, as a gift or for their own use. How difficult is it to make pendants with your own hands? Let's look at a few options available.
What are pendants made of?
Any woman can afford to wear such jewelry, therefore, the variety of these accessories is striking in the multitude of shapes, sizes, colors and materials. What is used to create pendants with your own hands? There are many options: plastic, wood, paper, leather, feathers, fur, fabric, stones, metal, beads. The first pendants were made from fish vertebrae, beautiful shells, pieces of amber and even natural flowers. Now modernity dictates its trends, and on the necks of girls you can even see jewelry in the form of a computer motherboard or a floppy disk. The fantasy of those who make pendants with their own hands is truly limitless, which makes each of them an individual and original piece of jewelry.

Making a heart pendant
We can say that heart-shaped pendants are the most popular, almost every girl has such an ornament. In addition, they are easy to make even for a novice creator. The easiest way to make a heart pendant with your own hands is to weave from beads or wire. Such an accessory will be a wonderful gift both for Valentine's Day and for any other holiday. To create such a beaded jewelry, you will need the beads themselves of different colors and sizes, a fishing line and a ring to which the chain will be attached. You can weave a simple red heart, futuristic gold or silver, the pattern is easy to find in a beading magazine. If you want to experiment, take a piece of felt and embroider a heart on it. You can fill the entire inside, and not just the edging, sew or glue beads of various sizes, imitation pearls, Swarovski crystals. Let all the elements be combined with each other in color, the combination of gold, yellow and white looks very beautiful. At the end of the embroidery, cut out the heart, carefully glue the cardboard on the back to keep the shape. Lay a leather layer on top of the cardboard, sew along the perimeter - and the pendant is ready.
Weaving wire ornaments
Do-it-yourself pendants are made not only from beads. A fairly common option is a wire suspension. Those jewelry that are sold in stores are made of gold-plated or silver-plated, and copper or aluminum is suitable for home art. Pendants of various shapes are made from wire. Thin wire is easier for a beginner to work with, and a combination of thick and thin metal thread will add zest to your creation. To work with this material, wire cutters, solder and often complement with stones, beads, pearls or wooden elements.
Stone pendants
With your own hands, you can also make pendants with stones, not necessarily with precious ones. The easiest way is to find an unusual pebble on the seashore (or ask friends to bring from vacation), make a hole in it and hang it on a chain. If you are not satisfied with this option, then use beading patterns that include

Sheathing (edging) of a stone with beads is called a cabochon, and this is a fairly popular way of making jewelry. The cut can be made metal using the same wire: let the flight of the imagination, the combination of different shapes, the combination of opposites be a priority, without limiting you to standard schemes.
How to make a pendant with your own hands from plastic

Home sorceresses use for their masterpieces - a rather malleable material from which you can mold anything, like from plasticine. Then it will harden and keep its shape. To make pendants with your own hands from plastic, you will need:
- polymer clay of the required colors (or white and acrylic paint);
- thick polyethylene film;
- pin (a suspension is attached to it);
- glossy varnish;
- glue "Supermoment";
- rolling pin;
- sharp knife,
- stationery knife,
- textured stack (for example, a bundle of wire or toothpicks, a knitting needle);
- pliers.
You need to work on a prepared flat surface, it is advisable to use disposable rubber gloves so as not to leave marks on the product. The manufacturing process is similar to roll, cut, fasten different parts. You can make one pendant or a set with earrings. Shape and color - your choice. To harden, the clay is sent to the oven for a certain time (according to the instructions sold with the material).
Let the question of how to make a pendant with your own hands not be before you. Just decide what decoration will decorate the neck, and go ahead, try different options.