Decoupage of a glass jar with an aging effect. Decoupage of glass, tin and coffee cans: master classes Decoupage and aging of a glass jar: aging with a candle and spraying
What every kitchen has a lot of is different jars, boxes and other containers for spices and bulk products. Finding the perfect set in a store, even with such a large selection, is difficult. But thanks to the decoupage technique, you can create beautiful containers in the same style from glass jars. Decorating objects with carved designs has been known since the Middle Ages. There are no problems with materials for decoupage - you can find them in all office supply stores or at home.
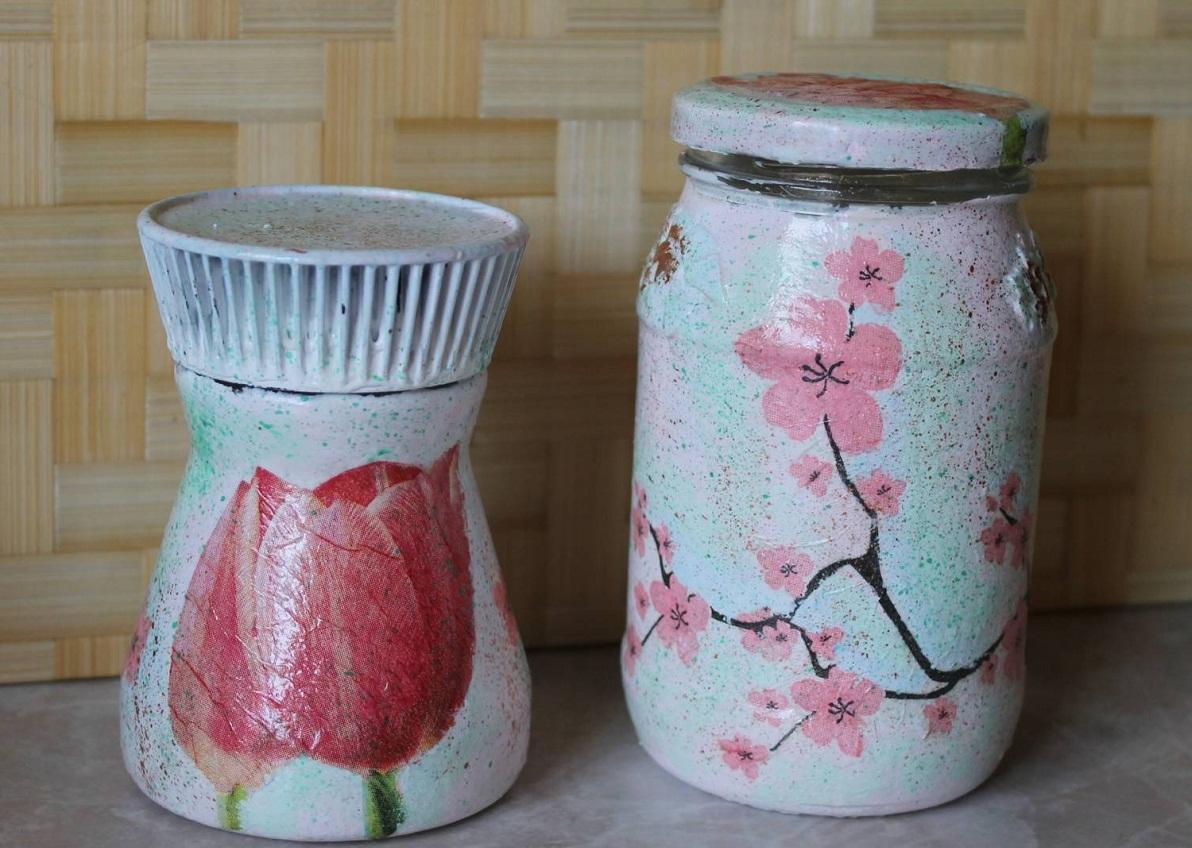
This is a creative activity that brings pleasure from the process and incredible results. You can make a complete set of dishes with your own hands if you decorate several jars of different sizes and decorate a clock with a napkin holder in the same style.
A set of small containers looks original; to complete the picture, a special stand is created from a cardboard box. It is first covered with thick paper of any color, then covered with acrylic paint and decorated with designs made from napkins. At the final stage, acrylic varnish is applied in 2-3 layers.
Napkins made from rice paper are well suited for work, especially since there are many advantages of using it:
- Saturation and dense texture of decorated areas;
- Three-dimensionality of the image;
- “Innate” decorative elements;
- When gluing, the paper blends perfectly with the surface;
- For beginners, it is convenient to use such material because it does not require pre-processing.
The decoupage technique captivates with its limitless choice of compositions and varied styles. Any image can be transferred to glass. Galina Vakula, an experienced decoupage master, tells in her training materials how to work with glass, creating unique patterns.
Decoupage of a glass jar: master class
The described master class is ideal for beginners, and a good help for experienced needlewomen who love to create masterpieces with their own hands. Napkin technology is considered one of the simplest and most inexpensive.
For creativity you will need:
- Original three-layer napkin;
- Special glue;
- Acrylic paint, preferably in spray;
- Acrylic varnish, brush, scissors;
- Alcohol or dish soap.

To decoupage kitchen jars or bottles, you need to select several glass containers with tightly closing lids. Whether the shape is round or different, it is still important that the product is suitable for further use.
The surface must be degreased and dried before applying acrylic to it. You can use alcohol or dishwashing liquid. It is necessary to paint in 2-3 layers so that the composition richly envelops the entire product. While the workpiece dries, decorative elements are prepared from napkins.
The cut out fragments for decorating the edges of the tank are “tried on” along the perimeter of the jar, then, using a brush and glue, they are applied to the desired places. If the shape of the product is asymmetrical, it is important to pay special attention to the front part. The structure of the napkin is fragile, so you should approach the pasting process carefully. By applying elements in small sections, you should avoid the formation of folds and wrinkles.
Important! If you use PVA glue, the paint will bleed onto the front part through the pores of the napkin. Here you need special glue for decoupage. It is very strange that many authors of articles advise beginners to use PVA, misleading people.
The glued elements must dry completely, after which you can start working with varnish. In order for the tank to retain its attractiveness for a long time and justify its purpose, the product is applied in 2-3 layers. Before the varnish has had time to dry, the excess that has smeared and extends beyond the edges of the design can be removed with a cotton pad soaked in alcohol. It is recommended to bake the finished product in the oven so that the design does not wash off. Baking time 1 hour 30 minutes, temperature – 130°C.
Decoupage of a glass jar: aging effect
Baby food jars can be used to store soda, salt, coffee and other bulk products. To do this, the labels are removed, the lids are repainted if desired, and original signature labels are made.

Lids are decorated in several ways:
- Wrapping paper;
- Fabric;
- Colored acrylic composition;
- Chalkboard or magnetic paint.
The technique of artificial aging is popular. Craquelure varnish helps to achieve this effect. Craquelure is applied to the surface to be treated, and paint is applied on top, which will crack under the varnish. A network of cracks is formed, arranged in a chaotic manner. The paint is chosen in a contrasting color, peeking through the cracks, it will give a decorative additional effect.
For the bottom layer, brown is used, if the base is yellow, the top layer is blue, then the bottom is blue. It is important to take into account that the thicker the varnish layer, the larger and more pronounced the cracks will be. The main paint is applied to the craquelure when it has not yet hardened inside, but no longer sticks to the fingers.
When ready-made decoupage cards or napkins are not used, you need to print the selected designs on a printer with a waterproof cartridge.
For application, a brush or foam rubber is used; in the first case, the patterns are smooth with clear edges. Foam rubber allows you to achieve soft and chaotically located cracks; more of them will appear during the drying process.
Decoupage on glass jars: direct and reverse application techniques
Before you get creative, it is important to decide on the technique. It can be direct or reverse. The use of a particular method largely depends on the functional use of the item. For example, a jar for storing liquid non-food products is decorated with a direct design. Containers for spices are decorated with reverse decoupage: the varnished surface should not come into contact with food.

Methods of applying decoration:
- Direct decoupage differs in that it involves the use of a special primer for glass and other non-absorbent smooth surfaces.
- Reverse decoration is performed exclusively on glass. Here the back and inside of the product are processed, so only jars with a wide neck are suitable in order to easily place the applique inside.
Corrugated glass will not work - the image will be greatly distorted, but if an original, fancy effect is required, then you can work with such a surface.
Glass jar decoupage technique (video)
Original jars that are difficult to find a worthy use for, but don’t want to throw away, can easily be turned into exclusive new interior items using the decorative decoupage technique. Decoupage on glass opens up an unusually beautiful world of creativity and decor for many. In his bins there is a huge stock of ideas for creating masterpieces that will originally complement the interior of a house or apartment. There are always new options for inspiration, master classes, video instructions, thanks to which you can implement ideas extremely economically and surprise everyone with your grace and simplicity.
Don’t rush to throw away the dishes left over from pickled cucumbers and jam; it will make a beautiful container for cereals or sugar.
The decoupage of jars with napkins described in this master class is ideal for beginners and will serve as a help to experienced needlewomen who know how to create masterpieces with their own hands. Napkin making equipment is one of the simplest and most inexpensive, and if you use free items rather than store-bought items, decor and gifts will be very cheap.
Decoration materials and work tools
To decoupage a glass jar for bulk products, you will need:
- glass jar with lid;
- acrylic primer;
- napkins for decoupage with a similar pattern;
- acrylic paints (the choice of colors depends on the shades of the chosen motifs);
- scissors;
- foam sponges or regular foam sponges for dishes;
- PVA glue;
- synthetic brushes: one wide (1.5-2 cm) and several small ones;
- acrylic varnish;
- nail polish remover with acetone or other degreaser;
- glitter for decoration (optional).

If this is your first time taking up decoupage, visit our website “Women’s Hobbies” to make it easier to navigate the terms and actions.
Step-by-step master class on decorating a jar
Before you start decoupaging the jar, wash it and the lid well. Then wipe the outside of the items with a cloth soaked in acetone. Let it dry.
After degreasing, try not to touch the treated surface with your hands unless absolutely necessary.

Cover the bottom and walls approximately to the middle with an even layer of acrylic primer; if necessary, you can apply 2 layers. Do the same with the outer surface of the lid. 
While the primer dries, prepare the motifs for gluing. Carefully cut or tear out the necessary fragments. 
Place the prepared fragments on the primed surface and apply PVA glue evenly with a wide brush. Let the drawings dry well. 
While the glue is drying, prepare paint of a suitable color and evenly cover the primed surface of the lid using a foam sponge. 
Using the same paint, use a sponge to cover the bottom and part of the walls free from drawings. 
Paint over the background along the edge of the motifs with a thin brush. 
Carefully clean areas of glass covered with primer that extend beyond the edge of the motifs with any thin and sharp object (knife, scissors, manicure accessories).

The edge of the picture should be as smooth and clear as possible. 
In a separate container, mix a small amount of decorative glitter and PVA glue. 
Using a synthetic brush, cover the lid and background of the jar with the resulting solution. Let the glue dry. 
You can additionally decorate individual elements of the motifs with acrylic paint - this will make the drawing brighter and more vibrant. For example, small elements coated with pearlescent paints or metallic shades look good. 
Use acrylic varnish and a wide synthetic brush to cover the lid and jar in three layers. Let dry thoroughly. 
Now you can safely use your product for its intended purpose. 

Decorate with decoupage several glass jars of different sizes: for cereals, legumes, sugar, coffee, tea. Do it in the same style. You will get a full set of dishes, which you won’t be ashamed to display in the most visible place. Feel free to give homemade items to friends and relatives. Today, handmade products are especially valued!
Don't be afraid to wash your decoupage jar, but soaking and using harsh detergents and abrasives can ruin the decor.
A master class on decoupage of glass jars with napkins for readers of the online magazine “Women’s Hobbies” was prepared by Anna_Ko. Join us on social networks to be the first to know about new publications.
You can use anything for such needlework: ordinary glass jars, simple dishes, any bottles, glass, and even jars of chips and coffee. Try to make decoupage of jars for the kitchen, decoupage of plastic jars - and you will see how cool it looks on the shelves or on the table.

The meaning of this technique is to paste cut-out napkins, printed drawings, selected dishes or any interior item. After pasting, most often the entire surface is covered with a layer of protective varnish. This is if you want the item to last you longer.

The flower is not cut out of the napkin, but the edges are simply torn off.
Master class No. 1 – decoupage of enamel dishes
If you just want to try your hand at this technique, all you need is napkins or printouts, clippings from a glossy magazine, any acrylic paint, or regular stationery PVA glue.
Decoupage varnish (if you buy it in a special store - the price is steep) you can buy in a store for repairs, or you can make it yourself. There are 2 options for homemade varnish.
How to make Mod Podge (varnish) based on glue:
- 225 ml PVA glue.
- 112.5 ml water.
- 2 tablespoons water-based varnish (optional).
Mix everything in one jar, shake and close the lid. The varnish is ready.
How to Make Mod Podge Using Flour:
- 1 ½ (210 grams) cups flour
- ¼ cup (56.25 grams) granulated sugar.
- 1 cup (225 ml) cold water.
- ¼ teaspoon olive oil (optional)
- ¼ teaspoon vinegar (optional)
Mix all the ingredients in a ladle, beat a little with a fork, don’t forget about the vinegar. Turn on medium heat and bring to a boil. If it's too thick, add water. Bring to a boil, stirring, remove from heat. We wait for it to cool down and pour it into a jar with a lid.


You can start a master class for beginners. We choose the surface that we want to decorate and prepare the materials. The dishes can be decorated with any designs, such as cards, wrapping paper, magazine clippings, postcards, napkins, etc.
Images are printed only on a laser printer; they will be blurred on an inkjet printer.
To work you will need:
- White acrylic paint.
- Sandpaper (sandpaper).
- Brown acrylic paint.
- Brush.
- Mod Podge or DIY varnish from 2 options.
- Sponge
- PVA glue (diluted with water 1:1).
- Can, jug, mug - any enamel container.
We set up a work corner: lay down newspaper or paper. Degrease the surface (wash with water, then you can wipe with alcohol or cologne).

Print out the pictures and cut them out. We try to cut all the pictures at an angle so that the varnish adheres better.

Take a foam sponge (or a dish sponge) and “blot” the corners of the picture with brown paint. Place the tablet in water for 1-2 minutes. We need to remove the top layer on which there is a pattern. There are several ways to thin out an image.
You can simply split it (for example, office paper, cardboard), or you can, by attaching the picture with the reverse side, “roll up” the top layer with your fingertips.
Another “dry” way to split paper is with tape. We seal the pattern on the reverse side tightly across or along with strips of tape. It's better to use wide tape. Press the tape and paper firmly so that they stick together better. Starting from the corner, separate the layers of paper and carefully separate the top layer. Just do not tear sharply, otherwise the design may be torn.


We spread PVA glue on the place chosen for the picture, put the picture on this place, and also coat it with glue on top. After 30 minutes, cover the top with decoupage varnish or homemade varnish (recipe above). We put it aside and wait for the varnish to dry (2-3 hours), then you can go through it again, final. We made a vase from an old can.

Master class No. 2 – decoupage of a glass jar
We will make the next glass jar decoupage master class from ordinary glass jars; you can use them to make vases or stands for spoons and forks. Decoupage of glass jars should begin by soaking them in warm water, followed by removing the old labels.

Decoupage a glass jar is a good idea. For work we need everything that was in the first master class; PVA glue can be replaced with decoupage varnish (Mod Podge or homemade). If you use PVA glue, then it needs to be diluted with water 1:2 so that it is not too thick.

So, we print out pictures or cut them out from magazines, postcards, napkins, etc.
For work we take:
- Acrylic paints – white and black.
- Sandpaper.
- PVA glue.
- Decoupage varnish (can be replaced with homemade varnish: see above).
- Printouts or magazine clippings.
- Brush, sponge.

Apply primer to the glass. If you are a beginner artist, you can skip this moment; just cover the glass with black paint.

Apply black acrylic paint to the glass surface of the jar. Let it dry thoroughly.

We go along all the sides and bulges of the glass jar using sandpaper. We need this for the aging effect.

We print out the pictures and cut out the fragments with scissors. Place the cut out fragment on the file, take a brush and decoupage varnish (homemade varnish number 1, made from PVA glue: see above). Apply the solution to the fragment. We wait for it to dry and apply again, and so on up to 3 times.

Then put the fragment in warm water for 5-10 minutes. Using a brush, apply PVA glue to the center of the jar. Carefully, so as not to tear the picture, apply it to the jar and remove the top layer.

First we coat the picture with varnish, and then the entire jar. Dry and varnish again. This is how you can decoupage small and large glass jars.


Master class No. 3 – decorating a tin can
Next, we wash, degrease and dry jars, bottles, metal cans, flower pots, in general, everything that you are going to decoupage. In this master class we will make decoupage of a tin can. These jars are usually used to sell canned fruits or vegetables.
We start decoupaging cans by making sure there are no sharp edges or burrs. There are many ways to shape the edges: you can use pliers and bend the sharp tin edges inward, you can cut a wire with a diameter of 3-4 mm, and glue the vinyl top of the wire to the top of the can:


After we have washed and degreased the tin can with alcohol or cologne, and decorated the top, we need to apply dark acrylic paint to the surface of the can. This can be done with a brush or sponge. We are waiting for the paint to dry.

After the dark paint has dried, apply a layer of white acrylic. And we also wait for it to dry. You can cover it with white acrylic one more time.


We glue the pictures using the “file method”. Place the picture face down on the stationery file and pour water on top. Let's keep the pictures in water for 3 minutes and thin them after that. We drain the water, apply it to the desired place, press it, and remove the file. Using a brush, we smooth out and expel air bubbles, apply glue to the drawing. Smooth out evenly and straighten out wrinkles. We work from the center point to the edges. We go over the picture with a brush and glue. Let it dry. We apply varnish. Let's dry it. We repeat again.

Professionals apply 25-30 layers of varnish to the product, but we are beginners, 2-3 layers are enough for us.

Glass jars and bottles are processed in the same way. If the color of the glass is dark, then you don’t need to cover it with dark acrylic. Only use white paint and then sand with sandpaper.
Master class No. 4 – decoupage of cans for bulk products
And another master class using chip packaging. It is convenient to store tea, sugar, coffee. We repeat everything as in the first two works. As a result, you will get jars for bulk products.

Decoupage coffee jars. Very cute and cute decor.


Decorating your home is easy using scrap materials. Glass and tin jars that are thrown away as unnecessary can become the basis for creating attractive decorative items. Just look at the photo of decoupage cans to understand that in this way you can make the kitchen cozy, while the costs will be minimal.
Decoupage glass jar
In the kitchen, the housewife uses jars and jars to store bulk products and spices. It’s boring to store food in simple glass containers, so try to create a decoupage glass jar that will support the style of the entire room and become a functional and attractive decorative item.

To work you will need:
- any jars you want to transform;
- acrylic primer;
- napkins with a pattern;
- PVA glue or special decoupage glue;


Step-by-step instructions for beginners
First of all, clean and dry jars will need to be degreased using any alcohol-containing product. Then cover the outer surface of the jar with soil using a sponge. To make the drawing brighter, you need to apply the primer in a few words.

Second step: using fine sandpaper, level the surface of the container.

Cut out the fragments you like from a napkin or decoupage card and make a rough composition. Apply PVA glue to the primed surface, then apply a napkin.


Place a piece of polyethylene or a stationery file on top of the napkin, gently press and smooth the picture, starting from the middle and moving towards the edges.

After drying, you can add new fragments or paint the background with acrylic paints. If the jar has a lid, coat it with primer, then decoupage the lid with acrylic paint or the above method.

The last stage is varnishing. It needs to be done in several layers. This will preserve the craft for a long time and allow you to wash the jar.

In the same style, you can decoupage coffee cans to store tea, bulk products or spices: they will add a special flavor to your kitchen.


Original ideas for decoupage
By decoupaging a small glass jar, you can get an original candlestick. The jar can be coated with primer completely or partially, only in places where decorative fragments are glued. Through the glass the candle will shine even more effectively.


Using the above master class on decoupage of cans, you can make an original vase or flower pots from a tin can. Relief patterns created using a stencil and texture paste will be an effective addition.

Decoupage jars with napkins for an eco-style kitchen can be complemented with decor made from natural materials. Twine, pine cones, and artificial berries will help you create original New Year's compositions.

An original way to decorate a jar is decoupage on eggshells. To do this, small pieces of eggshell, previously thoroughly washed and cleared of the inner film, are carefully glued onto the primed surface.

Then the relief surface is once again covered with glue and decoupage is performed using a napkin or fragments of a decoupage card or rice paper. The result is a spectacular piece of furniture.

Banks do not always have a smooth surface. You can decoupage a tin can with a relief surface in the same way, you just need to be very careful when gluing the motifs.


Objects made using the craquelure technique have an unusual appearance. This will require a special varnish. The base is covered with paint, which will then be visible through the cracks, then a layer of varnish is applied, and after drying, the top is painted with acrylic paint.


The last step is to glue the napkin. The top layer cracks when it dries, and the jar takes on its original appearance. With reverse decoupage and two-component craquelure, the technology changes slightly.

This technique is suitable for jars of unusual shape, clay vases and jugs. They will be appropriate in eco-styles, vintage and retro.

The simple decoupage technique will allow you to turn ordinary objects into original ones that will complement the style of your home, giving it charm and comfort.

Photos of decoupage cans


In order to decorate various objects with your own hands, they use the decoupage technique. It has become known since the Middle Ages. Today, jars, bottles, and pieces of furniture decorated in such an unusual way are again regaining their former popularity. A product designed in this way will decorate any home.
Options
Many novice craftsmen are interested in the question of what this type of decoration can be made from. For these purposes, multi-layer napkins are useful. Choose those products that depict interesting, colorful designs.

At first glance, the process may seem complicated to you, but it is not. An alternative is decoupage cards. As you can see in the photo of decoupage cans, this is paper prepared in a special way, on which interesting patterns are applied.

Often this kind of card is used to decorate sets and boxes. They are used to complement gift wraps that will surely make you stand out from the rest.


To enhance the effect, gilding or blackening is often used when decoupaging a glass jar. The technique of artificial “aging” is quite popular today.

Pay attention! The use of the technique of decoupage of jars with your own hands is gaining more and more popularity. Using this method of decorating objects allows you to create unusual, truly original things, unlike other things.

It is not necessary to use exclusively images that can be transferred to another surface. After all, there are other equally acceptable solutions. This is the use of volumetric decoupage technique. For these purposes, special modeling masses are used. The use of eggshells is relevant.

Application
To use the coffee can decoupage technique, you will need ordinary available parts. The duration of the process will pleasantly surprise you, because in a short period of time you can achieve amazing results.


Stylists most often use techniques when decorating rooms made in different styles. For example, it could be Victorian style, Provence, or other styles.

It is difficult to decorate furniture in this way, because in this case experience and a certain level of skill are required.

Important! As a gift to friends, or, for example, for a housewarming, you can bring a bottle decorated using this technique into your home.

Simple ways
In order to decorate properly, you should pay attention to the master class on decoupage jars. It is best to choose unusual shapes; even metal or plastic products will do. Plastic type lids look more attractive. They can be easily painted in any shade that suits you.

Similarly, apply the tips below to decoupage a tin can.

If you are using egg shells, then they must first be dried. Clear it of the inner film, thus preparing it for further work.

Prepare PVA glue and scissors, because these are working tools. The main materials will be napkins (multi-layered) with interesting designs, acrylic paints in appropriate colors and varnish for decoration.

In the event that you want to decorate not just one, but a whole set of cans, then the designs can be identical.


At the beginning of processing, it is necessary to glue the surface with pieces of shell. Leave small gaps for paint to get in. A picture will be applied to part of the surface.

After the image has dried, apply a thin layer of primer. Then you should wait until it dries completely.

After this, it’s time to choose paint. Pay attention to the color, it should be harmoniously combined with the pattern you have chosen.


In the place where the shell is missing, you can glue a picture that was previously cut out from a napkin. Choose interesting images, or entire compositions.

After drying, it is necessary to repeat the varnish application procedure. Thus, the product will last longer while maintaining its original appearance.


Conclusions
There are a lot of interesting options. They are united by attractive appearance, originality, and unusualness.

This DIY jar will definitely find application and fit into any stylistic direction.

Photos of decoupage cans


