Do-it-yourself country paths from river stones. Pebble and stone garden paths
Any suburban area is not complete without paths. Along with a purely practical purpose, they serve as a kind of separators of the functional areas of the garden, mark the boundaries of lawns and flower beds. To make these elements of landscape design attractive and durable, you should choose durable, wear-resistant materials for their creation. A properly made pebble path in the country will last for more than one year due to the unique properties of the building material.
Natural material in landscape design
Rounded stones are often used in landscape design. The area, decorated with pebbles, looks natural and stylish. In addition, pebble paths can easily withstand considerable loads - you can safely walk along them and roll garden carts.
Pebble paths look especially good in a country house decorated in a Mediterranean or rustic style. In the first case, various mosaic patterns made of pebbles that differ in color and size will be appropriate. For a country-style garden, a simplified version is suitable, when plain pebbles are laid in a continuous canvas without unnecessary frills.
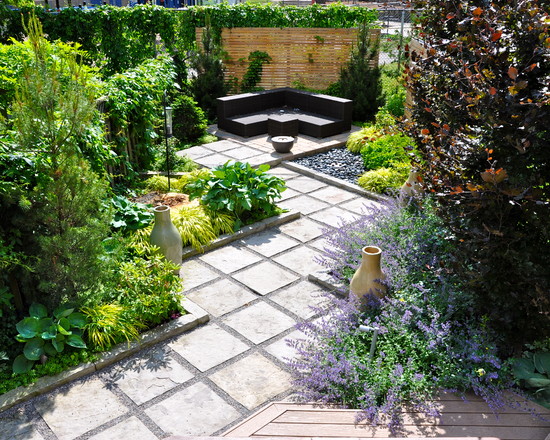
If rockeries, an alpine slide or a pond are located on the site, paved stone paths will become a logical addition to the overall landscape. A garden designed in this way will acquire a harmonious, complete look.

Path of large pebbles in the garden
Technology of paving garden paths
In order for pebble garden paths to serve for many years, it is important to take into account all the nuances, starting with the preparation and selection of stone.
What pebbles to choose for the paths
There are only two types of pebbles - natural, mined from a river or sea, and also made artificially. Stones of natural origin are superior in quality to their industrial counterparts. Therefore, if possible, it is better to purchase natural material so that the laid canvas does not lose its decorative and functional qualities longer.
As a rule, pebbles are sold in bulk. In stores, you can find ready-made pebble tiles or pebble mats on an elastic basis. It is much easier to pave paths from prepared pebbles with your own hands, but this material costs an order of magnitude more expensive. If there is a suitable reservoir nearby, you can simply pick up stones on the shore. This option will require a minimum of costs.

Combination of large stones and pebbles
What is required for work
In order to make a garden path out of pebbles, you will need the following tools and materials:
- pebbles;
- sand, crushed stone, screenings;
- cement;
- curb tiles or suitable stones for this;
- marking tools;
- building level;
- a piece of board along the width of the track, a hammer;
- shovel, rake, brush.
If you plan to lay out a complex pattern, you must first draw a sketch of it on paper. Before making a pebble path in the country, it is better to sort the stones by color and size, so the work will go much faster and easier.

An example of a complex pattern
Stages of creating a pebble path
Following the step-by-step instructions, even a beginner can build a pebble garden path:
- Mark the contours of the future path. This can be done with pegs and rope, or simply mark the outlines directly on the ground. The width of the cover should not be less than 50 cm, otherwise it will be inconvenient to walk. The width of 90-150 cm is considered optimal.
- A layer of earth is removed over the entire marked area to a depth of 15–20 cm. The larger the paving stones, the deeper the trench should be.
- At the bottom of the ditch made, a layer of sand is poured, and on top - a layer of gravel. The trench should be filled to two-thirds of its depth. A sand and gravel cushion is necessary so that the path has a solid foundation and does not crack over time.
- Install curb tiles or any other curb material along the edges. Fill the entire area with cement mortar. To do this, mix 3-4 parts of sand with 1 part of cement and a sufficient amount of water. Concrete should not reach the edge of the curb a little. At this stage, be sure to check the horizontal orientation of the web using a level.
- While the cement is wet, begin to lay out the pebbles. If the track is without a pattern, everything is simple. Pebbles are placed close to each other, pressing them into the solution flat or edge to a third of the height. In the case when it is required to pave the path with a mosaic ornament, they do it a little differently. Pebbles are laid out on the ground next to the path according to the sketch. Then carefully transfer the pattern to the concrete. Circular ornaments begin to spread from the middle. When working with stones of different sizes, large elements are first fixed, and the rest of the space is filled with small ones.
- In order for the pebble to lie flat, it is upset with a board and a hammer. The board is selected according to the width of the canvas. They lay it across the path and tap it along the entire length with a hammer, leveling the pebble masonry in one plane. The quality of work is checked by the level.
- The paved canvas is left overnight, covered with a film, so that the concrete hardens a little. After that, a liquid cement mortar is made and poured over the entire surface so as to smooth the gaps between the pebbles. Excess solution is removed with a soft brush.
- The finished pebble track is again covered with a film, after which it is left to dry completely. You can walk on a fresh canvas only after 10-15 days, when the concrete has completely hardened.

Stunning pebble pattern
For real craftsmen, it will not be difficult to make beautiful paths in the country with their own hands from pebbles - the patterns require only painstaking work and artistic taste. And the result will be the main decoration of the garden for many years.
Natural stone is often used for paving and landscaping of a suburban area. On sale there is a tile of regular or arbitrary shape, which makes it possible to implement any designer's projects.
Natural materials for arranging paths
Natural stone is characterized by the following properties:
- Frost-resistant.
- Durable.
- Durable.
- May have different shapes.

The properties of a material largely depend on its origin. The most common are:
- Slate. It has a layered structure, so it can be quickly divided into separate plates if necessary. Due to the porosity, the material is destroyed when exposed to moisture in cold weather.
- Shungite is considered one of the most durable stones, which allows it to be used when creating paths. Paving slabs and paving stones are on sale, design and color can vary significantly. A small amount of quartz in the composition of the material leads to the formation of white and gold patterns.
- Quartzite is frost-resistant, hard and durable. The material is difficult to process, this requires a special tool. Quartzite tiles and paving stones can be white, red, green. Developers often prefer quartzite because of its good value for money. A dacha with paths made of this material is a practical solution.
- Granite is considered the most durable natural material that can be used as a decorative surface. The appearance of the created paths is attractive, however, granite is rarely chosen for giving because of the high cost. Natural stone for paths is sold in the form of tiles with smooth edges, which simplifies installation work.
To create paths, zlatolit, lemezit can be used. Marble is considered one of the most expensive natural materials, so it is most often used for interior decoration.
Advantages of road materials made of natural stone
You can create paths from natural material with your own hands. The main advantages of using a stone of natural origin:
- Even under the most adverse operating conditions, the material can last for several decades.
- Frost resistance. Too low a temperature can change the basic properties of the material.
- Strength. The garden path throughout the entire period of operation will be subjected to mechanical stress. High strength eliminates the possibility of defects.
- Ease of installation. You can carry out the work yourself, this requires a relatively small set of tools.
- Large selection: texture, size, color.
The only drawback is the high cost of the product. Cobblestone and concrete pavers are much cheaper, which is primarily due to the peculiarity of production.
Comparison with materials of artificial origin
When comparing materials, pay attention to:
- Features of the applied production technology.
- Technical and operational characteristics.
- Price.
- Application area.
In all the above parameters, except for the price, natural material is superior to artificial. The high cost is justified by the fact that paving stones of natural origin last much longer. A one-time financial investment will pay off over a long period of operation, because natural stone does not react to environmental influences.
Necessary tools for working with stone

The paving of the path can be done independently. This requires the following tool:
- Bayonet and shovel for working with soil.
- Rubber mallet.
- Level to determine the correct position of individual stones.
- Angle grinder with special nozzles that are designed to work on stone.
- Debris brush.
- Rope and pegs for marking the site.
- Vibrating machine.
- Equipment for the preparation of concrete.
You will also need crushed stone, sand and cement to prepare the base and lay the stone.
Substrate preparation and laying
In order for the paving stones not to move at the time of its operation, it is necessary to properly prepare the base. There are 3 main technologies:
- Concrete.
- Combination of cement and sand.
- Sand.
The bearing base of concrete is created in the case when the path being created must withstand a significant load. The sand cushion is suitable for placing boulders and cobblestones. The best option is a mixture of sand and cement.
Planning and layout

- The path should be located at a sufficient distance from the trees, because. roots can break the integrity of the base.
- The width of the path should be no more than 1.2 m. It is recommended to choose a multiple of the paving stone size, which will reduce the amount of work.
- It is recommended to give simple path shapes, because. with complex ones, you have to spend a lot of time trimming the stone. Due to the high hardness, this is quite difficult to do.
- The slope should be created in such a way that precipitation is diverted from the structures.
Marking on the site is carried out with the help of pegs and thread. It allows you to maintain high accuracy during work.
Drainage layer design
Heavy rainfall can create a lot of problems because water washes away the base. Therefore, experts recommend creating a high-quality drainage layer:
- The top layer of soil is removed, taking into account the markings.
- The recommended depth of the created trench is 30-40 cm.
- A layer of sand is laid at the bottom of the trench, which is well compacted.
- The next step is to lay down the geotextile with a 10cm overlap. This layer is required to reduce the chance of weed growth as it only allows water to flow in one direction.
- The drainage layer is represented by a layer of gravel, the thickness of which is 10-15 cm. A fine fraction material is selected, which should be compacted. The layer is covered with non-woven textiles.

excavation
The installation of the curbstone is carried out after the creation of the drainage layer. The height of the curb is adjusted by adding sand. Most often, it rises 5-7 cm above the ground.
Concrete base device
The main load will fall on the concrete base. It is created like this:
- A layer of sand 3-4 cm thick is poured.
- The border is often used as formwork. If necessary, it is possible to limit the spread of concrete mortar by fixing the sides made of boards along the perimeter.
- A layer of concrete 10-15 cm thick is poured into the created formwork. If a car drives on the surface, the base is reinforced. It takes about 72 hours for the composition to dry.
- After the concrete has hardened, a cement-sand mixture is poured onto the surface. The selected tile will be laid on it.

Concrete foundation is expensive. However, if the technology is followed, the track will last for a long period.
cement sand base
A universal option can be called a cement-sand base:
- To begin with, a layer of sand 7-10 cm thick is created and compacted.
- Dry cement crumbles, which is again rammed.
At the time of laying the paving stones, the cement-sand base must be dry. To prevent it from crumbling, a curbstone and formwork should be installed.
sand cushion

The sand cushion is the cheapest. It has relatively low strength and reliability, but is suitable for tracks that will not be heavily loaded. It is not recommended to use in case of high groundwater level and moving ground.
The preparation of the sand cushion is carried out by scattering the material in an even layer. In this case, it is recommended to add water from time to time, because. this will simplify the tamping process.
Laying natural stone

The technology of laying natural stone allows you to do the work yourself. In this case, the installation features depend on the thickness and configuration of the stone. Among the features of the work carried out, the following can be noted:
- Smooth paving stones are laid close, the minimum gap is maintained. Cracks between individual stones can cause erosion of the base.
- Work begins with the calculation of 1 row, the length of which should be no more than 1 m.
- The next step is to create a transverse row, gradually creating areas of 1 m².
- It is necessary to periodically check the correct location of the paving stones. For this, the building level is used.
- When individual stones subside, the solution is poured. The protruding elements of the track being created are easily knocked out with a rubber mallet.
- After laying the entire tile, the formed seams are sealed with a cement-sand mortar. To do this, the prepared mixture is scattered over the surface and distributed with a brush. After 3 days, the operation is repeated. The voids should be filled in order to exclude the possibility of penetration of precipitation under the material.
If uneven tiles are used, then it is selected in such a way that the seams are minimal. Too wide gaps are sealed with sand and filled with water.
Conclusion
The development of modern technologies has led to the emergence of high-quality materials. Polymer tiles are an unusual offer, and you can also purchase paving stones made of tinted concrete. However, natural stone is considered the most beautiful material that can be used to create paths. The resulting surface shade and patterns are unrepeatable. formed naturally over a long period.
Modern landscape design is unthinkable without natural materials. Increasingly, suburban areas, recreational areas and residential areas are being formalized. And it's not just about the lining.
Indeed, even in the work with parking lots, entrances and garden paths, they take natural stone. It would seem, what is so difficult? I took several pallets of material and put them on the solution. But there are developments and features when using natural stone. How to do it according to technology, that's the task!
What can you buy
There are breeds that are most appropriate for a garden path. We recommend taking a look at:

Various forms
There are specific types of material, it is from them that builders are repelled, choosing a convenient natural stone for work:
- Flagstone. Flat type. In laying it is extremely inconvenient due to the varying thickness. You can often meet at playgrounds.
- Chipped paving stone. Ordinary rectangular stones. The classic type of natural material, for example, for pavements.
- cobblestones. Must be round. It is not easy for women in heels to walk along such a path.
- boulders. Not the main natural material, because of the large size. But ideally fills sharp drops and problem areas.
Walkway paved with marble tiles.
How to pave with your own hands
The technology of work is not related to the type or breed of material. The only difference is in the installation methods.
- A cement mortar is created, and the road surface is fixed in it. A shallow trench (up to 30 centimeters) is preliminarily prepared. Then the bottom layer is rammed and sprinkled with sand. The latter serves as a pillow. Enough and 10 centimeters on the shock-absorbing layer. After re-tamping already sand, an intermediate gravel is poured on top. Sometimes crushed stone or small construction waste is used. Then concrete is poured with reinforcement for maximum strength. And then comes the laying of the stone. This method is expensive, heavy and long, it is used only on difficult ground.
- It is much easier when there are no preliminary preparations. If a deep trench is not needed, then channels are made on the bayonet of a shovel. Then they are qualitatively tamped and the very bottom is covered with construction polyethylene. A layer of gravel is poured over it. And already on the draft stone there is a layer of sand (cushion). Here, natural stones are laid on it.
Stone tools needed
Used in paving:
- Rubber mallets;
- Shovel and bayonet shovels;
- levels;
- Trowels;
- angle grinder with nozzles for working on stone;
- brushes;
- Rope marking;
- Ramming handle;
- Vibrotamper (for industrial scale);
- Reinforcement equipment;
- Equipment for the preparation of concrete.
From the side building material you will need:
- crushed stone;
- Cement;
- Sand.
Developments and rules
Any type of natural stone walkway begins to be created according to the same pattern:
Stage 1. We mark the territory. It is necessary to clear the future path or site from shrubs, weeds, household debris and stones. Tighten the thread even with significant tortuosity. We just put more pegs for fixing.
Stage 2. Carefully dig a trench the desired depth, with the expectation that the final layer of stone will be above surface water.
Note! There is a third way of paving, called highly artistic.
It does not require a lot of work, however, without an artistic touch, the composition will not converge. The fact is that only the largest stones are bought for work, which are simply laid in place of the removed soil.
Over time, vegetation will appear in the seams of such stones, one might say slabs. But that's the designer's move, and it's more profitable for the budget.
Masters works: 
The most complex compositions cannot be completed without the use of stones of various sizes and shades. 
Balance between regular cobblestones and carvings 
Classics cannot be completed without a curb stone, therefore, when planning just such a style, it is better to stock up a small square-shaped stone. 
In the process of laying, masters often use the following trick: they put a cement-sand mortar in a bag with a cut off end and, like experienced confectioners, work through each seam. 
Approximately this is how a long-laid stone looks like according to the third paving method, when there is a minimum of preliminary preparation, and the stones are almost randomly laid in place of the cut soil.
How to lay out a path from a thin natural stone
We are talking about a rock in the likeness of sandstone or shale. It is thin and light stone tiles that they try to lay on stone dust. It is mixed with cement mortar. This combination favorably affects the shrinkage of non-heavy materials.
Even for thin layers of stone, it is desirable to compact the gravel with maximum effort. And already on a hard and smooth plane, you can lay the front material.
Pros and cons of paths made of natural stones
From the positive:
- Choice of color and shape. There are no limits to the designer's imagination.
- Eco-friendly materials.
- With high-quality installation, a very strong and stable construction. The negative influences of the external environment are not terrible.
- Just figure out how to stack with your own hands.
From the negative:
- Most breeds are very expensive.
- Wide slabs and large stones are heavy.
- There are breeds that are very difficult to compose.
- Rocks with a low threshold of strength cannot be used for parking lots, parking lots and driveways.
Estimated cost
Price for Moscow and the Moscow region for 2017:
- Sawn sandstone from 1400 rub/sq.m.
- Sandstone yellow from 500 rub/sq.m.
- Plitnyak lamezit from 209 rub/sq.m.
- Granite from 200 rub/sq.m.
- Lemezit from 200 rub/sq.m.
- Sandstone "paving stones" from 2199 rubles / sq.m.
- Burnt sandstone from 750 rub/sq.m.
- Paving stone blocks from 990 rub/sq.m.
Results
A garden path in the private sector of a cottage settlement or in an elite dacha is practical, aesthetic and durable.
Likbez on video
Instructions for creating a track - from Dmitry Chernak.
A fashionable trend in the design of a personal plot has recently become the manufacture of a pebble path in the country with their own hands. The building materials market offers a wide range of different materials. Pebbles are one of the few natural and environmentally friendly elements used for paving.
What is suitable for
A variety of types of pebbles will emphasize the style inherent in your summer cottage. If the cottage is decorated in a Mediterranean style, then it will be necessary to lay out various mosaic patterns, highlighting many shades and changing the size of the pebbles. When decorating a site in a country style, it will be appropriate to use a single-colored gray raw material of a small, and preferably a very small fraction.
These tracks have a practical application.
When the house is decorated in high-tech style, you can complement the existing main approaches to housing with thin paths made of small stones, dividing the various sections of your garden according to their intended purpose. If there is a reservoir or an alpine hill on the site, large pebbles and the paths paved with it will be an excellent end to the landscape design.
Video "Do-it-yourself pebble path"
From this video you will learn how to make a beautiful pebble path in the country with your own hands:
Paving technology
Subject to all the prescribed points, any summer resident will be able to lay pebbles on his site:
- Let's mark the path. We define the width. Usually it is from 0.9 to 1.5 m. The features of the relief may not always allow this, then the minimum width should not be less than 50 cm. In this case, we use pegs and a cord.
- According to the marked width, we dig a trench to a depth of 20 cm. More or less depends on the size of the pebbles: the larger it is, the greater the depth, and vice versa.
- We lay two layers of geotextile on the bottom. Its use will protect the path from the germination of weeds.
- We pour a layer of sand, and after that - crushed stone. We fill the volume of the trench with a sand-gravel mixture to two-thirds of the depth and be sure to wet it. The device of such a pillow is necessary so that later during operation the track does not have cracks or other defects.
- Install a tile or curbstone along the edges of the trench. We fill the entire area with a ready-made solution of a cement-sand mixture, in a ratio of 1: 3 / 3.5. Using the level, we check the horizontalness of the filled surface.
- We make laying of pebbles with the help of a board and a hammer. We precipitate it halfway into the solution, which is still raw. The stones are placed as close to each other as possible. They can be installed both along and flat, depending on the idea.
- We will take measures to slowly solidify the solution: cover with a film, periodically we will water. This must be done so that our path does not have cracks.
After finishing work, the track should stand under the film for several weeks and dry.
When performing these works, you will need:
- shovel;
- rake;
- timber, which in length will correspond to the width of the track;
- level, building corner;
- brush;
- a hammer.
Material selection
To determine the track material, it is important to know that pebbles happen:
- marine;
- river;
- artificial.
 This material is of several types.
 Sea pebbles differ from river pebbles in a variety of sizes, colors and shades. The river has a solid gray-brown tone and a smaller fraction. They are distinguished by size:
- small - up to 2.5 cm;
- medium - 2.5–5 cm;
- large - more than 5 cm.
Let's choose the required faction. If we prefer the manufacture of colored mosaics, then an artificial stone of medium or large fraction will be more suitable. And if only the functional use of the path for its intended purpose is important, then small river pebbles will be enough. The use of natural material will allow it to last longer. If there is a reservoir in the immediate vicinity, then you can use pebbles taken directly from the river. So you can save on the purchase of basic raw materials.
Direct laying
Before starting work, you need to make sure that all sections of the future path are horizontal. Laying work is carried out in a wet solution, so everything must be done before the mixture hardens. With mosaic laying, it is necessary to lay out a drawing next to the place of the future location. If the pebbles have different colors and sizes, you should pre-sort them. With wet laying without patterns, the pebbles are placed very tightly. With the help of a plank and a hammer, the surface of the future path is leveled.
If a mosaic is made, then a sketch of a drawing is applied to the solution, which is located nearby. Until the mixture has hardened, the drawing is carefully transferred to the planned place. Aligned with a hammer with a rail. When laying a mosaic of pebbles, there is no need for a clear alignment of each stone parallel to one another. If the drawing is done perfectly evenly, then it will lose its naturalness, so do not waste your energy in vain. Start paving round shapes of mosaics from the middle. This will keep the pattern fairly symmetrical. When using stones of different sizes, try to work out the larger elements first.
When laying, the mortar between the stones may be unevenly distributed. To avoid this, you need to smooth out all these irregularities with a brush. After everything is done, it is necessary to carefully shed the laid out path and cover until completely dry.
A properly laid pebble path is practical and requires minimal maintenance. After heavy rainfall, especially after winter, it is recommended to treat the seams of your path with a special impregnation to increase the elasticity of the cement coating. If this is not done, then over time the cement mixture will crack and the cracks will fill with earth or sand. If you did not use geotextiles when arranging the path, then after some time you will have to deal with the removal of weeds from your paths. With the destruction of individual sections of the path, it is necessary to repair them using building mixtures and glue.
Now your site will have modern pebble paths that will allow you to keep clean and tidy on the street and in the house in any weather. The appearance of the estate will become more solid and neat.
A beautiful garden plot is hard to imagine without paved paths. It is best to use natural stone for these purposes. This is due not only to its practicality and durability, but also to the aesthetic side of the issue. Concrete products will never be able to compete in beauty with natural material, which will perfectly emphasize the beauty of the lawn, trees and flowers. The article will discuss how to make garden paths with your own hands.
Advantages and disadvantages of natural stone for paths
Paved with natural stone garden paths not only speak of the good taste of the owner of the site, but also fully emphasize the landscape design. Their use is universal and suitable for all stylistic trends. But besides its decorative functions, natural stone is also valued for a number of advantages:
- a large assortment of textures, colors and sizes will allow you to easily choose the right option;
- laying it is quite simple with your own hands, and therefore, you do not need to hire professional workers;
- long service life at any temperature. Natural stone does not deform and does not crack from heavy loads and seasonal heaving of the soil.

The disadvantages include the following points:
- this is an expensive material, purchasing it for tracks, you will have to spend a large amount;
- has a lot of weight. Even if the volume of the purchased stone is small, it is not always possible to take it away on a conventional trailer for a passenger car and unload it yourself. Additional costs for renting a forklift will be required;
- it will never be possible to calculate the exact amount of material required, since it has a non-standard shape. In the process, you will have to buy or attach the remaining surplus.
Tip: natural stone for paths of all breeds can be attributed to the elite material. Frightening, at first glance, the price quickly pays off and is justified. Since when paving with concrete stones, almost every year it is necessary to carry out repairs and change individual cracked elements.
Types of natural stone for paths
Types of natural stone implies two concepts at once - this is their rock (shale, sandstone, etc.) and its type (cobblestone, flagstone, etc.)
Depending on the breed, the stones are endowed with certain characteristics and appearance. They are made up of the mineral composition and origin of the stone and are endowed with individual advantages and disadvantages. For paving garden paths with your own hands, it is preferable to choose sandstone, quartzite, granite, shungite and slate.

- Slate has a layered structure due to the minerals located parallel to each other. Therefore, they can be divided into flat plates of different thicknesses. It goes on sale in the form of small plates, so that it is convenient to work with it manually and select the dimensions for the tracks. But among the shales there are minerals that have high porosity. This negatively affects their performance. For paths, it is best to choose quartzite slate.
- Granite. It is considered the standard of strength and durability. Such a stone, without any changes in its characteristics, will last 200 years or more. It contains minerals such as feldspar, mica and quartz. The color of the stone depends on the amount of spar in its composition and can vary from dark red to gray. This stone is widely used for street steps and paths and platforms.
- Quartzite. In fact, this is also slate with mica in its composition. Quartzite shale is characterized by hardness and strength. Even though these properties are considered an advantage, handling it is quite difficult. This stone is multi-colored, its tone depends on the lighting and can be either more or less saturated. On sale you can find almost white quartzite, reddish or with a green tint. Due to its beauty and durability, it is perfect for paving garden paths with your own hands.

- Shungite. Perfect for garden paths in both traditional and modern style. As for the color, it has all shades of gray, up to black. In the presence of quartz inclusions, it may have golden or white patterns. In nature, this rock is monolithic or layered. In the first case, it is characterized as a very durable mineral that will withstand several hundred freezing cycles. It is resistant to chemical influences and does not change its appearance even in places with intense load on it.
- Sandstone. Perhaps this is the most popular and sought-after natural material for garden paths. It is less durable when compared with granite, but is also durable and will last any generation of site owners. In addition, it is easily processed, so it has an affordable price. Sandstone is available in various colors: gray-green, pink, light yellow, fawn or light brown.
In total, there are several types of natural stone suitable for paving a garden path with your own hands. This is a relatively identical in shape chipped paving stones and sawn stone. Stones of chaotic shape and size - cobblestone, flagstone, boulders.
- Flagstone. It can be of different thickness, size and shape (split into small elements on purpose, for the convenience of paving), but always has a flat surface. Chipped edges are not processed. Its laying as garden paths or recreation areas is easy and fairly quick, even with your own hands. As a base on which it is laid, both a sand cushion and a gravel or concrete base are equally suitable.
DIY garden path photo

- Chipped paving stones. The path, lined with such a stone, looks very noble and elegant. Natural paving stones are made from durable minerals such as granite or shungite. The workpiece is split into small rectangular elements. Due to uneven edges and a rather large width, rather large seams (up to 1.5 cm) will form between them. If the foundation has been done correctly, a split paving stone garden path will last for many decades, even without curbs.
- sawn stone. As the name implies, this type of natural stone undergoes the most processing. Its edges are sawn with an even cut and polished. Therefore, when paving, it is possible to create an almost monolithic canvas, with a minimum thickness of the seam between individual stones. This is especially convenient if you plan to walk on them in stilettos.

- Cobblestone. Only suitable for creating decorative paths. Due to the shape of the stones, which are small and round, very beautiful paths are created among flowering shrubs and ornamental trees. A large range of colors and a variety of rocks allows you to create real masterpieces, laying out not only narrow paths, but also real stone panels. Due to the rounded shape, it is very difficult to walk on them.
Do-it-yourself garden paths made of natural stone
Flagstone is the most versatile and simple stone for paving a path in a garden.
- It is allowed to lay it both on a sand cushion and on a concrete base.
- In any case, the marking of the future track is first done. Then the fertile soil layer (20 cm) is removed. Most often, such paths in private gardens do not provide for borders, but if there is a desire or need to install them, then this is done at the very beginning.
- Then sand is poured and compacted. If necessary, a concrete screed with reinforcement is made from above.

- If the stones are dirty, there is clay or sand on them, they must first be completely cleaned with a brush and water from a hose. And then the creative process of selecting stones according to their configuration begins.
- If the base is concrete, then the thickest stone is laid first. And if it is sandy, then the order is not important, since you can always add sand or remove the excess, thereby displaying everything on the same level.
- First, a rough “fitting” of stones is done. Therefore, chalk is required to number them. Having laid the first stone, a large number “1” is written on it in the center, the next element is selected for it and designated by the number “2”. At the same time, on the junction line of these two stones, they also make indications that the stone under the number "2" will border on the stone number "1" in this very place. To do this, the corresponding numbers are put down in small print.
- According to this principle, a section of the track is assembled. If necessary, and it often occurs, the stones are corrected by a grinder with special circles designed for cutting natural stone. Having prepared the desired segment of the path, the stones are carefully removed and stacked side by side.
DIY garden paths drawings

- For high-quality laying of stone, you need to purchase a special glue. In accordance with the instructions indicated on the package, it is mixed in the right proportions with cement and sand. The consistency should resemble thick sour cream.
- The concrete base is cleaned of sand and dirt (preferably washed with a hose and allowed to dry). Glue is applied to the back of the stone with a spatula. On thinner stones, the mixture should be applied more to align them in height with the thickest.
Tip: the adhesive should be applied evenly, it should not form cavities and air bubbles.
- The stone with the adhesive solution is pressed against the track as tightly as possible so that there are no air gaps left. All excess glue will come out on the sides, it is immediately collected with a spatula or trowel and placed back into the container.
- Next, put the next workpiece and immediately align it horizontally with a level. Due to the fact that the stones are already numbered, the work will go quickly and the glue will not set ahead of time.
- At the end of the paving, the path is left to dry for a day. After this time, the path is cleaned with a stiff brush and washed with running water. The first few days, if the weather is dry and hot, it is recommended to moisten the path with water.
Paving stone garden path without cement
- First, you also need to make markings for the future track. If the shape is curved, then it is convenient to use spray paint to mark the boundaries.
- Then a trench is dug 20-30 cm deep. If the roots of shrubs or trees come across, they must be completely removed, so that the bottom of the trench is even and smooth.
- The first layer is laid with black geotextile with a density of 80 and above. The width of the material is chosen so that it can be closed with an overlap in the future.
- Next, a layer of crushed stone 10 cm is poured and compacted. It will create a rigid base and will perform the function of drainage, diverting water from the track.
- Having closed the crushed stone with geotextile, sand is poured on top. Its layer should completely fill the height of the trench. It is shed and compacted until the base is level. Additionally, it is checked with a long rule and, if necessary, sand is added.
- Natural stone is laid on top and compacted by tapping with a rubber mallet.

- The resulting gaps between the paving elements are filled with a dry mixture of cement and sand in a ratio of 1/10. The excess is brushed off.
- During the first 2-3 weeks, some stones may sag. Therefore, it is necessary to carefully monitor the condition of the path and, if necessary, lift individual stones and pour sand under them.
DIY garden path options
Another option for a garden path made of natural stone is pebble path. Due to the compact size of the stones, it is easy to do it yourself. You can choose any sinuous shape and not worry that you will have to process the stone a lot, adjusting it to the size of the track.

- But this version of the garden path is only suitable for pedestrian areas in private gardens. It will not withstand a more intense load. Pebbles are very small stones, if you neglect the arrangement of curbs that create the necessary rigidity, after a few years the pebbles will diverge, and weeds will begin to grow in the cracks that form.
Tip: if the path still could not be saved from weeds, it can be treated with herbicides from a sprayer. But the concentration should be twice as high as indicated on the package.
- Maintaining a pebble or gravel path is easy. Twice a year, treat with weed preparations and, if necessary, add pebbles.
Combined track. For it, several types of natural stone are used at once. For example, large limestone or sawn stone with wide gaps filled with small pebbles looks beautiful.

- The design of garden paths, made with the use of stone and wood cuts, looks no less beautiful and original. Such garden paths are especially harmonious if there are structures made of natural wood on the site.
Do-it-yourself garden paths made of concrete under a stone
Natural stone, no doubt, looks very beautiful and has a lot of advantages, but in the rain and in the cold season it becomes very slippery. Concrete paths are deprived of such a disadvantage, thanks to a rough surface. But in appearance, they lose much to natural materials.
- But today there are special plastic molds for the garden path with their own hands. They look like a reusable formwork for several stones at once, different in shape. If, when preparing the mixture, pigments are also added to the concrete solution, then maximum similarity with the stone can be achieved.

- There is another way to make a garden path with your own hands using a form that looks as close as possible to natural material. First, a cement mortar from ASG, cement and water is poured into a mold previously lubricated by mining. And without waiting for the solution to set, 1 or 2 colored pigments are poured right on top in the form of a dry powder and immediately begin to rub it in a chaotic direction with a trowel. For example, brown and yellow can be combined at times.
DIY garden path video