Do-it-yourself aluminum suitcase. How to make a leather doctor briefcase
The suitcase is a universal thing. It can be used in various situations and serve for various important cases. And how to make a suitcase with your own hands or transform an outdated model, we will tell you in this article.
We give a second life
Never rush to throw an old suitcase in the trash, with the right attitude, it can serve you for more than a dozen years.
For example, you can make a restored suitcase a unique, exclusive piece of furniture that will be your pride in the future. Do not be lazy to connect your imagination, and you will get a truly amazing thing. We offer several ideas.
- Wonderful bedside table:


- Vintage coffee table:


- The original bar with shelves inside, on which it is convenient to place glasses:

- Stunning vintage shabby chic suitcase. This style consists in the technique of aging things in a certain way: creating small scuffs and bumps using a special paint application. Another feature of this style is the color scheme: delicate, pastel, pink, white colors. Floral motifs must also be present.

- Another, no less interesting performance in the steampunk style, as in the photo:
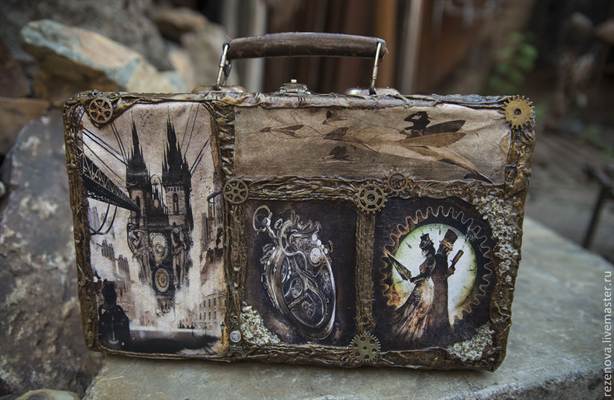

This style allows you to combine trendy things with antiquity. Things made mainly of leather are decorated with various metal decorative elements, chains. All these options will perfectly fit into the interior, add charm, zest and exclusivity.
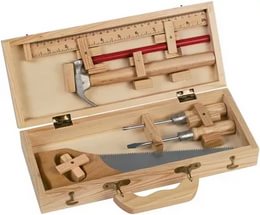
But if you need a suitcase for more rational use, and there is no suitable old model of the right size at hand, then why not make it yourself from an available material, for example, from plywood.

In such a suitcase it is great to store the necessary tools and all sorts of little things.
You can also use the shape of a suitcase as all sorts of original gifts:
- Candy suitcase:


- A mastic suitcase that will perfectly decorate your cake and delight the birthday man with its originality:


- A suitcase out of the box can serve not only as an original packaging for a gift made of cardboard, but also act as a present that needlewomen will appreciate with pleasure:


Well, if you want to decorate even a small present somehow in an original way, then we bring to your attention a master class on packaging in the form of a suitcase made of paper for chocolate.
small suitcase
We will need:
- 2 sheets of thick paper, preferably with some kind of image;
- thick white paper;
- kapron tape;
- glue "Moment".
- We transfer the template to thick paper and cut it out along the contour;


- We take background paper on which an interesting print is printed, and in the same way we cut out the details according to the template;
Helpful Hints
If you have old suitcases left at home, in the country or in the pantry, then you should not immediately throw them away.
The fact is, from suitcases, even the oldest and hopeless ones, you can make completely new things that will be more functional and useful.
Here are some interesting ideas and useful tips on how you can recycle an old suitcase to give it a second life:
Useful things from an old suitcase
Coffee table
Small enough to put even in the hallway and functional enough to use as a coffee table.

Speaker
You might not want to turn a suitcase into a speaker, but this conversion looks pretty impressive.

Dollhouse
You can make such a house yourself or buy it online. It all depends on your capabilities and desires.

Bed for cats
If you have one or more cats at home, then you may want to make a comfortable place for them to rest.

Bathroom cabinet
Looks nice and holds a lot of different useful things for the bathroom.

How to make other things out of a suitcase
Dresser
For such a chest of drawers, you will need several suitcases. However, it can be made from 2 or 3 suitcases. It can store tools or various things that do not lie well.

See also: DIY crafts from old things
Cabinet for face and body care products

needlework box
In a suitcase, you can neatly organize a whole department for needlework. Such a suitcase can also be decorated from the outside and taken with you if necessary, for example, if you were invited by needlework friends.

What can be done from suitcases
Coffee table

Mini bar
This suitcase minibar was made by designer Dane Holweger. It is perfect for various parties or just to decorate the house and improve its functionality.

Seamstress suitcase


Tray
Remove the lid of the suitcase, decorate the inside of the lid with a cloth, using, for example, a stapler.

How to make a beautiful DIY organizer from an old suitcase

1. First you need to process the suitcase with sandpaper to remove the paint.

2. Paint the suitcase any color you like, using a special paint - in this case plastic paint.


3. Using thick cardboard or plastic, divide the inside of the suitcase into several sections. Cut to desired size and glue with superglue to each other.

4. If desired, you can paint plastic or cardboard with spray paint. However, this is best done in a well-ventilated area, wearing a respiratory mask and goggles.

Now you can safely fill the organizer with the necessary things.
What to make from an old suitcase: a picnic suitcase

You will need:
old suitcase
Sandpaper
Stationery knife
Paint tape
Cream wax (optional)
tassel
paste glue
Decoupage glue (PVA glue)
Adhesive for fabric
Ribbed elastic band
stapler.
1. Remove all stickers from the suitcase (if any). Wipe it clean.

2. Remove the old lining with a utility knife. An old lining can not only smell bad, but can also tear quickly. It also accumulates a lot of dust under it.

3. Cover with masking tape all parts of the suitcase that you do not want to paint. First of all, it concerns the mechanisms.

4. Paint with 2-3 coats of paint.

5. To protect the paint, you can apply cream wax on top of it.

Sometimes, in order to decorate your apartment, it is not necessary to buy a closet or chest of drawers. With the help of your imagination, skillful hands and time, you can make various interior elements that will not only serve as decoration, but will also be useful for the household. For example, if you make a suitcase, it will look beautiful and original, while having some tools at hand, you can do it yourself and have compartments in it that can be used to sort things.
First of all, a homemade suitcase can help in the distribution of space, so you need to create it in the style of your apartment or the room where it will be located. In order to create a suitcase, it is not necessary to have any special skills, you can make it simply by using the appropriate master class.
Before starting work
If you don’t have enough imagination for the design of your suitcase, you can see photos of existing options or come up with your own combination of different styles. First you need to think about the size of the future suitcase, its shape and approximate design, for convenience, all this can be depicted on paper and some sketches can be made. In this case, you can even draw in detail all the compartments in the suitcase, decorations.

When creating a suitcase, you need to remember that it can serve as a small locker for clothes, for children's things, or as a storage place for kitchen items. Therefore, having decided on its size, we proceed to the execution technique, the choice of material from which it will be made.
Do-it-yourself reconstruction of an old suitcase
The easiest option for creating a suitcase would be to reconstruct an existing old suitcase. Usually for such a procedure, you need to take an old suitcase in the shape of a rectangle and make a new wardrobe out of it for your things. An old suitcase can not even be decorated with anything, it will look beautiful in the interior of any style.

You can, of course, remake a new suitcase, but it will still come in handy on trips, and if not things are placed in it, it may get dirty or its inside may deteriorate, and then the suitcase will not be suitable for use.
How to make a suitcase out of cardboard
If the size, design and purpose of the new thing is chosen, it is necessary to choose the way in which this suitcase will be made. The first easy way involves creating it from cardboard. As you might guess, at the end of the process, a neat cardboard suitcase will be in your hands. At the same time, the cardboard must be very dense, and the creator must choose the shape of the suitcase himself. The suitcase can be round, square, triangular or diamond-shaped. It all depends on the desire and imagination of the person.

In order to make a cardboard suitcase, you need a large piece of cardboard; for convenience, it is better to cut out all its details on the box at once, so that later you can simply fold them and glue them. You can make a suitcase with a handle or come up with the illusion of wheels.
But the most important step will be decorating the suitcase. To do this, you need a fabric that can be sheathed crafts inside and out. In this case, any fabric will do, and the colors can also be chosen to your taste. The resulting suitcase can even be taken on the road as a cosmetic bag or a small accessory for hygiene products.
Exactly the same technology can be used to make a suitcase out of a box. For this, a shoe box or any other is suitable, while the suitcase can have a removable lid or a glued one. The box can be painted, pasted over with colored cardboard or sheathed with a cloth.

Plywood suitcase
The strongest and most durable will be a plywood suitcase. To do this, you need wooden boards from which you can cut out all the parts for the suitcase. As for decorations: sometimes they are not needed, as the look of plywood can be very original and fit the style of any room. Such a suitcase can be used as a toolbox, usually men make such an item themselves for their convenience. Girls can decorate such a suitcase inside with a cloth, and leave it on top in its original form. It is such a suitcase that can be made with shelves inside, so that it is possible to sort your things on the shelves.
If the suitcase is needed as a gift, it can be made from paper. At the same time, you can put a small gift inside the suitcase, and decorate the paper itself beautifully with the help of different ribbons, paints and bows. A suitcase can be made for a ring if a young man wants to make an original proposal to his girlfriend. Such a gift will not leave anyone indifferent.

Exactly the same suitcase can be made from sweets. At the same time, the whole suitcase can be candy or simply decorated with candy flowers. A girl will like such a suitcase, because you can eat sweets, and use the suitcase for your things, for example, for jewelry.
With the help of video tutorials, you can learn how to make a suitcase out of mastic if you need to decorate a cake. Also, with the help of a tutorial video, you can learn how to make a real shabby chic suitcase, especially suitable for a gift or to emphasize the style of a bedroom. For a more serious interior, a steampunk-style suitcase is suitable, it is easy to make, and the appearance will resemble a pirate suitcase.
Video on the topic of the article
A few days ago we showed 35 ideas, . Would you like to get such a handy thing, but don't know where to start? In this collection of tutorials, you will see 5 easy ways to make a DIY craft case.
- the basis - in most cases - were old suitcases (of different sizes and original appearance);
- the authors converted both the main compartment and the inside of the lid for storage;
- no special skills were required;
- if the suitcase is a travel suitcase, before starting the renovation, the old lining was completely removed from it so that the frame opens;
- all methods are extremely economical (with rare exceptions, you don’t have to buy anything - just what was found in the needlewoman’s house is enough).
Check out 5 tutorials on how to turn an old suitcase into a cute craft case and make yourself even better!
__________________________
do-it-yourself handicraft case, master class No. 1 “simple and tasteful”:

Needleworker Vanessa offers an easy way to transform even the oldest and most boring suitcase. This will require inexpensive materials and a minimum of skills.
before:
Even if the suitcase is pretty on the outside, its lining is rarely as beautiful. Feel free to remove it and paint the inside of the suitcase in some nice color - for example, green. Then cut out two blanks from cardboard (according to the shape of the bottom and the inside of the lid) and glue them with paper (or cotton cloth) in a flower. In the cardboard for the top, make holes for the elastic bands, thread the elastic bands and tie on the back side, then glue the cardboard on the inside of the lid and frame with a beautiful braid.
Now the lid of the suitcase will help you always keep scissors, reels, needles and other necessary little things at hand. And in the main compartment you can store the remains of fabrics, braid, needles, pins and buttons.
__________________________
do-it-yourself suitcase for needlework, master class No. 2 "journey to the land of creativity":

One Swiss needlewoman loves retro, handmade things and cannot imagine her life without travel. All these hobbies were combined in a nice little case for needlework, which she made with her own hands.
The basis for the "magic chest" was an old boring suitcase. Its sides were painted white, and the standard upholstery was replaced with a floral fabric. And the shabby thing turned into a nice vintage hand-made.
The suitcase has also been transformed inside. The dark bottom was covered with a fabric in a bright cell. The inside of the lid was decorated with multi-colored fabric pockets - not only beautiful, but also functional. They can store large items. For skeins of braid and cuts of fabric, small baskets and containers are suitable. And elastic bands and small pockets on the sides will help organize the smallest items (needles, pins, coils).
__________________________
do-it-yourself suitcase for needlework, master class No. 3 "sweet life":

Just look at this suitcase! Bright prints on the outside, old pages on the inside. Such a thing is usually expensive, but you are quite capable of making it yourself.
The base is the same old suitcase. We will decorate it not only inside, but also outside.
before:
For the design of the outer part, Amy chose a fabric with appetizing prints of sweets. If you do not find exactly the same, you can choose any other, but be sure to be bright and with an interesting pattern.
The interior looks especially luxurious. All thanks to the unusual decor from ... the pages of the old dictionary, which are pasted over the bottom and walls.
Amy made the lid of the suitcase not only beautiful, but also functional by attaching small plastic jars to it. They can be put on superglue or attached using double-sided tape.
__________________________
master class No. 4 “like mom” - do-it-yourself suitcase for children's needlework:

Does your daughter like to sew, knit or draw? Give your little fairy a magical craft box just like Megan did. All you need is a small suitcase (not necessarily an old one!), a sheet of colored cardboard and a little imagination.
Attach the cardboard to the lid of the suitcase from the inside and cut the blank according to its shape. If there is no multi-colored cardboard, take a regular one and glue it with a cloth. Then make holes to secure the holders for the spools and knitting needles (they can be made from ordinary elastic). Glue the cardboard to the inside of the lid - a cute craft case is ready!
It can be difficult for children to keep order, especially in small things. Help them in this difficult task by equipping the suitcase with a container with dividers. Now buttons, beads, pins and other necessary little things will lie in one place and will no longer scatter all over the suitcase.
Are you inspired and want to do something else? Do not limit your creative impulses! Sew a pillow for needles, a bag for small things, a pencil case for pencils and felt-tip pens to complete the suitcase - yourself or involve your daughter in this. Now your child will be able to boast of original handmade things.
Making a suitcase with your own hands, as it turned out, is very simple. Much easier than restoring an old suitcase. This does not require any "reserved" elements and devices, and all the necessary materials are available and sold in stores at fairly low prices.
background
As often happens in creative practice, the necessary things are usually in the trash, like our Soviet-era suitcase a little larger than a diplomat. Its dimensions were suitable for storing a bunch of jewelry and trinkets, woven, but lying around idle. A very shabby, dirty and unaesthetic appearance of a useful thing in the household left no doubt: the restoration of the old suitcase was necessary.
At first, the fittings were carefully removed and placed to soak in a can of gasoline. Then the linings and the ancient torn leatherette were removed. It turned out that the side boards that make up the frame were rotten, and the walls of the lids were generally made of thick cardboard, pierced to huge holes in several places.

The cardboard has been torn off and thrown away. Instead, boards of the required size were cut from hardboard. The wooden frame is sanded down to white wood, a couple of walls are replaced with new ones and reinforced with glue and self-tapping screws. Covers made of hardboard are put on glue and nailed.
So, it can be argued that we began to design a suitcase with our own hands almost from scratch.
Exterior finish
Dark brown leatherette was used for decoration. Leatherette is marked strictly according to the size of each suitcase flap, taking into account the turn on the walls of the inner sides.


We carefully cover the surface of the leatherette with PVA glue, and, accordingly, one of the covers of the suitcase. We glue the material, carefully expelling all air bubbles and excess adhesive liquid, smoothing out irregularities. For this purpose, we have a felt squeegee in store.

We especially conscientiously roll the material around the perimeter of the edges so that the hand-made suitcase looks aesthetically pleasing, as if it came off the factory assembly line yesterday.

The hardest part is wrapping the corners. We deliberately do not give patterns, because we assume that every home craftsman has his own vision of the technology for high-quality finishing of corners when restoring an old suitcase. The main thing here is accuracy, a lot of glue and diligence.
We will show a number of photographs, which, we hope, will help clarify the technological process of pasting corners.


When the dermantine is stretched over the skeleton, it is recommended to walk over the seized glue with a warm iron in order to fix the gluing (bake). Be sure to iron through a rag, otherwise your synthetic material will melt.

At this, we consider the first stage of making a suitcase with our own hands, or restoring an old one, to be completed. Therefore, we will put back its fittings.


Interior upholstery
For interior upholstery, we will make pads on synthetic winterizer covered with synthetic velvet or any other suitable textile. The illustration shows the components of "velvet" pillows and part of the procedure for their layer-by-layer formation.


When the pillows are ready, we thoroughly glue the inner walls of the product with glue and glue the pillows inside.

This is how our "new" handmade suitcase looks like.

We did not attach the handle. The project is to make our suitcase wearable on a shoulder strap, like a sketchbook, but so far there is no time to look for suitable fittings and options for attaching it.
So, we have created a functional thing, the practical applicability of which is not limited to storing jewelry or tools. The master class not only clearly shows how to make a suitcase with your own hands, but will come in handy as an instruction, according to which the restoration of an old suitcase is also feasible.
Materials and tools used in the master class:
- suitcase frame with fittings;
- sandpaper, hammer, screwdriver, brush, scissors, mounting knife;
- hardboard and wooden slats (optional);
- PVA glue;
- shoe nails 10 mm long;
- leatherette, cardboard, synthetic winterizer, synthetic velvet.
Time spent on restoration:
- giving the product a look suitable for finishing, including grinding and puttying - 2-3 days;
- finishing - 2-3 hours.